はじめに
ローカルで OpenAI API や Gemini API を使ったモバイルアプリ / Webアプリ開発をしていると、まずは .env にAPIキーを置いて呼び出したくなると思います。
VITE_OPENAI_API_KEY=sk-proj-xxxxxxxxxxxxx
// アプリ内で直接呼び出し
const openai = new OpenAI({
  apiKey: import.meta.env.VITE_OPENAI_API_KEY,
  dangerouslyAllowBrowser: true,
});
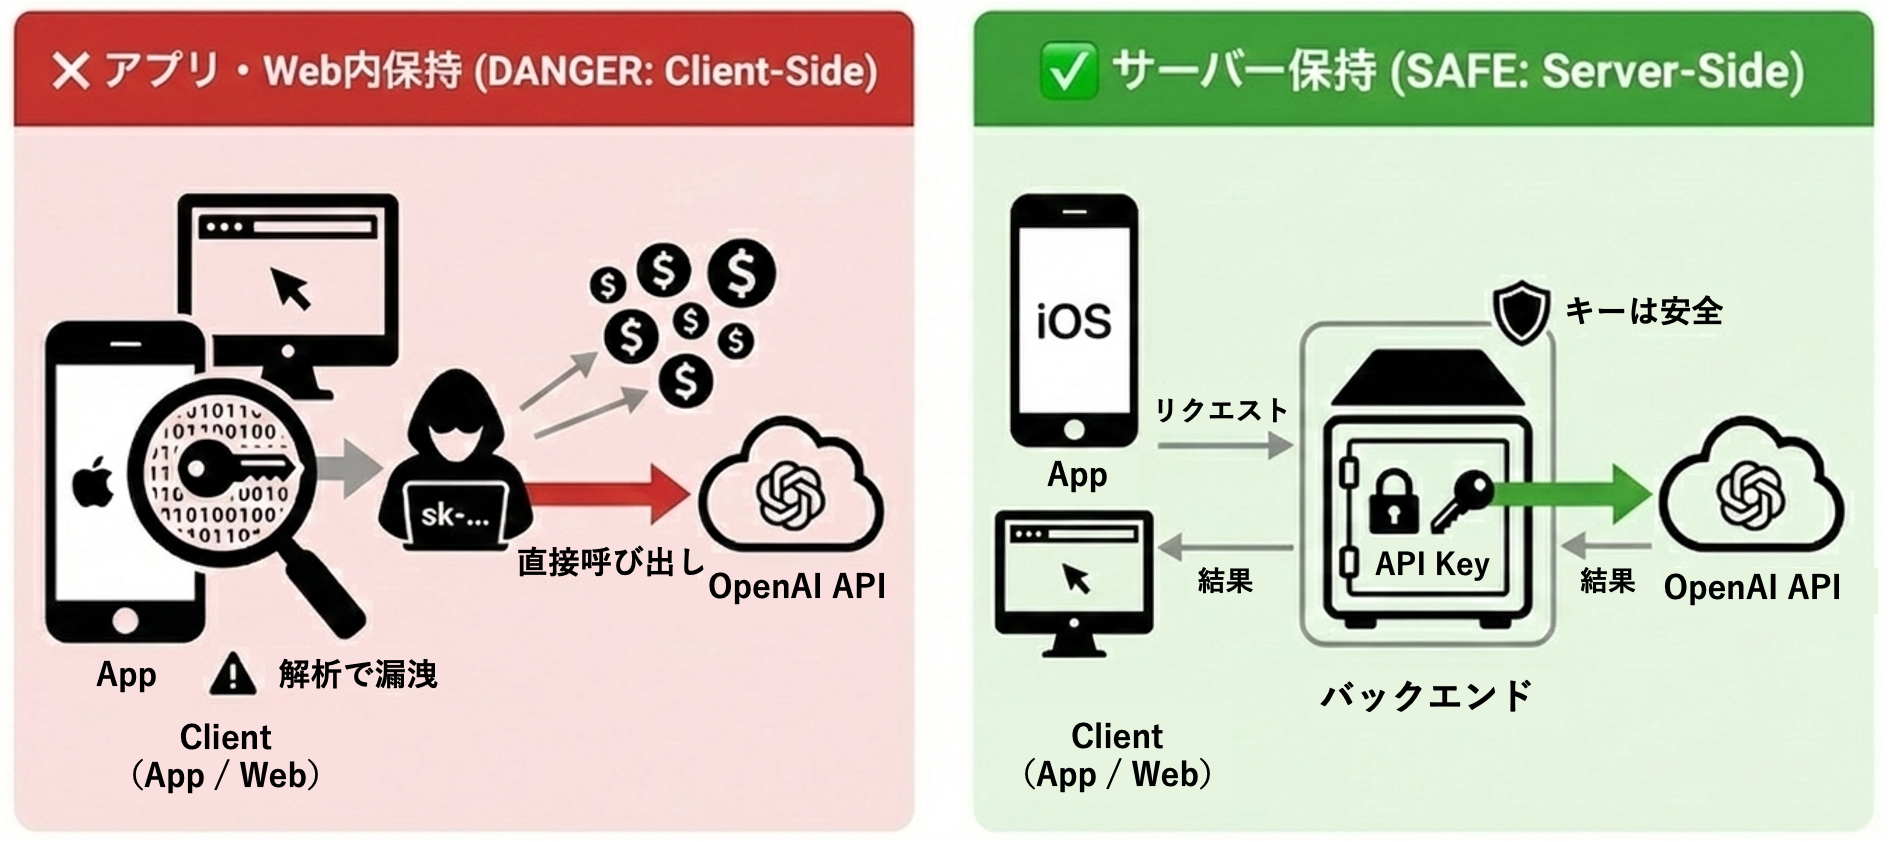
上記の実装はローカルでは動きますが、クライアント側から OpenAI API を叩いているので、このまま本番環境にデプロイすると大問題になります。本記事では、なぜ APIキーをクライアント側で持つのが危険なのか、そして AWS Lambda / Node.js を使った安全な実装方法を初心者向けに解説します。
クライアント側でAPIキーを持つことの危険性
1. iOSアプリでは完全にバレる
React Native / Swift / Flutter 等のクライアントアプリは配布物(IPA)の中身をユーザーに渡すため、そこにAPIキーを入れた時点で「回収され得る状態」になります。見え方は違っても、配布物にキーを入れる構造自体がNGです。
# iOSアプリの配布物の中身(バイナリ/スナップショット/アセット等)から文字列検索
$ strings <app_binary_or_snapshot> | grep "sk-"
sk-proj-xxxxxxxxxxxxxxxxxxxxx  # ← APIキーが見つかる
2. Webでも完全にバレる
Webフロントも同じで、.env の値はビルド成果物(JSバンドル)に文字列として載ることがあります(Viteなら VITE_、Nextなら NEXT_PUBLIC_ など “クライアント公開” の仕組みがあるため)。
# Webサイトのビルド成果物の中身(JSバンドル)から文字列検索
$ curl -s https://example.com/assets/index-xxxxx.js | grep "sk-proj"
sk-proj-xxxxxxxxxxxxxxxxxxxxx  # ← APIキーが見つかる
たとえバンドルに直書きしていなくても、ブラウザからLLMを直叩きする時点でキーはクライアント側に存在するので、DevToolsの Network などから拾われてコピーされます。
3. OpenAI 公式も明確に警告している
ブラウザやモバイルアプリなどのクライアントサイド環境でOpenAI APIキーを公開すると、悪意のあるユーザーがそのキーを入手してあなたに代わってリクエストを実行できるようになり、予期せぬ請求や特定のアカウントデータの漏洩につながる可能性があります。リクエストは常に、APIキーを安全に保管できる独自のバックエンドサーバー経由でルーティングする必要があります。 ※和訳
サーバー側でAPIキーを持つ方法
本記事では、サーバー側でAPIキーを持つ方法として、①AWS Lambda(サーバーレス) で管理する方法、②Node.js(自前サーバー)で管理する方法の2つを紹介します。
実装例①: AWS Lambda (サーバーレス) で管理
1. Secrets Manager にキーを保存
aws secretsmanager create-secret \
  --name llm-api-keys \
  --secret-string '{"OPENAI_API_KEY":"sk-proj-xxx"}'
2. CDK でインフラ定義
import * as cdk from "aws-cdk-lib";
import * as lambda from "aws-cdk-lib/aws-lambda";
import * as apigw from "aws-cdk-lib/aws-apigateway";
import * as secrets from "aws-cdk-lib/aws-secretsmanager";

export class ApiStack extends cdk.Stack {
  constructor(scope: cdk.App, id: string, props?: cdk.StackProps) {
    super(scope, id, props);

    const secret = secrets.Secret.fromSecretNameV2(this, "LLMKeys", "llm-api-keys");

    const fn = new lambda.Function(this, "ChatFn", {
      runtime: lambda.Runtime.NODEJS_24_X,
      handler: "handlers/chat.handler",
      code: lambda.Code.fromAsset("lambda/dist"),
      environment: { SECRET_ARN: secret.secretArn },
    });

    secret.grantRead(fn);

    const api = new apigw.RestApi(this, "ChatApi");
    api.root.addResource("chat").addMethod("POST", new apigw.LambdaIntegration(fn));
  }
}
3. Lambda で OpenAI API を呼ぶ
import { SecretsManagerClient, GetSecretValueCommand } from "@aws-sdk/client-secrets-manager";
import OpenAI from "openai";

const sm = new SecretsManagerClient({});
let cachedKey: string | null = null;

async function getOpenAIApiKey(): Promise<string> {
  if (cachedKey) return cachedKey;

  const arn = process.env.SECRET_ARN;
  if (!arn) throw new Error("SECRET_ARN is not set");

  const res = await sm.send(new GetSecretValueCommand({ SecretId: arn }));
  const secret = JSON.parse(res.SecretString ?? "{}");

  const key = secret.OPENAI_API_KEY ?? secret.apiKey;
  if (!key) throw new Error("OPENAI_API_KEY not found in secret");

  cachedKey = key;
  return key;
}

export async function handler(event: any) {
  const body = JSON.parse(event?.body ?? "{}");
  const text = body?.text;
  if (!text) {
    return {
      statusCode: 400,
      headers: { "Content-Type": "application/json" },
      body: JSON.stringify({ error: "text is required" }),
    };
  }

  const apiKey = await getOpenAIApiKey();
  const client = new OpenAI({ apiKey });

  const out = await client.responses.create({
    model: "gpt-5",
    input: text, // ← 受け取ったプロンプトをそのまま渡す
  });

  return {
    statusCode: 200,
    headers: { "Content-Type": "application/json", "Access-Control-Allow-Origin": "*" },
    body: JSON.stringify({ answer: out.output_text }),
  };
}
4. クライアントからの呼び出し
const res = await fetch(`${API_ENDPOINT}/chat`, {
  method: "POST",
  headers: { "Content-Type": "application/json" },
  body: JSON.stringify({ text: "hello" }),
});

const data = await res.json();
console.log(data.answer);
実装例②: Node.js (自前サーバー) で管理
1. 依存を入れる
npm i express openai
2. Node.js (Express) で OpenAI API を呼ぶ
import express from "express";
import OpenAI from "openai";

const app = express();
app.use(express.json());

const client = new OpenAI(); // process.env.OPENAI_API_KEY を読む

app.post("/chat", async (req, res) => {
  try {
    const { text } = req.body ?? {};
    if (!text) {
      return res.status(400).json({ error: "text is required" });
    }

    const out = await client.responses.create({
      model: "gpt-5",
      input: text,
    });

    return res.json({ answer: out.output_text });
  } catch (err) {
    console.error(err);
    return res.status(500).json({ error: "internal error" });
  }
});

app.listen(3000, () => console.log("http://localhost:3000"));
localhost はローカル検証用です。本番では
https://api.example.com/chatのように、デプロイ先のドメインに置き換えます。
3. サーバーを起動 (環境変数でキーを注入)
A. exportして実行
export OPENAI_API_KEY="sk-proj-xxx"
node server.mjs
B. .env を使って実行
OPENAI_API_KEY=sk-proj-xxx
node --env-file=.env server.mjs
4. クライアントからの呼び出し
const res = await fetch("http://localhost:3000/chat", {
  method: "POST",
  headers: { "Content-Type": "application/json" },
  body: JSON.stringify({ text: "hello" }),
});

const data = await res.json();
console.log(data.answer);
まとめ
ローカル開発で.envを使うのは便利ですが、本番環境では必ず AWS Lambda / Node.js などのサーバー側で管理することが重要です。
おわりに
今後も、実務で得た細かい知見をTipsとして紹介していきます。質問や改善のフィードバックがあれば、ぜひコメントで教えてください!