こんにちは。エクセルソフトの田淵です。
MvvmCrossでカスタムコンバーターを作成するには? - Build Insider
フェンリルさんによる Xamarin逆引きTips -MvvmCross 編- でコンバーターの記事が載っていたので、Xamarin.Forms の IValueConverter に再チャレンジしてみました。
2015/6/22 追記
また、リクエストがありましたので、View to view Binding する方法と、一般的であろう ViewModel 的な Binding する方法の両方を Xaml と C# で用意しました。
それっぽいもの
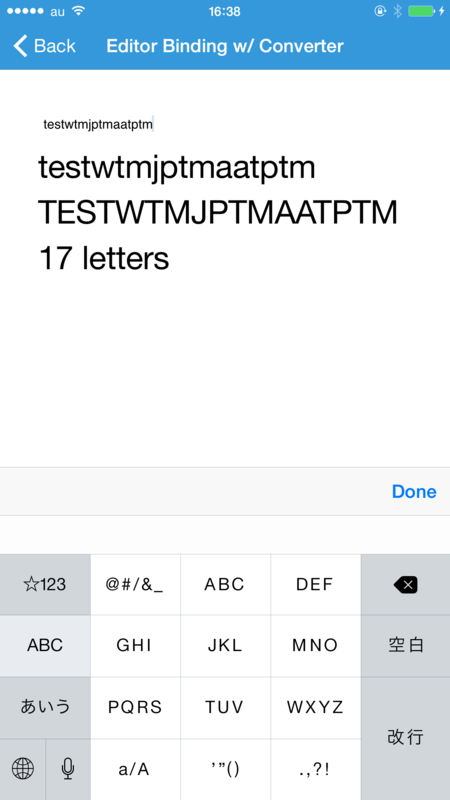
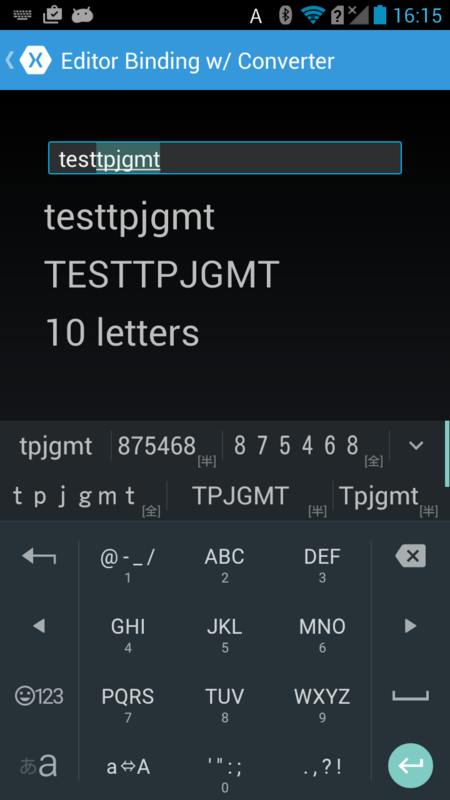
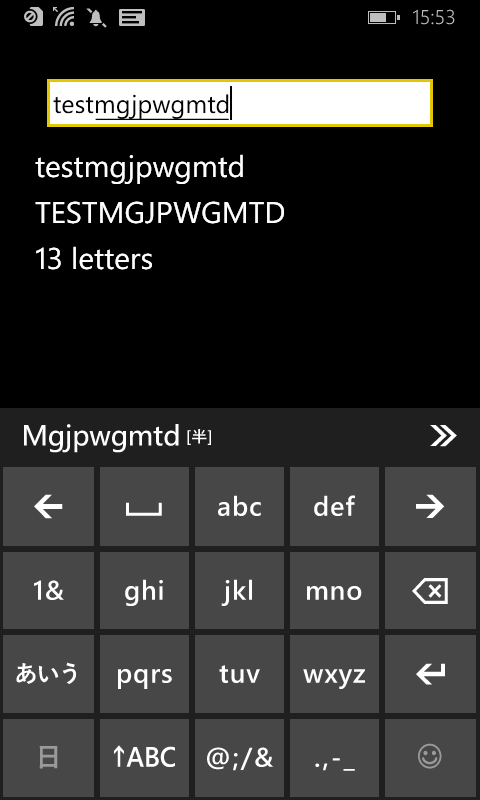
Editor のテキストを Binding して Convert
例えば Editor のテキストを Label に Binding するだけなら、わざわざ ViewModel 的なものを呼び出さないでも、Xamarin のドキュメントにあるように View-to-View Bindings で直接参照することができます。
View to view Binding で Convert
今回のように同じ View 内の情報を Binding や Convert する場合は、View to view Binding が便利です。
Xaml の場合
<ContentPage.Resources>
  <ResourceDictionary>
    <cv:StringCaseConverter x:Key="scConverter" />
    <cv:StringToLengthConverter x:Key="s2lConverter" />
  </ResourceDictionary>
</ContentPage.Resources>

<StackLayout>
  <Editor x:Name="editor" Text="test" />
  <!-- ConverterParameter は "True" で UpperCase、"False" で LowerCase になります。
       今は固定してしまっていますが、Switch とかから IsToggled を参照したいですね。 -->
  <Label BindingContext="{x:Reference Name=editor}"
         Text="{Binding Text,
                Converter={StaticResource scConverter},
                ConverterParameter=True}" />
  <Label BindingContext="{x:Reference Name=editor}"
         Text="{Binding Text,
                Converter={StaticResource s2lConverter},
                StringFormat='{0} letters'}" />
</StackLayout>
のように BindingContext="{x:Reference Name=editor}" とすることで Editor の x:Name の値を直接参照できます。
Converter/ViewModel をフォルダで分けている場合は、NameSpace も別々になりますので、NameSpace の設定だけ xmlns:cv="clr-namespace:XF_IValueConverterSample.Converters;assembly=XF_IValueConverterSample" のようにしてあげて、<ResourceDictionary> で Converter を指定します。
(Xamarin のサンプル は NameSpace が local になっていますが、using と同じ感じだと思いますので cv (Converter) や vm (ViewModel) などで複数指定できるみたいです。)
指定した Converter は Binding XXX, Converter={StaticResource Key名} で呼び出せます。
scConverter では if (System.Convert.ToBoolean(parameter)) で True の時に value.ToString().ToUpper() に、Flase の時に value.ToString().ToLower() になるようにしました。s2lConverter では value.ToString().Length で Build Insider と同じく文字数を取りました。
C# の場合
var editor = new Editor { Text = "test" };

var sclabel = new Label { Text = "" };
sclabel.BindingContext = editor;
sclabel.SetBinding(Label.TextProperty,
    new Binding("Text",
        converter: new Converters.StringCaseConverter(),
        converterParameter: "True"));

var sllabel = new Label { Text = "" };
sllabel.BindingContext = editor;
sllabel.SetBinding(Label.TextProperty,
    new Binding("Text",
        converter: new Converters.StringToLengthConverter(),
        stringFormat: "{0} letters"));

Content = new StackLayout
{
    Children = {
        editor,
        sclabel,
        sllabel
    }
};
C# の場合は各コントロールに .BindingContext で Binding 対象を、.SetBinding で Bind する内容を記述します。
Binding ですが、Binding(string, BindingMode, IValueConverter, object, string, object) となっており、 ConverterParameter や Path などを設定できます。
詳細は Xamarin API Documentation をご覧ください。
単純なコンバートであればコードビハインドや ViewModel なしでも出来て便利ですね。
ViewModel の Binding で Convert
次は一般的な ViewModel を経由した Binding と Convert です。
Xaml の場合
xmlns:cv="clr-namespace:XF_IValueConverterSample.Converters;assembly=XF_IValueConverterSample"
xmlns:vm="clr-namespace:XF_IValueConverterSample.ViewModel;assembly=XF_IValueConverterSample"

<ContentPage.BindingContext>
  <vm:CommonViewModel />
</ContentPage.BindingContext>

<ContentPage.Resources>
  <ResourceDictionary>
    <cv:StringCaseConverter x:Key="scConverter" />
    <cv:StringToLengthConverter x:Key="s2lConverter" />
  </ResourceDictionary>
</ContentPage.Resources>
で ViewModel と Converter を指定します。同じフォルダにファイルがある場合は NameSpace も同じですので、local で良いかと思います。
<StackLayout>
  <Editor Text="{Binding Message}" />
  <Label Text="{Binding Message}" />
  <Label Text="{Binding Message,
                Converter={StaticResource scConverter},
                ConverterParameter=True}" />
  <Label Text="{Binding Message,
                Converter={StaticResource s2lConverter},
                StringFormat='{0} letters'}" />
</StackLayout>
レイアウト部分はこれだけです。
ViewModel は INotifyPropertyChanged を継承した ViewModel を用意して
string _message;

public string Message
{
    get { return _message; }
    set
    {
        if (_message != value)
        {
            _message = value;
            OnPropertyChanged("Message");
        }
    }
}
を OnPropertyChanged メソッドと一緒に入れてしまいましたが、OnPropertyChanged は BaseViewModel とかに定義して BaseViewModel を継承する方が一般的なやり方なのかもしれません。(素人ですみません><)
Converter の部分は使いまわしですので、説明は割愛します。
C# の場合
BindingContext = new ViewModel.CommonViewModel();

var editor = new Editor { Text = "" };
editor.SetBinding(Editor.TextProperty, "Message");

var sclabel = new Label { Text = "" };
sclabel.SetBinding(Label.TextProperty,
    new Binding("Message",
        converter: new Converters.StringCaseConverter(),
        converterParameter: "True"));

var sllabel = new Label { Text = "" };
sllabel.SetBinding(Label.TextProperty,
    new Binding("Message",
        converter: new Converters.StringToLengthConverter(),
        stringFormat: "{0} letters"));

Content = new StackLayout
{
    Children = {
        editor,
        sclabel,
        sllabel
    }
};
BindingContext は一度で指定できました。後はそれぞれで .SetBinding するだけです。こちらも converter, converterparameter などは一緒なので割愛します。
結果は同じでこんな感じです。
メモ:
Slider の値を ViewModel の OnPropertyChanged 経由で Label に反映することは出来ましたが、当初 Editor の Text が Binding で出来ませんでした。これは、Xaml で Editor の Text をText="{Binding Message}"した場合、Converter に渡る Value が Null なので、Converter 側でしっかり Null チェックをしていれば大丈夫だった。ということでした。お恥ずかしい。。
if (value == null)
    return 0;
Null チェック大事ですね。
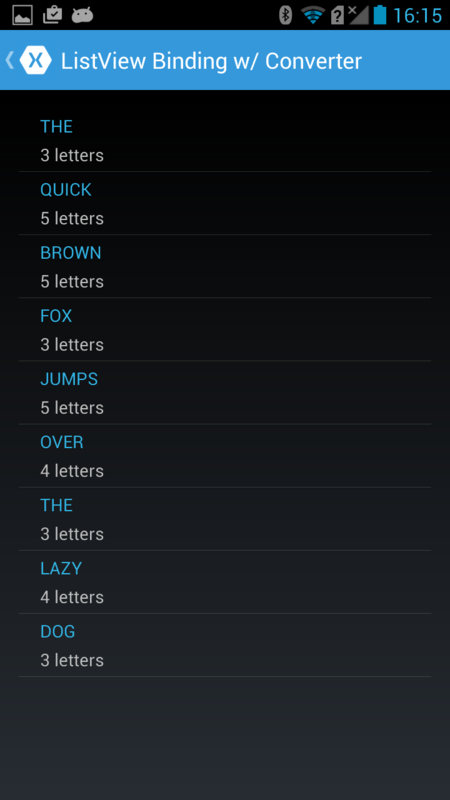
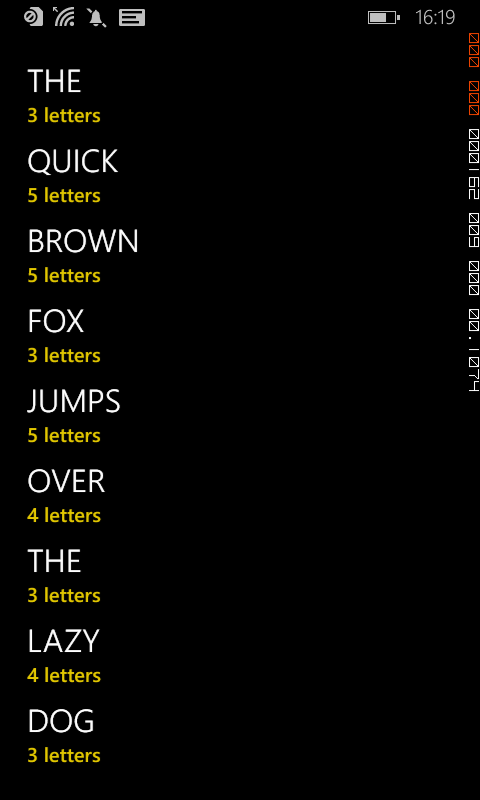
おまけ:ListView の Binding を Convert
先日の de:code のプロジェクトでは間に合わなかった ListView の Binding したやつを Convert してみました。
<ListView ItemsSource="{Binding}">
  <ListView.ItemTemplate>
    <DataTemplate>
      <TextCell Text="{Binding word,
                       Converter={StaticResource scConverter},
                       ConverterParameter=True}"
                Detail="{Binding word,
                         Converter={StaticResource s2lConverter},
                         StringFormat='{0} letters'}" />
    </DataTemplate>
  </ListView.ItemTemplate>
</ListView>
var listdata = new List<Words> {
    new Words { word = "the" },
    new Words { word = "quick" },
    new Words { word = "brown" },
    new Words { word = "fox" },
    new Words { word = "jumps" },
    new Words { word = "over" },
    new Words { word = "the" },
    new Words { word = "lazy" },
    new Words { word = "dog" }
};

this.BindingContext = listdata;
string[] をそのまま ItemsSource に渡すことも出来るのですが、それだと {Binding xxx} の xxx をどう書くのか良く分からなかったので面倒ですが List にしました。すべて小文字ですが、Editor と同様に s2u で大文字にし、s2i で文字数を取得しています。

IValueConverter のまとめ
簡単な変換であれば一時格納用のクラスを作ったりせずに手軽に値を変換できます。
ContentPage 内のデータを参照するだけであれば、View to view の Binding も手軽ですし、一般的な ViewModel 的なのを使った Binding も (分かってしまえば) 簡単です。
是非使ってみてください。
Xamarin 気になった方は
是非 ダウンロード(直接) / ダウンロード(弊社経由) して触ってみてください。
学習用リソース や JXUG リンクページ に参考資料を纏めてますので併せてどうぞ。
Xamarin の情報が欲しい方は私のはてなブログも購読いただいたりすると嬉しいです。
以上です。