画面下部のテキストボックス(UITextField)をタップしてキーボードが出てくる際、viewをスクロールさせてあげないとテキストボックスがキーボードの裏で隠れてしまう。iOS開発を自分でやってみて初めて知った事実。
UITextFieldを載っけているViewをスクロールさせて、これを防ぐ。
準備
まずはViewをStoryboardで普通に作っていく。Xcode7.2で試しています
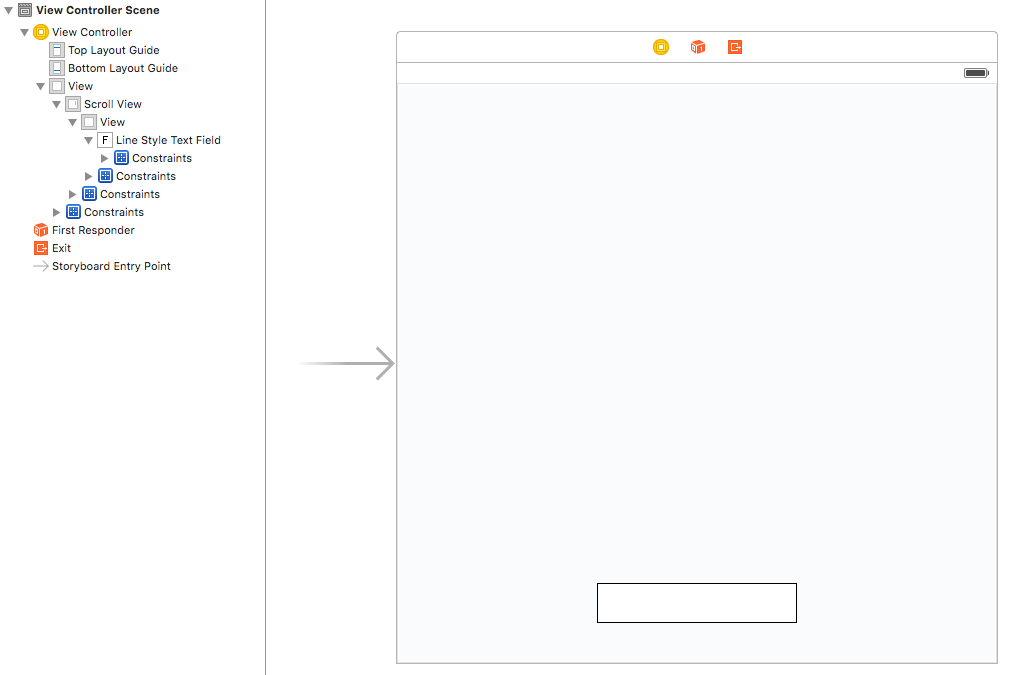
スクロールさせなきゃいけないので、UIViewControllerを置いた後、UIScrollView => UIViewの順にViewを重ねていく。
AutoLayoutの設定は詳しく書かないが、上記2つのviewとも親viewの上下左右の端にピッタリくっつける。一番最後に置いたUIViewは、UIViewControllerについていたUIView(親の親view)と高さ・幅を等しくする。この最後に置いたUIViewの上にUITextFieldをセット。
↓ こんな感じのStoryboardになる。
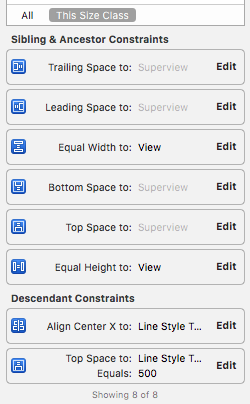
UITextFieldをセットしたUIViewのAutolayout設定は以下。
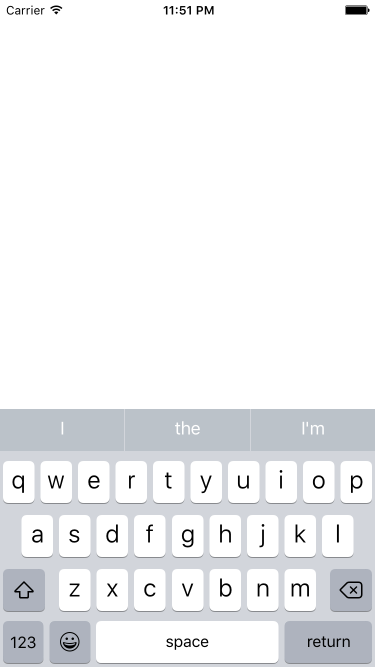
基本的なviewが出来たのでシミュレータで実行。UITextFieldは隠れてしまい、何が入力されているか分からない。
キーボードで隠れないように
というわけで、これを防ぐ。
キーボードの表示/非表示の通知
キーボードが表示される/隠れる直前に、UIKeyboardWillShowNotification, UIKeyboardWillHideNotificationというNotificationが飛んでいるので、それをオブザーバでキャッチできるようにする。
UIScrollViewとUITextFieldをOutletでコード側で利用できるようにしておく。
また、UITextFieldのデリゲートを設定し、returnキーを押したらキーボードを隠す。
import UIKit

class ViewController: UIViewController, UITextFieldDelegate {

    @IBOutlet weak var scrollView: UIScrollView!
    @IBOutlet weak var textField: UITextField!

    override func viewDidLoad() {
        super.viewDidLoad()

        textField.delegate = self
    }

    override func viewWillAppear(animated: Bool) {
        super.viewWillAppear(animated)

        NSNotificationCenter.defaultCenter().addObserver(self,
            selector: "keyboardWillBeShown:",
            name: UIKeyboardWillShowNotification,
            object: nil)
        NSNotificationCenter.defaultCenter().addObserver(self,
            selector: "keyboardWillBeHidden:",
            name: UIKeyboardWillHideNotification,
            object: nil)
    }

    override func viewWillDisappear(animated: Bool) {
        super.viewWillDisappear(animated)

        NSNotificationCenter.defaultCenter().removeObserver(self,
            name: UIKeyboardWillShowNotification,
            object: nil)
        NSNotificationCenter.defaultCenter().removeObserver(self,
            name: UIKeyboardWillHideNotification,
            object: nil)
    }

    func keyboardWillBeShown(notification: NSNotification) {
    }

    func keyboardWillBeHidden(notification: NSNotification) {
    }

    // MARK: - UITextFieldDelegate

    func textFieldShouldReturn(textField: UITextField) -> Bool {
        textField.resignFirstResponder()
        return true
    }

}
キーボードの表示 <=> 非表示の切替が可能になり、そのイベントが起こる際にkeyboardWillBeShown:, keyboardWillBeHidden:を実行するようになった。
画面のスクロール処理
続いて、本題の画面スクロール処理を書いていく。以下の様な方針。
-
UIKeyboardWillShowNotificationのuserInfoにキーボードの位置情報が入っているので利用 - キーボードの位置と
UITextFieldの位置から、スクロールサイズを計算しスクロール -
UIKeyboardWillShowNotificationには、キーボード表示時のアニメーション時間も含まれるため、その時間で画面をスクロールさせる
func keyboardWillBeShown(notification: NSNotification) {
    if let userInfo = notification.userInfo {
        if let keyboardFrame = userInfo[UIKeyboardFrameEndUserInfoKey]?.CGRectValue, animationDuration = userInfo[UIKeyboardAnimationDurationUserInfoKey]?.doubleValue {
            restoreScrollViewSize()

            let convertedKeyboardFrame = scrollView.convertRect(keyboardFrame, fromView: nil)
            let offsetY: CGFloat = CGRectGetMaxY(textField.frame) - CGRectGetMinY(convertedKeyboardFrame)
            if offsetY < 0 { return }
            updateScrollViewSize(offsetY, duration: animationDuration)
        }
    }
}

func keyboardWillBeHidden(notification: NSNotification) {
    restoreScrollViewSize()
}

func updateScrollViewSize(moveSize: CGFloat, duration: NSTimeInterval) {
    UIView.beginAnimations("ResizeForKeyboard", context: nil)
    UIView.setAnimationDuration(duration)

    let contentInsets = UIEdgeInsetsMake(0, 0, moveSize, 0)
    scrollView.contentInset = contentInsets
    scrollView.scrollIndicatorInsets = contentInsets
    scrollView.contentOffset = CGPointMake(0, moveSize)

    UIView.commitAnimations()
}

func restoreScrollViewSize() {
    scrollView.contentInset = UIEdgeInsetsZero
    scrollView.scrollIndicatorInsets = UIEdgeInsetsZero
}
上記の方針にしたがって何を行っているかというと、次の通り。
-
UIKeyboardWillShowNotificationには、以下の情報が含まれているので、それを取得- キーボードのframeの情報(
UIKeyboardFrameEndUserInfoKey) - キーボードのアニメーション時間(
UIKeyboardAnimationDurationUserInfoKey)
- キーボードのframeの情報(
- キーボードのframeの情報は、デバイスのウインドウ全体の中での座標になっているので、
convertRect(_:fromView:)でscrollView内での座標に変換 -
textFieldの下端とキーボードの上端のy座標(変換後)を比較- 前者のほうが大きかったら、キーボードに隠れないということなので処理終了
- 後者が大きければキーボードから隠れないように、両者の差分だけスクロール処理
-
updateScrollViewSize(_:duration:)でスクロール処理を実行-
scrollViewのcontentInset,scrollIndicatorInsetsを調整し、先ほど計算した差分の大きさだけ下方向に拡大 -
scrollViewのcontentOffsetを調整し、y方向に同様の大きさだけスクロール - これらの処理を、取得済のアニメーション時間で実行
-
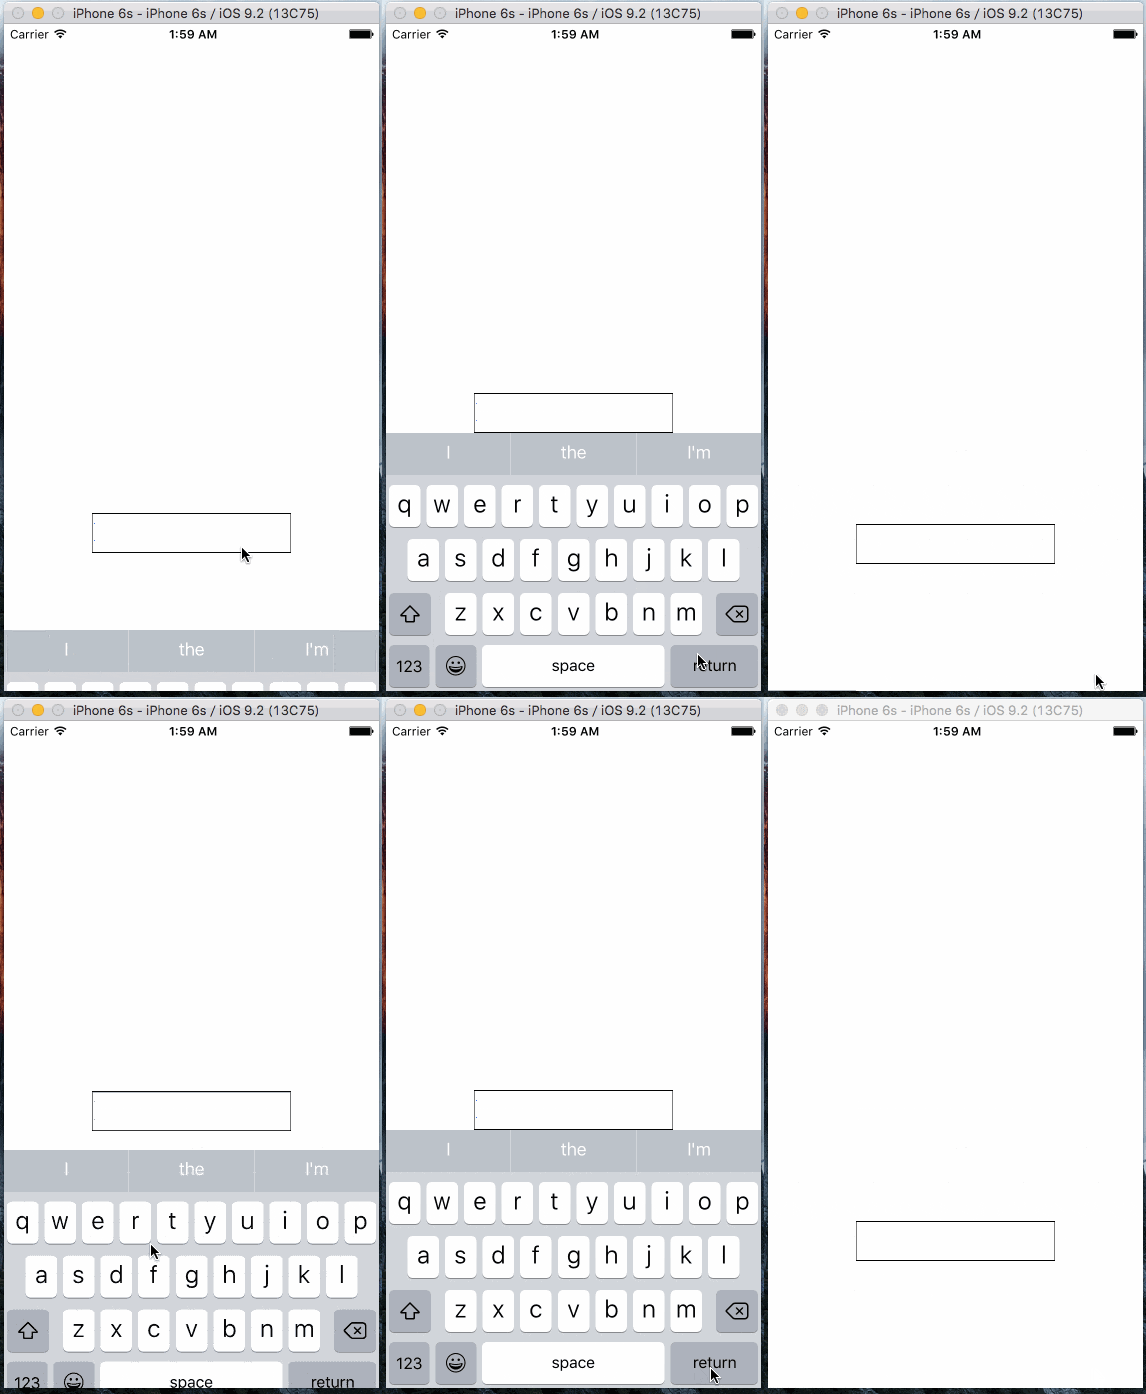
これで、キーボードが表示されるときにUIScrollViewが上方向にスクロールするようになった。(※UITextFieldが隠れる場合のみ)
キーボードが隠れるときにはこれの逆の操作をrestoreScrollViewSize:で行い、scrollViewのcontentInset, scrollIndicatorInsetsをデフォルトの値に戻す。
完成
以上で、キーボードが隠れなくなり、自分が何を入力してるのか分かるようになった![]()


