この記事は
Jupyterhub on Kubernetesでデータサイエンティストのためのマルチユーザー分析環境を構築したとき(現在進行形ですが)の実践的なtipsです。
公式のドキュメントやgithubのissue、海外のブログなどを頑張って探せば情報はあるにはあるんですけど、まとまった情報が無いので自分の備忘録的にもまとめようと思います。
※ 基本的な用語については説明を省きます。
※ Installing JupyterHubまではできてる前提で説明します。
やりたいこと
基本的な設定
- エンドポイントをいい感じにしたい
- Cognitoとの認証連携をしたい
- ユーザーのspawner要求によって立ち上げるインスタンスタイプを変更したい
- オートスケーリングしたい
- ユーザーの作業データを永続化したい
ちょっとだけめんどくさい設定
めんどくさい設定
環境
AWS環境のus-east-1で検証してます。(※2020/11時点)
- EKS: 1.16
- Jupyterhub on Kubernetes: 0.10.2
前提
values.yamlとはこれのことです。一部抜粋し、必要項目についての設定を記載します。
あらかじめ、AWS Route53でドメインを取得してます。仮にhoge.comとします。
Jupyterhub用のサブドメインはjupyter.hoge.comとします。
awsリソースの設定については雑なterraformのソースコードの抜粋を貼ってます。参考程度に。
EKSはeksctlで構築しています。
エンドポイントをいい感じにしたい
概要
いきなりざっくりですみません。もう少し具体的にすると下記のような感じです。
- エンドポイントをjupyter.hoge.comに固定する
- httpsアクセスのみにする
- 接続元のIPを制限する
これらはKubernetesのingressとawsのalb、route53を使って解決します。
構築
https通信をするので、証明書はaws certificate managerから事前に発行しておきます。(ssl終端はalbです)
data "aws_route53_zone" "hoge" {
  name         = "hoge.com."
  private_zone = false
}


resource "aws_acm_certificate" "cert" {
  domain_name = "*.hoge.com."
  validation_method = "DNS"
}


resource "aws_route53_record" "cert_validation" {
  zone_id = data.aws_route53_zone.hoge.zone_id
  name    = aws_acm_certificate.cert.domain_validation_options[0].resource_record_name
  type    = aws_acm_certificate.cert.domain_validation_options[0].resource_record_type
  records = [aws_acm_certificate.cert.domain_validation_options[0].resource_record_value]
  ttl     = 300
}


resource "aws_acm_certificate_validation" "cert" {
  certificate_arn = aws_acm_certificate.cert.arn
}
jupyterhubの設定に入る前にもう少し準備します。
- ingressとalbを連携させるためにalb-ingress-controllerをデプロイ
- デプロイしたingressを検知して自動でroute53にaレコードを登録するためにexternal-dnsをデプロイ
さて、jupyterhubの設定ですが、
ingressとalbを連携させた際には、albの設定はingressリソースのannotationから行います(参考)。
ingressリソース自体は、jupyterhubに機能としてもう用意されてるのでvalues.yamlを編集します。
ingress:
  enabled: true
  annotations:
    kubernetes.io/ingress.class: alb
    alb.ingress.kubernetes.io/scheme: internet-facing
    alb.ingress.kubernetes.io/listen-ports: '[{"HTTP": 80}, {"HTTPS":443}]'
    alb.ingress.kubernetes.io/actions.ssl-redirect: '{"Type": "redirect", "RedirectConfig": { "Protocol": "HTTPS", "Port": "443", "StatusCode": "HTTP_301"}}'
    alb.ingress.kubernetes.io/subnets: subnet-*****,subnet-*****,subnet-*****
    alb.ingress.kubernetes.io/certificate-arn: certificateのarn
    alb.ingress.kubernetes.io/security-groups: sg-*****,sg-*****
    alb.ingress.kubernetes.io/success-codes: 200,302
  hosts:
    - jupyter.hoge.com
ポイントとしては、
-
alb.ingress.kubernetes.io/listen-portsでHTTPプロトコルでは80ポートを、HTTPSプロトコルでは443ポートを公開する -
alb.ingress.kubernetes.io/actions.ssl-redirectでhttpでアクセスしたユーザーをhttpsへリダイレクトする -
alb.ingress.kubernetes.io/certificate-arnで証明書を指定する -
alb.ingress.kubernetes.io/security-groupsでインバウンドを制限したsgを指定する -
hosts:にはエンドポイントとなるサブドメイン(jupyter.hoge.com)を指定する。
これで指定IPから、jupyter.hoge.comへアクセスできるようになるはずです。
Cognitoとの認証連携をしたい
概要
認証機能はjupyterhubで完結するpassword認証や、github連携、google連携などいろいろ対応してるようです。
今回は、基本的にawsの機能で完結させたかったので、cognito連携を行います。
構築
まずはCognitoの設定です。
resource "aws_cognito_user_pool" "hoge" {
  ~よしなに設定してください~
}

resource "aws_cognito_user_pool_client" "jupyterhub" {
  # Client
  name                   = "JupyterHub"
  user_pool_id           = aws_cognito_user_pool.hoge.id
  generate_secret        = true
  refresh_token_validity = 365
  explicit_auth_flows = [
    "ALLOW_ADMIN_USER_PASSWORD_AUTH",
    "ALLOW_REFRESH_TOKEN_AUTH",
    "ALLOW_USER_PASSWORD_AUTH",
  ]
  prevent_user_existence_errors = "ENABLED"

  # Integration
  supported_identity_providers         = ["COGNITO", ]
  callback_urls                        = ["https://jupyter.hoge.com/hub/oauth_callback", ] # https://<ドメイン>/hub/oauth_callback
  logout_urls                          = ["https://jupyter.hoge.com", ] # https://<ドメイン>
  allowed_oauth_flows_user_pool_client = true
  allowed_oauth_flows                  = ["code", ]
  allowed_oauth_scopes = [
    "aws.cognito.signin.user.admin",
    "email",
    "openid",
    "phone",
    "profile",
  ]
}
cognitoのドメイン(Route53のドメインとは別物)も下記で設定します。
https://hoge.auth.us-east-1.amazoncognito.com
続いてJupyterhub on Kubernetesの設定です。
Cognito連携は機能としてもう用意されてるのでvalues.yamlを編集します。
hub:
  extraEnv:
    OAUTH_CALLBACK_URL: https://hoge.com/hub/oauth_callback # ユーザープールクライアントのcallback_urls
    OAUTH2_AUTHORIZE_URL: https://hoge.auth.us-east-1.amazoncognito.com/oauth2/authorize # <cognitoのドメイン>/oauth2/authorize
    OAUTH2_TOKEN_URL: https://hoge.auth.us-east-1.amazoncognito.com/oauth2/token # <cognitoのドメイン>/oauth2/token
    OAUTH2_USERDATA_URL: https://hoge.auth.us-east-1.amazoncognito.com/oauth2/userInfo # <cognitoのドメイン>/oauth2/userInfo

auth:
  type: custom
  custom:
    className: oauthenticator.generic.GenericOAuthenticator
    config:
      login_service: "AWS Cognito"
      client_id: ***** # ユーザープールクライアントのclient_id
      client_secret: ***** # ユーザープールクライアントのclient_secret
  admin:
    access: true
    users:
      - admin # Administrator権限を持たせたいcognitoユーザをlistで指定
ログイン画面が「Sign in with AWS Cognito」になりました。

クリックするとユーザ名とパスワードが求められるので、cognitoのユーザープールに登録したログイン情報を入力するとログインできます。

ユーザーのspawner要求によって立ち上げるインスタンスタイプを変更したい
概要
複数ユーザーがいれば、人によってsingleuserpodに要求するスペックが異なることがしばしばあります。メモリが多く積まれているマシンを使用したいユーザーがいれば、gpuマシンを使用したいユーザーがいます。
これに対しては、JupyterhubのprofileListとnodegroup(eks)を組み合わせて対応します。
※今回の構成では、user : singleuserpod : インスタンス = 1 : 1 : 1 の構成を取ってます。

構築
あらかじめ、nodegroupを設定しておく必要があります。
以下、eksctl用のcluster.yamlの例です。
nodeGroups:
  - name: cpu-r5-large
    instanceType: r5.8xlarge
    desiredCapacity: 0
    minSize: 0
    maxSize: 10
    volumeSize: 100
    volumeType: gp2
    iam:
      withAddonPolicies:
        autoScaler: true
        imageBuilder: true
        cloudWatch: true
        efs: true
    securityGroups:
      withShared: true
      withLocal: true
      attachIDs: ['sg-*****', 'sg-*****']
    ssh:
      allow: false
      publicKeyName: Hoge
    tags:
      k8s.io/cluster-autoscaler/node-template/label/alpha.eksctl.io/nodegroup-name: 'cpu-r5-large'
      k8s.io/cluster-autoscaler/enabled: 'true'
      k8s.io/cluster-autoscaler/クラスター名: 'true'
  - name: gpu-k80
    instanceType: p2.xlarge
    desiredCapacity: 0
    minSize: 0
    maxSize: 10
    volumeSize: 100
    volumeType: gp2
    iam:
      withAddonPolicies:
        autoScaler: true
        imageBuilder: true
        cloudWatch: true
        efs: true
    securityGroups:
      withShared: true
      withLocal: true
      attachIDs: ['sg-*****', 'sg-*****']
    ssh:
      allow: false
      publicKeyName: Hoge
    tags:
      k8s.io/cluster-autoscaler/node-template/label/alpha.eksctl.io/nodegroup-name: 'gpu-k80'
      k8s.io/cluster-autoscaler/enabled: 'true'
      k8s.io/cluster-autoscaler/クラスター名: 'true'
ここでは、下記にだけ注目しておきましょう。ノードグループ名に対してインスタンスタイプを指定しています。
※gpuを使えるようにするためには、別途nvidia-device-pluginをdaemonsetでデプロイするなどの作業が必要です。(詳しくはこちら)
name: cpu-r5-large
instanceType: r5.8xlarge
続いて、jupyterhubのvalues.yamlを編集します。
singleuser:
  profileList:
  - slug: "ml-large"
    display_name: "ml-large"
    kubespawner_override:
      image: "<repository:tag>"
      cpu_limit: 31
      mem_limit: '251G'
      node_selector:
        alpha.eksctl.io/nodegroup-name: cpu-r5-large
  - slug: "gpu-k80"
    display_name: "gpu-k80"
    kubespawner_override:
      image: "<repository:tag>"
      node_selector:
        alpha.eksctl.io/nodegroup-name: gpu-k80
      extra_resource_limits:
        nvidia.com/gpu: "1"
      storage:
        extraVolumes:
          - name: shm-volume
            emptyDir:
              medium: Memory
        extraVolumeMounts:
          - name: shm-volume
            mountPath: /dev/shm
ポイントとしては下記で先ほど設定したnodegroupの名前を選択していること。
node_selector:
  alpha.eksctl.io/nodegroup-name: cpu-r5-large
インスタンスのスペックよりも少なくresource limitを指定していること。(主な理由は下記)
※ インスタンスタイプごとに公開されているリソースをフルに要求しても、podはインスタンスに乗らない
※ 後にsidecarを立てたり、他サービスのdaemonsetなどが同じインスタンスに乗ってくるので、その分を確保しておきたい
cpu_limit: 31
mem_limit: '251G'
gpuインスタンスの場合は、ホストのShared Memoryをpodにマウントしていること。(参考)
※ podに割り当てられるShared Memoryが限られているらしく、hostのものフルに使いたい(自分の環境だと、これをしないとpytorchとかで学習するときにShared Memoryが不足してると怒られました)
storage:
  extraVolumes:
    - name: shm-volume
      emptyDir:
        medium: Memory
  extraVolumeMounts:
    - name: shm-volume
      mountPath: /dev/shm
設定がうまくいっていれば、spawnerの画面で下記のようにprofileを選択できるようになっています。(サンプルの画像です)

オートスケーリングしたい
概要
singleuserのpodを立てるためのインスタンスは、ユーザーが作業してない時は落としておきたい。
ということで、常時インスタンスは0台。ユーザーが使いたい時だけインスタンスが立ち上がるようにオートスケーリングを実装します。
※この構成だと、ユーザーがspawnerによってサーバーをキックした際に、インスタンスが立ち上がっていない場合は下記のような処理が発生します。
オートスケーリング実行 -> インスタンス立ち上げ -> docker imageのpull -> singleuserpodの立ち上がり
となると、notebookが使えるようになるまで数分程度待たないといけないということになります。(placeholderやprepullerなどの実装は行いません。)
構築
まずは、ノードグループがcluster autoscalerに対応していないといけません。今回使用するオートスケーラーはcluster-autoscaler-autodiscoveryなので、それに従います。
cluster.yamlの設定から、ポイントとしては必要な権限を与えていること。
iam:
  withAddonPolicies:
    autoScaler: true
autodiscoveryでひっかけられるようにtagを追加しておくこと。
tags:
      k8s.io/cluster-autoscaler/node-template/label/alpha.eksctl.io/nodegroup-name: 'cpu-r5-large'
      k8s.io/cluster-autoscaler/enabled: 'true'
      k8s.io/cluster-autoscaler/クラスター名: 'true'
です。
では、cluster-autoscaler-autodiscoveryをデプロイします。
command:
  - ./cluster-autoscaler
  - --v=4
  - --stderrthreshold=info
  - --cloud-provider=aws
  - --skip-nodes-with-local-storage=false
  - --expander=least-waste
  - --node-group-auto-discovery=asg:tag=k8s.io/cluster-autoscaler/enabled,k8s.io/cluster-autoscaler/<YOUR CLUSTER NAME>
最低限、--node-group-auto-discovery=asg:tag=k8s.io/cluster-autoscaler/enabled,k8s.io/cluster-autoscaler/<YOUR CLUSTER NAME>だけeksのクラスター名に書き換えておけば動くはずです。(バージョンによっては環境変数にリージョン名を入れておかないといけないケースもあります。)
あとはspawnerがsingleuserpodを立ち上げようとした際に、pending状態のpodをcluster autoscalerが自動検知して、ノードセレクターやリソース要求を満たすノードグループのインスタンスを立ち上げてくれます。(厳密にいうとcluster autoscalerがawsのasgのdesired capacityを増加させることで、asgに紐づいた起動テンプレート、つまりnodegroupで設定したスペックのインスタンス、が立ち上がるという流れです。)
逆にユーザーがsingleuserpodを停止した場合も、cluster autosclerが自動検知してインスタンスを落としてくれます。
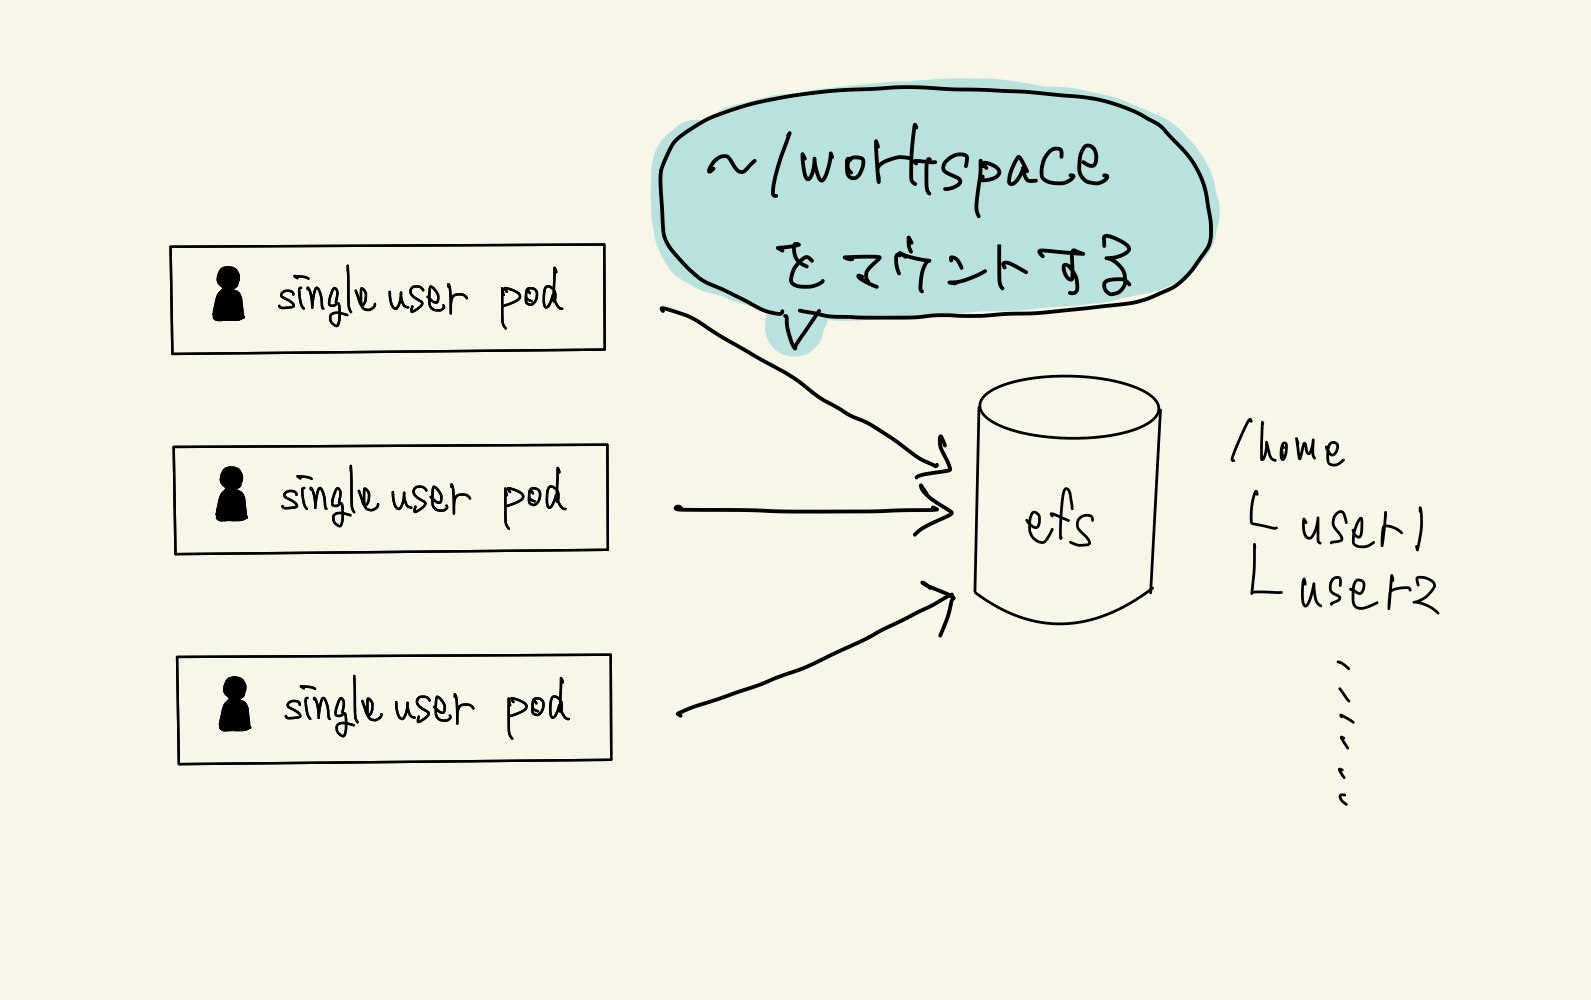
ユーザーの作業データを永続化したい
概要
Jupyterhub on Kubernetesのsingleuserpodはコンテナなのでもちろんデータも揮発性です。何かしらのvolumeを用意してあげないと、分析環境としては困ってしまいます。
今回の実装では、aws efsをボリュームとして利用することにします。
構築
実装はここを参考にしてます。
まずはefsを作成しておきます。注意点としてはsgなどの設定で、ちゃんとeks内のpodからアクセスできるようにしておくことです。
次にpvとpvcを作成します。staticなボリュームです。efsは容量上限がないので、storageの設定は便宜上設定しているだけで、効きません。
apiVersion: v1
kind: PersistentVolume
metadata:
  name: efs-persist
spec:
  capacity:
    storage: 1000Gi # dummyの設定なので実際には反映されない
  accessModes:
    - ReadWriteMany
  nfs:
    server: fs-*****.efs.us-east-1.amazonaws.com # 先ほど作成したefs(リージョンはus-east-1想定)
    path: "/"
---
kind: PersistentVolumeClaim
apiVersion: v1
metadata:
  name: efs-persist
  namespace: jhub
spec:
  storageClassName: ""
  accessModes:
    - ReadWriteMany
  resources:
    requests:
      storage: 100Gi # dummyの設定なので実際には反映されない
最後にvalues.yamlを編集します。
singleuser:
  extraEnv:
    CHOWN_HOME: 'yes'
    CHOWN_EXTRA: '/home/jovyan/workspace'
  uid: 0
  fsGid: 0
  storage:
    type: static
    static:
      pvcName: "efs-persist"
      subPath: 'home/{username}'
    homeMountPath: /home/jovyan/workspace
ポイントとしては、pv自体はefsの/ディレクトリにマウントしますが、各ユーザは/home/<user名>にマウントされること。これにより、お互いに干渉し合うことなくefsを利用することができます。
また、今回rootユーザでのマウントをしてるので、デフォルトでjovyanを使用するsingleuserpodだとworkspace配下の権限がありません。なので、CHOWN_EXTRAを利用して、/home/jovyan/workspaceをjovyan権限にしてしまいます。
注意点は、マウントポイントを/home/jovyanなど設定ファイルのあるディレクトリに指定しないということです。
ちなみに、このsingleuserpodに設定して効果のある環境変数に関してですが、まとまったドキュメントが発見できず、自分はsingleuserpodがデフォルトでベースにしているdocker imageであるbase-notebookから、start.shなどの起動スクリプトを見て確認してました。
各ユーザー毎にawsリソースへの権限を管理したい
概要
このあたりから、jupyterhubに設定項目が用意されてるわけではなく、自分でinitContainerなどを駆使しながら構築していく必要が出てきます。
マルチユーザー環境だと、やれあの人はプロジェクトAの担当で、あの人はプロジェクトBの担当で、自分はこの分析環境の管理者で。など、ユーザごとに権限を変えたくなります。
権限ということでまず思いつくのは、nodegroupに紐づいているiamroleに直接policyをアタッチする(セキュリティ観点でよろしくないとされてますが)であったり、IRSAを用いてsingleuserpodを実行するsaに対してpolicyをアタッチする。などがあります。
ただ、これだとみんな同じ権限になってしまうんですね...
今回は解決案の一つとして、どうにかiamuserのクレデンシャルをsingleuserpodの.aws/credentialsに置いてやる(できるだけセキュアに)。ということで構築したので、説明していきます。
図で書くとこんな感じです。

① terraformでcredentialsとか作成してるので、credentialの情報をaws secret managerに登録する(ユーザー全員分)。
② external secretsを用いて、secret managerのcredentials情報をsecretにimportする(ユーザー全員分)。
③ singleuserpodのinitContainerでcredentialをgrep & 整形して、emptyDir経由でnotebookコンテナの.aws/credentialsにマウントする。
構築
①secret managerにcredential情報を格納します。
まずはcredentials情報を準備します。
[
  {
    "name": "useer1",
    "password": "*****",
    "aws_access_key_id": "*****",
    "aws_secret_access_key": "*****"
  },
  {
    "name": "user2",
    "password": "*****",
    "aws_access_key_id": "*****",
    "aws_secret_access_key": "*****"
  },
  ...
]
secretmanagerに登録します。nameは後にexternal secretsから引用する際に利用します。
resource "aws_secretsmanager_secret" "iamuser" {
  name        = "iamuser"
}

resource "aws_secretsmanager_secret_version" "iamuser" {
  secret_id = aws_secretsmanager_secret.iamuser.id
  secret_string = jsonencode({
    "credentials" = file("credentials.json"),
  })
}
②external secretsをeksにデプロイしておきます。
続いて、Jupyterhubのtemplate配下にsecretmanagerをおきます。
apiVersion: 'kubernetes-client.io/v1'
kind: ExternalSecret
metadata:
  name: singleuser-credentials
  labels:
    {{- include "jupyterhub.labels" . | nindent 4 }}
spec:
  backendType: secretsManager
  data:
    - key: iamuser
      name: iamuser
      property: credentials
これで、secretmanagerのcredentialsがkubernetesのシークレットにimportできました。
③initContainerとvolumeを設定するためにvalues.yamlを編集します。
singleuser:
  initContainers:
  - name: "resolve-credentials"
    image: cfmanteiga/alpine-bash-curl-jq
    imagePullPolicy: IfNotPresent
    env:
    - name: username
      value: '{username}'
    command: ['/bin/bash','-c']
    args:
    - jq -r '.[] | select(.name=="{username}") | "[default]\naws_access_key_id = " + .aws_access_key_id +"\naws_secret_access_key = " + .aws_secret_access_key' /usr/local/singleuser-credentials/iamuser > /usr/local/aws-credentials/credentials
    - if [[ ! -s /usr/local/aws-credentials/credentials ]]; then echo 'No Credential.'; fi
    volumeMounts:
    - name: singleuser-credentials
      mountPath: /usr/local/singleuser-credentials
    - name: aws-credentials
      mountPath: /usr/local/aws-credentials

  storage:
    extraVolumes:
    - name: singleuser-credentials
      secret:
        secretName: singleuser-credentials
        defaultMode: 0400
    - name: aws-credentials
      emptyDir: {}
    extraVolumeMounts:
    - name: aws-credentials
      mountPath: /home/jovyan/.aws
ここで注意点ですが、今回の設定ではiamuserとsingleuserのユーザー(この設定を行なっていればcognitoのユーザー)の紐付けはユーザー名で行なっているので、同じユーザー名にしておく必要があります。
singleuserpod内でdockerコマンドを使いたい
概要
Jupyterhubを運用していく上で、ユーザーからsingleuserpod内でもDockerfileの開発を行いたい。という要望が出ました。
dockerコンテナ内でdockerコマンドを使うとなると、docker daemonをどのように供給するかが課題であり、いわゆるDooD(Docker outside of Docker)やDinD(Docker in Docker)と言われる方法がメジャーです。
on Kubernetesに限ってざっくり説明すると
- DooD: ノードのdaemonをpodにマウントする方法
- メリット: 実装が楽、privileged権限が不要
- デメリット: ノード上の他のpodにアクセスできるようになってしまう
- DinD: daemonはサイドカー(DinDイメージ)に立てて、localhostで通信する方法
- メリット: pod内完結(ホストへのアクセスが不要なので、他のpodに影響無)
- デメリット: privileged権限が必要
ノード上の他のpod(自分のケースだとdaemonsetで立っている、nvidia-device-pluginやprometheusのnode-exporterなど)にアクセスされてしまうのは困るので、DinDを採用しました。

構築
values.yamlでsingleuserpodにサイドカーコンテナを設定します。
singleuser:
  extraEnv:
    DOCKER_HOST: tcp://localhost:2375
  extraContainers:
  - name: "docker-daemon"
    image: docker:19.03.12-dind
    imagePullPolicy: IfNotPresent
    env:
    - name: DOCKER_TLS_CERTDIR
      value: ''
    resources:
      requests:
        cpu: 0.5
        memory: 512Mi
    securityContext:
      privileged: true
ポイントは環境変数でdocker daemonの接続先を教えてあげていることです。
今回の構成での注意点としては
- DinDコンテナが使えるリソースはサイドカーのリソースに依存する(singleuserpod : インスタンス = 1 : 1 なのでnotebookとdocker daemonのサイドカーでインスタンスのリソースを分け合わないといけません)
- DinDコンテナのイメージはサイドカーに保存されますが、特に永続化はしてないので揮発性
ローカルPCからsingleuserpodにssh接続したい
概要
jupyter notebookやjupyter labには一応ターミナル機能が存在してます。ただ、ブラウザによって挙動が異なったり、なにかと不便です。ということで、インスタンスへのアクセスと同様にローカルPCからssh接続をしたいのですが、幸いこのプルリクでextraなportの穴をproxyに開けられるようになりました。そして、このプルリクの方が開発しているjupyterhub-sshというものを利用させていただいて実現しました。
最終的な構成は下記の図です。

注意点としては、jupyterhub-sshはTCPプロトコルのアクセスが必要なのに対して、albは現状、HTTPとHTTPSのプロトコルにしか対応していない点です。今回はユーザーに対してエンドポイントを2つ用意することで解決しました。
また、jupyterhub-sshのgithubより2020/11時点で下記のようなので、まだVSCodeやPycharmなどから接続することはできなそうです。
You can do anything you would generally interactively do via ssh: run editors, fully interactive programs, use the commandline, etc. Some features like non-interactive command running, tunneling, etc are currently unavailable.
構築
jupyterhub-sshを構築します。
hubUrl: 'http://proxy-public'
# hostKey: <--set-file>

ssh:
  enabled: true
  image:
    repository: yuvipanda/jupyterhub-ssh-ssh
    tag: '0.0.1-n062.h2759fb4'
  service:
    type: LoadBalancer
    port: 22
  resources:
    requests:
        cpu: 200m # Temporary
        memory: 512Mi # Temporary
  serviceAnnotations:
    external-dns.alpha.kubernetes.io/hostname: jupyter-developer.hoge.com
    service.beta.kubernetes.io/aws-load-balancer-security-groups: "sg-*****"
  nodeSelector:
    alpha.eksctl.io/nodegroup-name: <好きなノードグループへ>
ポイントはhubUrlはproxyに接続するようにする。という点です。jupyterhubとjupyterhub-sshは同じnamespace上に構築してるためhttp://proxy-publicとしてます。
また、awsのclassic load balancerを立ち上げて、external-dnsによるサブドメインのaレコードの登録とsgのアタッチをしています。
続いてjupyterhub側にportの穴を開けておきます。
hub:
  networkPolicy:
    enabled: true
    allowedIngressPorts: [8022]

proxy:
  service:
    type: NodePort
    extraPorts:
      - name: ssh
        port: 8022
  chp:
    networkPolicy:
       enabled: true
       allowedIngressPorts: [http, https, 8022]

singleuser:
  networkPolicy:
    enabled: true
    allowedIngressPorts: [8022, 8080]
これで、ローカルPCから下記でつながるようになるはずです。(パスワードはjupyterhubで発行したapiTokenです)
$ ssh user1@jupyter-developer.hoge.com
UIをカスタマイズしたい
概要
なんとなくシステムに対して愛着をわかせるためにやってみました。
カスタマイズしたい要素としては下記です。
- html
- ロゴ
- css
- ファビコン
htmlとロゴに関しては、jupyterhubのconfigファイルに上書きをする設定値が用意されているんですが、cssとファビコンに関しては用意されておらず、結果的にデフォルトのファイルを無理やり上書きする方法で対応します。
構築
ベースとなるテンプレートはここにあります。下記のような構成です。
├── static
│   ├── favicon.ico # ファビコンの画像
│   ├── images
│   │   ├── jupyter.png # ロゴ
│   │   └── jupyterhub-80.png # ロゴ
│   ├── js
│   │   └── ***.js # js
│   └── less
│       └── ***.less # css
└── templates
    └── ***.html # テンプレートのhtml
ここで、templatesとロゴの画像については、jupyterhubのコンフィグにパスを指定できる設定項目があります。
ロゴ画像以外のstaticについてはどうやら任意のパスを指定する設定項目は無いようです。こちらを参考に、無理やりファイルをオーバーライトする方法で実装してみようと思います。
① カスタマイズするフロント用gitリポジトリを作成して、そこで実装します。
cssに関しては、style.min.cssをオーバーライトしてやるために、あらかじめlessをコンパイルしました。
以下で必要なパッケージを取得してビルドします。
※ bootstrapなどのバージョンは注意です。使用されてるバージョンはjupyterhubのパッケージで正規でコンパイルされたstyle.min.cssなどから確認しました。
$ git clone https://github.com/twbs/bootstrap.git -b v3.4.1
$ mv bootstrap/less static/components/bootstrap/less
$ rm -rf bootstrap

$ git clone https://github.com/FortAwesome/Font-Awesome.git -b v4.7.0
$ mv Font-Awesome/less static/components/font-awesome/less
$ mv Font-Awesome/fonts/ static/components/font-awesome/
$ rm -rf Font-Awesome

$ docker run --rm -v `pwd`:/app -ti appleboy/node-less static/less/style.less > static/css/style.css
$ docker run --rm -v `pwd`:/code -w /code castorinop/minify uglifycss static/css/style.css > static/css/style.min.css
git pushしときます。
② リポジトリをinitContainerでマウントして、jupyterhubの任意の場所にvolume経由で配置していきます。
values.yamlを編集します。
hub:
  initContainers:
    - name: git-clone
      image: alpine/git
      command: ["/bin/sh", "-c"]
      args:
        - >
          mkdir -p ~/.ssh/ &&
          cp -rL /keys/* ~/.ssh/ &&
          chmod 600 ~/.ssh/* &&
          git clone --single-branch --branch=master --depth=1 -- git@*****.git /tmp/jupyterhub/custom &&
          cp /tmp/jupyterhub/custom/templates/* /etc/jupyterhub/custom/templates/ &&
          cp /tmp/jupyterhub/custom/static/images/hoge-logo.png /etc/jupyterhub/custom/static/images/ &&
          cp /tmp/jupyterhub/custom/static/css/style.min.css /etc/jupyterhub/custom/static/css/ &&
          cp /tmp/jupyterhub/custom/static/favicon.ico /etc/jupyterhub/custom/static/favicon/
      volumeMounts:
        - name: custom-templates
          mountPath: /etc/jupyterhub/custom/templates
        - name: custom-logo
          mountPath: /etc/jupyterhub/custom/static/images
        - name: custom-css
          mountPath: /etc/jupyterhub/custom/static/css
        - name: custom-favicon
          mountPath: /etc/jupyterhub/custom/static/favicon
        - name: git-clone-secret
          mountPath: /keys
  extraVolumes:
    - name: custom-templates
      emptyDir: {}
    - name: custom-logo
      emptyDir: {}
    - name: custom-css
      emptyDir: {}
    - name: custom-favicon
      emptyDir: {}
    - name: git-clone-secret
      secret:
        secretName: hub-git
  extraVolumeMounts:
    - name: custom-templates
      mountPath: /etc/jupyterhub/custom/templates
    - name: custom-logo
      mountPath: /etc/jupyterhub/custom/static/images
    - name: custom-css
      mountPath: /usr/local/share/jupyterhub/static/css
    - name: custom-favicon
      mountPath: /usr/local/share/jupyterhub/static/favicon.ico
      subPath: favicon.ico
  extraConfig:
    template: |
      c.JupyterHub.logo_file = '/etc/jupyterhub/custom/static/images/hoge-logo.png'
      c.JupyterHub.template_paths = ['/etc/jupyterhub/custom/templates']
ポイントとしては、
gitはprivateリポジトリなので、これと同じ経路で鍵をマウントしてます。
また、要素ごとにマウントポイントを分けてます。これで、ピンポイントにファイルのみのオーバーライトをします。(雑にstaticとtemplateを丸ごとオーバーライトしてみましたが、バグりました。)
これで今後はJupyterhubを自分色に染めていけそうです。

ユーザーが好きなイメージでsingleuserpodを立ち上げられるようにしたい
概要
運用してるうちにマイノリティなユーザーからマイノリティなコンテナ環境の要望をもらいました。管理者である自分が都度その人のためのコンテナを用意してあげて、profileListに追加するのはなかなかにめんどくさいので、ユーザーが好きなコンテナを分析環境としてsingleuserpodで立ち上げられるようにしてしまおうと思います。
やり方としては、kubespawnerクラスをオーバーライトする形になります。
ちなみにjupyterhubには様々なspawnerが用意されているようですが(参考)、Jupyterhub on Kubernetesではkubespawnerを利用することになります。kubespawnerのソースコードをみてもらえば分かる通り、from jupyterhub.spawner import Spawnerを継承して実装されてます。
構築
Jupyterhubのvalues.yamlから継承クラスを実装します。
hub:
extraConfig:
template: |
# Custom Spawner
# ==========
import json
import os
import asyncio
from kubespawner.spawner import KubeSpawner
class MySpawner(KubeSpawner):
def _options_form_default(self):
return """
<!-- Scripts -->
<script type="text/javascript">
function customImageForm(){
options = document.getElementById('selectImageForm');
if(options[0].selected){
document.getElementById('customImage').style.display = "none";
document.getElementById('memGuarantee').style.display = "";
document.getElementById('gpuType').style.display = "none";
} else if(options[1].selected){
document.getElementById('customImage').style.display = "none";
document.getElementById('memGuarantee').style.display = "";
document.getElementById('gpuType').style.display = "none";
} else if(options[2].selected){
document.getElementById('customImage').style.display = "none";
document.getElementById('memGuarantee').style.display = "none";
document.getElementById('gpuType').style.display = "";
} else if(options[3].selected){
document.getElementById('customImage').style.display = "";
document.getElementById('memGuarantee').style.display = "";
document.getElementById('gpuType').style.display = "none";
} else if(options[4].selected){
document.getElementById('customImage').style.display = "";
document.getElementById('memGuarantee').style.display = "none";
document.getElementById('gpuType').style.display = "";
}
}
window.onload = customImageForm;
</script>
<!-- Form -->
<div id="selectImage">
<tr>
<label for="image">Image</label>
<select name="image" id="selectImageForm" onChange="customImageForm();">
<optgroup label="Default">
<option value="ml" selected="selected">Python</option>
<option value="r">R</option>
<option value="nvidia">Nvidia</option>
</optgroup>
<optgroup label="Custom">
<option value="custom_cpu">CPU Image</option>
<option value="custom_gpu">GPU Image</option>
</optgroup>
</select>
<br/><br/>
</div>
<div id="customImage">
<label for="custom_image">Custom Image</label>
<input name="custom_image" placeholder="repository:tag"></input>
<br/><br/>
</div>
<div id="memGuarantee">
<tr>
<td><label for="mem_guarantee">Memory</label> </td>
<td>
<input type="radio" name="mem_guarantee" value="tiny"> 2GB
<input type="radio" name="mem_guarantee" value="small" checked="checked"> 64GB
<input type="radio" name="mem_guarantee" value="medium"> 128GB
<input type="radio" name="mem_guarantee" value="large"> 256GB
</td>
</tr>
<br/><br/>
</div>
<div id="gpuType">
<tr>
<td><label for="gpu_type">GPU Type</label> </td>
<td>
<input type="radio" name="gpu_type" value="k80" checked="checked"> k80
<input type="radio" name="gpu_type" value="v100"> v100
</td>
</tr>
<br/><br/>
</div>
"""
def options_from_form(self, formdata):
options = {}
image = formdata.get('image', [''])[0].strip() # str: ml, r, nvidia, custom_cpu or custom_gpu
custom_image = formdata.get('custom_image', [''])[0].strip() # str: repository: tag
mem_guarantee = formdata.get('mem_guarantee', [''])[0].strip() # str: tiny, small, medium or large
gpu_type = formdata.get('gpu_type', [''])[0].strip() # str: k80 or v100
if image == 'ml':
options['profile'] = 'ml-' + mem_guarantee
elif image == 'r':
options['profile'] = 'r-' + mem_guarantee
elif image == 'nvidia':
options['profile'] = 'gpu-' + gpu_type
elif image == 'custom_cpu':
options['image'] = custom_image
options['profile'] = 'ml-' + mem_guarantee
elif image == 'custom_gpu':
options['image'] = custom_image
options['profile'] = 'gpu-' + gpu_type
self.log.info(f'Spawn Option is {options}')
return options
# add image to _user_option_key
_user_option_keys = {'profile', 'image',}
async def load_user_options(self):
if self._profile_list is None:
if callable(self.profile_list):
profile_list = await gen.maybe_future(self.profile_list(self))
else:
profile_list = self.profile_list
self._profile_list = self._init_profile_list(profile_list)
selected_profile = self.user_options.get('profile', None)
if self._profile_list:
await self._load_profile(selected_profile)
elif selected_profile:
self.log.warning("Profile %r requested, but profiles are not enabled", selected_profile)
# supported custom image
custom_image = self.user_options.get('image', None)
if custom_image is not None:
setattr(self, 'image', custom_image)
# help debugging by logging any option fields that are not recognized
option_keys = set(self.user_options)
unrecognized_keys = option_keys.difference(self._user_option_keys)
if unrecognized_keys:
	self.log.warning(
		"Ignoring unrecognized KubeSpawner user_options: %s",
		", ".join(
			map(
				str,
				sorted(unrecognized_keys)
			)
		)
	)
# Custom Spawner Options
# ==========
c.JupyterHub.spawner_class = MySpawner
いくつかのパートに分けて説明していきます。
前提として、最終的にはsingleuserに設定したprofileListの中からprofileを選択してpodを起動することに変わりはないので、profileListはここを参考にしてください。
また、今回実装したクラスをspawnerとして利用するために下記を設定しておきます。
c.JupyterHub.spawner_class = MySpawner
今回オーバーライドしたモジュールは下記です。
def _options_form_default(self):def options_from_form(self, formdata):async def load_user_options(self):
加えて、下記変数をオーバーライドしてます
_user_option_keys
それぞれ説明します。
def _options_form_default(self):
Spawnerページの下記form内の要素を表示するためのモジュールです。
<form enctype="multipart/form-data" id="spawn_form" action="/hub/spawn/admin" method="post" role="form"></form>
デフォルトだと、profileListのjsonデータからprofileListを表示する形式になっています。
今回は下記のようにイメージ、カスタムイメージのrepository:tag、マシンスペックを選択できるような形式にしました。
cpuマシンとgpuマシンでリソースの選択を変えるためのjavascriptもまとめてしまってます。
cpuマシンの場合

gpuマシンの場合

def options_from_form(self, formdata):
上のdef _options_form_default(self):でユーザがform入力したデータを元に立ち上げるprofile情報が入ったdictデータを返します。
個別にリソースを選択する今回のようなケースの場合は、デフォルトのkubespawnerのprofileで終始やり取りするフローとの差異をこのモジュールで吸収します。
ちなみにここで返すdict変数は後にprofileというキーからprofile名(profileListのslugキーに該当)を値として取得して処理されます。
また、ユーザーがカスタムイメージを入力した場合は、このdict変数内のimageというキーにrepository:tagという値を格納しておきます。
_user_option_keys
デフォルトだと、上のdef options_from_form(self, formdata)が返した変数に対して、次に処理するasync def load_user_options(self)というモジュールの中でprofileキー以外が存在していた場合はwarningログが表示されるようになっています。
# help debugging by logging any option fields that are not recognized
option_keys = set(self.user_options)
unrecognized_keys = option_keys.difference(self._user_option_keys)
if unrecognized_keys:
self.log.warning(
"Ignoring unrecognized KubeSpawner user_options: %s",
", ".join(
map(
str,
sorted(unrecognized_keys)
)
)
)
デフォルトだとこうなってますが
_user_option_keys = {'profile',}
カスタムイメージに対応するためにimageキーがあってもwarningが出ないようにしておきます。
_user_option_keys = {'profile', 'image',}
async def load_user_options(self):
ここで、選択されたprofileを元に実際にsingleuserpodを立ち上げるためのモジュール用の設定をセットしてます。
await self._load_profile(selected_profile)
デフォルトだとprofileList内の設定以外が入り込む余地がありません。
なので_load_profileされて、実際にsingleuserpodが立ち上がる間に下記を実行することでカスタムイメージの設定を上書きしてます。
※つまり使用するprofileはvalues.yamlで設定したものでユーザのイメージだけオーバーライトしてます。
# supported custom image
custom_image = self.user_options.get('image', None)
if custom_image is not None:
    setattr(self, 'image', custom_image)
おわりに
Jupyterhub環境は筆者も運用しながら設定を継ぎ足している最中なので、この設定はあくまで2020/11時点のものです。
また、この記事を書くにあたってソースコードを一部改訂してるため、もしかしたら矛盾している部分があるかもしれません。
どなたかの参考になれば幸いです。