webサイト作ってみたい!
ひとまず動くwebサイトを作りたい(CloudFront編)の続きになります
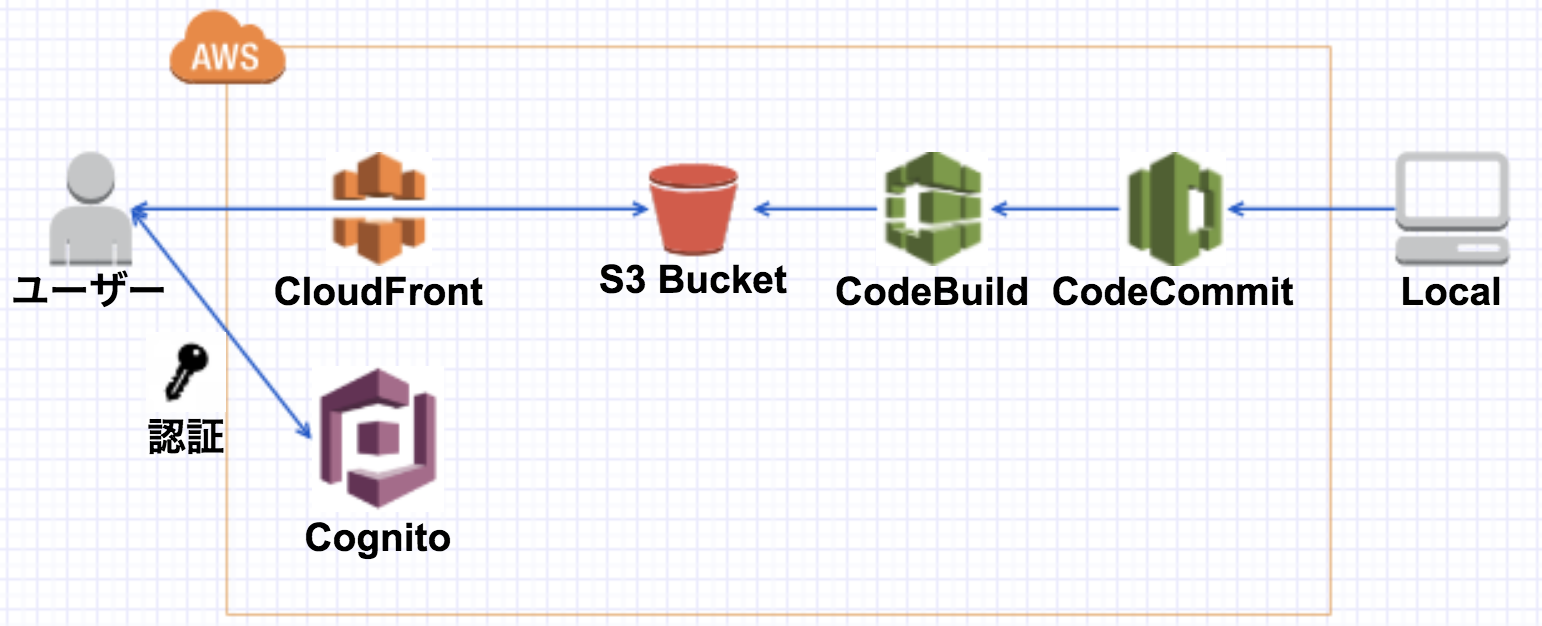
今回の設計図
実際のサイト

前回書けなかったCognitoを使ったユーザー登録機能周りについて書いていこうと思います。
基本的に以下のサイトを参考にしました
AWS SDK for JavaScriptでCognito User Poolsを使ったログイン画面を作ってみた
作っているサイト
私もネイル
ネイルモデルを探すネイリストと無料でネイルを受けたい人をマッチングするサービスです
道のり
-
Cognitoでサインアップ画面の作成 - ログイン画面の作成
- ログイン状態の確認
- プロフィールの更新
Cognitoの設定+サインアップ画面の作成
ひとまず色々後から修正できるのでひとまずデフォルトで作成
チュートリアル: ユーザープールの作成
サインアップ画面は以下のhtmlとjsで作成
<!-- sigupの情報送信用画面(signup後は見えない) -->
<div id="signup_form">
  <h1>ユーザー登録</h1>
  <form>
    <div class="form-group">
      <label>ユーザー名</label>
      <input type="text" class="form-control" placeholder="hogehoge" id="username" required>
    </div>
    <div class="form-group">
      <label>生年月日</label>
      <input type="date" class="form-control" id="birth_date" required>
    </div>
    <div class="form-group">
      <label>メールアドレス</label>
      <input type="email" class="form-control" placeholder="mail" id="email" required>
    </div>
    <div class="form-group">
      <label>パスワード</label>
      <input type="password" class="form-control" placeholder="password" id="password" required>
    </div>

    <button type="button" id="signup" class="btn btn-primary">登録</button>
  </form>
</div>

<!-- sigup後の認証コード用画面(最初は見えない) -->
<div style="display: none" id="verification">
  <h2>VARIFICATION</h2>
  <form>
    <div class="form-group">
      <label>Verification Code</label>
      <input type="text" id="verification-code" class="form-control">
      <input type="hidden" id="username">
      <button type="button" id="submit" class="btn btn-primary">Submit</button>
  </form>
</div>
var poolData = {
    UserPoolId: 'ap-northeast-1_**********',
    ClientId: '*************************'
};

jQuery(document).ready(function ($) {
    AWS.config.region = 'ap-northeast-1'; // Region
    AWS.config.credentials = new AWS.CognitoIdentityCredentials({
        IdentityPoolId: 'ap-northeast-1:*********-****-****-****-*************'
    });

    // Cognito User Pool Id
    AWSCognito.config.region = 'ap-northeast-1';
    AWSCognito.config.credentials = new AWS.CognitoIdentityCredentials({
        IdentityPoolId: 'ap-northeast-1:*********-****-****-****-*************'
    });

    //ユーザ登録時,signupボタンが押される時のfunction
    $('#signup').click(function () {

        var userPool = new AWSCognito.CognitoIdentityServiceProvider.CognitoUserPool(poolData);

        var attributeList = [];

        //サインアップ時に追加する項目を追加
        //ここのNameはuser poolの属性とあっている必要がある
        // ex) birth_dateとした場合エラーになる
        var dataEmail = {
            Name: 'email',
            Value: $('#email').val()
        };
        var birthDate = {
            Name : 'birthdate',
            Value : $('#birth_date').val()
        };

        var attributeEmail = new AWSCognito.CognitoIdentityServiceProvider.CognitoUserAttribute(dataEmail);
        var attributeBirthDate = new AWSCognito.CognitoIdentityServiceProvider.CognitoUserAttribute(birthDate);
        attributeList.push(attributeEmail);
        attributeList.push(attributeBirthDate);

        var dataName = {
            Name: 'name',
            Value: $('#username').val()
        };

        attributeList.push(dataName);

        userPool.signUp($('#username').val(), $('#password').val(), attributeList, null, function (err, result) {
            if (err) {
                alert(err);
                console.log(err);
                return;
            }
            else {
                var cognitoUser = result.user;
                //認証用画面を表示する
                $("#verification").show();
                //サインアップ用画面を隠す
                $("#signup_form").hide();
                $("#username").val(cognitoUser.getUsername());
            }
        });
    });

    //ユーザ認証時、submitボタンが押される時のfunction
    $('#submit').click(function () {

        var userPool = new AWSCognito.CognitoIdentityServiceProvider.CognitoUserPool(poolData);

        var userData = {
            Username: $('#username').val(),
            Pool: userPool
        };

        var cognitoUser = new AWSCognito.CognitoIdentityServiceProvider.CognitoUser(userData);
        cognitoUser.confirmRegistration($('#verification-code').val(), true, function (err, result) {
            if (err) {
                alert(err);
                return;
            }
            console.log('call result: ' + result);
            //認証完了後指定画面に遷移させる
            location.href = "index.html";
        });
    });
});
ここで注意しないといけないのがユーザープールに送信する属性データの名前である
(signup.jsの中のemail,birthdateなどの名前である)
ユーザープールの設定から確認できるデフォルト属性を使う分には問題ないが、
それ以外を使う場合はカスタム属性として事前に追加しておく必要がある

ログイン画面の作成
ログイン画面は以下のhtmlとjsで作成
<form>
  <div class="form-group">
    <label>ユーザー名</label>
    <input type="text" class="form-control" id="username" required>
  </div>
  <div class="form-group">
    <label>パスワード</label>
    <input type="password" class="form-control" placeholder="password" id="password" required>
  </div>
  <button type="button" id="login" class="btn btn-primary">ログイン</button>
</form>
// Region
AWS.config.region = 'ap-northeast-1';
AWSCognito.config.region = 'ap-northeast-1';
AWSCognito.config.credentials = new AWS.CognitoIdentityCredentials({
    IdentityPoolId: 'ap-northeast-1:*********-****-****-****-*************'
});

jQuery(document).ready(function ($) {
    $('#login').click(function () {

        var authenticationData = {
            Username: $('#username').val(),
            Password: $('#password').val()
        };
        var authenticationDetails = new AWSCognito.CognitoIdentityServiceProvider.AuthenticationDetails(authenticationData);
        var poolData = {
            UserPoolId: 'ap-northeast-1_***********',
            ClientId: '**************************'
        };
        var userPool = new AWSCognito.CognitoIdentityServiceProvider.CognitoUserPool(poolData);
        var userData = {
            Username: $('#username').val(),
            Pool: userPool
        };
        var cognitoUser = new AWSCognito.CognitoIdentityServiceProvider.CognitoUser(userData);

        cognitoUser.authenticateUser(authenticationDetails, {
            onSuccess: function (result) {
                console.log('access token + ' + result.getIdToken().getJwtToken());

                AWS.config.credentials = new AWS.CognitoIdentityCredentials({
                    IdentityPoolId: 'ap-northeast-1:*********-****-****-****-*************',
                    Logins: {
                        'cognito-idp.ap-northeast-1.amazonaws.com/ap-northeast-1_********': result.getIdToken().getJwtToken()
                    }
                });
                AWS.config.credentials.get(function (err) {
                    if (err) {
                        console.log('error in authetication AWS' + err);
                        window.location.href = 'index.html';
                    }
                    else {
                        // Using authenticated credentials $('#accessKey').val(AWS.config.credentials.accessKeyId);
                        $('#master-account').val($('#username').val());
                    }
                });
            },

            onFailure: function (err) {
                alert(err);
            },
        });
    });
});
ログイン状態の維持
- ログインしていない場合は
login.htmlに遷移 - ログイン指定ればユーザー名の表記+ログアウトボタンの作成
<div id="loginUser"></div>
<div id="logout">
  <div id="logoutButton"></div>
</div>
AWSCognito.config.region = 'ap-northeast-1'; // Region

var data = {
  UserPoolId: 'ap-northeast-1_**********',
  ClientId: '*************************'
};
var userPool = new AWSCognito.CognitoIdentityServiceProvider.CognitoUserPool(data);
var cognitoUser = userPool.getCurrentUser();

$(window).load(check_session());

//$(window).load(
function check_session() {
  if (cognitoUser != null) {
    cognitoUser.getSession(function(err, sessresult) {
      if (sessresult) {
        console.log('You are now logged in : ' + cognitoUser.username);
        cognitoUser.getUserAttributes(function(err, attrresult) {
          if (err) {
            alert(err);
            return;
          }
          $("#loginUser").html(cognitoUser.username + "さん");
          $("#logoutButton").html("<p class='copyright text-muted'>logout</p>");

          for (i = 0; i < attrresult.length; i++) {
            if (attrresult[i].getName() == "email") {
              $("#email").html("EMail: " + attrresult[i].getValue());
            }
          }

          // Add the User's Id Token to the Cognito credentials login map.
          AWS.config.credentials = new AWS.CognitoIdentityCredentials({
            IdentityPoolId: 'ap-northeast-1:*********-****-****-****-*************',
            Logins: {
              'cognito-idp.ap-northeast-1.amazonaws.com/ap-northeast-1_********': sessresult.getIdToken().getJwtToken()
            }
          });
        });
      } else {
        var url = "login.html";
        $(location).attr("href", url);
      }
    });
  } else {
    var url = "login.html";
    $(location).attr("href", url);
  }
}


$(document).on("click", "#logout", function($) {
  cognitoUser.signOut();
  location.reload();
})
プロフィールの更新
プロフィール情報を更新できる状態にする
updateAttributesを使っていて、
サインアップの時と同様attributeのNameに気をつける
<form>
  <div class="form-group">
    <label class="control-label">プロフィール</label>
    <textarea class="form-control" placeholder="プロフィール" id="profile" rows="3"></textarea>
  </div>
  <div class="modal-footer">
    <button type="button" id="updateProfile" class="btn btn-primary">登録</button>
  </div>
</form>
var data = {
  UserPoolId: 'ap-northeast-1_*********',
  ClientId: '**********************'
};
var userPool = new AWSCognito.CognitoIdentityServiceProvider.CognitoUserPool(data);
var cognitoUser = userPool.getCurrentUser();

$('#updateProfile').click(function(e) {
  if (cognitoUser != null) {
    cognitoUser.getSession(function(err, sessionResult) {
      if (sessionResult) {
        var attributeList = [];
        var attribute = {
          Name: 'profile',
          Value: $("#profile").val()
        };
        attribute = new AmazonCognitoIdentity.CognitoUserAttribute(attribute);
        attributeList.push(attribute);

        cognitoUser.updateAttributes(attributeList, function(err, result) {
          if (err) {
            alert(err);
            return;
          }
        });
        alert('success');
      }
    });

  }
});
次はlambda周りについて
cognito周りのログインができたので次は認証後のlambdaについて書いていこうと思います
最近seoが謎すぎて検索に乗せる方法がわからないので、
誰か詳しい方教えていただけるとめっちゃ助かります。。。笑
手探りでやっている状態なのでどしどしご指摘をいただけると嬉しいです!
また思い出しながら書いていったので間違った内容があればすみません。。