はじめに
Arm* Development Studio for Intel® SoC FPGAはIntel® SoC FPGA用のArm*社純正の開発環境(以下Arm* DS)です。主にデバッグ時に使うツールで、下記サイトなどに詳しい解説があります。
- SoCEDS and ARM Development Studio
- Building Bootloader for Cyclone V and Arria 10
- Cyclone V SoC GSRD
- Linux Application Debugging With DS5
- Linux Kernel Debugging With DS-5
- About debugging a Linux kernel
ここでは、上記をまとめてデバッガーの基本使用法を説明したいと思います。上記の資料はArm* DS5(Arm* DSの前バージョンの名前)用もあり、これをベースに最新のArm* DSでCyclone® V SoC FPGA Development KitにてLinux Application, U-Boot-SPL/U-Boot, Linux Kernelのデバッグをします。Linux Applicationデバッグはネットワーク経由で行うので、Ethernet接続が必要です。U-Boot-SPL/U-Boot, Linux KernelデバッグはIntel® FPGA Download Cable II(旧名称USB Blaster II)経由のため、USB接続が必要です。Linux ApplicationやLinux Kernelのビルドを行うので、ホストOSはLinuxを使用します。
もくじ
- 1. インストール
- 2. Cyclone® V SoC FPGA Development Kit準備
- 3. Linux Applicationデバッグ
- 4. U-Boot-SPL/U-Bootデバッグ
- 5. Linux Kernelデバッグ
- 6. Arm* DS便利な機能
- 7. まとめ
- 8. 参考資料
- Notices & Disclaimers
1. インストール
1.1 Operating System
Arm* DSのサポートしているOSはHardware and host platform requirementsに記載があり、
- Windows 10
- Red Hat Enterprise Linux 7 Workstation
- Ubuntu Desktop Edition 18.04 LTS
- Ubuntu Desktop Edition 20.04 LTS
となっています。今回はLinux ApplicationやLinux Kernelのビルド及びデバッグするので、Ubuntu Desktop Edition 20.04 LTSを使用します。今回使用した、PCの仕様は
| Item | Description |
|---|---|
| CPU | Intel® Pentium® Silver N6005 Processor |
| RAM | DDR4 PC3200 16GiB Dual Channel |
| SSD | NVMe PCIe3.0 M.2 2280 512GB |
| OS | Ubuntu 20.04.5 LTS (Focal Fossa) |
です。MiniPCに属するものですが、Linux Kernelビルドを行うには少し力不足を感じますが、Arm* DSを使う分には十分なパフォーマンスでした。このPCにOS(64-bit PC (AMD64) desktop image
)をクリーンインストールして作業を行いました。
1.2 前準備
本記事では主にターミナルを使って作業を行います。最初に~/ARM_DSフォルダーを作り、そこで作業を行います。下記を実行してARM_DSフォルダーを作成します。
$ cd ~
$ mkdir ARM_DS
次にU-Bootをビルドするのに必要なライブラリーを下記コマンドでインストールします。
$ sudo apt-get install -y gawk wget git-core diffstat unzip texinfo \
gcc-multilib  build-essential chrpath socat cpio python python3 \
python3-pip python3-pexpect  xz-utils debianutils iputils-ping \
python3-git python3-jinja2 libegl1-mesa libsdl1.2-dev  pylint3 xterm \
libncurses-dev gawk flex bison openssl libssl-dev
これらは、Building Bootloader for Cyclone V and Arria 10からの転記です。
次に、Yoctoビルドに必要なライブラリーを下記コマンドでインストールします。上記と被っている部分もありますが、実行してください。
$ sudo apt install gawk wget git diffstat unzip texinfo gcc build-essential chrpath \
socat cpio python3 python3-pip python3-pexpect xz-utils debianutils iputils-ping \
python3-git python3-jinja2 libegl1-mesa libsdl1.2-dev pylint3 xterm python3-subunit \
mesa-common-dev zstd liblz4-tool
これらは、Setting Up Yocto Build Systemからの転記です。
そして、Linux Applicationビルドや、Linux kernelビルドに必要な追加ライブラリーも合わせて下記コマンドでインストールします。
$ sudo apt install -y autoconf libgmp-dev libmpc-dev libmpfr-dev python2
そして、gitを使用すために、emailアドレスと、Your Nameを自分に置き換えて、下記コマンドを実行してください。
$ git config --global user.email "you@example.com"
$ git config --global user.name "Your Name"
以上で、前準備は完了です。
1.3 Intel® Quartus® Prime Software
今回使用するCyclone® V SoCのハードウエアデザインをコンパイルするにはIntel® Quartus® Prime Softwareが必要ですが、Arm* DSのDebug Configuration設定時にIntel® Quartus® Prime SoftwareのJTAG関連ツールにもアクセスするので、このツールが必要です。インストールするツールは
- Intel® Quartus® Prime Standard Edition Design Software Version 22.1 for Linux
- Intel® Quartus® Prime Lite Edition Design Software Version 22.1 for Linux
の何れかになります。サポートOSはOperating System Supportより確認でき、Intel® Quartus® Prime Standard Edition、Intel® Quartus® Prime Lite Editionは共にUbuntu* 20.04 LTSをサポートしていることがわかります。
ここではIntel® Quartus® Prime Standard Edition Design Software Version 22.1 for Linuxを使用します。Standard Editionは有償バージョンで、Lite Editionは無償バージョンです。まず、Intel® Quartus® Prime Standard Edition Design Software Version 22.1 for Linuxをクリックしてください。そして、下に移動して、individual filesをクリックしてください。
下記のような画面になりますので、

赤枠の、QuartusSetup-22.1std.0.915-linux.runとcyclonev-22.1std.0.915.qdzをダウンロードしてください。ダウンロード先が~/Downloadの場合、下記のように入力すると、インストールを開始します。
$ cd ~/Download
$ chmod +x ./QuartusSetup-22.1std.0.915-linux.run
$ ./QuartusSetup-22.1std.0.915-linux.run
あとは指示通りにディフォルト設定でインストールしてください。正常完了すれば、~/intelFPGA/22.1stdフォルダーにインストールされます。
パスや環境変数は下記の通りです。~/.bashrcなどに追加してください。
export QUARTUS_ROOTDIR=$HOME/intelFPGA/22.1std/quartus
export QSYS_ROOTDIR=$QUARTUS_ROOTDIR/sopc_builder/bin
export PATH=$QUARTUS_ROOTDIR/bin:$QSYS_ROOTDIR:$PATH
export LM_LICENSE_FILE=[Your License File Path]
ターミナルを新規に開き、下記コマンドを入力して、下記のバージョンが表示されれば正しくインストールされています。
$ quartus_asm --version
Quartus Prime Assembler
Version 22.1std.0 Build 915 10/25/2022 SC Standard Edition
Copyright (C) 2022  Intel Corporation. All rights reserved.
次に、Intel® FPGA Download Cable II(旧名称USB Blaster II)を認識できるようにします。下記を51-usbblaster.rulesのファイル名で~/ARM_DSに保存してください。
# Intel® FPGA Download Cable
SUBSYSTEM=="usb", ATTR{idVendor}=="09fb", ATTR{idProduct}=="6001", MODE="0666", SYMLINK+="usbblaster/%k"
SUBSYSTEM=="usb", ATTR{idVendor}=="09fb", ATTR{idProduct}=="6002", MODE="0666", SYMLINK+="usbblaster/%k"
SUBSYSTEM=="usb", ATTR{idVendor}=="09fb", ATTR{idProduct}=="6003", MODE="0666", SYMLINK+="usbblaster/%k"

# Intel® FPGA Download Cable II
SUBSYSTEM=="usb", ATTR{idVendor}=="09fb", ATTR{idProduct}=="6010", MODE="0666", SYMLINK+="usbblaster2/%k"
SUBSYSTEM=="usb", ATTR{idVendor}=="09fb", ATTR{idProduct}=="6810", MODE="0666", SYMLINK+="usbblaster2/%k"
下記を実行してください。
$ sudo cp ~/ARM_DS/51-usbblaster.rules /etc/udev/rules.d
これで、Intel® FPGA Download Cable II(旧名称USB Blaster II)を認識できるようになります。下記コマンドを実行してみてください。現時点はPCにCyclone® V SoC FPGA Development Kitが接続されていないと思いますので、
$ jtagconfig
No JTAG hardware available
上記のようにハードウエア未検出と表示されれば正常です。
1.4 Arm Development Studio for Intel® SoC FPGA
Arm* Development Studio for Intel® SoC FPGA for Linuxをクリックしてください。

そして赤枠をクリックしてDS000-BN-00001-r22p0-00rel1.tgzをダウンロードしてください。~/Downloadフォルダーにダウンロードした場合、下記のコマンドを入力してください。
$ cd ~/Download
$ tar xf ~/DS000-BN-00001-r22p0-00rel1.tgz
$ cd DS000-BN-00001-r22p0-00rel1
$ sudo ./armds-2022.0.sh
これでインストールが開始されますます。最初は下記のようにライセンス契約書が表示されますので、
問題なければYesを押してください。その後は全てリターンキーでインストールが開始します。
==========================================================
Welcome to the Installer for Arm Development Studio 2022.0
==========================================================
--- Host target check...[x86_64]
		END USER LICENSE AGREEMENT FOR ARM SOFTWARE DEVELOPMENT TOOLS

This end user license agreement ("License") is a legal agreement between you (a
single individual), or the company or organisation (a single legal entity) that
you represent and have the legal authority to bind, and Arm relating to use of t
he Arm Tools. Arm is only willing to license the Arm Tools on condition that you
 accept all of the terms of this License. By clicking "I Agree" or by installing
 or otherwise using the Arm Tools and/or any Update thereto (as permitted by thi
s License) you indicate that you agree to be bound by all of the terms and condi
tions of this License. If you do not agree to the terms of this License, Arm wil
l NOT license the Arm Tools to you, you may not install or use the Arm Tools or
any part thereof, and you shall promptly return the Arm Tools to Arm or to your
supplier (if not Arm) and ask for a refund of the license fee paid (if any).

.............

Arm Document Reference LES-PRE-21260, Version 12.4, Effective Date 22.01.2021


Please answer with one of: 'yes' or 'no/quit'
Do you agree to the above terms and conditions? yes

Please answer with one of: 'yes/y' or 'no/n'
Run installation platform requirement checks? [default: yes]

--- Running installation platform requirement checks

Running dependency check [failed]
*** WARNING ***
One or more of the Arm Development Studio system dependencies are not installed, see below for a list of the missing libraries.

 libncurses.so.5 (64-bit)
 libc.so.6 (32-bit)
 libgcc_s.so.1 (32-bit)
 libstdc++.so.6 (32-bit)
 libz.so.1 (32-bit)
One of:
 libwebkit-1.0.so.2 (64-bit)
 libwebkitgtk-1.0.so.0 (64-bit)
 libwebkitgtk-3.0.so.0 (64-bit)

We recommend you install the missing dependencies, otherwise the programs will not run correctly. For further information see the Arm Development Studio readme.

Where would you like to install to? [default: /opt/arm/developmentstudio-2022.0]

Please answer with one of: 'yes/y' or 'no/n'
'/opt/arm/developmentstudio-2022.0' does not exist, create? [default: yes]

--- Installing to '/opt/arm/developmentstudio-2022.0' (This may take a while...)

Please answer with one of: 'yes/y' or 'no/n'
Install desktop menu item additions? [default: yes]

--- Installing menu entries

Post install stage provides the following functions:
- Installation of USB drivers for RealView ICE and DSTREAM hardware units
- Remove unwanted models dependencies for some versions of linux

Please answer with one of: 'yes/y' or 'no/n'
Run post install setup scripts? [default: yes]

--- Running post install setup scripts


-----------------------------------
Installation completed successfully
-----------------------------------

To start using Arm Development Studio 2022.0 either:
- Create a suite sub-shell using /opt/arm/developmentstudio-2022.0/bin/suite_exec <shell>
- Launch GUI tools via their desktop menu entries

The Release notes for the product can be found here: file:///opt/arm/developmentstudio-2022.0/sw/info/readme.html

==========================================================
インストール中にライブラリ依存関係確認が行われ、ライブラリ不足が発生していることが確認できます。もう一度、依存関係を確認したい場合は下記コマンドを実行します。
$ /opt/arm/developmentstudio-2022.0/sw/dependency_check/dependency_check_linux-x86_64.sh
Running dependency check [failed]
*** WARNING ***
One or more of the Arm Development Studio system dependencies are not installed, see below for a list of the missing libraries.

 libncurses.so.5 (64-bit)
 libc.so.6 (32-bit)
 libgcc_s.so.1 (32-bit)
 libstdc++.so.6 (32-bit)
 libz.so.1 (32-bit)
One of:
 libwebkit-1.0.so.2 (64-bit)
 libwebkitgtk-1.0.so.0 (64-bit)
 libwebkitgtk-3.0.so.0 (64-bit)

We recommend you install the missing dependencies, otherwise the programs will not run correctly. For further information see the Arm Development Studio readme.
インストール時と同じエラーが確認できたと思います。上記のエラーはPCの環境に依存するので、異なる場合があります。今回は上記のライブラリー不足を解消させます。
では、まず32ビットライブラリーをインストールできるように、下記コマンドを実行します。
$ sudo dpkg --add-architecture i386
$ sudo apt-get update
次に、/etc/apt/sources.listをroot権限でgeditやvimで開き、最後に下記を追加し、
deb http://cz.archive.ubuntu.com/ubuntu bionic main universe
保存してエディターを閉じます。そして、
sudo apt-get update
を実行し、下記コマンドを実行し、ライブラリを追加します。
sudo apt-get install -y libncurses5 libwebkitgtk-3.0-0 libc6-i386 libgcc-s1:i386 lib32stdc++6 lib32z1
もう一度、依存関係を確認するために、下記コマンドを実行します。
$ /opt/arm/developmentstudio-2022.0/sw/dependency_check/dependency_check_linux-x86_64.sh
Running dependency check [succeeded]
依存関係が、解消している場合は、上記のように[succeeded]と表示されます。これでArm* DSのインストールは完了です。下記コマンドを実行すると、
$ /opt/arm/developmentstudio-2022.0/bin/suite_exec -t "Arm Compiler for Embedded 6" bash
Environment configured for 'Arm Compiler for Embedded 6'
ARM Shellに移行します。上記コマンドは長いので、下記を~/.bashrcに登録しておけば、arm6でARM Shellが起動します。
alias arm6='/opt/arm/developmentstudio-2022.0/bin/suite_exec -t "Arm Compiler for Embedded 6" bash'
そして、下記コマンドでArm* DSが起動します。
$ armds_ide &
起動を開始すると、下記画面が表示され、

下記のような画面が表示されます。Workspaceの選択画面が表示された場合は~/ARM_DSを指定してください。

最初の起動時はライセンスの設定が必要です。詳しくはSoCはじめてガイドを参照してください。ライセンスをお持ちでない方は、こちらのサイトに評価バージョンの取得方法も記載されているので、参考にしてください。
1.5 GNU Compiler
GNU C Compilerを、下記コマンドでインストールします。
$ cd ~/ARM_DS
$ wget https://developer.arm.com/-/media/Files/downloads/gnu-a/10.3-2021.07/binrel/gcc-arm-10.3-2021.07-x86_64-arm-none-linux-gnueabihf.tar.xz
$ tar xf gcc-arm-10.3-2021.07-x86_64-arm-none-linux-gnueabihf.tar.xz
$ rm gcc-arm-10.3-2021.07-x86_64-arm-none-linux-gnueabihf.tar.xz
次に下記を、~/.bashrcなどに追加してください。
export PATH=$HOME/ARM_DS/gcc-arm-10.3-2021.07-x86_64-arm-none-linux-gnueabihf/bin:$PATH
export ARCH=arm
export CROSS_COMPILE=arm-none-linux-gnueabihf-
追加後、ターミナルを開きなおして、下記コマンドより、バージョンを確認します。
$ ${CROSS_COMPILE}gcc --version
arm-none-linux-gnueabihf-gcc (GNU Toolchain for the A-profile Architecture 10.3-2021.07 (arm-10.29)) 10.3.1 20210621
Copyright (C) 2020 Free Software Foundation, Inc.
This is free software; see the source for copying conditions.  There is NO
warranty; not even for MERCHANTABILITY or FITNESS FOR A PARTICULAR PURPOSE.
上記が表示されれば、GNU C Compilerが正しくインストールされました。
1.6 Serial Port Terminal(minicom)
シリアルポートツールをインストールします。既にツールをお持ちの方はスキップしてください。ここでは、minicomを使用します。下記コマンドでインストールします。
$ sudo apt-get install -y minicom
詳しいセットアップはCyclone® V SoC FPGA Development KitとPCをUSBケーブルで接続してから行うので、2.3 USBケーブル接続と確認にて説明します。
2. Cyclone® V SoC FPGA Development Kit準備
2.1 スイッチ、ジャンパー確認
はじめの、今回使用するCyclone® V SoC FPGA Development KitのDIPスイッチや、ジャンパーの確認を行います。Configuring Boardに確認項目が記載されています。
下記に転記しましたので、確認してください。

| Item | Setting |
|---|---|
| J5 | Open |
| J6 | Short |
| J7 | Short |
| J9 | Open |
| J13 | Short |
| J16 | Open |
| J26 | Short pins 1-2 |
| J27 | Short pins 2-3 |
| J28 | Short pins 1-2 |
| J29 | Short pins 2-3 |
| J30 | Short pins 1-2 |
| J31 | Open |
| Item | Setting |
|---|---|
| SW1 | All OFF |
| SW2 | All OFF |
| SW3 | ON-OFF-ON-OFF-ON-ON |
| SW4 | OFF-OFF-ON-ON |
2.2 SDカード準備
起動用SDカードの準備を行います。SDカードスロットが無いPCはUSB接続のメモリカードライターを用意してください。
下記コマンド入力して、事前に作成されたSDカードイメージをダウンロードします。
$ mkdir -p ~/ARM_DS/sdimage
$ cd ~/ARM_DS/sdimage
$ wget https://releases.rocketboards.org/2022.11/gsrd/c5_gsrd/sdimage.tar.gz
$ wget https://releases.rocketboards.org/2022.11/gsrd/c5_gsrd/sdimage.tar.gz.md5sum
次に、ダウンロードされた、ファイルが正しいか、下記コマンドで確認します。
$ cat sdimage.tar.gz.md5sum
3e566be8035bfccd1b91007e351fc210  sdimage.tar.gz
$ md5sum sdimage.tar.gz
3e566be8035bfccd1b91007e351fc210  sdimage.tar.gz
これより、MD5値が一致してるので、ダウンロードされたファイルは正しいことが確認されました。
書き込みは、コマンドライン(Creating SD Card参照)
で行えるのですが、デバイス名を間違えるとPC本体のファイルシステムを破壊してしまうので、ここでは、このイメージをStartup Disk Creatorを使用してSDカードに書き込みます。
Startup Disk Creatorは拡張子がimgでないとファイル選択画面で表示されないので、下記コマンドでファイルを解凍と、合わせて拡張子も変更します。
$ tar xf sdimage.tar.gz
$ mv gsrd-console-image-cyclone5.wic gsrd-console-image-cyclone5.img
次に左下隅のアプリケーション検索メニューを開き、diskと入力して、赤枠のStartup Disk Creatorを選択してください。

下記画面が開きますので、"Other.."ボタンを押します。

Disk imageを選択し、\ARM_DS\sdimage\gsrd-console-image-cyclone5.imgを選択し、"Open"をクリックします。

書き込み先のSDドライブを確認して、"Make Startup Disk"ボタンをクリックします。

書き込み確認画面が現れますので、"Yes"ボタンをクリックし、その後、rootのパスワード要求画面が表示されますのでパスワードを入力してください。

入力が終わると、下記のように書き込みが始まります。

書き込みが完了すると、下記が表示されますので、"Quit"ボタンをクリックします。

これで、SDカードへの書き込みは完了です。このカードをCyclone® V SoC FPGA Development KitのSDカードスロットに差し込んでください。
2.3 USBケーブル接続と確認
Cyclone® V SoC FPGA Development KitのUARTとIntel® FPGA Download Cable II(旧名称USB Blaster II)(2.1 スイッチの確認参照)コネクタとPCを2本のUSBケーブルで接続します。
この時PCとは直接接続してください。USB-HUBを介して接続すると問題が生じる場合があります。またUARTとはUniversal Asynchronous Receiver/Transmitterの略で一般的なシリアルポートを指す用語です。
接続が完了すると、UARTポートをPCで認識できるようになります。下記を入力して、
$ ls /dev/ttyUSB*
/dev/ttyUSB0
ttyUSB0と表示されれば、正しくUARTポートを認識しています。複数UARTポートを接続した場合は、ttyUSB1などが増えます。
では先ほどインストールしたminicomの設定を行います。下記と入力して設定画面を開きます。
$ sudo minicom -s
下記画面が表示されたら"Serial Port Setup"を選択してください。

次に、下記のように、Serial Deviceに/dev/ttyUSB0を入力し、"Hardware Flow Control"をNoに設定します。

ESCキーで元の画面に戻り、"Save Setup as dfl"を選択し、初期環境設定を保存した後、"Exit from Minicom"を選択し、設定画面を終了させます。

最後に、下記エイリアスを~/.bashrcに追加してください。簡単にminicomを起動できます。
alias com="sudo minicom -D /dev/ttyUSB0"
では.bashrcに追加した後、再度ターミナルを開きcomと入力し、rootのパスワードを入力すれば、下記のような画面が開きます。

上記画面が表示されれば、minicomの設定は完了です。今後のはこのれをシリアルコンソールと呼びます。このシリアルコンソールはここままにしておいてください。
2.4 Linux起動
Cyclone® V SoC FPGA Development KitのSDカードスロット横のEthernetコネクタにネットワークケーブルを接続して電源を入れてください。
最初に、U-Boot SPLが起動し、次にU-Bootが起動し、最後にLinuxの起動を開始します。下記に起動ログの一部を示します。
U-Boot SPL 2019.10-g8e98071-dirty (Aug 04 2020 - 22:50:14 +0800)
DDRCAL: Scrubbing ECC RAM (1024 MiB).
DDRCAL: SDRAM-ECC initialized success with 580 ms
Trying to boot from MMC1


U-Boot 2019.10-g8e98071-dirty (Aug 04 2020 - 22:50:14 +0800), Build: jenkins-uboot-s7

CPU:   Altera SoCFPGA Platform
FPGA:  Altera Cyclone V, SE/A6 or SX/C6 or ST/D6, version 0x0
BOOT:  SD/MMC Internal Transceiver (3.0V)
       Watchdog enabled
DRAM:  1 GiB
MMC:   dwmmc0@ff704000: 0
Loading Environment from MMC... OK
In:    serial
Out:   serial
Err:   serial
Model: Altera SOCFPGA Cyclone V SoC Development Kit
Net:
Warning: ethernet@ff702000 (eth0) using random MAC address - 76:a3:20:6e:9d:0e
eth0: ethernet@ff702000
Hit any key to stop autoboot:  0
162 bytes read in 2 ms (79.1 KiB/s)
## Executing script at 02100000
  5048976   zImage
    29016   socfpga_cyclone5_socdk.dtb
  2387888   soc_system.rbf
            extlinux/
      162   u-boot.scr
 594968111   GPL-source-20.1.tar.gz
 19418639   u-boot-socfpga-20.1-src.tar.gz
 178086315   linux-socfpga-5.4.23-lts-src.tar.gz
  1560699   cyclone5-poky-v2020.01-zeus-source.tar.gz

8 file(s), 1 dir(s)

2387888 bytes read in 119 ms (19.1 MiB/s)
switch to partitions #0, OK
mmc0 is current device
Scanning mmc 0:1...
Found /extlinux/extlinux.conf
Retrieving file: /extlinux/extlinux.conf
121 bytes read in 4 ms (29.3 KiB/s)
1:      Linux Default
Retrieving file: /extlinux/../zImage
5048976 bytes read in 251 ms (19.2 MiB/s)
append: root=/dev/mmcblk0p2 rw rootwait earlyprintk console=ttyS0,115200n8
Retrieving file: /extlinux/../socfpga_cyclone5_socdk.dtb
29016 bytes read in 7 ms (4 MiB/s)
## Flattened Device Tree blob at 02000000
   Booting using the fdt blob at 0x2000000
   Loading Device Tree to 09ff5000, end 09fff157 ... OK

Starting kernel ...

Deasserting all peripheral resets
[    0.000000] Booting Linux on physical CPU 0x0
[    0.000000] Linux version 5.4.23-altera (oe-user@oe-host) (gcc version 9.2.0 (GCC0

.....
.....

[   12.321234] random: crng init done
[   12.324630] random: 7 urandom warning(s) missed due to ratelimiting

Poky (Yocto Project Reference Distro) 3.0.3 cyclone5 ttyS0

cyclone5 login: root
Last login: Tue Dec 13 08:14:04 +0000 2022 on /dev/ttyS0.
root@cyclone5:~#
最後にcyclone5 login:と表示され、rootと入力し、"root@cyclone5:~#"プロンプトが表示されれば正常です。今回のシステムはパスワードが未設定のため、Passwordの要求はありません。
次に、ifconfigと入力して、inet addrが表示されれば、正常にネットワークを認識しています。
root@cyclone5:~# ifconfig
eth0      Link encap:Ethernet  HWaddr b2:ad:ce:16:ca:9a
          inet addr:192.168.50.204  Bcast:192.168.50.255  Mask:255.255.255.0
          inet6 addr: fe80::b0ad:ceff:fe16:ca9a/64 Scope:Link
          UP BROADCAST RUNNING MULTICAST  MTU:1500  Metric:1
          RX packets:250 errors:0 dropped:136 overruns:0 frame:0
          TX packets:52 errors:0 dropped:0 overruns:0 carrier:0
          collisions:0 txqueuelen:1000
          RX bytes:21244 (20.7 KiB)  TX bytes:7841 (7.6 KiB)
          Interrupt:33 Base address:0x4000

lo        Link encap:Local Loopback
          inet addr:127.0.0.1  Mask:255.0.0.0
          inet6 addr: ::1/128 Scope:Host
          UP LOOPBACK RUNNING  MTU:65536  Metric:1
          RX packets:4 errors:0 dropped:0 overruns:0 frame:0
          TX packets:4 errors:0 dropped:0 overruns:0 carrier:0
          collisions:0 txqueuelen:1000
          RX bytes:280 (280.0 B)  TX bytes:280 (280.0 B)

root@cyclone5:~#
これより、Cyclone® V SoC FPGA Development KitのIPアドレスは192.168.50.204であることがわかります。
また、別ターミナルを開き下記コマンドを実行してみてください。
$ jtagconfig
1) USB-BlasterII [1-3]
  4BA00477   SOCVHPS
  02D020DD   5CSEBA6(.|ES)/5CSEMA6/..
と表示されれば、正しくデバイスを認識しています。
3. Linux Applicationデバッグ
Linux Applicationデバッグを行います。Linux Application Debugging With DS5に従って説明します。
3.1 memtoolビルド
サンプルとしてmemtoolを使用します。
Linuxなどでは仮想記憶を使用したメモリ保護を行っている関係で、通常、物理メモリ、周辺機器物理レジスタには直接アクセスできません。
これを可能にするのがmemtoolです。このツールはデバッグなので良く使い、コードサイズが小さいので、サンプルとして選択しました。
では、memtoolのビルドを行います。下記にコマンドとビルドログを一緒に示します。
$ cd ~/ARM_DS
$ git clone https://github.com/pengutronix/memtool
Cloning into 'memtool'...
remote: Enumerating objects: 329, done.
remote: Counting objects: 100% (329/329), done.
remote: Compressing objects: 100% (137/137), done.
remote: Total 329 (delta 182), reused 328 (delta 182), pack-reused 0
Receiving objects: 100% (329/329), 370.34 KiB | 5.29 MiB/s, done.
Resolving deltas: 100% (182/182), done.

$ cd memtool

$ autoreconf -fi
configure.ac:6: installing './compile'
configure.ac:4: installing './install-sh'
configure.ac:4: installing './missing'
Makefile.am: installing './depcomp'

$ ./configure --host ${CROSS_COMPILE}gcc CFLAGS="-g -O0" --disable-mdio
checking for a BSD-compatible install... /usr/bin/install -c
checking whether build environment is sane... yes
checking for arm-none-linux-gnueabihf-gcc-strip... no
checking for strip... strip
checking for a thread-safe mkdir -p... /usr/bin/mkdir -p
checking for gawk... no
checking for mawk... mawk
checking whether make sets $(MAKE)... yes
checking whether make supports nested variables... yes
checking for arm-none-linux-gnueabihf-gcc-gcc... arm-none-linux-gnueabihf-gcc
checking whether the C compiler works... yes
checking for C compiler default output file name... a.out
checking for suffix of executables...
checking whether we are cross compiling... yes
checking for suffix of object files... o
checking whether we are using the GNU C compiler... yes
checking whether arm-none-linux-gnueabihf-gcc accepts -g... yes
checking for arm-none-linux-gnueabihf-gcc option to accept ISO C89... none needed
checking whether arm-none-linux-gnueabihf-gcc understands -c and -o together... yes
checking whether make supports the include directive... yes (GNU style)
checking dependency style of arm-none-linux-gnueabihf-gcc... gcc3
checking whether make sets $(MAKE)... (cached) yes
checking for special C compiler options needed for large files... no
checking for _FILE_OFFSET_BITS value needed for large files... 64
checking for mdio support... no
checking that generated files are newer than configure... done
configure: creating ./config.status
config.status: creating Makefile
config.status: executing depfiles commands

$ make
arm-none-linux-gnueabihf-gcc -DPACKAGE_NAME=\"memtool\" -DPACKAGE_TARNAME=\"memtool\" -DPACKAGE_VERSION=\"2018.03.0\" -DPACKAGE_STRING=\"memtool\ 2018.03.0\" -DPACKAGE_BUGREPORT=\"oss-tools@pengutronix.de\" -DPACKAGE_URL=\"\" -DPACKAGE=\"memtool\" -DVERSION=\"2018.03.0\" -D_FILE_OFFSET_BITS=64 -I.     -g -O0 -MT memtool.o -MD -MP -MF .deps/memtool.Tpo -c -o memtool.o memtool.c
mv -f .deps/memtool.Tpo .deps/memtool.Po
arm-none-linux-gnueabihf-gcc -DPACKAGE_NAME=\"memtool\" -DPACKAGE_TARNAME=\"memtool\" -DPACKAGE_VERSION=\"2018.03.0\" -DPACKAGE_STRING=\"memtool\ 2018.03.0\" -DPACKAGE_BUGREPORT=\"oss-tools@pengutronix.de\" -DPACKAGE_URL=\"\" -DPACKAGE=\"memtool\" -DVERSION=\"2018.03.0\" -D_FILE_OFFSET_BITS=64 -I.     -g -O0 -MT fileaccess.o -MD -MP -MF .deps/fileaccess.Tpo -c -o fileaccess.o fileaccess.c
mv -f .deps/fileaccess.Tpo .deps/fileaccess.Po
arm-none-linux-gnueabihf-gcc -DPACKAGE_NAME=\"memtool\" -DPACKAGE_TARNAME=\"memtool\" -DPACKAGE_VERSION=\"2018.03.0\" -DPACKAGE_STRING=\"memtool\ 2018.03.0\" -DPACKAGE_BUGREPORT=\"oss-tools@pengutronix.de\" -DPACKAGE_URL=\"\" -DPACKAGE=\"memtool\" -DVERSION=\"2018.03.0\" -D_FILE_OFFSET_BITS=64 -I.     -g -O0 -MT acc_mmap.o -MD -MP -MF .deps/acc_mmap.Tpo -c -o acc_mmap.o acc_mmap.c
mv -f .deps/acc_mmap.Tpo .deps/acc_mmap.Po
arm-none-linux-gnueabihf-gcc  -g -O0   -o memtool memtool.o fileaccess.o acc_mmap.o
これで、memtoolのビルドは完了です。~/ARM_DS/memtool/memtoolが生成できていればビルドは正常に完了です。
また、最適化を行うと、ソース位置がずれて、デバッグしずらいので、最初は最適化をOFFにします。もし、最適化をONにしたい場合は./configureのCFLAGSの-O0を-O2などに変更してください。
3.2 プロジェクトインポート
ではArm* DSを起動します。下記コマンドを実行してください。
$ arm6
$ armds_ide &
では、ビルドしたmemtoolをArm* DSにインポートします。File->Importメニューを選択してください。
下位のようにC/C++ -> Existing Code as Makefile Projectを選択し、"Next"ボタンを押します。

下記のように、~/ARM_DS/memtoolフォルダーを選択して"Open"ボタンを押します。
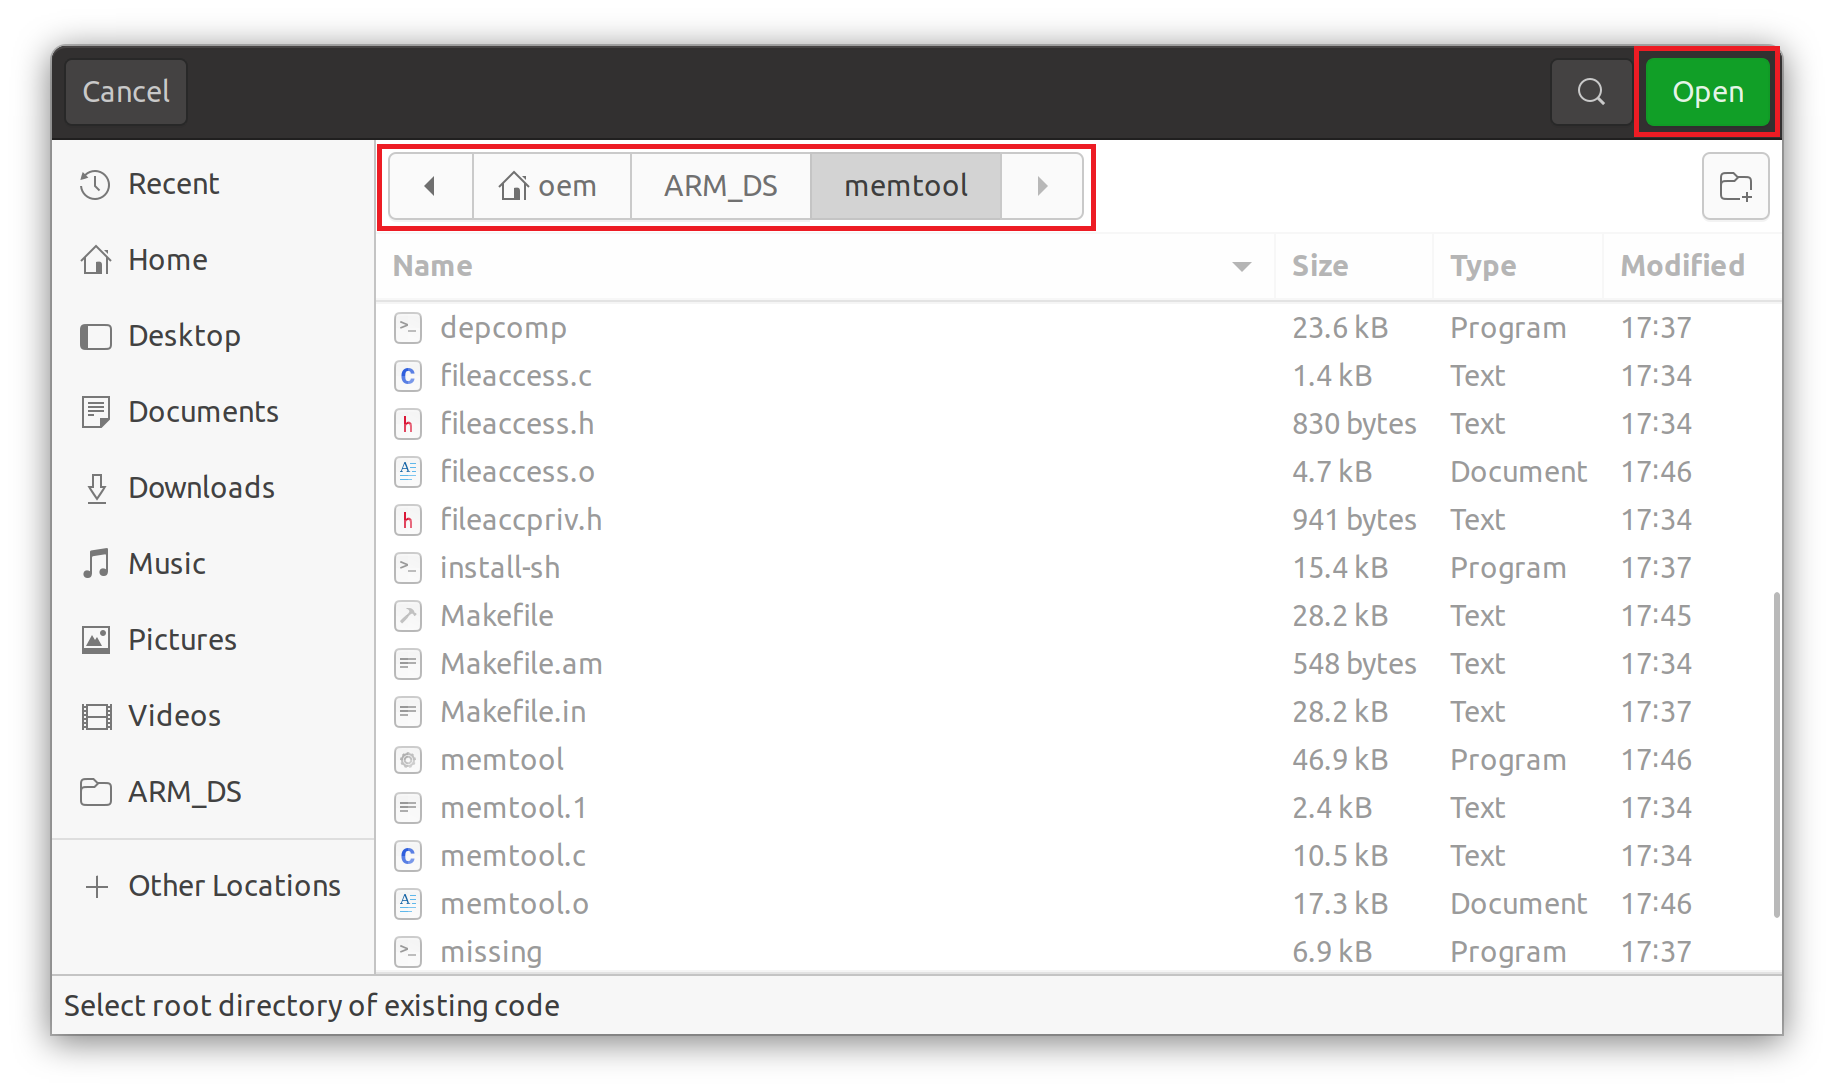
プロジェクト名が"memtool"、Existing Code Locationが~/ARM_DS/memtoolになってることを確認して"Finish"ボタンを押します。

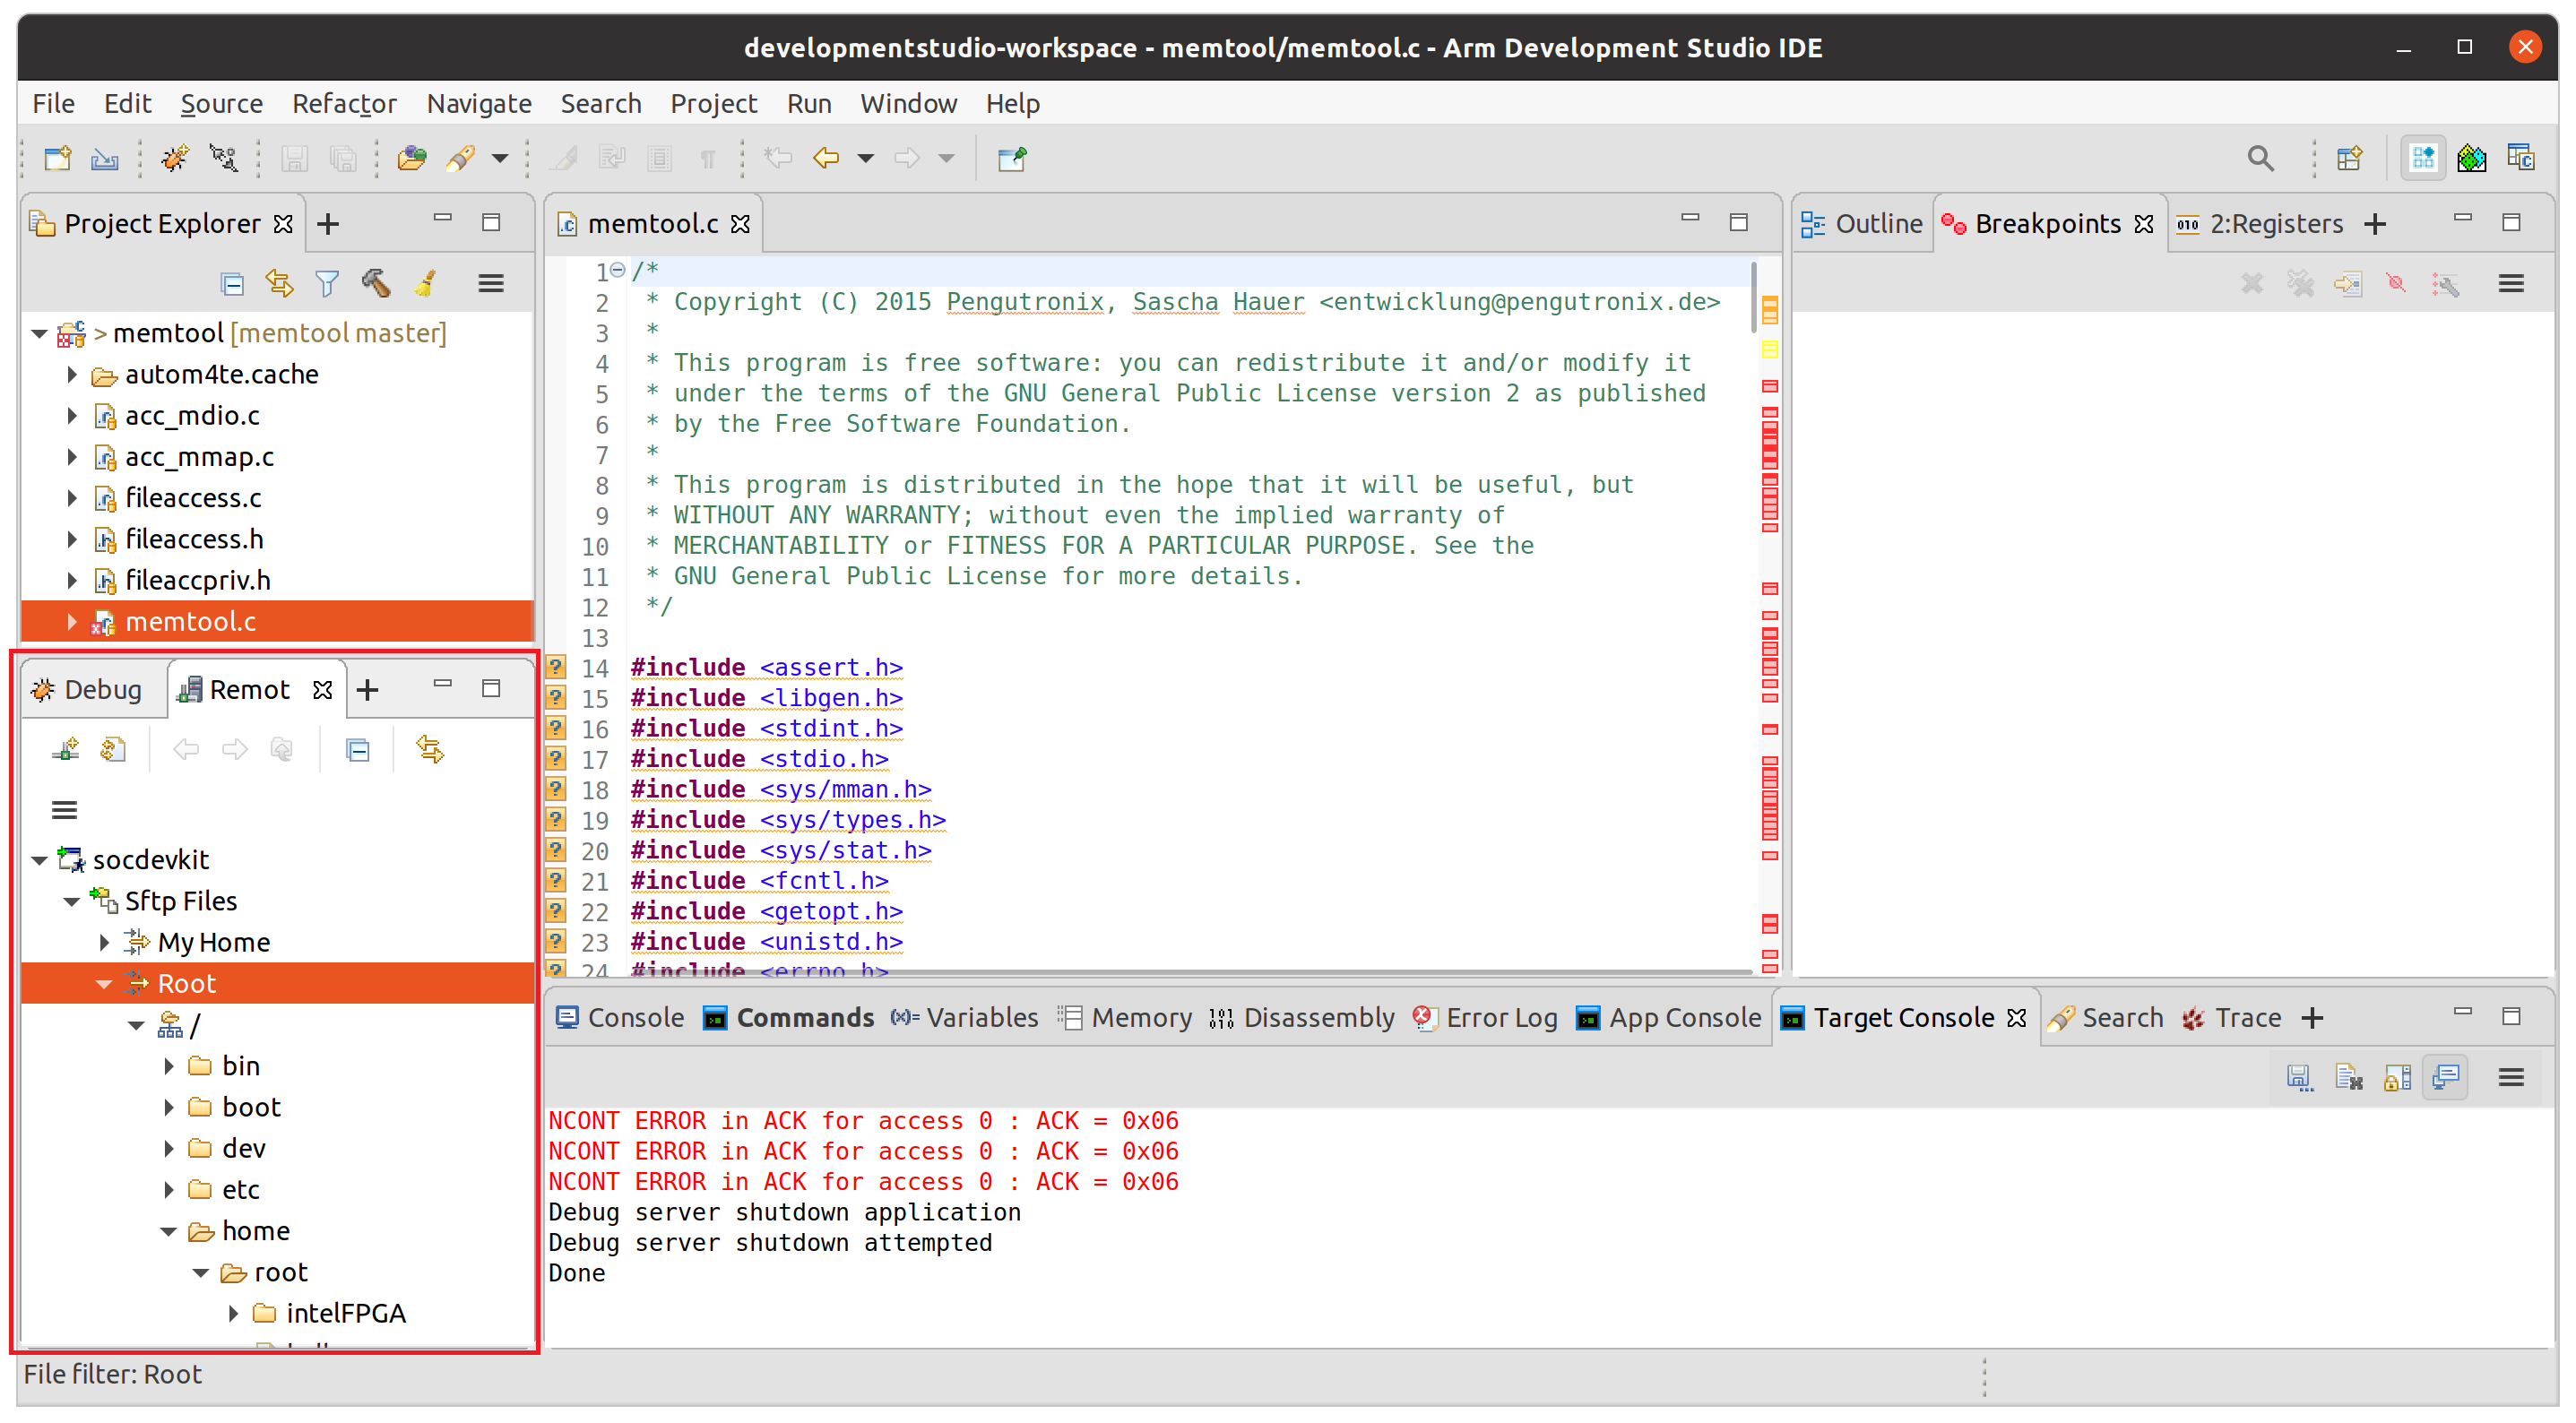
インポートが正常に完了すれば、下記のように、Project Explorerにmemtoolのファイルが表示されます。

これでインポートは完了です。次にRemote Systemの設定を行います。
3.3 Remote Systems設定
Linux ApplicationデバッグではEthernet経由で行うと説明しました。そのため、ターゲットとなるLinuxにはGNU DebuggerとSSHが使用できることが条件となります。
今回使用する事前構築されたSDカードイメージには既にGNU DebuggerとSSHが組み込まれています。これらのファイルのがないとLinux Applicationデバッグは行えないので、
Root File Systemを構築するときは、これらが含まれているか確認する必要があります。
例えば、Building Yocto Rootfsに、Root File Systemを構築するときのコマンドの記載を下記に転記します。
cd $ROOTFS_TOP
rm -rf cv && mkdir cv && cd cv
git clone -b honister https://git.yoctoproject.org/poky
git clone -b honister https://git.yoctoproject.org/meta-intel-fpga
source poky/oe-init-build-env ./build
echo 'MACHINE = "cyclone5"' >> conf/local.conf
echo 'BBLAYERS += " ${TOPDIR}/../meta-intel-fpga "' >> conf/bblayers.conf
# Uncomment next line to add more packages to the image
# echo 'CORE_IMAGE_EXTRA_INSTALL += "openssh gdbserver"' >> conf/local.conf
bitbake core-image-minimal
ln -s $ROOTFS_TOP/cv/build/tmp/deploy/images/cyclone5/core-image-minimal-cyclone5.tar.gz $LINUX_BIN/a9/
この中でコメントアウトされている、 # echo 'CORE_IMAGE_EXTRA_INSTALL += "openssh gdbserver"' >> conf/local.confを実行しないと、GNU DebuggerとSSH有効にならないので、Root File Systemを構築するときは必ずこの行を実行して有効にしてください。
では、Remote Systemsの設定を行います。まず、左下の"Debug Control"の横にある"+"ボタンをクリックします。

クリックすると、メニューが表示されますので、一番下の"Other..."をクリックします。

"Remote Systems"を選択して、"Open"をクリックします。

"Debug Control"の横に"Remote Systems"が追加されますので、赤枠の追加ボタンをクリックします。

SSH Onlyを選択して、"Next"をクリックします。

下記の画面が表示されますので、"Host Name"などを入力します。
この"Host Name"には2.4 Linux起動にてifconfigで確認したeth0のIPアドレス(この場合は192.168.50.204)を入力します。

今回は下記のように入力し、"Finish"ボタンをクリックします。

次に、Remote Systems内の"Sftp files -> Root"をクリックしてください。

下記のように、User IDとPasswordの入力を求めてきます。Passwordは未設定なので、下記のように入力して、"OK"ボタンをクリックしてください。

入力を終えると、ターゲットのファイルシステムが表示されます。
以上で、"Remote Systems"の設定は完了です。
3.4 Debug Configuration
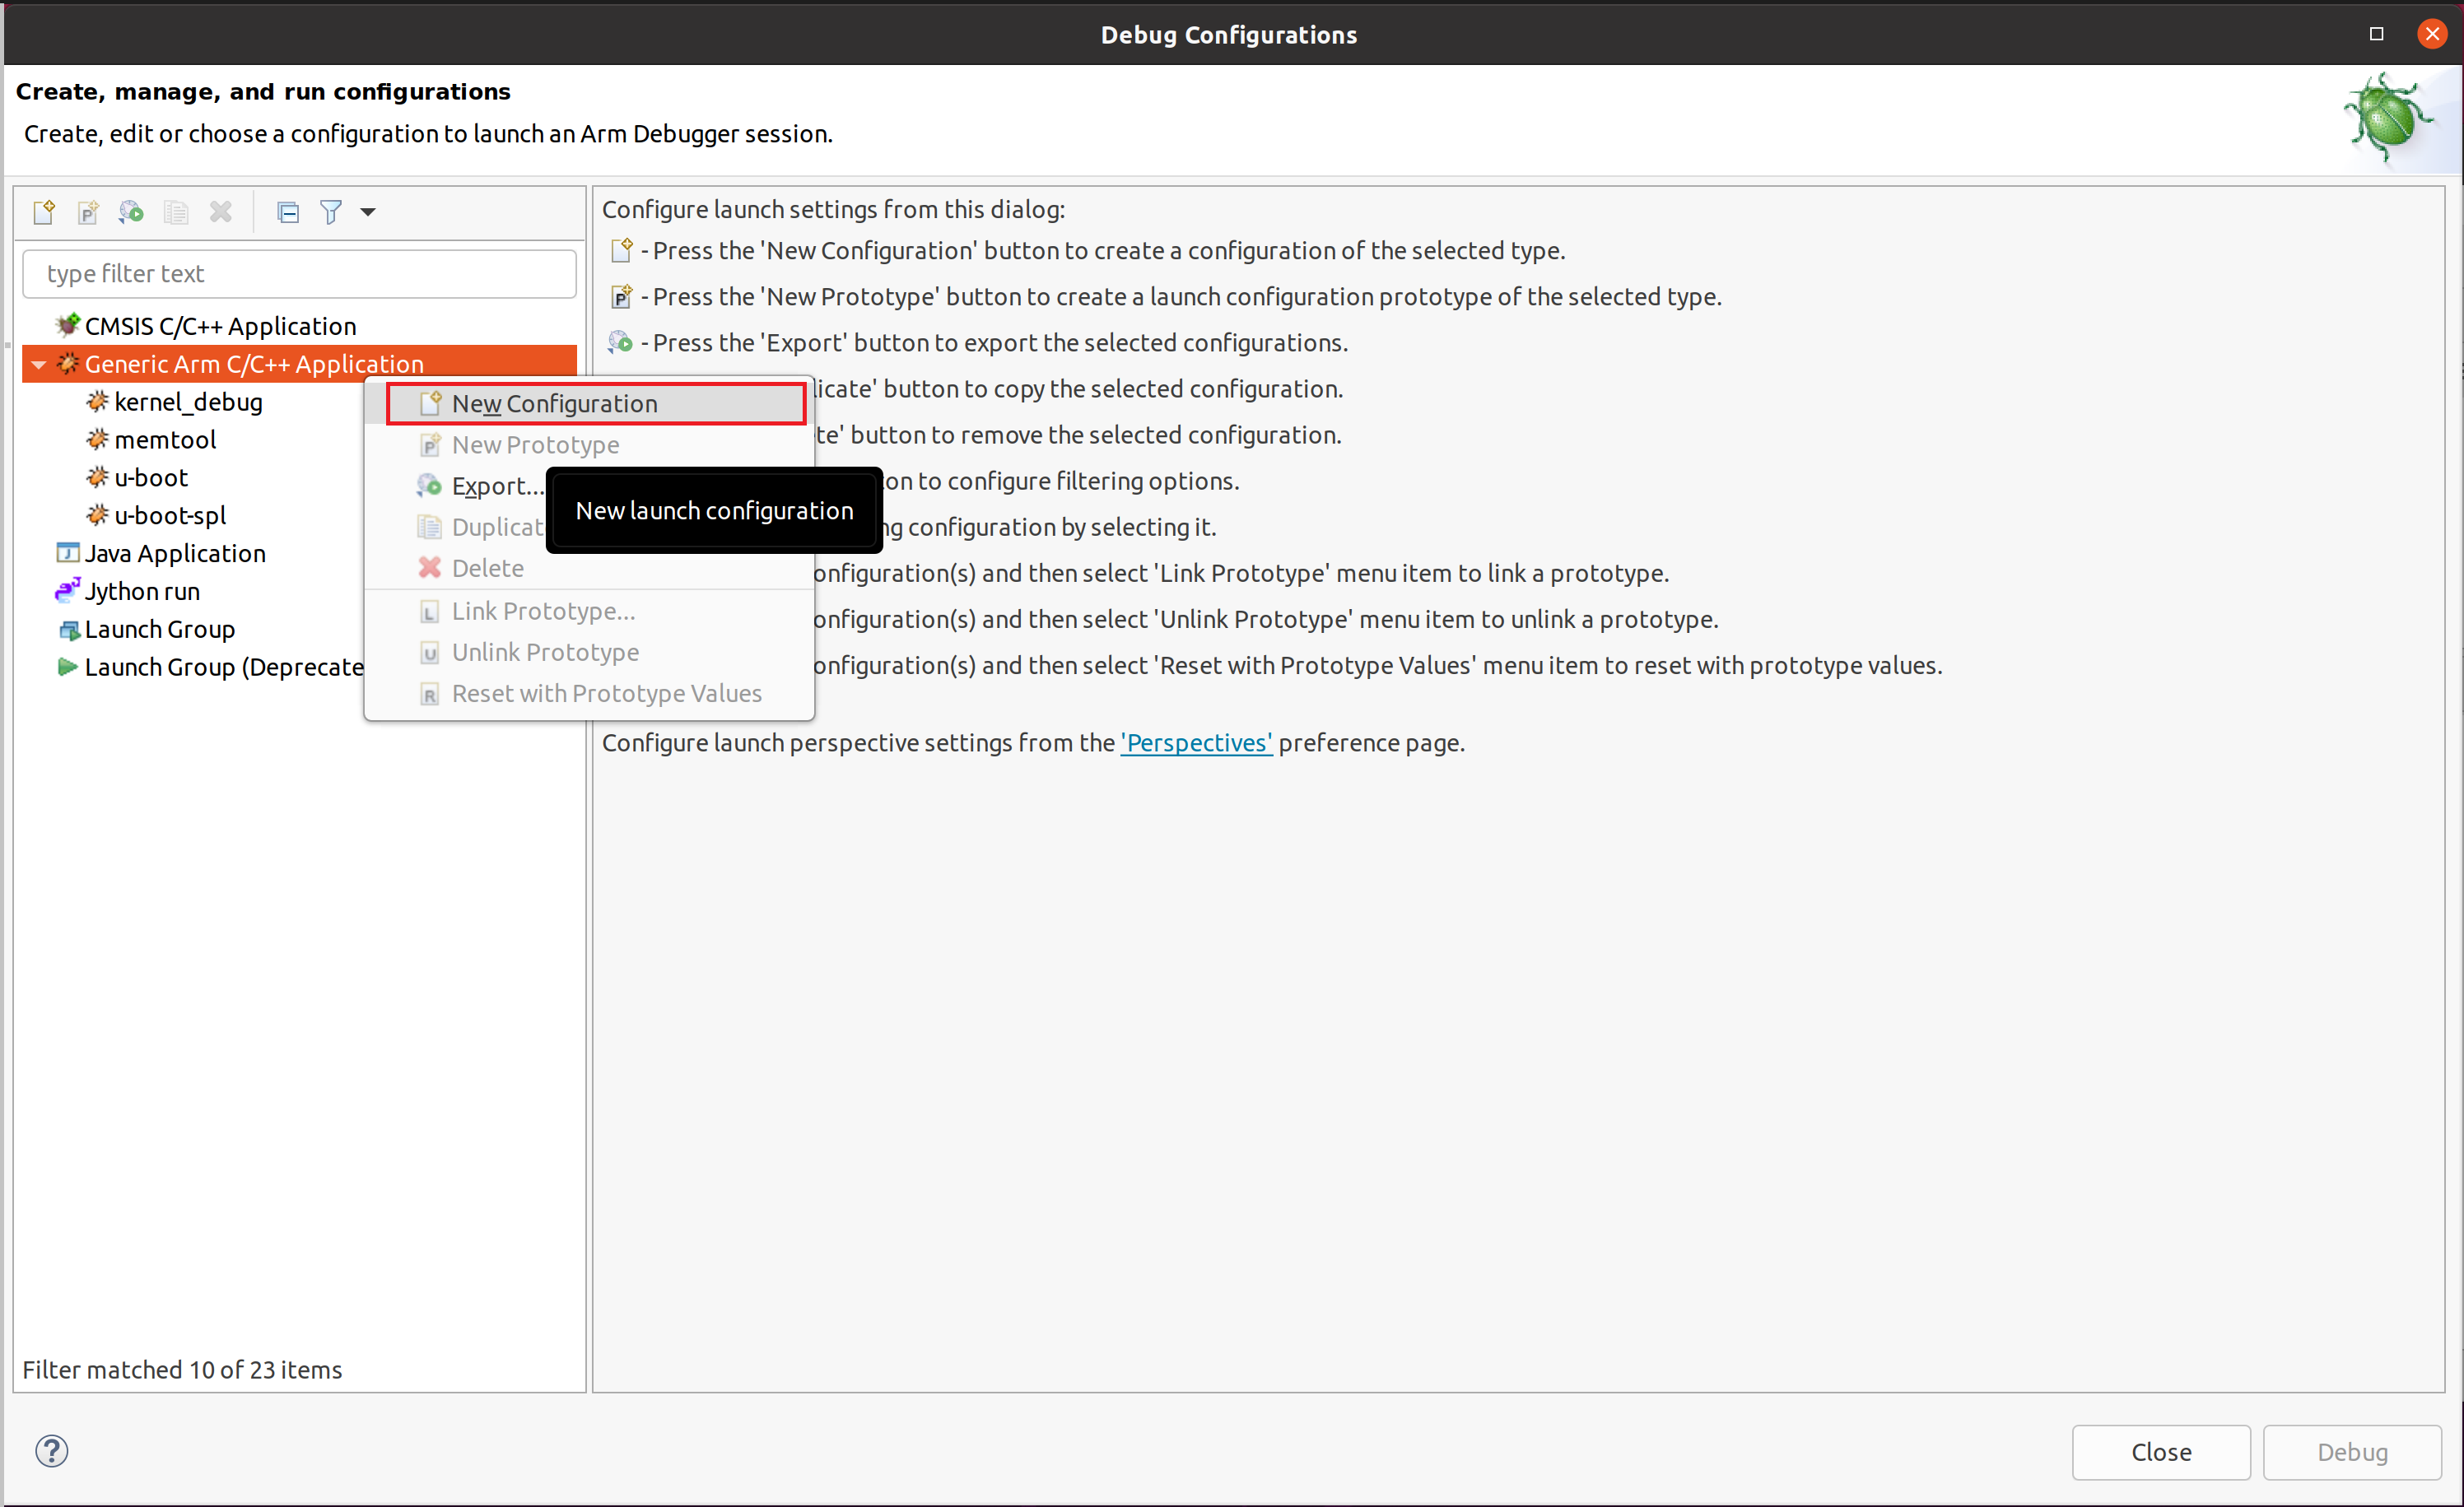
デバッグ構成を行います。Run -> Debug Configuraionメニューを選択します。
下記画面が表示されたらGeneric Arm C/C++ Applicationを右クリックして、"New Configuration"を選択します。
"Name"に"memtool"と入力し、"Connection"タブをクリックして、
"Select target"から"Intel SoC FPGA-> Cyclone V SoC(Dual Core)->Linux Application Debug->Download and debug application"を選択します。"RSE connection"が 先ほどRemote Systemsで構築した、"socdevkit"になっているか確認します。

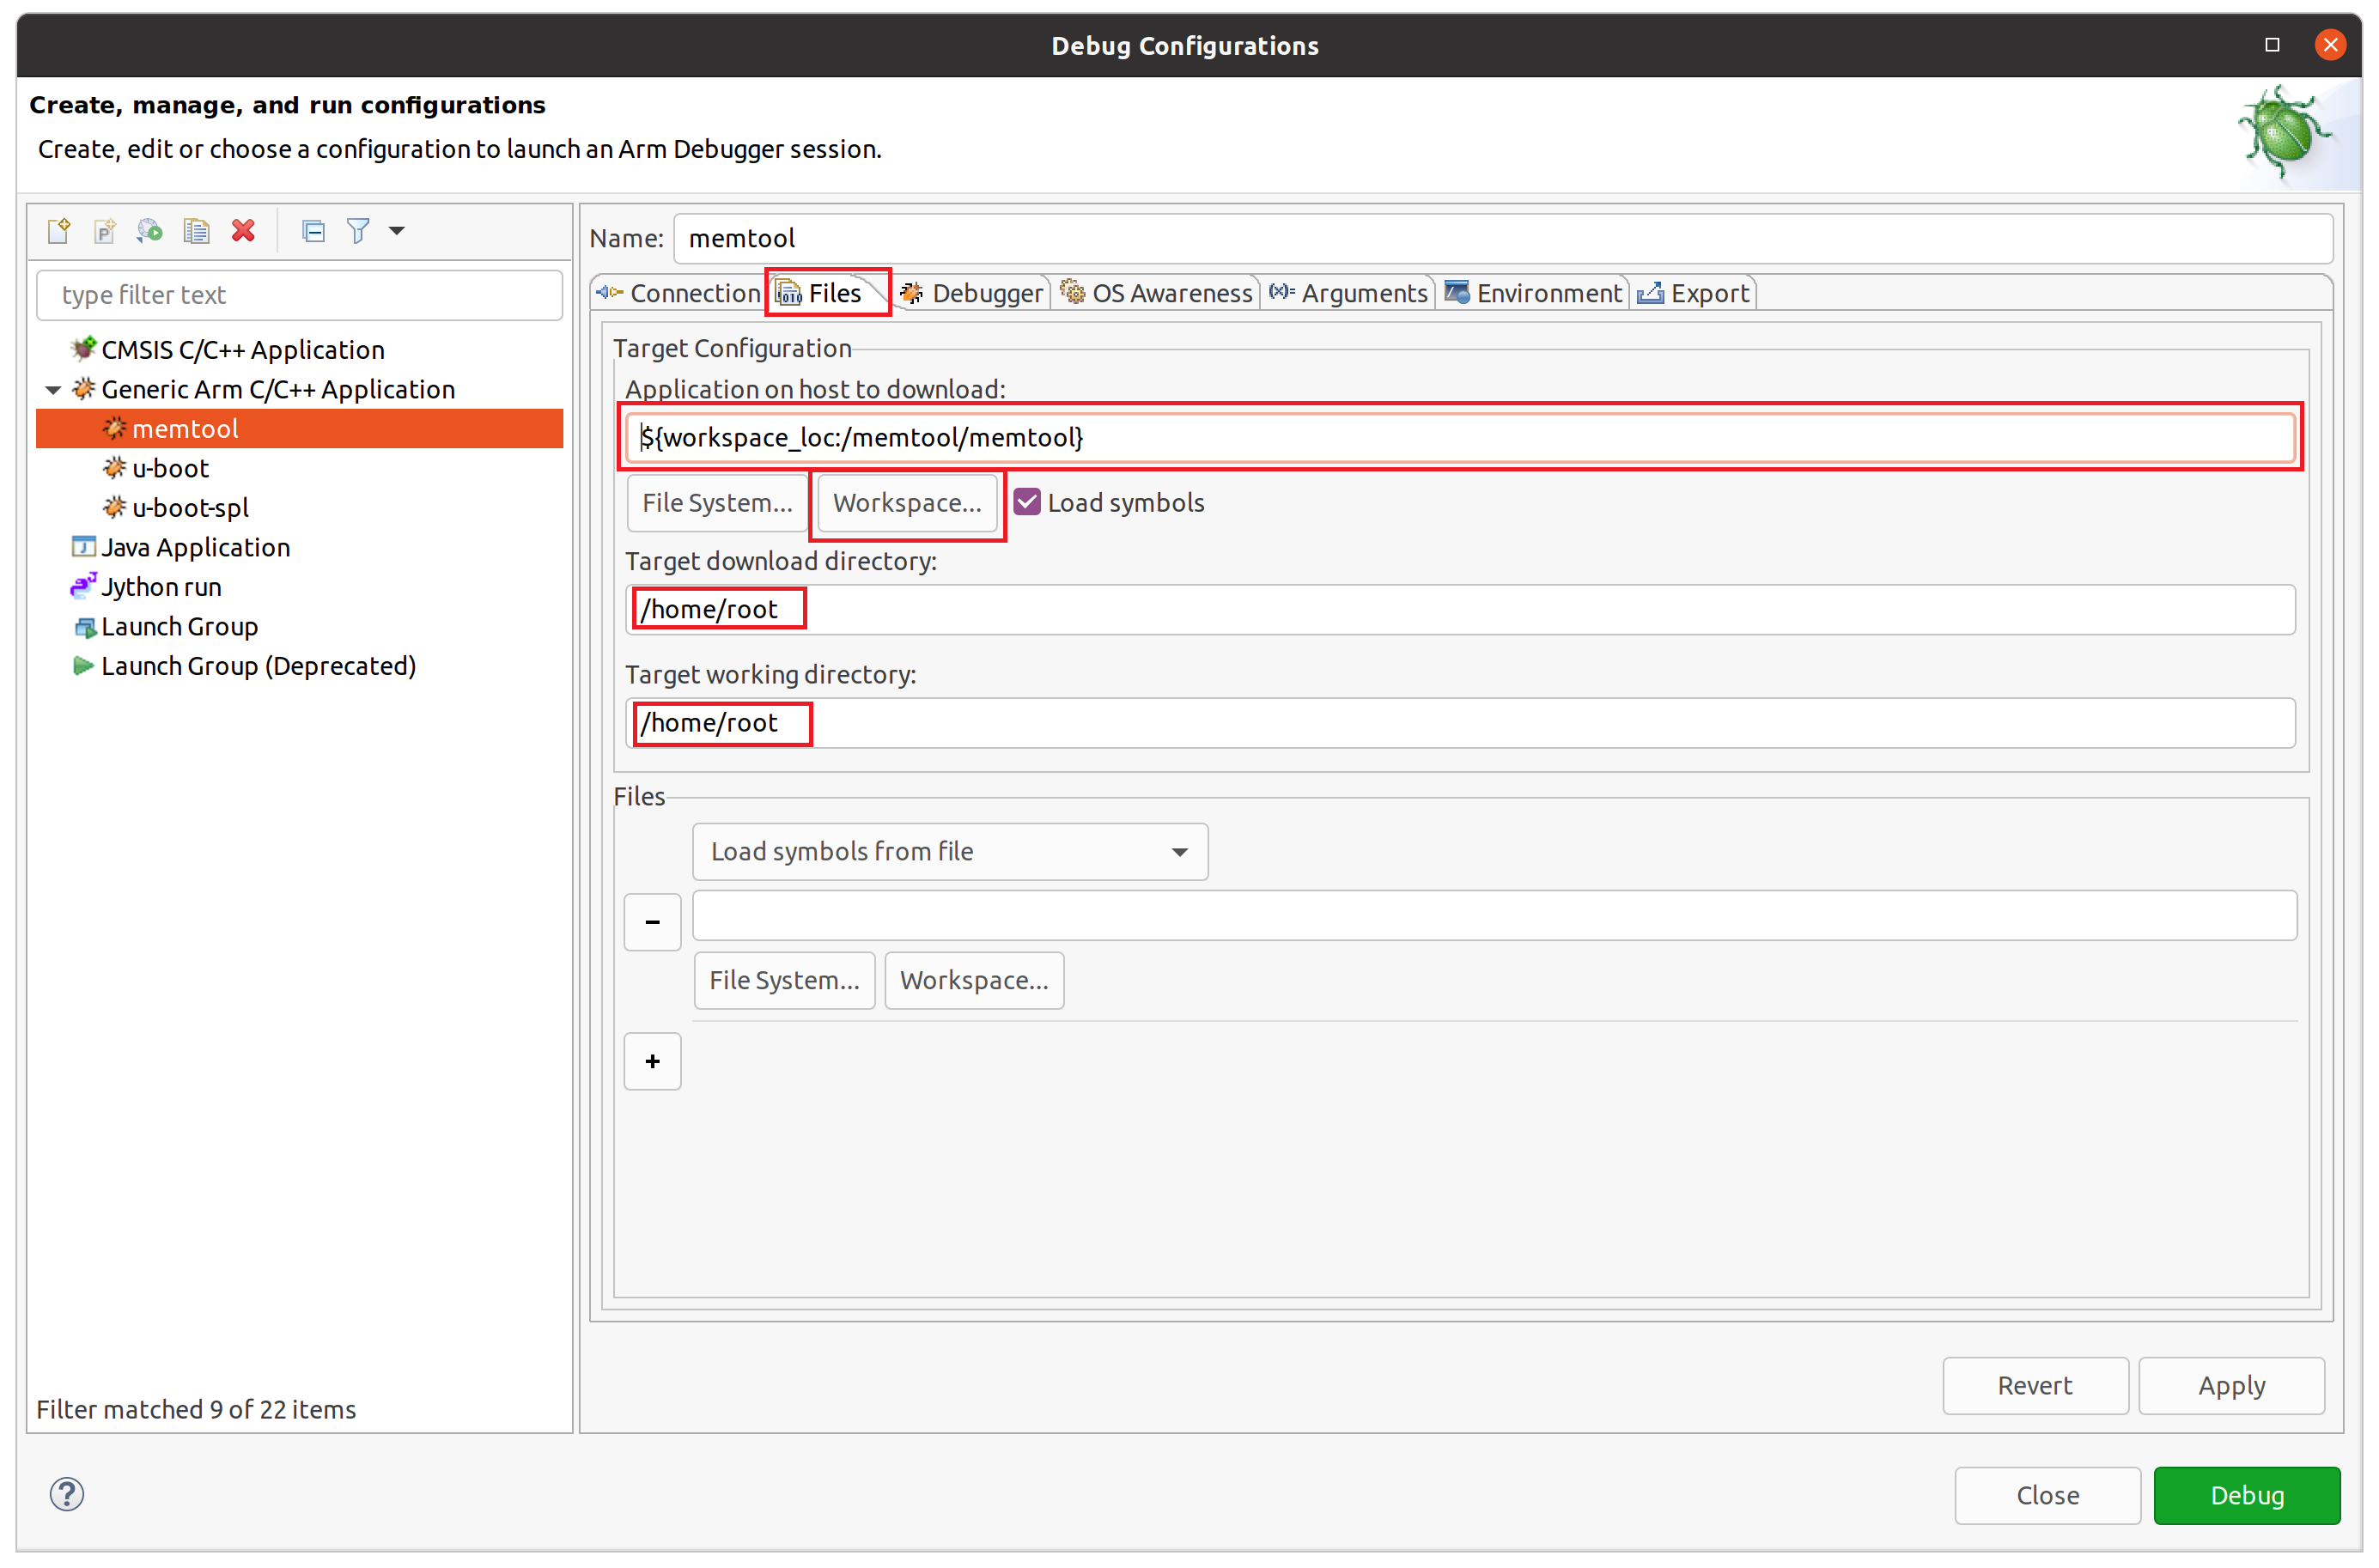
次に"Files"タブをクリックして、"Workspce..."ボタンをクリックして、memtoolを選択すると、"Application on host to download"は下記のようになります。そして、"Target download directory"と"Target working directory"には"/home/root"を入力します。
次に"Debugger"タブをクリックして、"Run control"が"Debug from symbol (main)"を指定しているか確認します。そして、"Host working directory"は"Use default"のチェックを外し、"Workspace..."ボタンより、memtoolを選択し、下記のようになっているか確認します。

最後に"Arguments"タブをクリックして、下記のように"Program Arguments"に"md 0x100000"を入力し、"Apply"ボタンをクリックして、設定を保存します。

そして、"Debug"ボタンをクリックし、デバッグを開始します。
3.5 デバッグ
"Debug"ボタンをクリックして、デバッグを開始すると、"Files"タブで指定した"/home/root"にApplicationをダウンロードし、"Debugger"タブの"Debug from symbol"で指定した関数(main)で中断します。この時main関数の引数は"Program Arguments"で指定した値になります。

ここで、簡単に"Debug control"のツールバーについて説明します。

| No | Name | Decription |
|---|---|---|
| 1 | Connect | ターゲットへ接続、切断 |
| 2 | Continue | 実行再開 |
| 3 | Interrupt | 実行中断 |
| 4 | Step in | 1行実行、関数の場合、その関数にジャンプ |
| 5 | Step over | 1行実行、関数の場合、その関数を全て実行 |
| 6 | Step out | 呼び出し関数へ戻る |
| 7 | Inline | アセンブラ1行単位実行か、C言語1行単位実行の切り替え |
今回、引数に"md 0x100000"を指定したため、Step inを繰り返し実行していると、下記のように、メモリ表示を行う、cmd_memory_display関数を呼び出します。そして、Commandsで"info locals"と入力すると、その時点でのローカル変数の表示を行います。そして"Debug control"の"Continue"ボタンをクリックします。

その結果、最後まで実行を行い、"App console"にメモリ内容を表示して終了します。

以上で、Linux Applicationのデバッグは完了です。また、一回接続を行えば、次回からは"Debug Control"の"memtool disconnected"をダブルクリックすれば、デバッグが開始されます。
4. U-Boot-SPL/U-Bootデバッグ
4.1 U-Boot-SPL/U-Bootビルド
U-Bootはブートローダーの一種でいろいろなコマンドが使用できるモニタープログラムです。このU-Bootは基本的にSDRAMなどの外部メモリに展開され実行されます。Cyclone® V SoC FPGAなどは起動時には外部メモリは有効になっておらず、それを有効にするブートローダーがU-Boot-SPLです。SPLはSecondly Program Loaderの略です。このU-Boot-SPLはサイズが小さく、Cyclone® V SoC FPGAの内蔵メモリに展開され、基本初期化と外部メモリの初期化を行い、U-Bootを外部メモリロードし、U-Bootを実行します。
最新のU-BootビルドフローはCyclone V SoC - Boot from SD Cardです。このフローに従えば、U-Boot-SPL/U-Bootが生成されます。
4.1.1 Golden Hardware Reference Design(GHRD)コンパイル
最初にGHRDをコンパイルします。下記コマンドを実行し、GHRDをダウンロードして、解凍します。
$ cd ~/ARM_DS
$ mkdir cv_gsrd
$ cd cv_gsrd/
$ export TOP_FOLDER=$(pwd)
$ wget https://github.com/altera-opensource/ghrd-socfpga/archive/refs/tags/QPDS22.1STD_REL_GSRD_PR.zip
$ unzip QPDS22.1STD_REL_GSRD_PR.zip
$ mv ghrd-socfpga-QPDS22.1STD_REL_GSRD_PR/cv_soc_devkit_ghrd/ .
$ rm -rf ghrd-socfpga-QPDS22.1STD_REL_GSRD_PR
$ cd cv_soc_devkit_ghrd
次に、下記コマンドを実行してNios2 Command Shellを起動し、GHRDをコンパイルします。コンパイルにはおおよそ15分程度かかります。
$ $QUARTUS_ROORDIR/../nios2eds/nios2_command_shell.sh
------------------------------------------------
Altera Nios2 Command Shell

Version 22.1, Build 915
------------------------------------------------
$ make generate_from_tcl
$ make rbf
4.1.2 U-Boot-SPL/U-Bootコンパイル
U-Boot-SPL/U-Bootをビルドします。下記コマンドを実行します。
$ cd $TOP_FOLDER/cv_soc_devkit_ghrd
$ mkdir -p software/bootloader && cd software/bootloader
$ git clone https://github.com/altera-opensource/u-boot-socfpga
$ cd u-boot-socfpga
$ git checkout -b test-bootloader -t origin/socfpga_v2022.04
$ cd arch/arm/mach-socfpga/cv_bsp_generator
$ python2 cv_bsp_generator.py -i $TOP_FOLDER/cv_soc_devkit_ghrd/hps_isw_handoff/soc_system_hps_0 -o ../../../../board/altera/cyclone5-socdk/qts
次に、下記ファイルに
$TOP_FOLDER/cv_soc_devkit_ghrd/u-boot-socfpga/configs/socfpga_cyclone5_defconfig
下記を追加します。
CONFIG_BOOTDELAY=60
"CONFIG_BOOTDELAY=60"の設定はU-Bootの起動待機時間の設定です。初期状態では短く、デバッグ時にU-Bootのコマンドプロンプトに入りたい場合に早すぎるため、60秒と長めに設定を変更します。
次に、下記U-Boot起動ログの"FPGA: Altera Cyclone V, SE/A6 or SX/C6 or ST/D6, version 0x0"は
U-Boot 2019.10-g8e98071-dirty (Aug 04 2020 - 22:50:14 +0800), Build: jenkins-uboot-s7

CPU:   Altera SoCFPGA Platform
FPGA:  Altera Cyclone V, SE/A6 or SX/C6 or ST/D6, version 0x0
BOOT:  SD/MMC Internal Transceiver (3.0V)
       Watchdog enabled
DRAM:  1 GiB
MMC:   dwmmc0@ff704000: 0
Loading Environment from MMC... OK
関数int print_cpuinfo(void)によって表示されます。この関数はscan_mgr_get_fpga_id()を呼び出し、JTAGポートにアクセスします。
Arm* DSにてデバッグする場合、JTAGを使うため、この関数を呼び出すとポートが衝突し、Arm* DSがハングアップします。
この問題を避けるため、下記を
arch/arm/mach-socfpga/misc_gen5.c(91)
const u32 id = scan_mgr_get_fpga_id();
に
const u32 id = 0x02d020dd;
書き換えてください。そして、下記を
lib/display_options.c(57)
unsigned long d = 1e9;
下記のように修正してください。
unsigned long d = 1000000000;
では、下記コマンドを実行して、U-Boot-SPL/U-Bootをビルドします。
$ make socfpga_cyclone5_defconfig
$ make -j 8
また、make -jの後の数字はビルド時に使用するCPUスレッドの数です。数字を設定しない場合は、全CPUスレッドを使用します。
ビルドが正常に完了すると、下記ファイルが生成されます。
| File | Path | Description |
|---|---|---|
| u-boot | ~/ARM_DS/cv_gsrd/cv_soc_devkit_ghrd/u-boot-socfpga | u-boot ELFファイル |
| u-boot.dtb | ~/ARM_DS/cv_gsrd/cv_soc_devkit_ghrd/u-boot-socfpga | u-boot用DTBファイル |
| u-boot-spl | ~/ARM_DS/cv_gsrd/cv_soc_devkit_ghrd/u-boot-socfpga/spl | u-boot-spl ELFファイル |
| u-boot-spl.dtb | ~/ARM_DS/cv_gsrd/cv_soc_devkit_ghrd/u-boot-socfpga/spl | u-boot-spl用DTBファイル |
ファイルを修正してコンパイルする場合は、
$ make -j
になりますが、もし、うまくコンパイルされない場合は、
$ make clean && make -j
としてください。
そして、socfpga_cyclone5_defconfigを修正した場合は
$ make mrproper && make clean
$ make socfpga_cyclone5_defconfig
$ make make -j
としてください。
4.2 Yoctoビルド
Yoctoとは、U-Boot-SPL/U-Boot/Linux Kernel/Root File System全体を一度で構築する環境です。
今回事前に生成されたSDカードイメージを使用することもあり、このYoctoのビルドは必要ではありませんが、
ここで、ビルド方法を説明します。
Yoctoのビルド方法はSetting Up Yocto Build Systemに記載があり、これに従って、Yoctoをビルドします。
まず、ビルドの前準備を行います。
$ cd ~/ARM_DS/cv_gsrd
$ export TOP_FOLDER=$(pwd)
$ git clone -b kirkstone https://github.com/altera-opensource/gsrd_socfpga
$ cd gsrd_socfpga/
$ . cyclone5-gsrd-build.sh
$ build_setup
次に、U-bootビルドに影響のあるパッチを無効化します。
$ sed -i '/file:.*patch/d' meta-intel-fpga-refdes/recipes-bsp/u-boot/u-boot-socfpga_v2021.07.bbappend
$ sed -i '/file:.*patch/d' meta-intel-fpga-refdes/recipes-bsp/u-boot/u-boot-socfpga_v2021.10.bbappend
上記を有効化するために、セットアップを再実行します。
$ cd $TOP_FOLDER/gsrd_socfpga
$ . ./poky/oe-init-build-env cyclone5-gsrd-rootfs/
上記実行後、フォルダーが~/ARM_DS/cv_gsrd/gsrd_socfpga/cyclone5-gsrd-rootfsに移動していることを確認して、GHRDで生成されRBF(FPGAの構成ファイル)をYoctoシステムの出力フォルダーにシンボリックリンクを設定します。
$ ln -s $TOP_FOLDER/cv_soc_devkit_ghrd/output_files/soc_system.rbf  \
  $WORKSPACE/meta-intel-fpga-refdes/recipes-bsp/ghrd/files/cyclone5_gsrd_soc_system.rbf
YoctoのGHRDに関するレシピを更新します。
$ export NEW_HASH=$(sha256sum $WORKSPACE/meta-intel-fpga-refdes/recipes-bsp/ghrd/files/cyclone5_gsrd_soc_system.rbf | cut -f1 -d" ")
$ sed -i "s/SRC_URI:cyclone5.*/SRC_URI:cyclone5 ?= \"file:\/\/cyclone5_gsrd_soc_system.rbf;sha256sum=$NEW_HASH\"/g" $WORKSPACE/meta-intel-fpga-refdes/recipes-bsp/ghrd/hw-ref-design.bb
$ sed -i "/SRC_URI\[cyclone5_gsrd_core.sha256sum\]/d" $WORKSPACE/meta-intel-fpga-refdes/recipes-bsp/ghrd/hw-ref-design.bb
次に、GHRDのhandoff情報を反映させます。下記コマンドを実行してください。
$ cd $TOP_FOLDER/gsrd_socfpga/cyclone5-gsrd-rootfs
$ devtool modify virtual/bootloader
$ cd workspace/sources/u-boot-socfpga
$ python2 arch/arm/mach-socfpga/cv_bsp_generator/cv_bsp_generator.py \
    -i $TOP_FOLDER/cv_soc_devkit_ghrd/hps_isw_handoff/soc_system_hps_0 \
    -o board/altera/cyclone5-socdk/qts
$ git commit -a -m "update handoff files for modified project"
上記コマンド実行にて、python2とgit行でエラーが発生した場合、前準備を確認してください。
現在のフォルダーが~/ARM_DS/cv_gsrd/gsrd_socfpga/cyclone5-gsrd-rootfs/workspace/sources/u-boot-socfpgaであることを確認して、下記を実行してください。
$ bitbake-layers create-layer $TOP_FOLDER/gsrd_socfpga/meta-modified-project
$ devtool update-recipe -a $TOP_FOLDER/gsrd_socfpga/meta-modified-project u-boot-socfpga
$ cd $TOP_FOLDER/gsrd_socfpga/cyclone5-gsrd-rootfs/
$ bitbake-layers add-layer $TOP_FOLDER/gsrd_socfpga/meta-modified-project
$ bitbake-layers remove-layer $TOP_FOLDER/gsrd_socfpga/cyclone5-gsrd-rootfs/workspace
$ rm -rf $TOP_FOLDER/gsrd_socfpga/cyclone5-gsrd-rootfs/workspace
以上で、Yoctoのセットアップは完了です。
では、Yoctoにより、Cyclone® V SoC FPGA Development Kit上で動作するLinuxをビルドします。下記コマンドを実行してください。ビルドには数時間かかります。
$ bitbake_image
最後に、生成されたファイルをまとめるため、下記コマンドを実行します。
$ bitbake_image
~ARM_DS/cv_gsrd/gsrd_socfpga/cyclone5-gsrd-rootfs/tmp/deploy/images/cyclone5/gsrd-console-image-cyclone5.wicが生成されていれば、ビルドは成功です。
これが最初にSDカードに書き込んだファイルです。
4.3 U-Boot-SPL Debug Configuration
U-BootをArm* DSにインポートします。詳細は3.2 プロジェクトインポートを参照してください。
"Project Name"をu-boot-socfpagとし、Existing Code Locationを~/ARM_DS/cv_gsrd/cv_soc_devkit_ghrd/u-boot-socfpgaとして、U-BootをArm* DSにインポートします。
次に下記をdebug_uboot_spl.dsとして~/ARM_DS/cv_gsrd/cv_soc_devkit_ghrd/u-boot-socfpgaに保存してください。これはArm* DSでU-Boot-SPLをロードするスクリプトです。
# initialize system
stop
wait 5s
reset
stop
wait 5s
set trust-ro-sections-for-opcodes off

# load SPL and run up until spl_boot_device
loadfile spl/u-boot-spl 0x0
start
wait
restore spl/u-boot-spl.dtb binary __bss_end
thbreak spl_boot_device
continue
wait 60s
spl/u-boot-splが実行ファイルで、spl/u-boot-spl.dtbがデバイスツリーファイルです。全て結合ファイルはu-boot-with-spl.sfpとして、u-boot-socfpga保存されていますが、Arm*DSでデバッグする場合は、
loadfileコマンドで実行ファイルをロードし、restoreコマンドで、DTBファイルをSPLの直後にロードします。
では、デバッグ構成を行います。Run -> Debug Configuraionメニューを選択します。
前回と同様にGeneric Arm C/C++ Applicationを右クリックして、"New Configuration"を選択します。
"Name"に"u-boot-spl"と入力"Connection"タブをクリックして、
"Select target"から"Intel SoC FPGA-> Cyclone V SoC(Dual Core)->Bare Metal Debug->Debug Cortex-A9_0"を選択します。
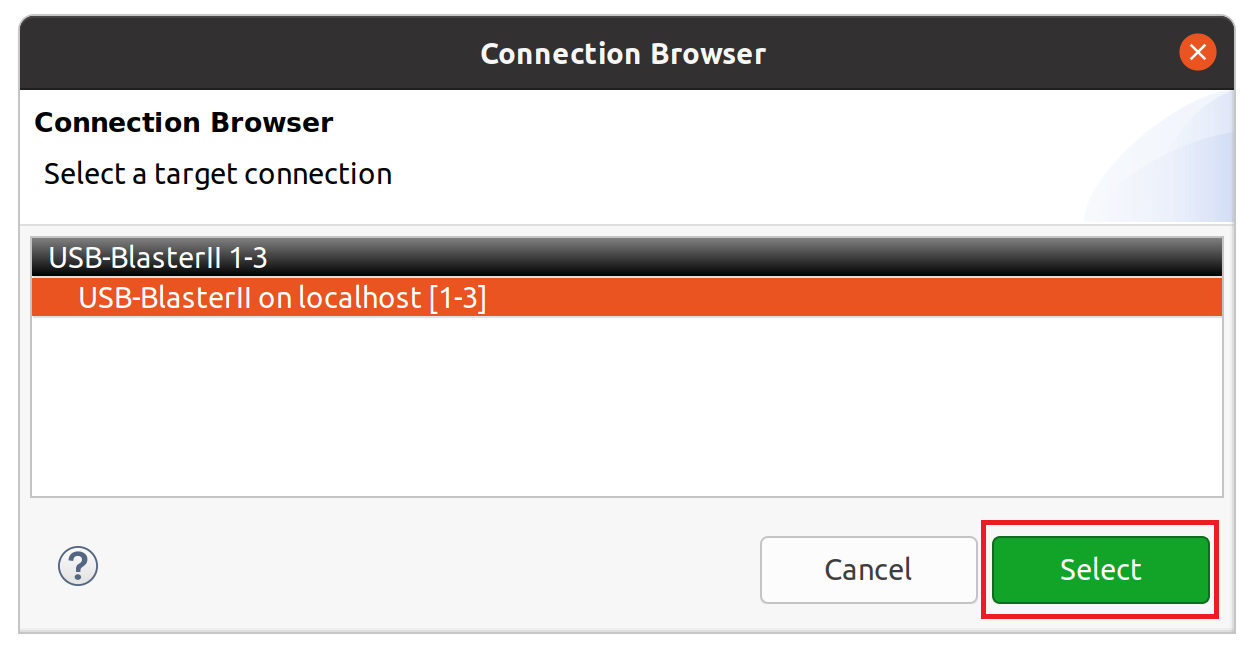
"Target Connection, Debug Port, Clock Speed"が下記のようになっているか確認し、"Bare Metal Debug"の右端の"Browse..."ボタンをクリックしてください。

下記の画面が表示され、

JTAGポートを認識すれば、下記のような画面になります。ポートを選択して"Select"ボタンをクリックします。
最初にArm* DSはIntel® Quartus® Prime Softwareが必要と説明しました。もし、ツールのパスが設定されていない場合は、下記のような画面が表示されます。
この場合は、Intel® Quartus® Prime Softwareのパスを再確認してください。

次に、"Debugger"タブをクリックして、"Connection only"を選択し、"Run target initialization debugger script"を有効にして、"Workspace..."ボタンをクリックしてください
先ほど保存した、debug_uboot_spl.dsを選択し、下記のようになっていれば設定は完了です。

"Apply"ボタンをクリックして、設定を保存してください。そして別ターミナルでシリアルコンソールを開いてください。
では、"Debug"ボタンをクリックして、デバッグを開始します。
4.4 U-Boot-SPL デバッグ
デバッグを開始すると、spl_boot_deviceで中断します。

これは、debug_uboot_spl.dsの"thbreak spl_boot_device"によるもので、thbreakは一時的なハードブレイクポイントを設定するコマンドです。
一時的とは、ブレイクするとブレイクポンとは自動的に削除されます。
また、右上のウインドウに関数リストが表示されていますが、これは、下記のように"+"をクリックして、"Functions"を選択すれば追加されます。

この状態で、シリアルコンソールを見ると、下記にようになります。

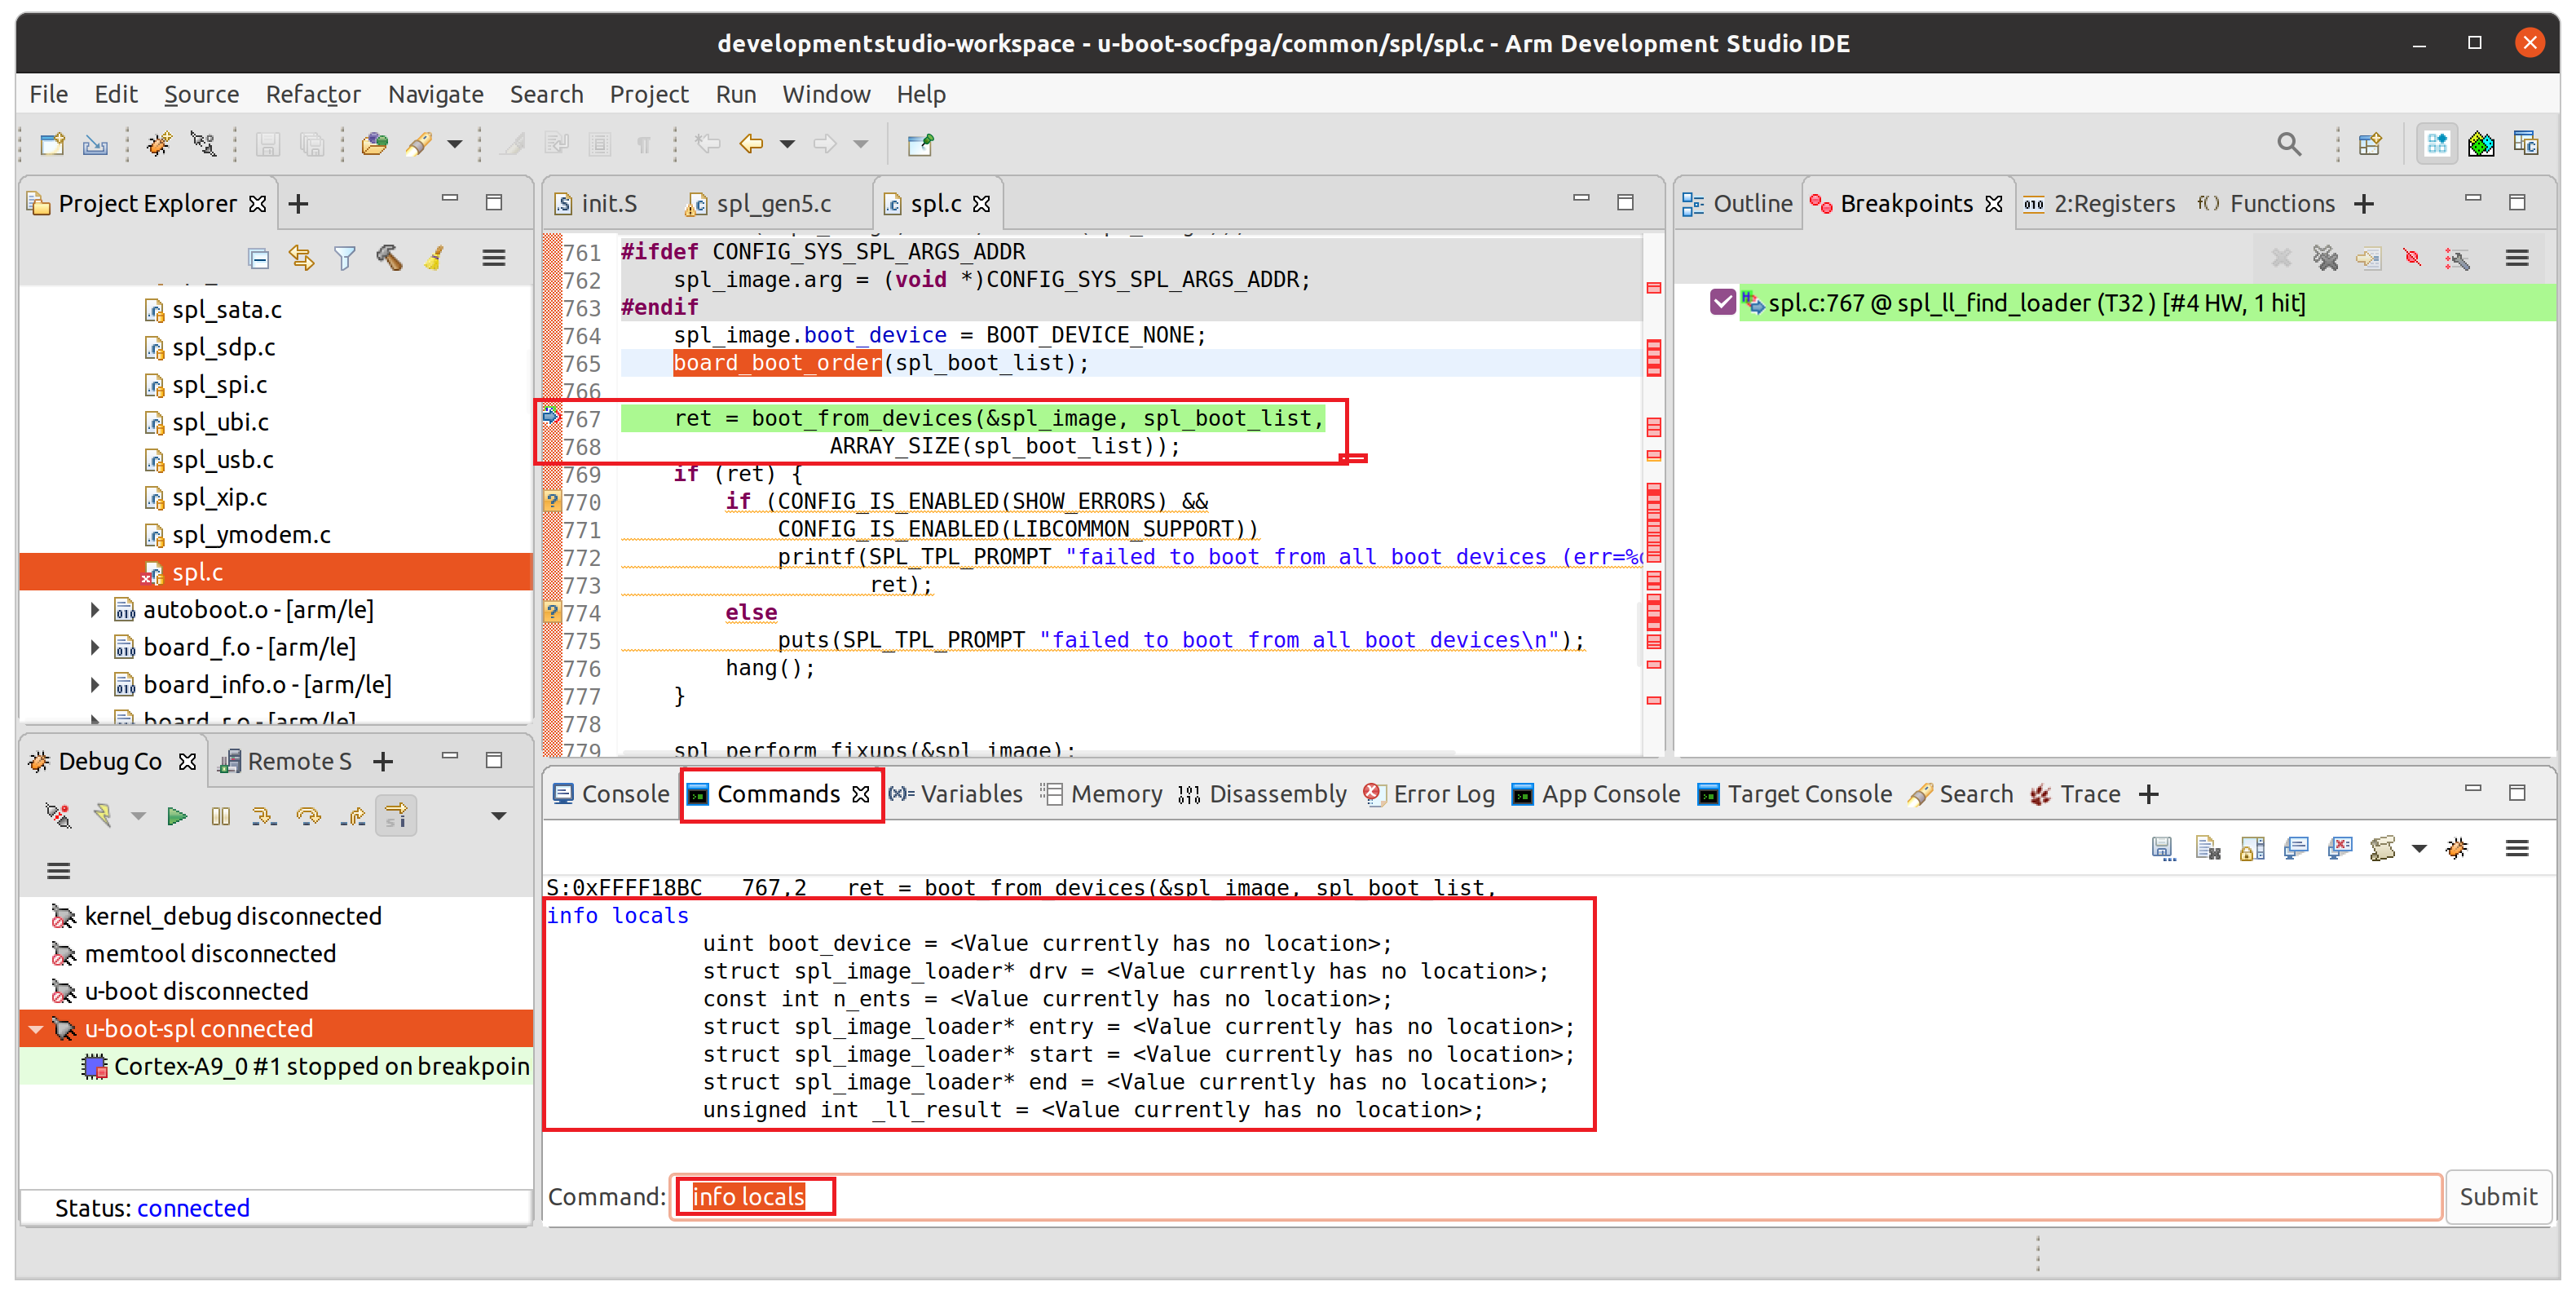
次に、common/spl/spl/c(767)行目にハードブレイクポイントを設定します。
下記のようにファイルを開き行番号左横の部分で右クリックをして、"DS Breakpoints->Toggle Hardware Breakpoint"を選択します。

設定が完了すると、下記のように行番号の横に"H"マークを伴った、赤丸が表示されます。
次に、Debug ControlのツールバーのContinueボタンをクリックするか、Commandsに"cont"と入力して実行を再開させます。

下記のように、767行目で中断したことが確認できます。また、Commandsに"info locals"と入力するとローカル変数が表示されます。
U-Boot-SPLのほぼ最後に呼びされる関数がjump_to_image_no_argsですので、この関数で中断させます。Functionsをクリックして、その下の検索ボタンをクリックします。

下記のような画面が表示されたら、検索キーワードに関数の先頭文字の"j"を入力すると、jump_to_image_no_argsが表示されますので、選択して、"OK"をクリックします。

jump_to_image_no_argsがFuntionsに表示されたら、この関数を右クリックして、下記のように、"Toggle Hardware Breakpoint"を選択します。
そして、Debug ControlのツールバーのContinueボタンをクリックするか、Commandsに"cont"と入力して実行を再開させます。

下記のようにjump_to_image_no_args中断していれば、正常に中断できました。

そして、下記のようにシリアルコンソールに"Trying to boot from MMC1"と表示されていれば正常です。以上で、U-Boot-SPL デバッグは終了です。
 - 注、SDカードが挿入されていないと、SDカード検出エラーになります。
4.5 U-Boot Debug Configuration
U-BootはU-Boot-SPLとプロジェクトが共通なのでインポートの必要はありません。
下記をdebug_uboot.dsとして~/ARM_DS/cv_gsrd/cv_soc_devkit_ghrd/u-boot-socfpgaに保存してください。
# initialize system
stop
wait 5s
reset
stop
wait 5s
set trust-ro-sections-for-opcodes off

# load SPL and run up until spl_boot_device
loadfile spl/u-boot-spl 0x0
start
wait
restore spl/u-boot-spl.dtb binary __bss_end
thbreak spl_boot_device
continue
wait 60s

# load and start U-Boot
delete
loadfile u-boot
start
wait
restore u-boot.dtb binary &_end

# run until relocation, and adjust symbols accordingly
thbreak relocate_code
cont
wait 60s
symbol-file u-boot ((gd_t*)$r9)->reloc_off
thbreak board_init_r
continue
wait 60s
これはArm* DSでU-Bootをロードするスクリプトです。このスクリプトの前半はdebug_uboot_spl.dsと同じです。
下記にU-bootの実行手順を示します。
- 前半の"thbreak spl_boot_device"までで、U-Boot-SPLを実行し、最低限の初期化と、外部メモリを有効にする
- "loadfile u-boot"にて、U-Bootをロード
- "restore u-boot.dtb binary &_end"にて、U-Boot用DTBファイルをロード
- "thbreak relocate_code"にてrelocate_codeまで実行。U-Bootはrelocate_codeにて、自分自身のコードをスタックの手間の上位アドレスに再配置。
- 再配置によってデバッグシンボルのアドレスが変更されたため、"symbol-file u-boot ((gd_t*)$r9)->reloc_off"にてデバッグシンボルアドレスを補正
- "thbreak board_init_r"にて初期化関数の手前で中断
前回と同様にGeneric Arm C/C++ Applicationを右クリックして、"New Configuration"を選択します。
"Name"に"u-boot"と入力"Connection"タブをクリックします。設定はU-Boot-SPLの設定と同一ですので、下記のように設定してください。

"Debugger"タブをクリックします。スクリプトがdebug_uboot_spl.dsから、debug_uboot.dsに変更された点を除き、設定はU-Boot-SPLの設定と同一ですので、下記のように設定してください。

"Apply"ボタンをクリックして、設定を保存してください。そしてシリアルコンソールが開いていることを確認してください。
では、"Debug"ボタンをクリックして、デバッグを開始します。
4.6 U-Boot デバッグ
デバッグを開始すると、board_init_rにて中断します。

シリアルコンソール画面は下記のようになります。

ここでは、メモリダンプコマンド(md)の動作をArm* DSで確認します。
下記が通常のシリアルコンソールで実行した場合です。
=> md 100000 5
00100000: 00000000 00000000 00000000 00000000  ................
00100010: 00000000                             ....
=> help md
md - memory display

Usage:
md [.b, .w, .l, .q] address [# of objects]
=>
ヘルプの"memory display"のキーワードより、mdコマンドの関数を探してみます。上記画面のNavigateメニューの下の"Search"アイコンをクリックするか、"Search->File..."メニューを選択してください。
下記画面が表示されたたら、"File Search"タブをクリックして、"Containing text"に"memory display"を入力して、"Search"ボタンをクリックします。

検索結果が表示されたら、"memory display"文字列を持つ、部分をダブルクリックして、ソースファイルをオープンします。

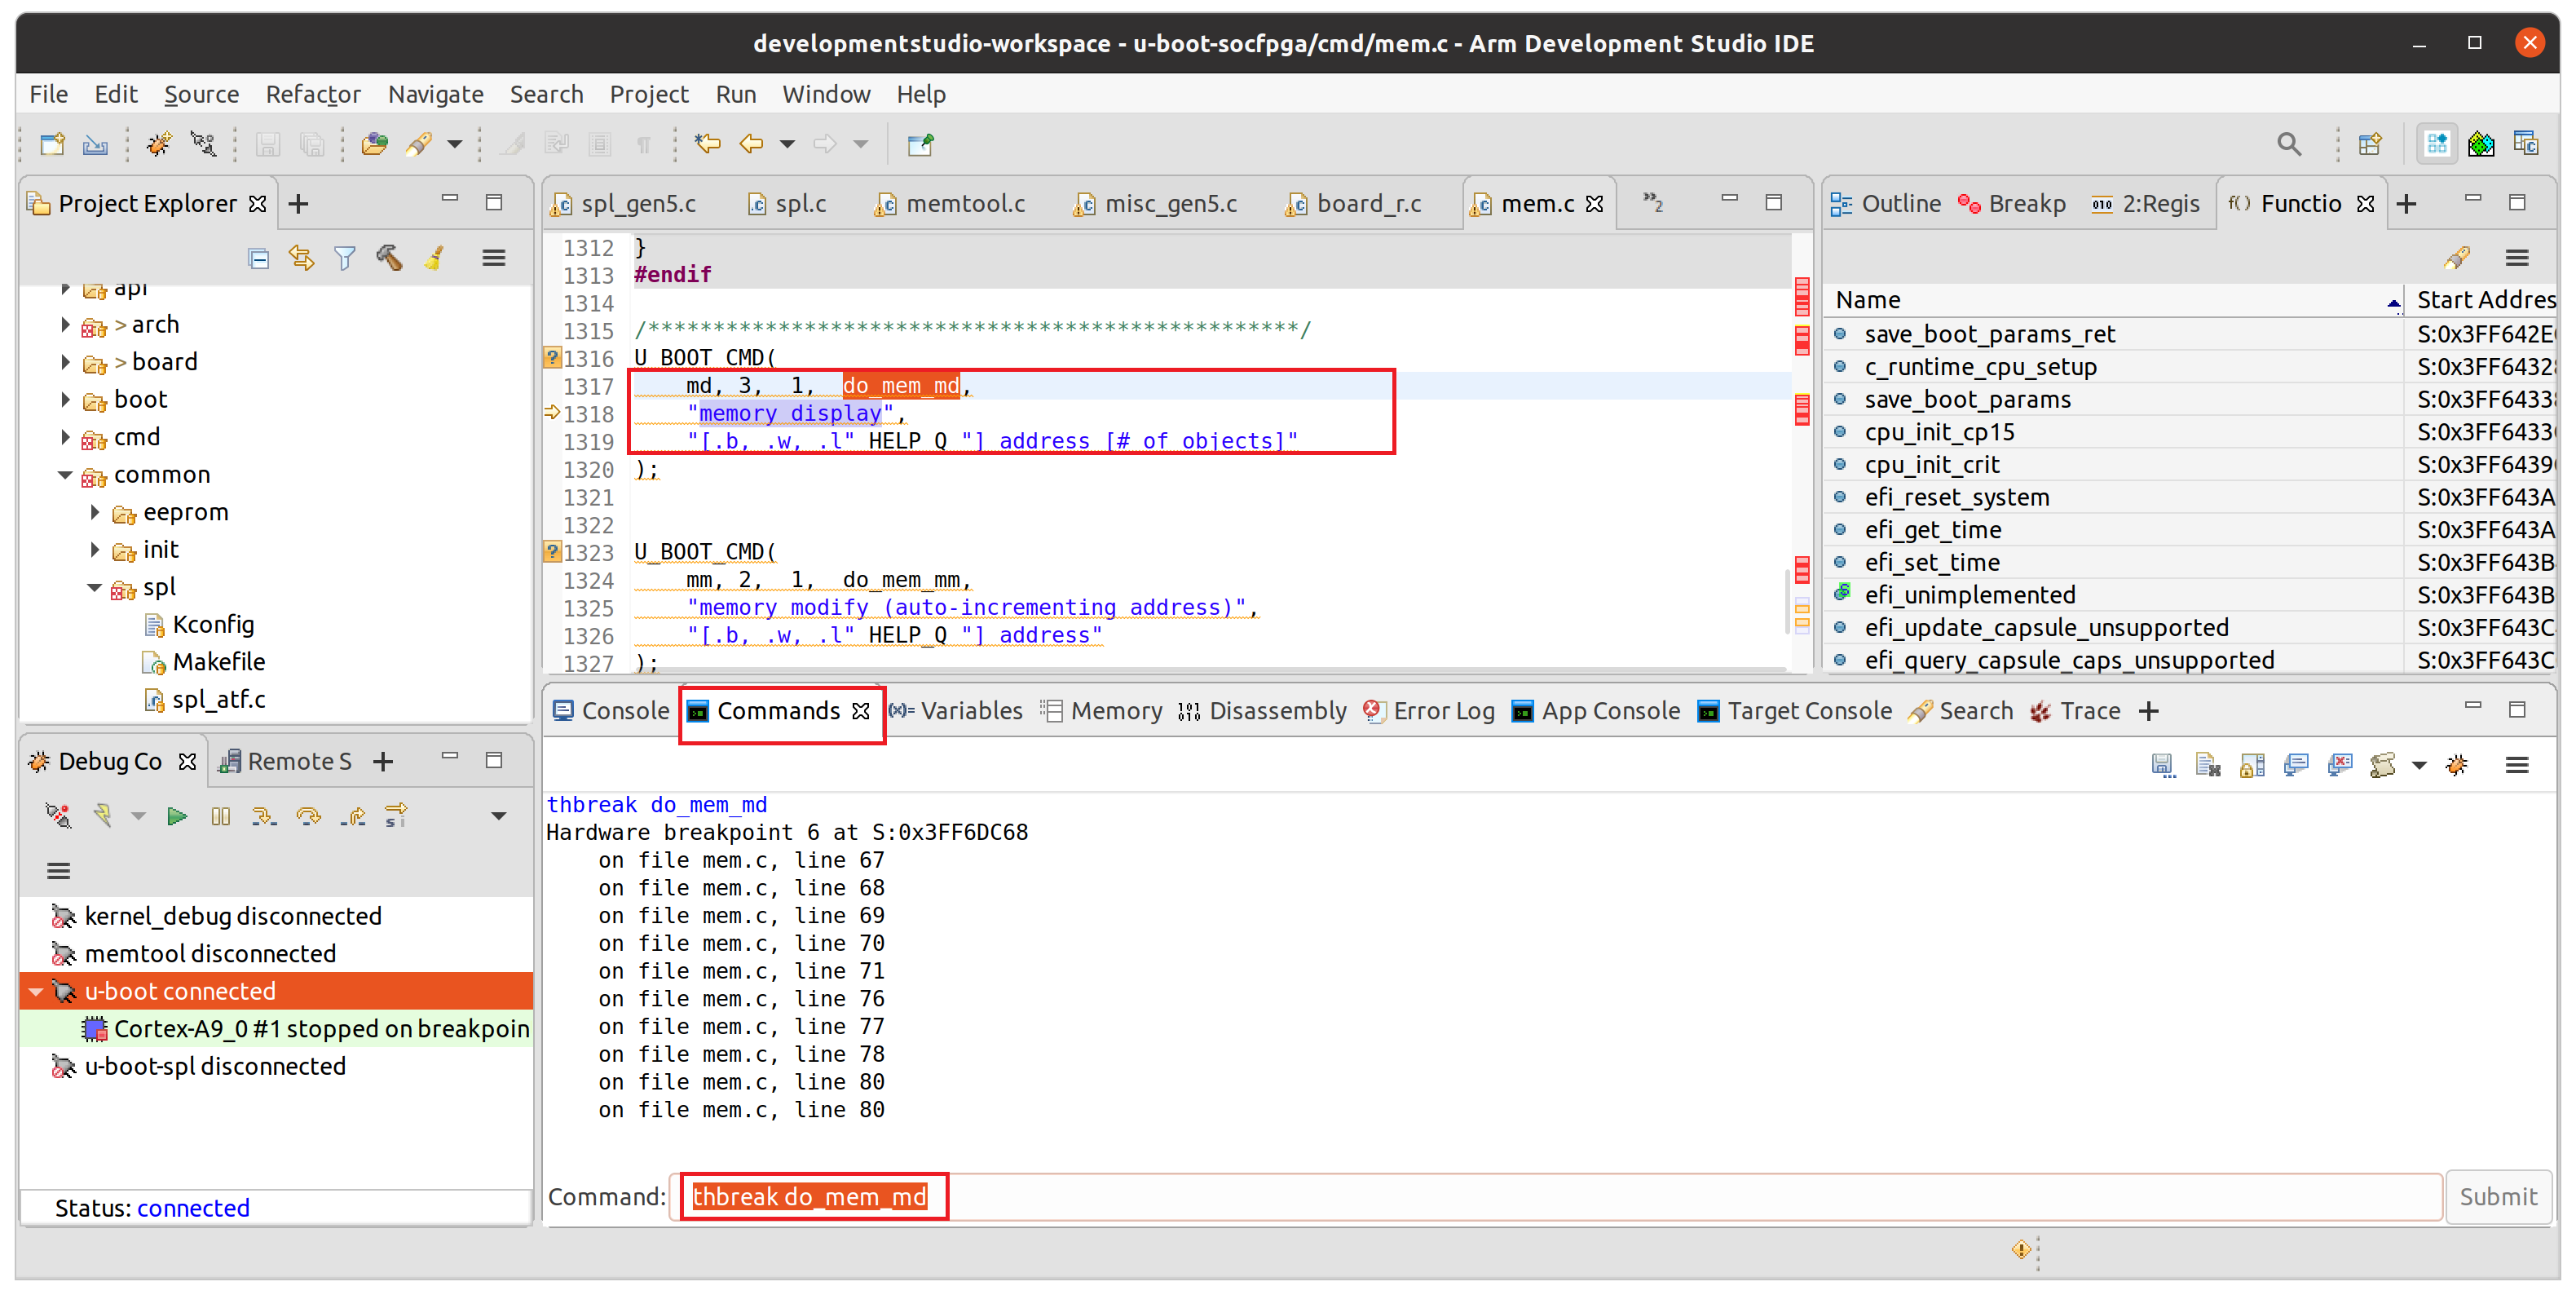
下記が抜き出したソースコードです。これより、mdコマンドの実行関数がdo_mem_mdであることがわかります。
U_BOOT_CMD(
	md,	3,	1,	do_mem_md,
	"memory display",
	"[.b, .w, .l" HELP_Q "] address [# of objects]"
);
では、ブレイクする関数が分かったので、下記のようにCommandsにて"thbreak do_mem_md"と入力してブレイクポイントを設定します。
そして、"Debug Control"の"Conitune"ボタンをクリックするか、Commandsに"cont"と入力して、実行を再開させます。
デバッグ再開後、シリアルコンソールに移動し、リターンキーを押して、U-Bootの起動を中止させます。

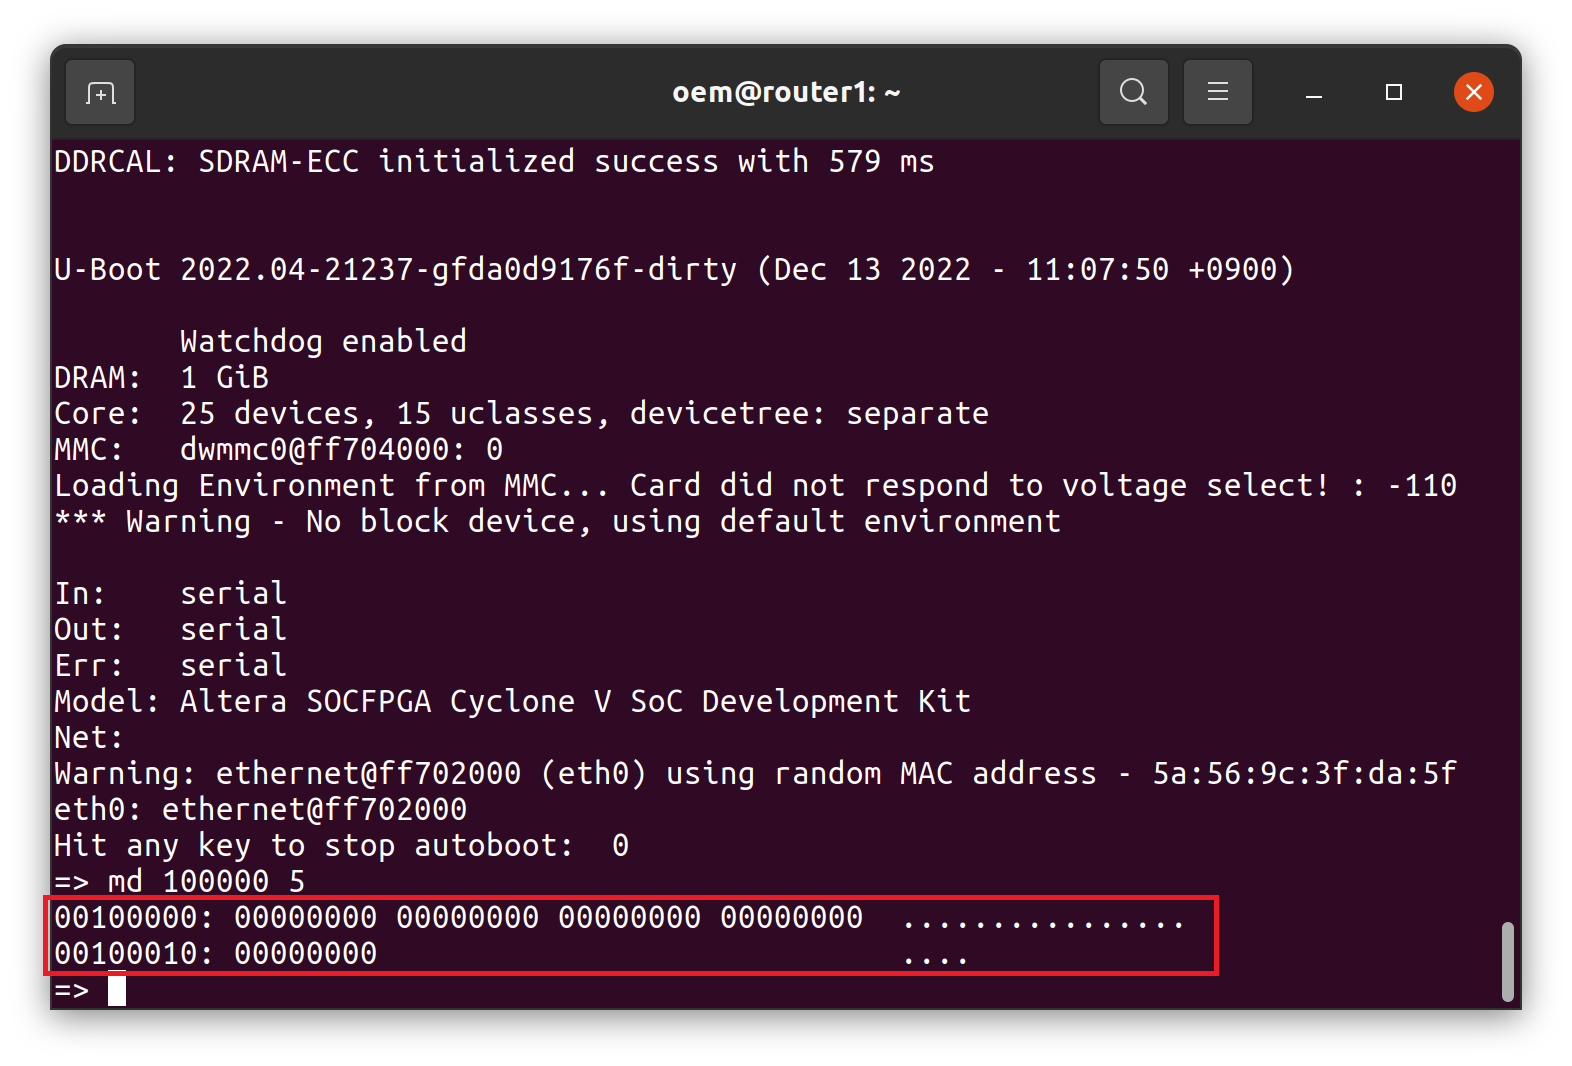
そして、下記のように、"md 100000 5"と入力します。

Arm* DSに戻り、下記のようにdo_mem_mdにて中断していることを確認します。

そして、"Step Over"の実行を繰り返し、適当なところで、Commandsに"info locals"と入力してローカル変数を確認します。

addrの値が1,048,576となっており、これは引数の0x100000の10進数の値であることがわかります。
では、"Debug Control"の"Conitune"ボタンをクリックするか、Commandsに"cont"と入力して、実行を再開させます。
再開すると、下記のように値がシリアルコンソールに表示されることがわかります。
以上で、U-Bootのデバッグは終了です。
5. Linux Kernelデバッグ
Linux Kernelをデバッグを行います。Linux Kernel Debugging With DS-5に従って説明します。
5.1 Linux Kernelビルド
Building Linux Kernelに従って、Linux Kernelをビルドします。下記コマンドを実行してください。
$ cd ~/ARM_DS
$ git clone https://github.com/altera-opensource/linux-socfpga linux-socfpga.a9
$ cd linux-socfpga.a9/
$ git checkout -b test-kernel -t origin/socfpga-5.15.50-lts
$ sed -i 's/120MB for jffs2 data/56MB for jffs2 data/g' arch/arm/boot/dts/socfpga_cyclone5_socdk.dts
$ sed -i 's/<0x800000 0x7800000>;/<0x800000 0x3800000>;/g' arch/arm/boot/dts/socfpga_cyclone5_socdk.dts
$ make socfpga_defconfig
次に、Arm Development Studio User GuideにAbout debugging a Linux kernelの説明の通り、下記設定が必要であることがわかります。
CONFIG_DEBUG_KERNEL=y
CONFIG_DEBUG_INFO=y
CONFIG_DEBUG_INFO_REDUCED=n
CONFIG_PERF_EVENTS=n
では、構成設定を確認します。下記コマンドを実行すると、上記マクロの設定を確認できます。
$ cat .config | grep -e CONFIG_DEBUG_KERNEL -e CONFIG_PERF_EVENTS -e CONFIG_DEBUG_INFO
CONFIG_PERF_EVENTS=y
CONFIG_DEBUG_INFO=y
# CONFIG_DEBUG_INFO_REDUCED is not set
# CONFIG_DEBUG_INFO_COMPRESSED is not set
# CONFIG_DEBUG_INFO_SPLIT is not set
CONFIG_DEBUG_INFO_DWARF_TOOLCHAIN_DEFAULT=y
# CONFIG_DEBUG_INFO_DWARF4 is not set
# CONFIG_DEBUG_INFO_DWARF5 is not set
# CONFIG_DEBUG_INFO_BTF is not set
CONFIG_DEBUG_KERNEL=y
上記より、About debugging a Linux kernelにある条件は満たしていることがわかります。では下記コマンドでLinux Kernelをビルドします。
$ make -j 8 zImage Image dtbs modules
では、生成したzImageをSDカードにコピーします。SDカードをPCに接続します。
下記を実行して、zImageが表示されれば、このパスが上書きするパスです。
$ ls /media/$USER/boot
extlinux  socfpga_cyclone5_socdk.dtb  soc_system.rbf  u-boot.scr  zImage
では、SDカードのzImageを生成したzImageで上書きします。下記コマンドを実行してください。
$ cd ~/ARM_DS/linux-socfpga.a9
$ cp arch/arm/boot/zImage /media/$USER/boot/
$ sudo sync
これで、上書きは完了です。SDカードをCyclone® V SoC FPGA Development Kitに接続してください。
シリアルコンソールを開いて、電源を入れてLinuxを起動させてください。
下記の画面のように、loginして、待機状態としてください。

5.2 Debug Configuration
前回と同様に"Project Name"をlinux-socfpga.a9とし、Existing Code Locationを~/ARM_DS/linux-socfpga.a9として、Linux KernelをArm* DSにインポートします。
詳細は3.2 プロジェクトインポートを参照してください。
Debug Configurationを開き、Generic Arm C/C++ Applicationを右クリックして、"New Configuration"を選択します。
"Name"に"kernel_debug"と入力し、"Connection"タブをクリックして、
"Select target"から"Intel SoC FPGA-> Cyclone V SoC(Dual Core)->Linux Kernel and/or Device Driver debug->Debug Cortex-A92x SMP"を選択します。
その他は、U-Boot-SPLと同じなので、"Target Connection, Debug Port, Clock Speed"が下記のようになっているか確認してください。

"Debugger"タブをクリックします。"Run Control"が"Connect only"に設定し、"Execute debug commands"にチェックを入れ、下記のようにコマンド入力します。
そして、ソースパスを下記のように設定してください。

"Apply"ボタンをクリックして、設定を保存してください。そしてシリアルコンソールが開いていることを確認してください。
では、"Debug"ボタンをクリックして、デバッグを開始します。
5.3 Kernelデバッグ
デバッグ開始すると、下記のように中断します。中断する場所はLinux Kernelの状態により異なります。

ここで、デバッグ例として、イーサネットのリンクアップ関数にブレイクポイントを設定して、中断することを確認します。この関数はリンクアップした時に呼び出される関数です。
別な言い方をすると、LANケーブルが接続されたときに呼び出されます。つまり、LANケーブルを抜き差しすれば、この関数が呼び出されます。
まず、Project Explorerよりdrivers/net/ethernet/stmicro/stmmac/stmmac_main.cを開てください。
Ctrl+Fを押して、下記のように検索ダイアログを開き、"link_up"と入力して、"Find"ボタンをクリックしてください。

stmmac_mac_link_up関数がリンクアップ時に呼び出される関数です。ではハードブレイクポイントを1094行に設定します。
そして、"Debug Control"の"Conitune"ボタンをクリックするか、Commandsに"cont"と入力して、実行を再開させます。

そして、LANケーブルを抜いてください。下記のように、シリアルコンソールにリンクダウンのメッセージが表示されます。
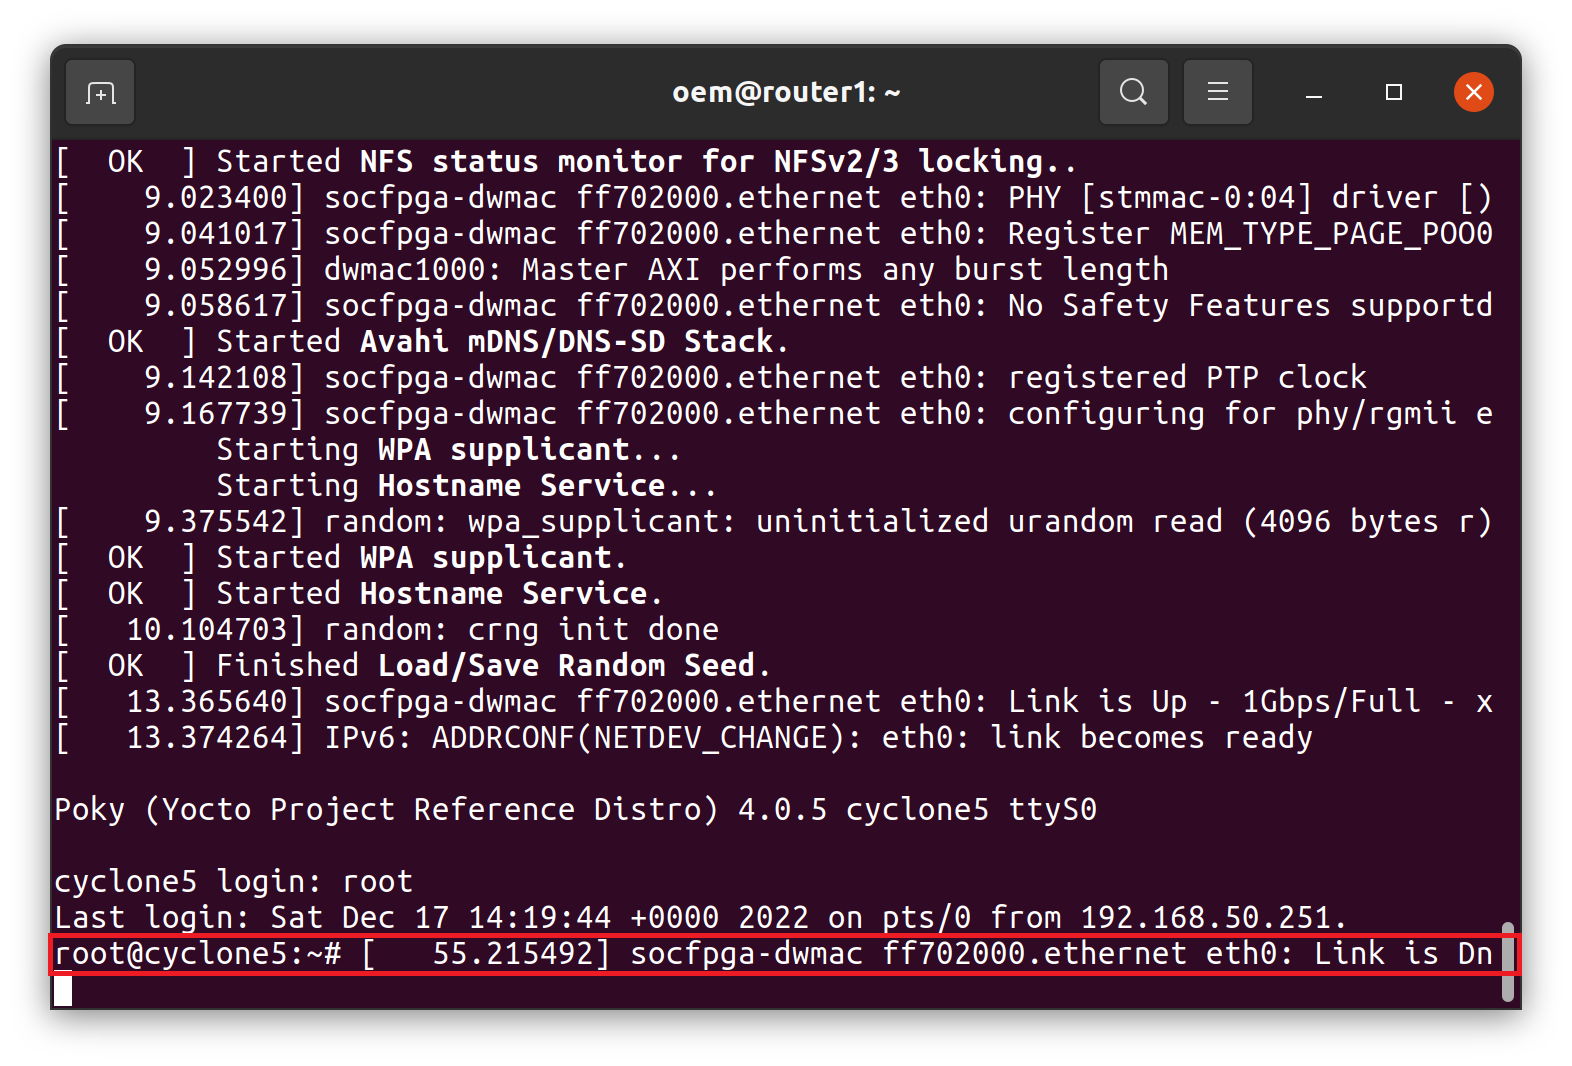
そして、再度LANケーブルを接続してください。stmmac_mac_link_up関数で中断したことが確認できます。

そして、"Debug Control"の"Conitune"ボタンをクリックするか、Commandsに"cont"と入力して、実行を再開させます。
下記のように、シリアルコンソール画面にリンクアップしたメッセージが表示されます。

以上でLinux Kernelデバッグは終了です。
5.4 Kernel初期化からデバッグ
先ほどは、実行中のLinux Kernelに対してデバッグを行いました。ここでは、Linux kerenlを初期化からデバッグします。
デバッグコンフィグレーションはLinux kernelデバッグと同一です。違いは、起動してからデバッガを接続するのではなく、U-Bootで接続する点です。
まず、U-Bootを最初から起動します。今Linuxが起動しているようでしたら"reboot"コマンドでU-Bootが起動させます。
U-Bootが起動待ちになったら、リターンキーを押して起動を中止させます。
そして、"edit bootcmd"と入力してしてください。起動コマンドが表示され、コマンドが"run fatscript;bridge enable;run distro_bootcmd"であることがわかります。
この最初の、2つのコマンドを入力して、FPGAをコンフィグして、ブリッジを有効にします。下記のようになれば正常です。

この状態で、Arm* DSを接続します。"Debug control"の"kernel debug"をダブルクリックすれば、接続します。
接続が完了すると、下記のようになります。"Functions"の"Search"ボタンをクリックします。

検索ワードに"kernel_init"と入力して、"OK"クリックしてください。

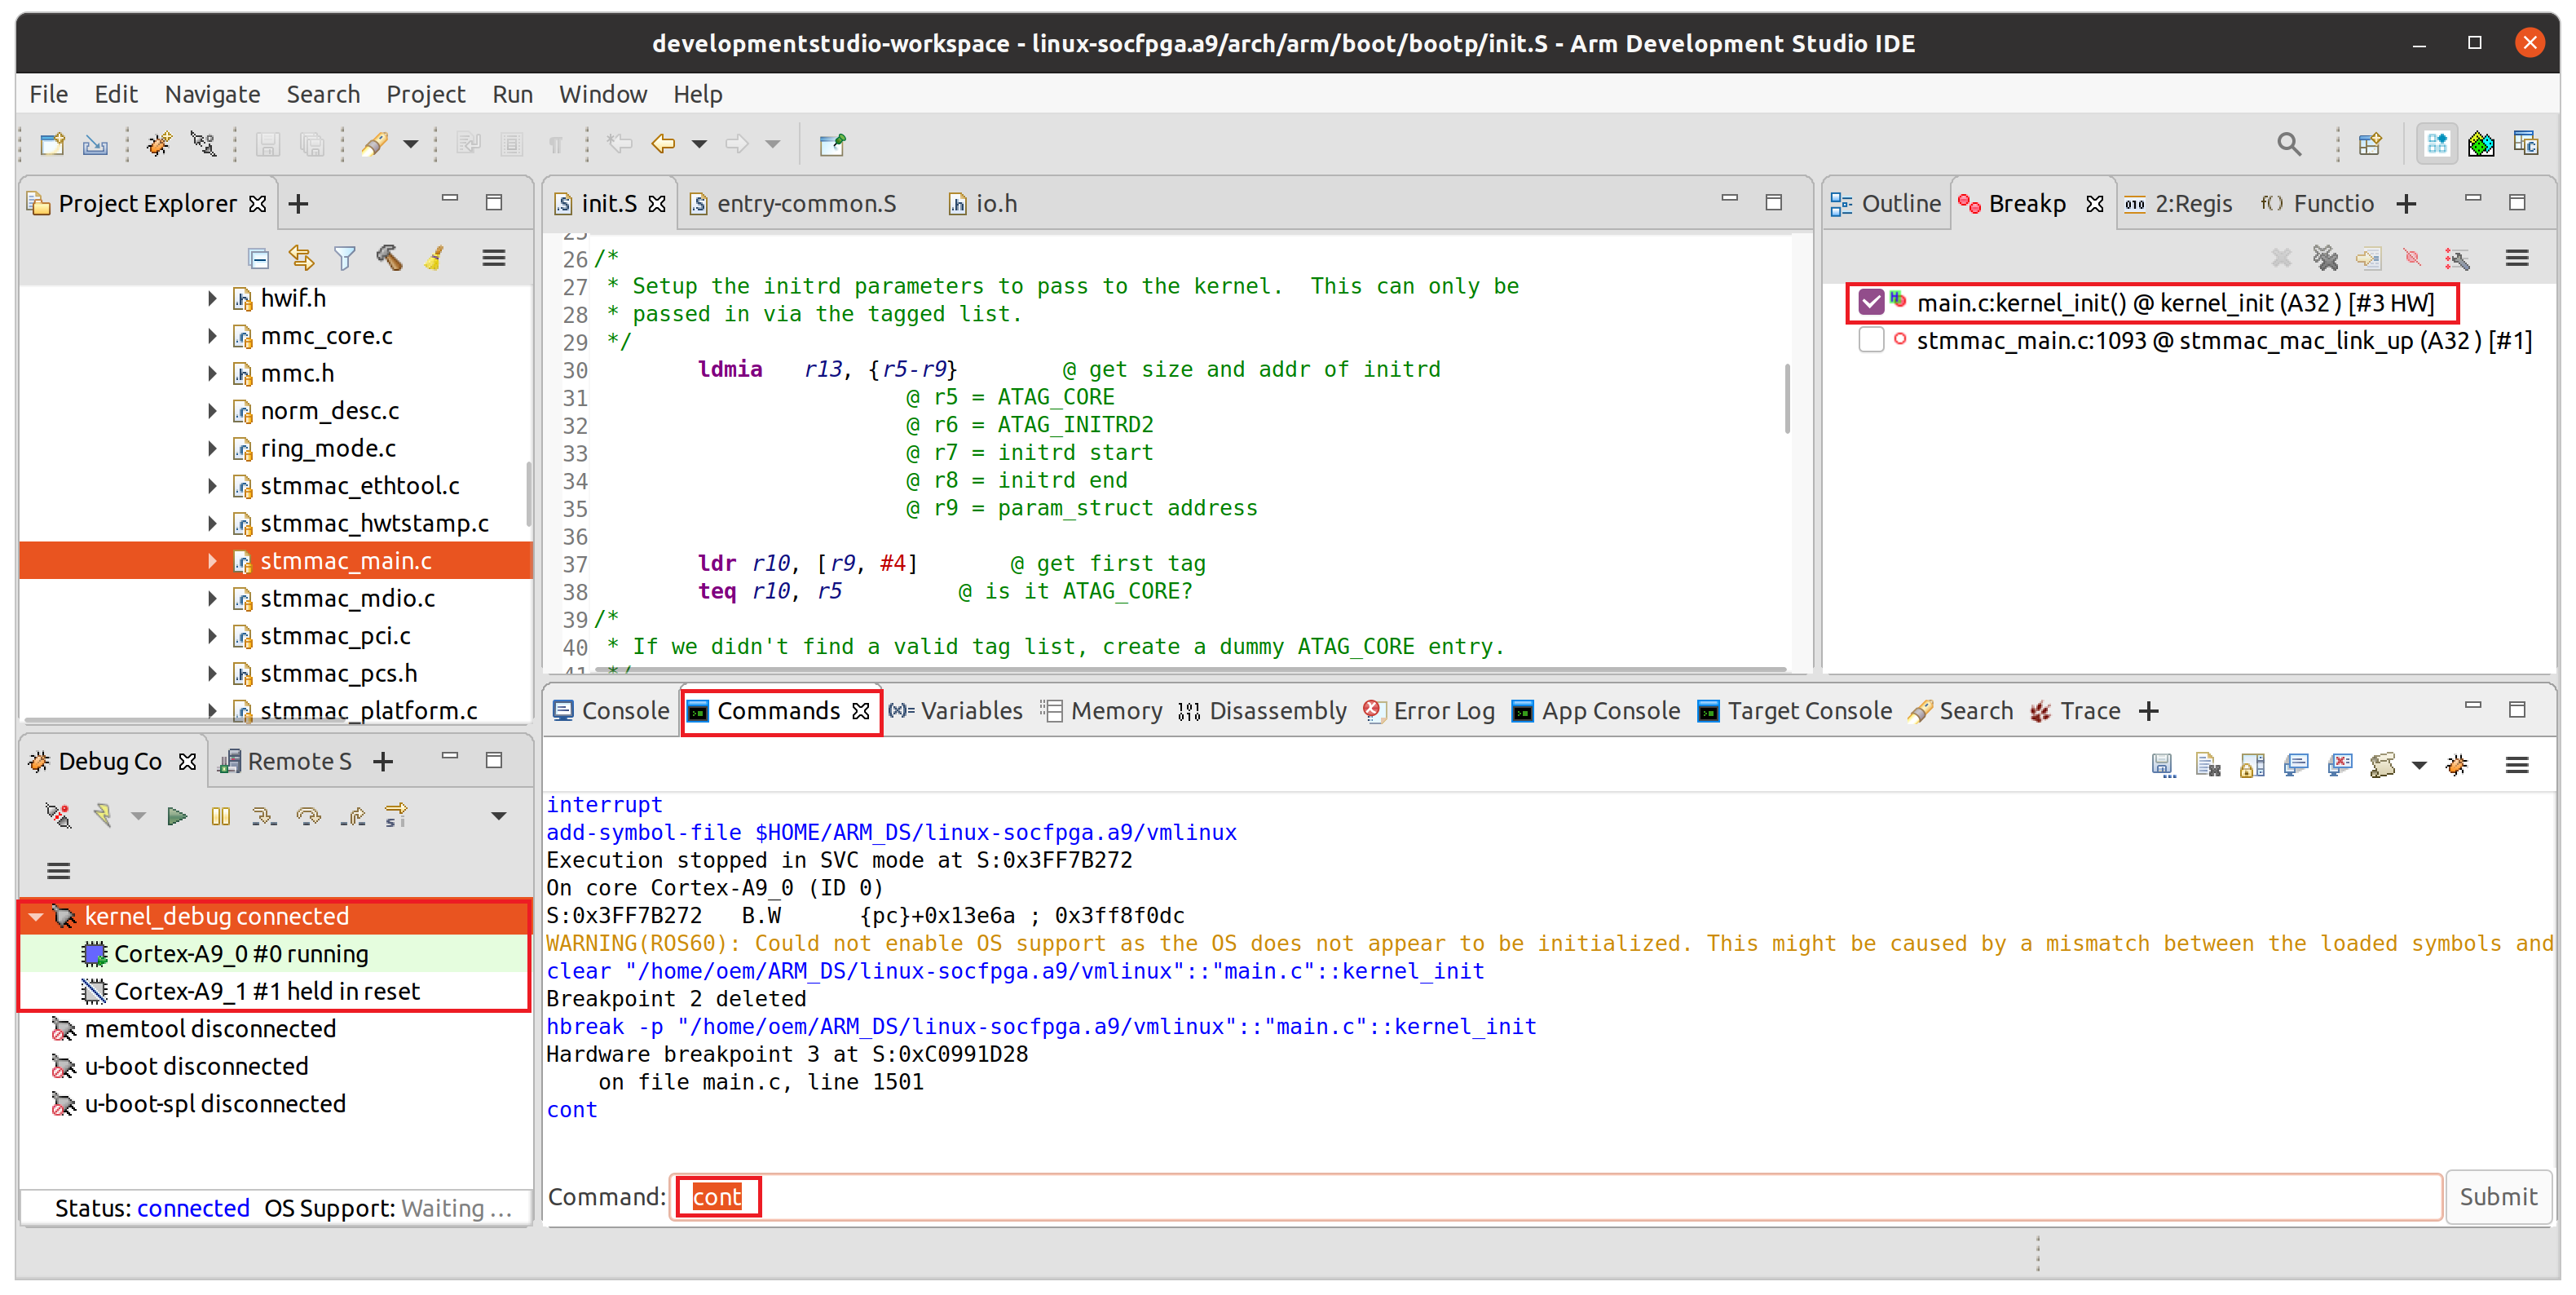
前回と同様に、Kernel_initにハードブレイクポイントを設定してください。

下記にように、Breakpointsをクリックして、kernel_initに正しブレイクポイントが設定されていることを確認して、
"Debug Control"の"Conitune"ボタンをクリックするか、Commandsに"cont"と入力して、実行を再開させます。
下記のように"Cotex-A9_0#0"が"running"になっていることを確認して、シリアルコンソールに移動します。
ここで、最後の起動コマンド"run distro_bootcmd"を入力して、Linux起動を開始させます。

実行を開始すると、下記のように停止しますので、Arm* DSに移動します。

Arm* DSに移動すると、kernel_initで中断していることが確認できました。

以上で、Kernel初期化からデバッグは終了です。
6. Arm* DS便利な機能
6.1 オンラインヘルプ
Help->Help Contensよりオンラインヘルプが参照できます。いろいろな資料がありますので参考してください。
特に、下記のArm Debuggder commands listed in groupsは参考になるので一読することをお勧めします。

下記がメモリに関するコマンドです。一番下の"x"がメモリ読み出しコマンドで、"memory set"が書き込みコマンドです。

6.2 Register View
Arm* DSにはレジスタ表示機能があり、CPUの汎用レジスタ、CPUの拡張レジスタ、FPGAの周辺機器レジスタを表示できます。
下記がCPUの汎用レジスタ表示です。コアの切り替えは"Debug Control"でコアを選択してください。

下記がCPUの拡張レジスタです。

下記がFPGAの周辺機器レジスタです。この機能を使用すればアドレスを知らなくともレジスタの値を確認できます。

下記がFPGAの周辺機器レジスタのReset Managerの値です。1がリセット状態を示すので、ほぼ全ての周辺機器がリセット状態であることがわかります。

6.3 MMU情報
Arm* DSはMMUの設定を簡単に表示できます。これにより仮想記憶の設定が容易に取得できます。コマンドは下記にオンラインヘルプに記載されています。

そして、Commandsに"mmu memory-map"と入力したり、MMU/MPUウインドで確認できます。

7. まとめ
今回、Arm* DSを使って、Linux Application, U-Boot-SPL/U-Boot, Linux Kerenlのデバッグの簡単なデモを行ってみました。Arm* DSには便利な機能がありますので、
オンラインヘルプを参照して、探してみてください。今回の記事が少しでもデバッグの参考になれば幸いです。
8. 参考資料
- Arm* Development Studio for Intel® SoC FPGA for Linux
- Arm Development Studio Intel SoC FPGA Edition
- Arm Development Studio
- Arm Development Studio User Guide
- SoCEDS and ARM Development Studio
- Building Bootloader for Cyclone V and Arria 10
- Cyclone V SoC GSRD
- Linux Application Debugging With DS5
- Linux Kernel Debugging With DS-5
- About debugging a Linux kernel
- Profile your Linux application
- インテル® SoC FPGA 向けデバッガー(Arm® DS / DS-5)の使い方
- SoCはじめてガイド
Notices & Disclaimers
Intel technologies may require enabled hardware, software or service activation.
No product or component can be absolutely secure.
Your costs and results may vary.
© Intel Corporation. Intel, the Intel logo, and other Intel marks are trademarks of Intel Corporation or its subsidiaries. Other names and brands may be claimed as the property of others.
The products described may contain design defects or errors known as errata which may cause the product to deviate from published specifications. Current characterized errata are available on request.
Intel disclaims all express and implied warranties, including without limitation, the implied warranties of merchantability, fitness for a particular purpose, and non-infringement, as well as any warranty arising from course of performance, course of dealing, or usage in trade.