はじめに
Nios® V processor インストール、Hello World実行編では、ツールインストール、ハードウエア構築、Hello Worldのコンパイル&実行までを行いましたが、ここではブート、シミュレーション、デバッグなどもう少し、実践的内容について、説明します。動作検証に使用したOSは前回と同様に下記となります。
Windows 10 Enterprise Version:20H2, Build:19042.1348
CentOS 7.9.2009, Kernel version:3.10.0-1160.21.1.el7.x86_64
もくじ
1. 環境設定
はじめに、Terminalと説明した場合、Linuxでは通常のTermialを指しますが、WindowsではNios® V Command Shell (Quartus Prime Pro 21.3)を指すことします。そして主な作業はWindows上で行いますが、特に説明が無い場合はWindows、Linuxでコマンドは同一です。
次に、Nios® V processor インストール、Hello World実行編で設定した環境設定を確認してください。Windowsの場合は環境変数を設定したため、Terminalを開けばコマンドを実行出来ますが、Linuxの場合は環境変数設定はenv.shに記述したので、Terminalを開いたら下記コマンドを実行して、環境変数を設定する必要があります。これが面倒な場合はこの設定を~/.bashrcなどに追加してください。
$ source env.sh
そして、Nios® V processor インストール、Hello World実行編の内容は既に実行済として話を進めます。
2. ブート方法
ここでは、 niosv-downloadコマンド無しで、FPGAコンフィグレーション直後、又は、リセット解除後にプログラムをブートする方法について説明します。
まず、Terminalを開いて下記コマンドでPlatform Deisgnerでデザインを開きます。
[niosv-shell] C:\workspace\base\NiosV\test> qsys-edit --quartus-project=top.qpf sys.qsys
デザインではプログラムはOn-Chip Memoryである"ram"上で動作しています。このメモリーはFPGAコンフィグレーション時に初期値を設定できるため、プログラムを保存することができます。Platform Deisgnerで"cpu"をクリックすると、下記のようにNios® V processorの設定が確認できます。
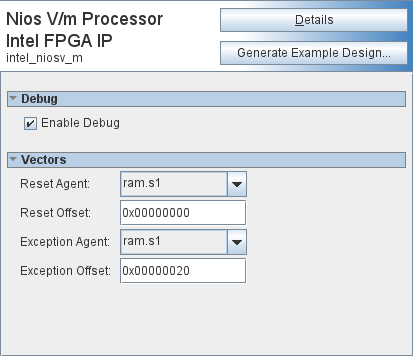
これより、リセットベクターはramの先頭から、例外ベクターはオフセット0x20に設定されています。
次に"ram"をクリックして、On-Chip Memoryの設定を確認します。スクロールすると、最後に"Memory Initialization"セクションがあり、下記のような設定なっているか確認します。
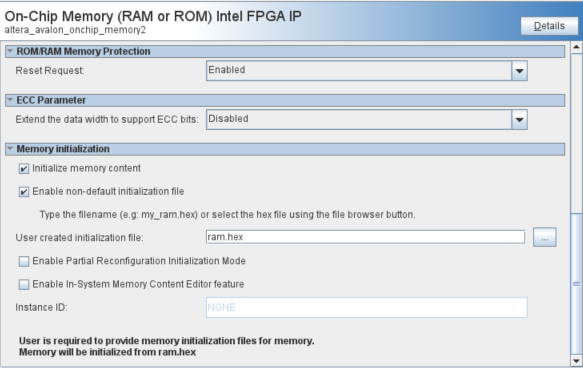
これは、"top.qpf"ファイルのあるディレクトリーの"ram.hex"ファイルでOn-Chip Memoryを初期化するとの設定です。今はまだ"ram.hex"は生成されていないはずなので、初期化はされず、全て0のままです。
2.1 ram.hexの生成
プログラムを変換して、ram.hexファイルを生成します。Terminalで下記コマンドを入力します。
[niosv-shell] C:\workspace\base\NiosV\test> elf2hex software/app/build/hello.elf  -w 32 -b 0x0 -e 0x7FFFF -o ram.hex
Picked up _JAVA_OPTIONS: -Djava.net.preferIPv4Stack=true
ここで、elf2hexコマンド引数について説明します。
| Option | Value | Description |
|---|---|---|
| -w | 32 | データ幅指定。On-Chip Memoryのバス幅に合わせるので、ここでは32を指定 |
| -b | 0x0 | 開始オフセットアドレス。On-Chip Memoryの先頭から配置するので、ここでは0x0指定 |
| -e | 0x7FFFF | 終了オフセットアドレス。On-Chip Memoryの最後まで配置するので、ここでは0x7FFFF指定 |
| -o | ram.hex | 出力ファイル名、ここではOn-Chip MemoryのUser created Initialization fileのファイル名(ram.hex)を指定 |
以上でram.hexの生成は完了です。
2.2 ram.hexを有効にする
このram.hexを有効にするには、一回フルコンパイルが必要です。フルコンパイルには時間が掛かりますが、一回完了すれば、それ以降はMemory UpdateとAssemblerコマンドのみで更新可能です。
Terminalより下記コマンドを実行し、フルコンパイルします。
[niosv-shell] C:\workspace\base\NiosV\test> quartus_sh --flow compile top
2.3 Hello Worldを実行する
Terminalより、下記コマンドを実行して、Hello Worldを確認します。FPGAコンフィグレーションはWindowsとLinuxでコマンドが異なるので、別々に記載してあります。
コンフィグレーションの後に、juart-terminalを続けて実行します。
Windows
[niosv-shell] C:\workspace\base\NiosV\test> quartus_pgm -c 1 -m JTAG -o p;top.sof@1
Info: *******************************************************************
Info: Running Quartus Prime Programmer
    Info: Version 21.3.0 Build 170 09/23/2021 SC Pro Edition
    Info: Copyright (C) 2021  Intel Corporation. All rights reserved.
    Info: Your use of Intel Corporation's design tools, logic functions
    Info: and other software and tools, and any partner logic
    Info: functions, and any output files from any of the foregoing
    Info: (including device programming or simulation files), and any
    Info: associated documentation or information are expressly subject
    Info: to the terms and conditions of the Intel Program License
    Info: Subscription Agreement, the Intel Quartus Prime License Agreement,
    Info: the Intel FPGA IP License Agreement, or other applicable license
    Info: agreement, including, without limitation, that your use is for
    Info: the sole purpose of programming logic devices manufactured by
    Info: Intel and sold by Intel or its authorized distributors.  Please
    Info: refer to the applicable agreement for further details, at
    Info: https://fpgasoftware.intel.com/eula.
    Info: Processing started: Fri Dec  3 14:20:56 2021
    Info: System process ID: 12580
Info: Command: quartus_pgm -c 1 -m JTAG -o p;top.sof@1
Info (213045): Using programming cable "USB-BlasterII [USB-1]"
Info (213011): Using programming file top.sof with checksum 0x1D3881A0 for device 10AS066N3F40@1
Info (209060): Started Programmer operation at Fri Dec  3 14:21:00 2021
Info (209016): Configuring device index 1
Info (209017): Device 1 contains JTAG ID code 0x02E050DD
Info (209007): Configuration succeeded -- 1 device(s) configured
Info (209011): Successfully performed operation(s)
Info (209061): Ended Programmer operation at Fri Dec  3 14:21:12 2021
Info: Quartus Prime Programmer was successful. 0 errors, 0 warnings
    Info: Peak virtual memory: 1278 megabytes
    Info: Processing ended: Fri Dec  3 14:21:12 2021
    Info: Elapsed time: 00:00:16
    Info: System process ID: 12580

[niosv-shell] C:\workspace\base\NiosV\test> juart-terminal
juart-terminal: connected to hardware target using JTAG UART on cable
juart-terminal: "USB-BlasterII [USB-1]", device 1, instance 0
juart-terminal: (Use the IDE stop button or Ctrl-C to terminate)

Hello world, this is the Nios V/m cpu checking in 0...
Hello world, this is the Nios V/m cpu checking in 1...
Hello world, this is the Nios V/m cpu checking in 2...
Hello world, this is the Nios V/m cpu checking in 3...
.....
.....
.....
Hello world, this is the Nios V/m cpu checking in 993...
Hello world, this is the Nios V/m cpu checking in 994...
Hello world, this is the Nios V/m cpu checking in 995...
Hello world, this is the Nios V/m cpu checking in 996...
Hello world, this is the Nios V/m cpu checking in 997...
Hello world, this is the Nios V/m cpu checking in 998...
Hello world, this is the Nios V/m cpu checking in 999...
Bye world!


juart-terminal: exiting due to ^C on host
Linux(ログは省略)
[intel@localhost test]$ quartus_pgm -c 1 -m JTAG -o p\;top.sof@1
[intel@localhost test]$ juart-terminal
これで、Windows, Linux共に、ブートしてプログラムが実行できることが確認できました。
2.4 Hello uC/OS-IIをフルコンパイル無しで反映させる
ここでは、フルコンパイル無しで、On-Chip Memoryを更新する方法について説明します。
まず、最初に下記コマンドで、hello_ucosii.elfを生成します。
[niosv-shell] C:\workspace\base\NiosV\test> elf2hex software/ucosii_app/build/hello_ucosii.elf  -w 32 -b 0x0 -e 0x7FFFF -o ram.hex
Picked up _JAVA_OPTIONS: -Djava.net.preferIPv4Stack=true
次に、quartus_cdbコマンドを実行して、メモリー初期化ファイルを更新します。GUIでは"Processing"メニューの"Update Memory Initialization File”に該当します。
[niosv-shell] C:\workspace\base\NiosV\test> quartus_cdb top -c top --update_mif
Info: *******************************************************************
Info: Running Quartus Prime MIF/HEX Update
    Info: Version 21.3.0 Build 170 09/23/2021 SC Pro Edition
    Info: Copyright (C) 2021  Intel Corporation. All rights reserved.
    Info: Your use of Intel Corporation's design tools, logic functions
    Info: and other software and tools, and any partner logic
    Info: functions, and any output files from any of the foregoing
    Info: (including device programming or simulation files), and any
    Info: associated documentation or information are expressly subject
    Info: to the terms and conditions of the Intel Program License
    Info: Subscription Agreement, the Intel Quartus Prime License Agreement,
    Info: the Intel FPGA IP License Agreement, or other applicable license
    Info: agreement, including, without limitation, that your use is for
    Info: the sole purpose of programming logic devices manufactured by
    Info: Intel and sold by Intel or its authorized distributors.  Please
    Info: refer to the applicable agreement for further details, at
    Info: https://fpgasoftware.intel.com/eula.
    Info: Processing started: Fri Dec  3 14:58:24 2021
    Info: System process ID: 19364
Info: Command: quartus_cdb top -c top --update_mif
Info (16677): Loading final database.
Info (16734): Loading "final" snapshot for partition "root_partition".
Info (16734): Loading "final" snapshot for partition "auto_fab_0".
Info (16678): Successfully loaded final database: elapsed time is 00:00:03.
Warning (113015): Width of data items in "ram.hex" is greater than the memory width. Wrapping data items to subsequent addresses. Found 16384 warnings, reporting 10 File: C:/workspace/base/NiosV/test/ram.hex Line: 1
    Warning (113009): Data at line (2) of memory initialization file "ram.hex" is too wide to fit in one memory word. Wrapping data to subsequent addresses. File: C:/workspace/base/NiosV/test/ram.hex Line: 2
    Warning (113009): Data at line (3) of memory initialization file "ram.hex" is too wide to fit in one memory word. Wrapping data to subsequent addresses. File: C:/workspace/base/NiosV/test/ram.hex Line: 3
    Warning (113009): Data at line (4) of memory initialization file "ram.hex" is too wide to fit in one memory word. Wrapping data to subsequent addresses. File: C:/workspace/base/NiosV/test/ram.hex Line: 4
    Warning (113009): Data at line (5) of memory initialization file "ram.hex" is too wide to fit in one memory word. Wrapping data to subsequent addresses. File: C:/workspace/base/NiosV/test/ram.hex Line: 5
    Warning (113009): Data at line (6) of memory initialization file "ram.hex" is too wide to fit in one memory word. Wrapping data to subsequent addresses. File: C:/workspace/base/NiosV/test/ram.hex Line: 6
    Warning (113009): Data at line (7) of memory initialization file "ram.hex" is too wide to fit in one memory word. Wrapping data to subsequent addresses. File: C:/workspace/base/NiosV/test/ram.hex Line: 7
    Warning (113009): Data at line (8) of memory initialization file "ram.hex" is too wide to fit in one memory word. Wrapping data to subsequent addresses. File: C:/workspace/base/NiosV/test/ram.hex Line: 8
    Warning (113009): Data at line (9) of memory initialization file "ram.hex" is too wide to fit in one memory word. Wrapping data to subsequent addresses. File: C:/workspace/base/NiosV/test/ram.hex Line: 9
    Warning (113009): Data at line (10) of memory initialization file "ram.hex" is too wide to fit in one memory word. Wrapping data to subsequent addresses. File: C:/workspace/base/NiosV/test/ram.hex Line: 10
    Warning (113009): Data at line (11) of memory initialization file "ram.hex" is too wide to fit in one memory word. Wrapping data to subsequent addresses. File: C:/workspace/base/NiosV/test/ram.hex Line: 11
Info (39024): Processed the following Memory Initialization File(s)
    Info (39025): Processed Memory Initialization File C:/workspace/base/NiosV/test/ram.hex File: C:/workspace/base/NiosV/test/ram.hex Line: 0
Info (20274): Successfully committed final database.
Info: Quartus Prime MIF/HEX Update was successful. 0 errors, 11 warnings
    Info: Peak virtual memory: 2038 megabytes
    Info: Processing ended: Fri Dec  3 14:58:33 2021
    Info: Elapsed time: 00:00:09
    Info: System process ID: 19364
最後に、quartus_asmコマンドを実行して、FPGAコンフィグレーションで使用するSOFファイルを生成します。GUIでは"Processing"メニューの"Start->Start Assembler”に該当します。
[niosv-shell] C:\workspace\base\NiosV\test> quartus_asm --read_settings_files=on --write_settings_files=off top -c top
Info: *******************************************************************
Info: Running Quartus Prime Assembler
    Info: Version 21.3.0 Build 170 09/23/2021 SC Pro Edition
    Info: Copyright (C) 2021  Intel Corporation. All rights reserved.
    Info: Your use of Intel Corporation's design tools, logic functions
    Info: and other software and tools, and any partner logic
    Info: functions, and any output files from any of the foregoing
    Info: (including device programming or simulation files), and any
    Info: associated documentation or information are expressly subject
    Info: to the terms and conditions of the Intel Program License
    Info: Subscription Agreement, the Intel Quartus Prime License Agreement,
    Info: the Intel FPGA IP License Agreement, or other applicable license
    Info: agreement, including, without limitation, that your use is for
    Info: the sole purpose of programming logic devices manufactured by
    Info: Intel and sold by Intel or its authorized distributors.  Please
    Info: refer to the applicable agreement for further details, at
    Info: https://fpgasoftware.intel.com/eula.
    Info: Processing started: Fri Dec  3 14:58:36 2021
    Info: System process ID: 11636
Info: Command: quartus_asm --read_settings_files=on --write_settings_files=off top -c top
Info (16677): Loading final database.
Info (16734): Loading "final" snapshot for partition "root_partition".
Info (16734): Loading "final" snapshot for partition "auto_fab_0".
Info (16678): Successfully loaded final database: elapsed time is 00:00:03.
Info: Quartus Prime Assembler was successful. 0 errors, 0 warnings
    Info: Peak virtual memory: 4266 megabytes
    Info: Processing ended: Fri Dec  3 14:59:16 2021
    Info: Elapsed time: 00:00:40
    Info: System process ID: 11636
ごれで、hello_ucosii.elfが反映されたSOFが生成されました。また、quartus_cdbやquartus_asmコマンドの引数は、一回GUIで実行すると、コンソール画面に引数と共に表示されてますので、それを利用するのが簡単です。
2.5 Hello uC/OS-IIを実行する
Terminalより、下記コマンドを実行して、Hello uCOS-IIを確認します。FPGAコンフィグレーションはWindowsとLinuxでコマンドが異なるので、別々に記載してあります。コンフィグレーション後に、juart-terminalを続けて実行します。
Windows
[niosv-shell] C:\workspace\base\NiosV\test> quartus_pgm -c 1 -m JTAG -o p;top.sof@1
Info: *******************************************************************
Info: Running Quartus Prime Programmer
    Info: Version 21.3.0 Build 170 09/23/2021 SC Pro Edition
    Info: Copyright (C) 2021  Intel Corporation. All rights reserved.
    Info: Your use of Intel Corporation's design tools, logic functions
    Info: and other software and tools, and any partner logic
    Info: functions, and any output files from any of the foregoing
    Info: (including device programming or simulation files), and any
    Info: associated documentation or information are expressly subject
    Info: to the terms and conditions of the Intel Program License
    Info: Subscription Agreement, the Intel Quartus Prime License Agreement,
    Info: the Intel FPGA IP License Agreement, or other applicable license
    Info: agreement, including, without limitation, that your use is for
    Info: the sole purpose of programming logic devices manufactured by
    Info: Intel and sold by Intel or its authorized distributors.  Please
    Info: refer to the applicable agreement for further details, at
    Info: https://fpgasoftware.intel.com/eula.
    Info: Processing started: Fri Dec  3 15:28:21 2021
    Info: System process ID: 764
Info: Command: quartus_pgm -c 1 -m JTAG -o p;top.sof@1
Info (213045): Using programming cable "USB-BlasterII [USB-1]"
Info (213011): Using programming file top.sof with checksum 0x1D3881A0 for device 10AS066N3F40@1
Info (209060): Started Programmer operation at Fri Dec  3 15:28:24 2021
Info (209016): Configuring device index 1
Info (209017): Device 1 contains JTAG ID code 0x02E050DD
Info (209007): Configuration succeeded -- 1 device(s) configured
Info (209011): Successfully performed operation(s)
Info (209061): Ended Programmer operation at Fri Dec  3 15:28:36 2021
Info: Quartus Prime Programmer was successful. 0 errors, 0 warnings
    Info: Peak virtual memory: 1267 megabytes
    Info: Processing ended: Fri Dec  3 15:28:36 2021
    Info: Elapsed time: 00:00:15
    Info: System process ID: 764

[niosv-shell] C:\workspace\base\NiosV\test> juart-terminal
juart-terminal: connected to hardware target using JTAG UART on cable
juart-terminal: "USB-BlasterII [USB-1]", device 1, instance 0
juart-terminal: (Use the IDE stop button or Ctrl-C to terminate)

Hello from main...
Task1 -- TOS: 0x27934, BOS: 0x25938
Task2 -- TOS: 0x29938, BOS: 0x2793c
Task3 -- TOS: 0x2b938, BOS: 0x2993c
Stat -- TOS: 0x2c8c0, BOS: 0x2c0c4
Idle -- TOS: 0x2d2d4, BOS: 0x2cad8
Hello from task1: 0

Hello from task2: 0

Hello from task3: 0

Hello from task3: 1

Hello from task2: 1

Hello from task3: 2

Hello from task1: 1

Hello from task3: 3

Hello from task2: 2

Hello from task3: 4

Hello from task3: 5

Hello from task2: 3

Hello from task1: 2

Hello from task3: 6

Hello from task3: 7

Hello from task2: 4

Hello from task3: 8

juart-terminal: exiting due to ^C on host
Linux(ログは省略)
[intel@localhost test]$ quartus_pgm -c 1 -m JTAG -o p\;top.sof@1
[intel@localhost test]$ juart-terminal
これで、フルコンパイル無しで、On-Chip Memoryを更新し、Windows, Linux共に、ブートしてプログラムが実行できることが確認できました。
3. シミュレーション
ここでは、今まで実行してきたHello WorldをQuesta*-Intel® FPGA Edition上で実行してみます。Questa*-Intel® FPGA Starter Editionを使用の方もコマンドは全く同一です。そのため表記はQuesta*-Intel® FPGA Editionを使用します。
3.1 シミュレーション用ファイル生成
シミュレーション用ファイルの生成を行います。Terminalを開き、下記コマンドにより、Platform Designerにてデザインを開きます。
[niosv-shell] C:\workspace\base\NiosV\test> qsys-edit --quartus-project=top.qpf sys.qsys
そして、"Genereate"メニューより、"Generate Testbench System..."をクリックします。下記画面の内容を確認し、"Generate"をクリックします。
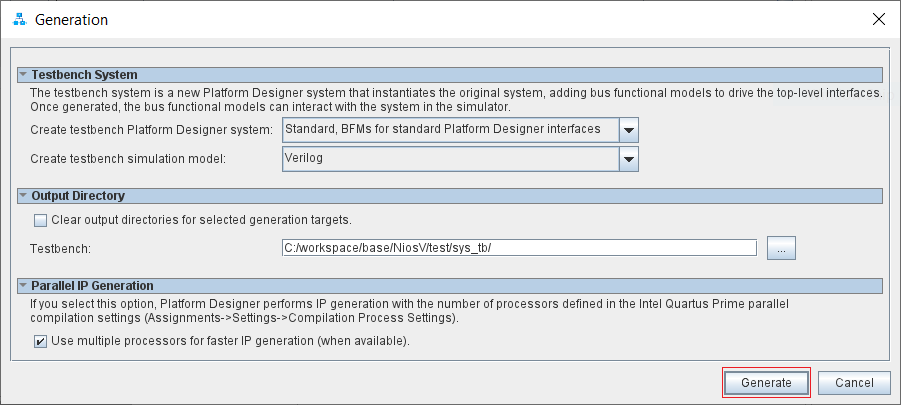
これで、シミュレーション用ファイルが生成されました。通常の"Generate HDL.."で生成するシミュレーションファイルとの違いは、クロックやリセットなどの、外部にExportされている信号をシミュレーションするテストベンチファイルが生成される点です。生成が完了すると、下記のようなディレクトリー構成のファイル群が生成されます。
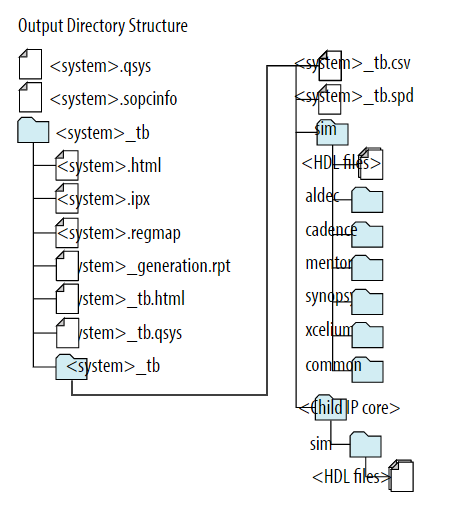
ここでSystemには.qsysのファイル名が入りますので、今回の場合は"sys"になります。
詳細は1.14.5. Generating System Testbench Filesを参照してください。
3.2 シミュレーション用ファイルの準備
今回使用するシミュレーターはQuesta*-Intel® FPGA Editionなので、sys_tb/sys_tb/sim/mentorディレクトリーに追加するファイルを保存します。まず、下記コマンドでプログラムをHEXファイルに変換し、保存します。
[niosv-shell] C:\workspace\base\NiosV\test> elf2hex software/app/build/hello.elf  -w 32 -b 0x0 -e 0x7FFFF -o sys_tb/sys_tb/sim/mentor/ram.hex
Picked up _JAVA_OPTIONS: -Djava.net.preferIPv4Stack=true
下記がシミュレーションコマンドをまとめたものです。"sys_tb/sys_tb/sim/mentor/example.do"として保存します。
source msim_setup.tcl
ld_debug
do wave.do
run 3ms
1番目の"source msim_setup.tcl"は全体の環境のセットアップを行います。
2番目の"ld_debug"はシミュレーションファイルをコンパイル結合させ、シミュレーションが実行できる状態にします。
3番目の"do wave.do"は表示する波形の信号を設定します。
4番目の"run 3ms"はシミュレーションを3ms実行させます。
次に、wave.doの詳細を示しますので、"sys_tb/sys_tb/sim/mentor/wave.do"として保存してください。このファイルにはAXI_BURST, AXI_SIZE, AXI_RESPと表示を解りやすくするためのユーザー型を定義しており、対象なる信号に対してはこの型を使用しています。
onerror {resume}
radix define AXI_BURST {
    "2'b00" "FIXED" -color "white",
    "2'b01" "INCR" -color "white",
    "2'b10" "WRAP" -color "white",
    "2'b11" "RES" -color "red",
    -default default
}
radix define AXI_SIZE {
    "3'b000" "1" -color "white",
    "3'b001" "2" -color "white",
    "3'b010" "4" -color "white",
    "3'b011" "8" -color "white",
    "3'b100" "16" -color "white",
    "3'b101" "32" -color "white",
    "3'b110" "64" -color "white",
    "3'b111" "128" -color "white",
    -default default
}
radix define AXI_RESP {
    "2'b00" "OKAY" -color "white",
    "2'b01" "EXOKAY" -color "green",
    "2'b10" "SLVERR" -color "red",
    "2'b11" "DECERR" -color "red",
    -default default
}
quietly WaveActivateNextPane {} 0
add wave -noupdate -label CLK /sys_tb/sys_inst/cpu/intel_niosv_m_inst/clk
add wave -noupdate -label RESET /sys_tb/sys_inst/cpu/intel_niosv_m_inst/reset_reset
add wave -noupdate -divider {INST BUS}
add wave -noupdate -label ARVALID /sys_tb/sys_inst/cpu/intel_niosv_m_inst/instruction_manager_arvalid
add wave -noupdate -label ARREADY /sys_tb/sys_inst/cpu/intel_niosv_m_inst/instruction_manager_arready
add wave -noupdate -label ARADDR /sys_tb/sys_inst/cpu/intel_niosv_m_inst/instruction_manager_araddr
add wave -noupdate -label ARSIZE -radix AXI_SIZE /sys_tb/sys_inst/cpu/intel_niosv_m_inst/instruction_manager_arsize
add wave -noupdate -label ARPROT /sys_tb/sys_inst/cpu/instruction_manager_arprot
add wave -noupdate -label RVALID /sys_tb/sys_inst/cpu/intel_niosv_m_inst/instruction_manager_rvalid
add wave -noupdate -label RREADY /sys_tb/sys_inst/cpu/intel_niosv_m_inst/instruction_manager_rready
add wave -noupdate -label RDATA /sys_tb/sys_inst/cpu/intel_niosv_m_inst/instruction_manager_rdata
add wave -noupdate -label RRESP -radix AXI_RESP /sys_tb/sys_inst/cpu/intel_niosv_m_inst/instruction_manager_rresp
add wave -noupdate -divider {DATA BUS}
add wave -noupdate -label ARVALID /sys_tb/sys_inst/cpu/intel_niosv_m_inst/data_manager_arvalid
add wave -noupdate -label ARREADY /sys_tb/sys_inst/cpu/intel_niosv_m_inst/data_manager_arready
add wave -noupdate -label ARADDR -radix hexadecimal /sys_tb/sys_inst/cpu/intel_niosv_m_inst/data_manager_araddr
add wave -noupdate -label ARSIZE -radix AXI_SIZE /sys_tb/sys_inst/cpu/intel_niosv_m_inst/data_manager_arsize
add wave -noupdate -label ARPROT /sys_tb/sys_inst/cpu/data_manager_arprot
add wave -noupdate -label RVALID /sys_tb/sys_inst/cpu/intel_niosv_m_inst/data_manager_rvalid
add wave -noupdate -label RREADY /sys_tb/sys_inst/cpu/intel_niosv_m_inst/data_manager_rready
add wave -noupdate -label RDATA -radix hexadecimal /sys_tb/sys_inst/cpu/intel_niosv_m_inst/data_manager_rdata
add wave -noupdate -label RRESP -radix AXI_RESP /sys_tb/sys_inst/cpu/intel_niosv_m_inst/data_manager_rresp
add wave -noupdate -label AWVALID /sys_tb/sys_inst/cpu/intel_niosv_m_inst/data_manager_awvalid
add wave -noupdate -label AWREADY /sys_tb/sys_inst/cpu/intel_niosv_m_inst/data_manager_awready
add wave -noupdate -label AWADDR -radix hexadecimal /sys_tb/sys_inst/cpu/intel_niosv_m_inst/data_manager_awaddr
add wave -noupdate -label AWSIZE -radix AXI_SIZE /sys_tb/sys_inst/cpu/intel_niosv_m_inst/data_manager_awsize
add wave -noupdate -label AWPROT /sys_tb/sys_inst/cpu/data_manager_awprot
add wave -noupdate -label BVALID /sys_tb/sys_inst/cpu/intel_niosv_m_inst/data_manager_bvalid
add wave -noupdate -label BREADY /sys_tb/sys_inst/cpu/intel_niosv_m_inst/data_manager_bready
add wave -noupdate -label BRESP -radix AXI_RESP /sys_tb/sys_inst/cpu/intel_niosv_m_inst/data_manager_bresp
add wave -noupdate -label WVALID /sys_tb/sys_inst/cpu/intel_niosv_m_inst/data_manager_wvalid
add wave -noupdate -label WREADY /sys_tb/sys_inst/cpu/intel_niosv_m_inst/data_manager_wready
add wave -noupdate -label WDATA -radix hexadecimal /sys_tb/sys_inst/cpu/intel_niosv_m_inst/data_manager_wdata
add wave -noupdate -label WLAST /sys_tb/sys_inst/cpu/intel_niosv_m_inst/data_manager_wlast
add wave -noupdate -label WSTRB /sys_tb/sys_inst/cpu/intel_niosv_m_inst/data_manager_wstrb
add wave -noupdate -divider Timer
add wave -noupdate -label ADDRESS -radix hexadecimal /sys_tb/sys_inst/cpu/timer_sw_agent_address
add wave -noupdate -label BYTE_ENABLE /sys_tb/sys_inst/cpu/timer_sw_agent_byteenable
add wave -noupdate -label READ /sys_tb/sys_inst/cpu/timer_sw_agent_read
add wave -noupdate -label READDATA -radix hexadecimal /sys_tb/sys_inst/cpu/timer_sw_agent_readdata
add wave -noupdate -label READDATAVALID /sys_tb/sys_inst/cpu/timer_sw_agent_readdatavalid
add wave -noupdate -label WRITE /sys_tb/sys_inst/cpu/timer_sw_agent_write
add wave -noupdate -label WRITEDATA -radix hexadecimal /sys_tb/sys_inst/cpu/timer_sw_agent_writedata
add wave -noupdate -divider IRQ
add wave -noupdate -label IRQ -radix hexadecimal /sys_tb/sys_inst/cpu/intel_niosv_m_inst/platform_irq_rx_irq
TreeUpdate [SetDefaultTree]
WaveRestoreCursors {{Cursor 1} {1283977 ps} 0}
quietly wave cursor active 1
configure wave -namecolwidth 150
configure wave -valuecolwidth 100
configure wave -justifyvalue left
configure wave -signalnamewidth 0
configure wave -snapdistance 10
configure wave -datasetprefix 0
configure wave -rowmargin 4
configure wave -childrowmargin 2
configure wave -gridoffset 0
configure wave -gridperiod 1
configure wave -griddelta 40
configure wave -timeline 0
configure wave -timelineunits ps
update
WaveRestoreZoom {1117371 ps} {2514107 ps}
3.3 シミュレーション実行
ではTerminalより、下記コマンドを実行してください。WindowsとLinuxでは"cd"コマンドでのパス指定が異なるので、念のため別々に記載します。
Windows
[niosv-shell] C:\workspace\base\NiosV\test> cd sys_tb\sys_tb\sim\mentor
[niosv-shell] C:\workspace\base\NiosV\test\sys_tb\sys_tb\sim\mentor> vsim -do example.do
Linux
[intel@localhost test]$ cd sys_tb/sys_tb/sim/mentor/
[intel@localhost mentor]$ vsim -do example.do
実行を完了すると、下記のような画面になります。
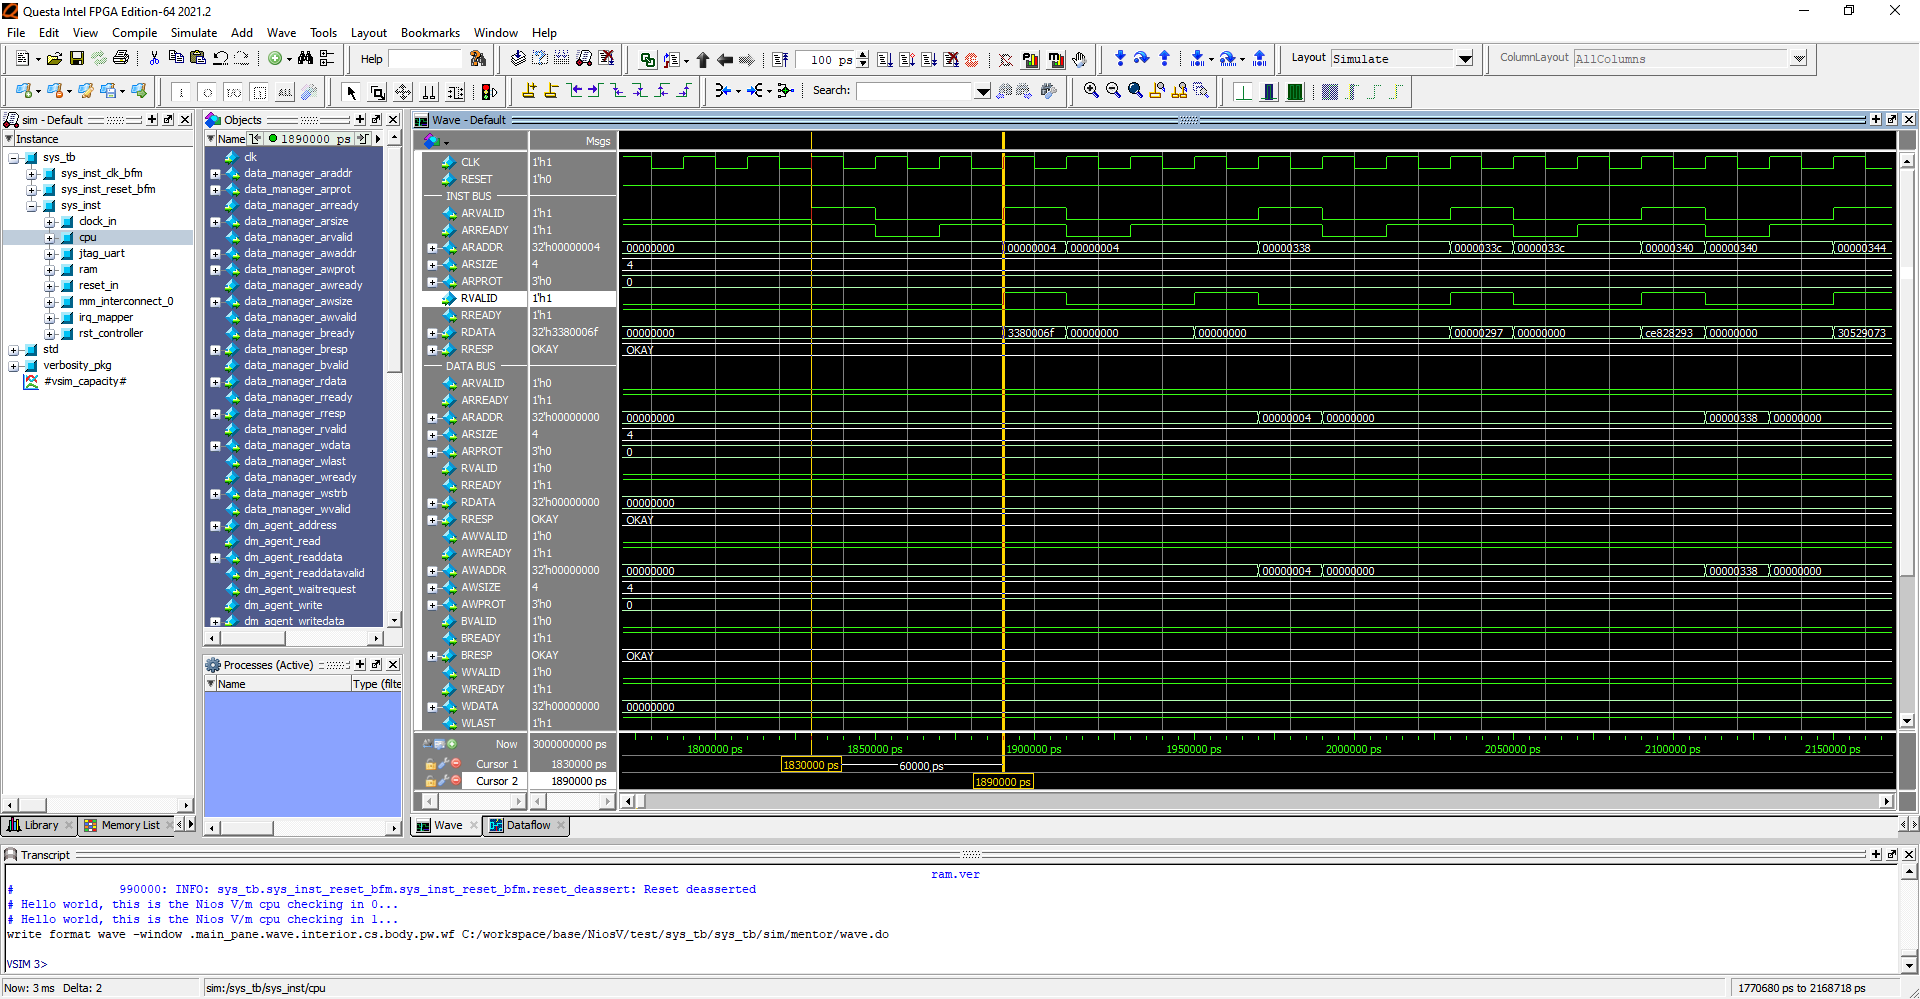
これから分かる通り、下記のTranscriptウインドウに"Hello world, this is the Nios V/m cpu checking in 0..."メッセージが確認できます。
3.4 信号の追加
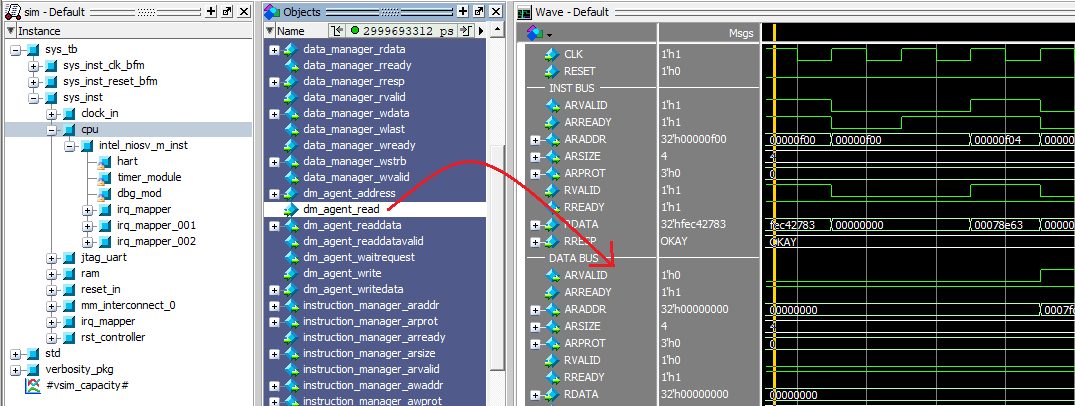
Waveウインドウに信号を追加したい場合は、下記の画面のように、追加したい信号をObjectsウインドウに表示させ、その信号をWave画面にドラッグ&ドロップしてください。
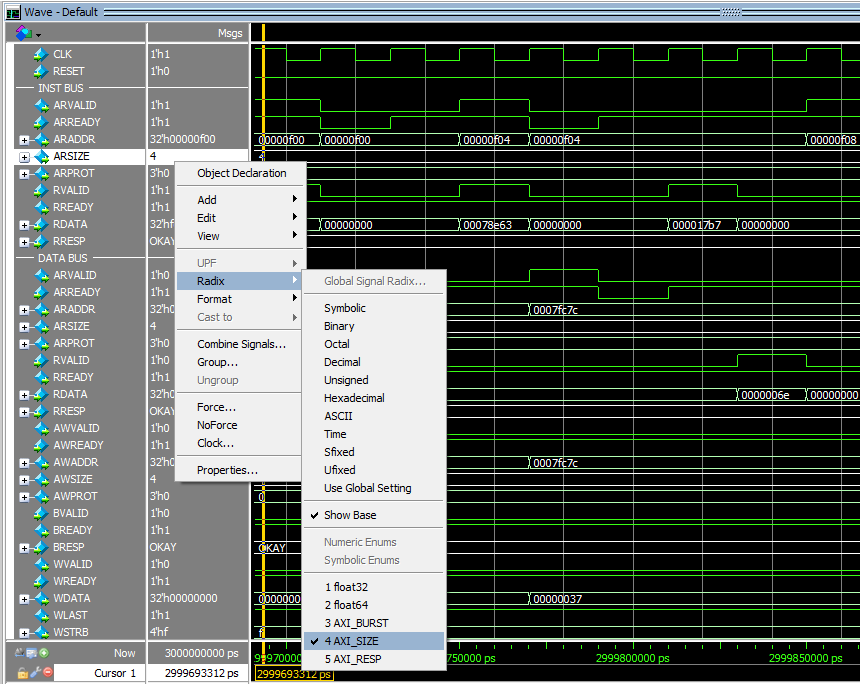
また、信号の表示フォーマットの変更は、信号を右クリックしてRadixを選択し、希望するフォーマットを選択してください。この時ユーザー定義型も表示されます。
そして、Fileメニューの"Save Format .. Ctrl+S"を選択するか"Ctrl+S"でwave.doに上書きできます。
3.5 AXI信号
ここで、バスに使用されているAXI信号について簡単に説明します。AXIバスはVALIDとREADY信号を使ったハンドシェイクを基本とします。接続先のSlaveのREADY信号がHIGHの場合、Master側はVALID信号をHIGHとして、そのチェンネル信号が有効であることを通知しします。詳しくはHandshake processを参照してください。
Nios® V/m ProcessorではAXI信号の一部が使用されており、下記に使用されている信号を示します。
| Channel | Signal | Source | Descrption |
|---|---|---|---|
| Read address channel | ARVALID | Master | リードアドレスチャンネルが有効の場合HIGH |
| ARREADY | Slave | 対応するスレーブがリードアドレスチャンネルを受け入れ可能の場合HIGH | |
| ARADDR | Master | リードアドレス | |
| ARSIZE | Master | リードサイズ | |
| ARPROT | Master | リードプロテクション | |
| Read data channle | RVALID | Slave | リードデータチャンネルが有効の場合HIGH |
| RREADY | Master | 対応するマスターがリードデータチャンネルを受け入れ可能の場合HIGH | |
| RDATA | Salve | リードデータ | |
| RRESP | Salve | リードレスポンス状態 | |
| Write address channel | AWVALID | Master | ライトアドレスチャンネル信号が有効の場合HIGH |
| AWREADY | Salve | 対応するスレーブがライトアドレスチャンネルを受け入れ可能の場合HIGH | |
| AWADDR | Master | ライトアドレス | |
| AWSIZE | Master | ライトサイズ | |
| AWPROT | Master | ライトプロテクション | |
| Write data Channel | WVALID | Master | ライトデータチャンネルが有効の場合HIGH |
| WREADY | Slave | 対応するスレーブがライトデータチャンネルを受け入れ可能の場合HIGH | |
| WDATA | Master | ライトデータ | |
| WLAST | Master | 最後のライトデータの場合HIGH | |
| WSTRB | Master | ライトデータの有効バイトを示す | |
| Write response channel | BVALID | Slave | ライトレスポンスチャンネル信号が有効の場合HIGH |
| BREADY | Master | 対応するマスターがライトレスポンスチャンネルを受け入れ可能の場合HIGH | |
| BRESP | Slave | ライトレスポンス状態 |
ここで、アドレス0x0000000のデータを読み出す信号波形を下記に示します。
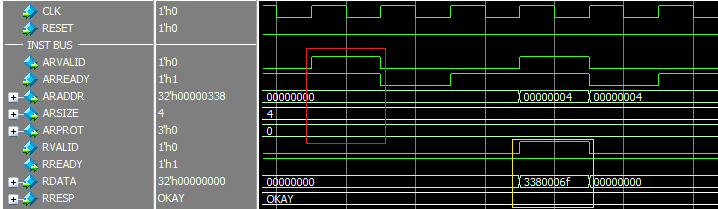
赤色枠で囲まれた信号がリードアドレスチャンネルで、黄色枠がリードデータチャンネルです。ハンドシェイクの条件を満たしたサイクルに情報が反映されてることが確認できます。
次に、上記AXI信号は通常のAXI信号に比べ信号種類が少ないことがわかります。主要信号であるARLEN, ARBURSTなどは、Platform Designerが自動挿入する変換IPによって補完されます。実際どのようなIPが挿入されているかは、Platform Designerの"System"メニューの"Show System with Platform Designer Interconect"を選択して、下記画面で確認できます。
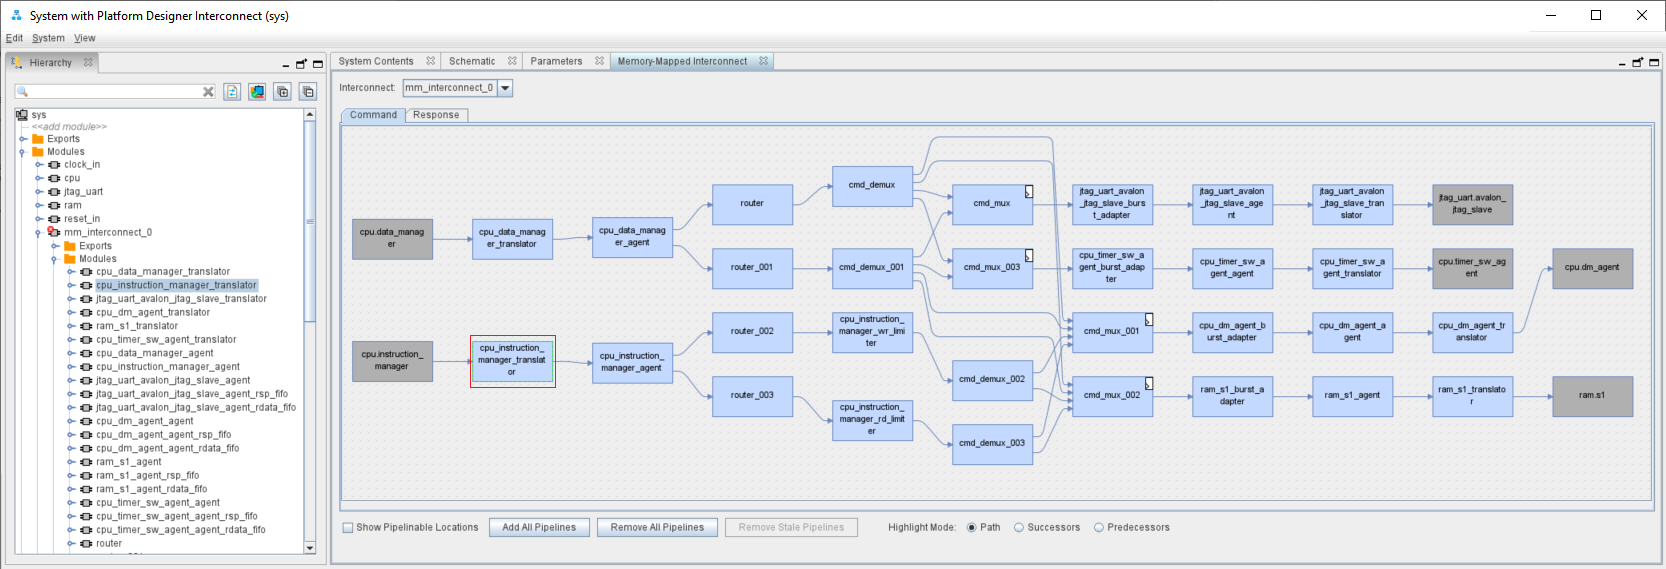
赤枠のモジュールが命令バスの変換IPです。実際にどのように補完されているかは、シミュレーターで確認するのが簡単です。対象となるモジュールの変換後のm0_xx信号を波形に追加した結果を下記に示します。黄色枠で囲われた信号が補完された信号です。
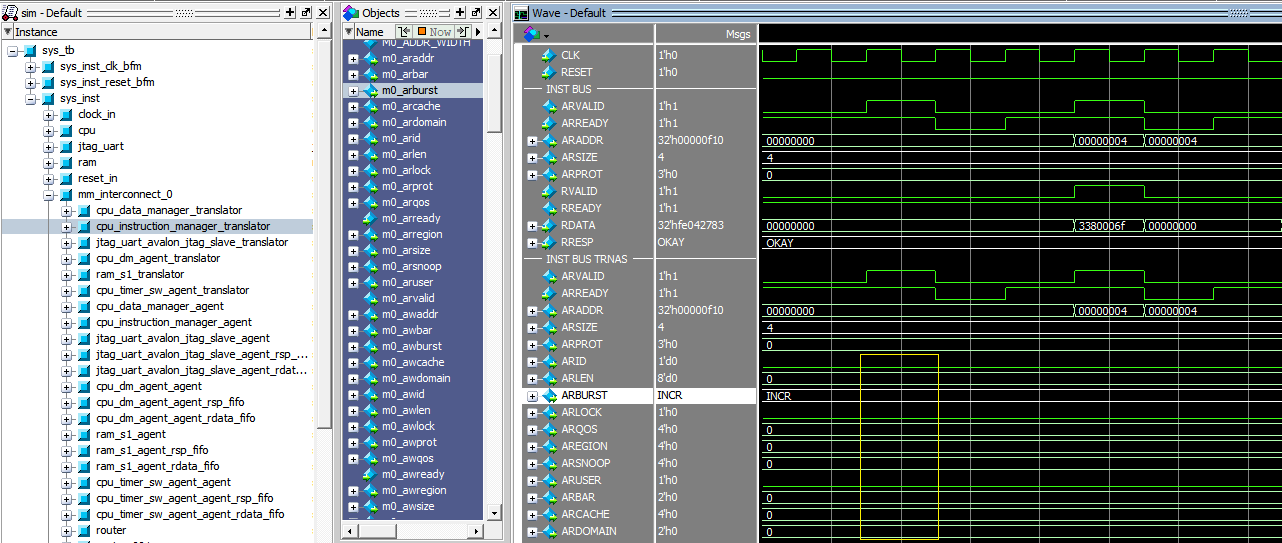
これを見ると、主な信号は0に固定され、ARBURSTだけINCR(2'b01)に変更されていることがわかります。以上からリードアドレスチャンネルの転送に関する信号を整理すると、
| Signal | Source | Value | Actual Value |
|---|---|---|---|
| ARADDR | Master | 0x00000000 | 0x00000000 |
| ARBURST | Master | INCR | 2b'01 |
| ARSIZE | Master | 4 | 3'b010 |
| ARLEN | Master | 1 | 8'b00000000 |
となり、アドレス0x00000000から開始し、バスサイズ4バイト、バースト長1のインクリメントアクセスを発行していることがわかります。
AXI信号の詳細に関しては、AMBA AXI and ACE Protocol Specification Chapter 2. Signal Descriptionsを参照してください。
3.6 プログラムトレース
ここでは、Wave画面を見て、プログラムが正しく実行されているかトレースしてみます。software/app/build/hello.elf.objdumpにhello.elfのソースコードとアセンブラーコードが混在したファイルが生成されます。これを元にトレースしてみます。
まず、hello.elf.objdumpのリセット開始からのアセンブラーコードを下記に示します。
00000000 <__reset>:
/* Jump to the _start entry point in the .text section if reset code
 * is allowed or if optimizing for RTL simulation.
 */
# if defined(ALT_ALLOW_CODE_AT_RESET) || defined(ALT_SIM_OPTIMIZE)
    /* Jump to the _start entry point in the .text section. */
    tail _start
   0:	3380006f          	j	338 <_start>
	...

00000338 <_start>:
    .globl _start
    .type _start, @function
_start:
    /* assume that we are in machine mode on startup */
	/* setup trap to catch anything that goes wrong early in the boot process */
	la t0, trap_vector
     338:	00000297          	auipc	t0,0x0
     33c:	ce828293          	addi	t0,t0,-792 # 20 <__flash_exceptions_start>
	csrw mtvec, t0
     340:	30529073          	csrw	mtvec,t0
そして、下記がリセット解除の命令バス信号です。

赤色枠が有効なリードアドレスチェンネルで、黄色枠が有効なリードデータチャンネルです。ここで、分岐命令直後(アドレス0x00000004)のデータはCPU内にフェッチはされますが、破棄されることに注意してください。この波形の命令バスのトーレス結果を下記に示します。
| Address | Data | Assembler Code |
|---|---|---|
| 0x00000000 | 0x3380006F | j 338 <_start> |
| 0x00000338 | 0x00000297 | auipc t0,0x0 |
| 0x0000033C | 0xCE828293 | addi t0,t0,-792 |
以上から、hello.elf.objdumpの内容と一致していることが確認できたと思います。
4.Eclipseによるデバッグ
デバックはEclipse IDE for Embedded C/C++ DevelopersとOpen OCDの組み合わせで行います。ここでは、簡単なデバッグ方法、ブレイク方法などについても説明します。
4.1 Eclipseのインストール
Eclipse IDE for Embedded C/C++ Developersより、Eclipseをダウンロードします。今回は2021/9バージョンを使用します。使用するOSに従って、右のWindows x86_64又はLinux x86_64をクリックしてください。
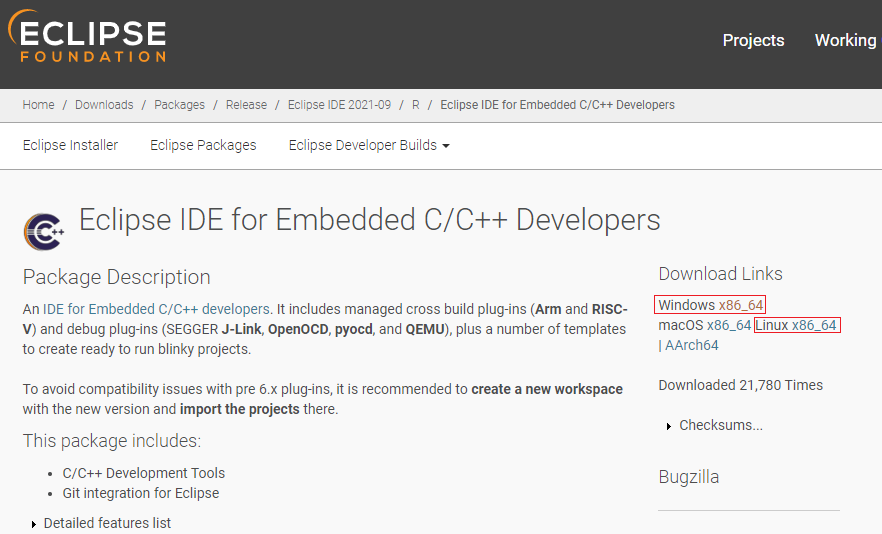
下記にOS別のリンクを示します。
| OS | Download_Link | SHA512 |
|---|---|---|
| Windows x86_64 | eclipse-embedcpp-2021-09-R-win32-x86_64.zip | f9032dd7e6eee45de939e937f411b33319c5aac162fb7e56566fea834c1479724cc9682b0aa1ff942e44603556a3b21280ad702dd9dde0aa785d74a2548328c8 |
| Linux x86_64 | eclipse-embedcpp-2021-09-R-linux-gtk-x86_64.tar.gz | dd143bf1f5095e7075502c338be88dc7b7cc0da563b6b65ea5ff1235665b788c85e2a969eb7a518c2a1cfaf095910b0b40cbb15c3671c7a7d39964645e43d181 |
念のためSHA512はTerminalで確認しておいてください。下記に確認結果を示します。
Windows
[niosv-shell] C:\tools> certutil -hashfile eclipse-embedcpp-2021-09-R-win32-x86_64.zip SHA512
SHA512 hash of eclipse-embedcpp-2021-09-R-win32-x86_64.zip:
f9032dd7e6eee45de939e937f411b33319c5aac162fb7e56566fea834c1479724cc9682b0aa1ff942e44603556a3b21280ad702dd9dde0aa785d74a2548328c8
CertUtil: -hashfile command completed successfully.
Linux
[intel@localhost ~]$ cd Downloads/
[intel@localhost Downloads]$ sha512sum eclipse-embedcpp-2021-09-R-linux-gtk-x86_64.tar.gz
dd143bf1f5095e7075502c338be88dc7b7cc0da563b6b65ea5ff1235665b788c85e2a969eb7a518c2a1cfaf095910b0b40cbb15c3671c7a7d39964645e43d181  eclipse-embedcpp-2021-09-R-linux-gtk-x86_64.tar.gz
ダウンロードしたファイルをWindowsではC:\toolsに移動させ、解凍してください。解凍すると"C:\tools\eclipse"ディレクトリーが作成されます。
Linuxの場合、~/Downloadsにeclipse-embedcpp-2021-09-R-linux-gtk-x86_64.tar.gzがダウンロードされているとすると、下記コマンドで解凍できます。
[intel@localhost Downloads]$ cd ~/tools
[intel@localhost tools]$ tar zxf ~/Downloads/eclipse-embedcpp-2021-09-R-linux-gtk-x86_64.tar.gz -C .
解凍後は~/tools/eclipseディレクトリーが作成されます。
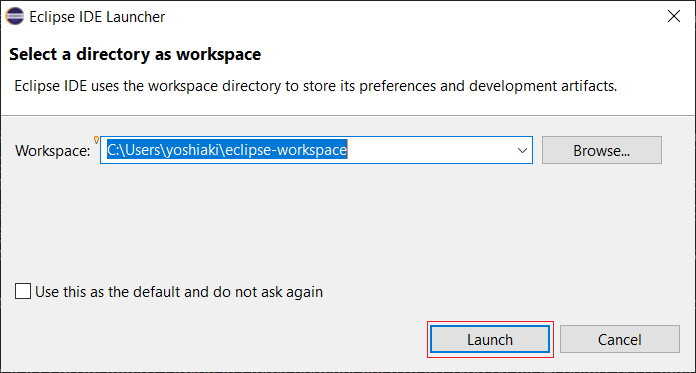
Eclipseの起動はWindowsでは、C:\tools\eclipse\eclipse.exeをダブルクリック、Linuxでは
[intel@localhost ~]$ ~/tools/eclipse/eclipse &
と入力して起動させてください。起動後、下記のようにworkspaceの保存先を聞いてきますので、ここではディフォルトのまま、"Launch"ボタンをクリックします。
そして、下記スプラッシュウインドウが表示され、

下記画面が表示されますので、Welcome横の"Close"を押して、Welcome画面は閉じてください。
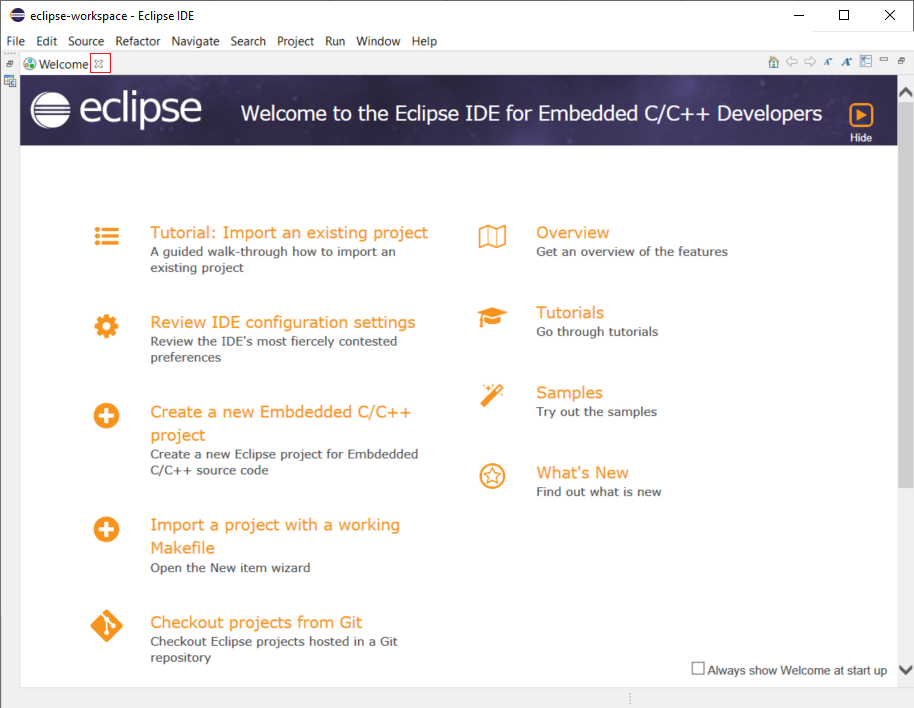
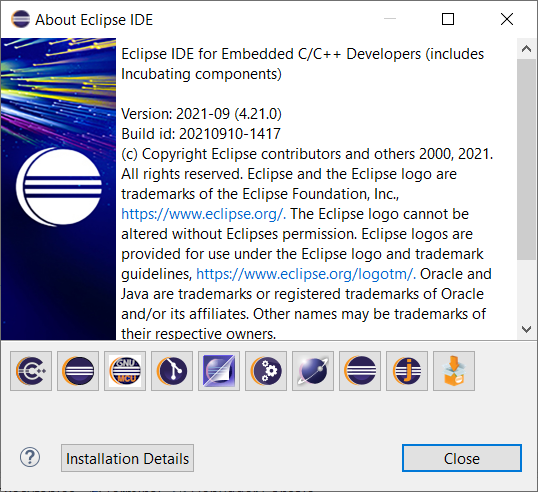
これで、Eclipseのインストールは完了です。念のため"Help"メニューより"About Eclipse IDE"を選択して、バージョンが下記のように"2021-9"であること確認してください。
4.2 cmake4eclipseのインストール
次に、Eclipse上でデザインをビルドするために、cmake4eclipseをインストールします。Installationをクリックすると、下記の画面が表示されます。
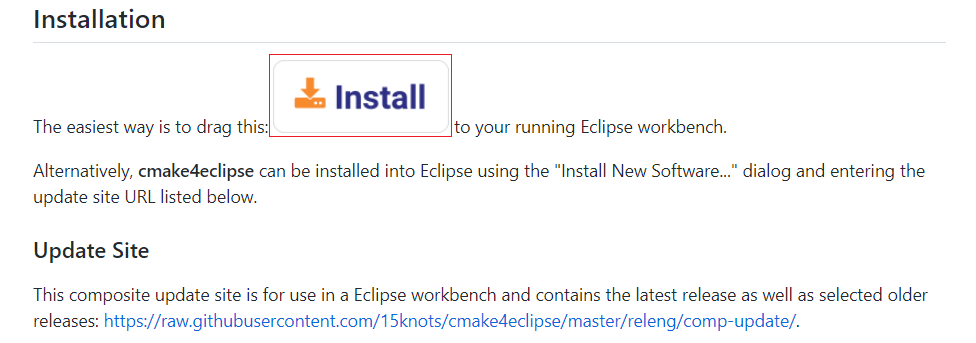
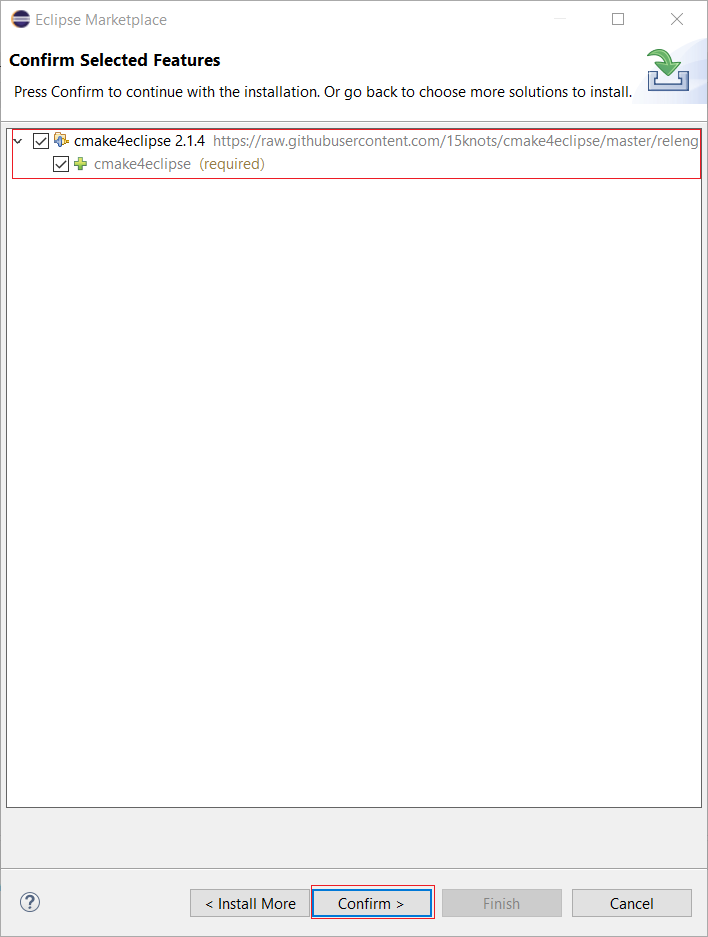
この赤枠の"Install"の部分をEclipseへドラッグ&ドロップしてください。下記画面が表示されますので、cmake4eclipseを確認して"Confirm"ボタンを押してください。
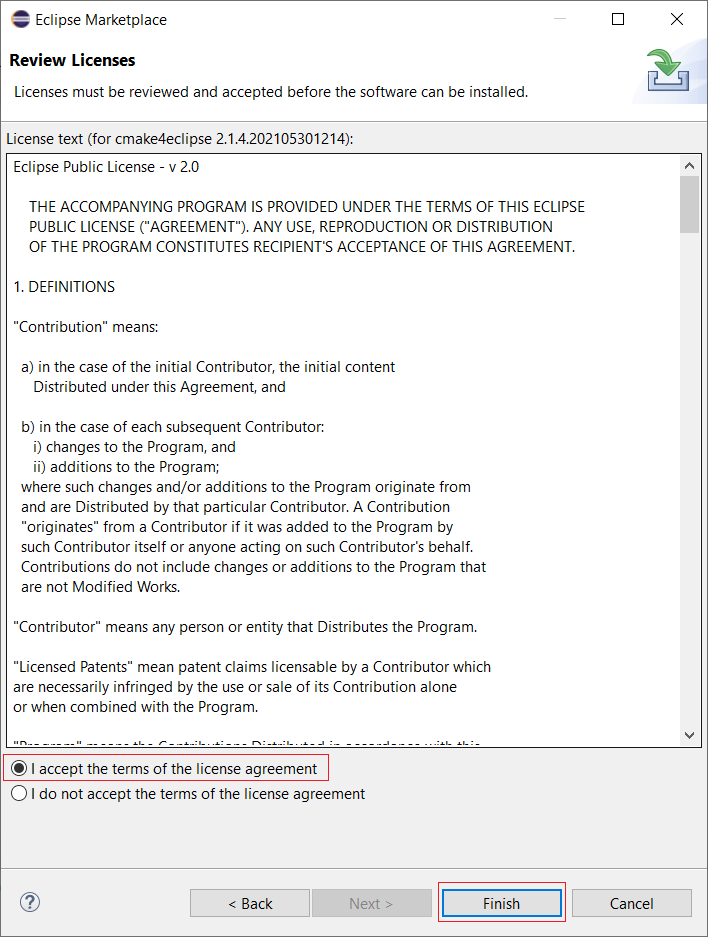
下記画面が表示されますので、ライセンス内容を確認し、"I accept the terms of the license agreement"をクリックして、"Finish"ボタンを押してください。
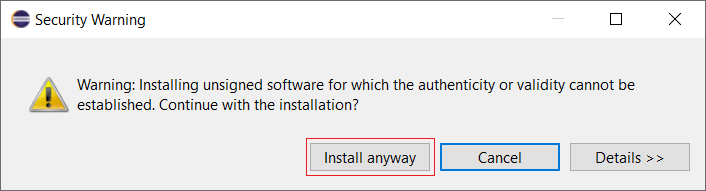
下記画面が表示されますので、"Install anyway"ボタンを押します。
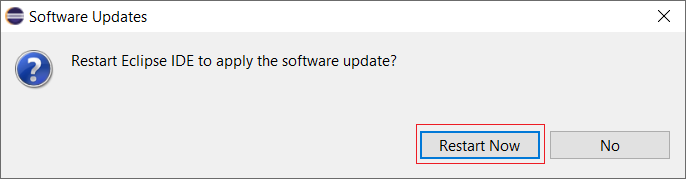
下記画面が表示されますので、"Restart Now"ボタンを押し、Eclipseを再起動させます。
以上で、cmake4eclipseのインストールは完了です。
4.3 Project作成&ビルド
ここでは、ProjectをEclipseでビルドする方法について説明します。ツールのパスはWindowsでは環境設定で、Linuxの場合はenv.shファイルで設定されているものとします。
注 今回使用した環境では、Widnwos上では期待通りの動作をしましたが、Linux上ではうまく動作しませんでした。そのため、Linixご使用の方で、この方法で動作しない場合は、Terminal上でビルドしてください。
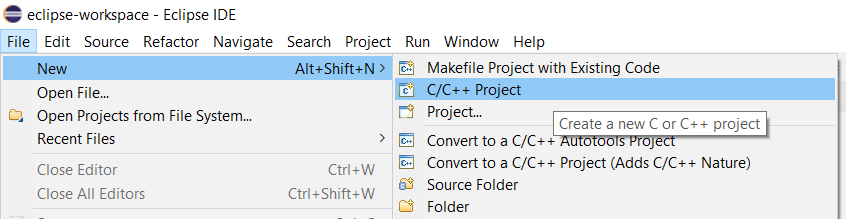
では、既に作成してあるHello WorldをEclipseでビルドできるようにインポートします。まず、software/app/buildディレクトリーがあると思いますので、削除してください。次に、Fileメニューより"New->C/C++ Project"を選択してください。
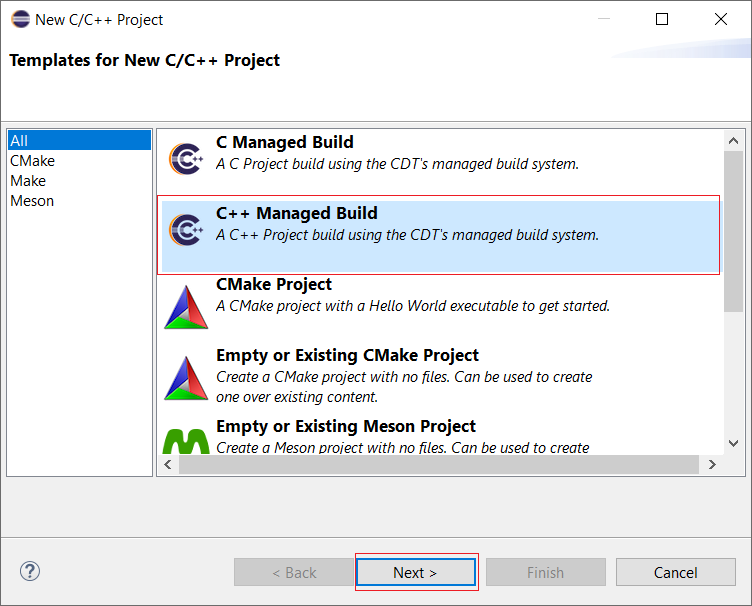
下記画面が表示されますので、"C++ Managed Build"を選択して、"Next"ボタンを押してください。
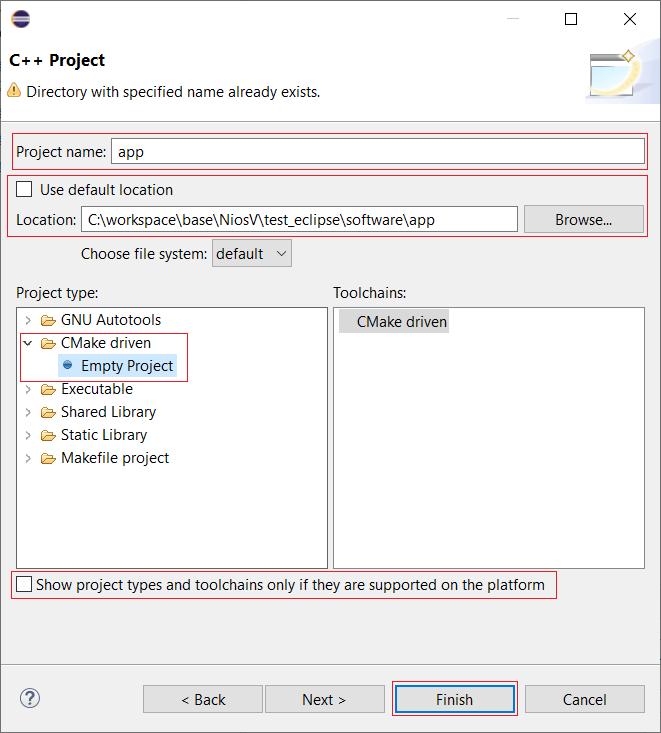
下記画面が表示されますので、一番下の"Show project types and toolchains only if they are supported on the platform"のチェックを外し、下記画面のように設定して"Finish"ボタンを押してください。
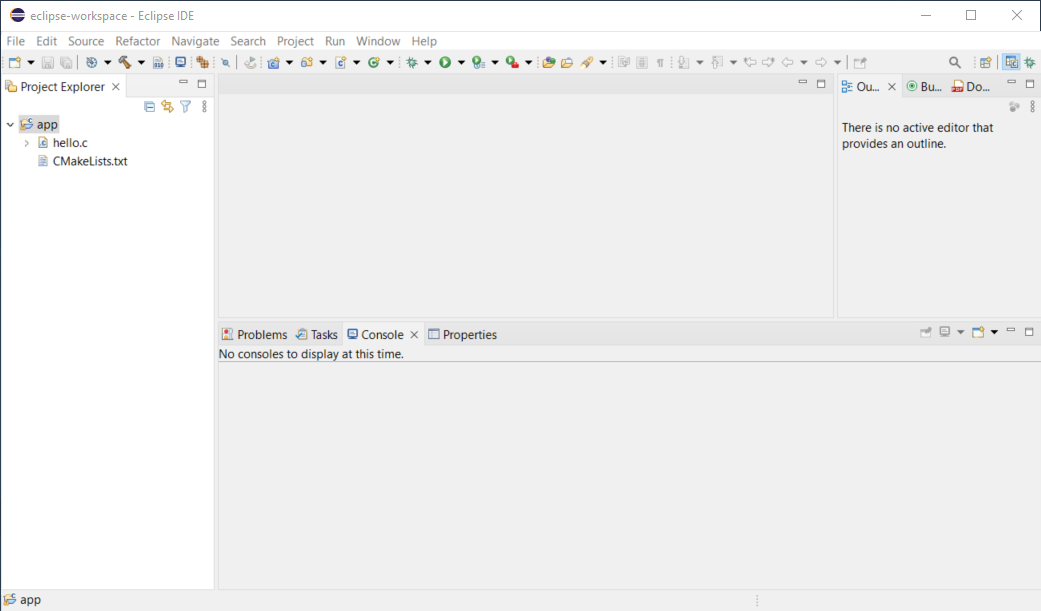
下記のような画面になりますので、"Project Explorer"で"app"を右クリックして、一番下の、"Properties"を選択します。
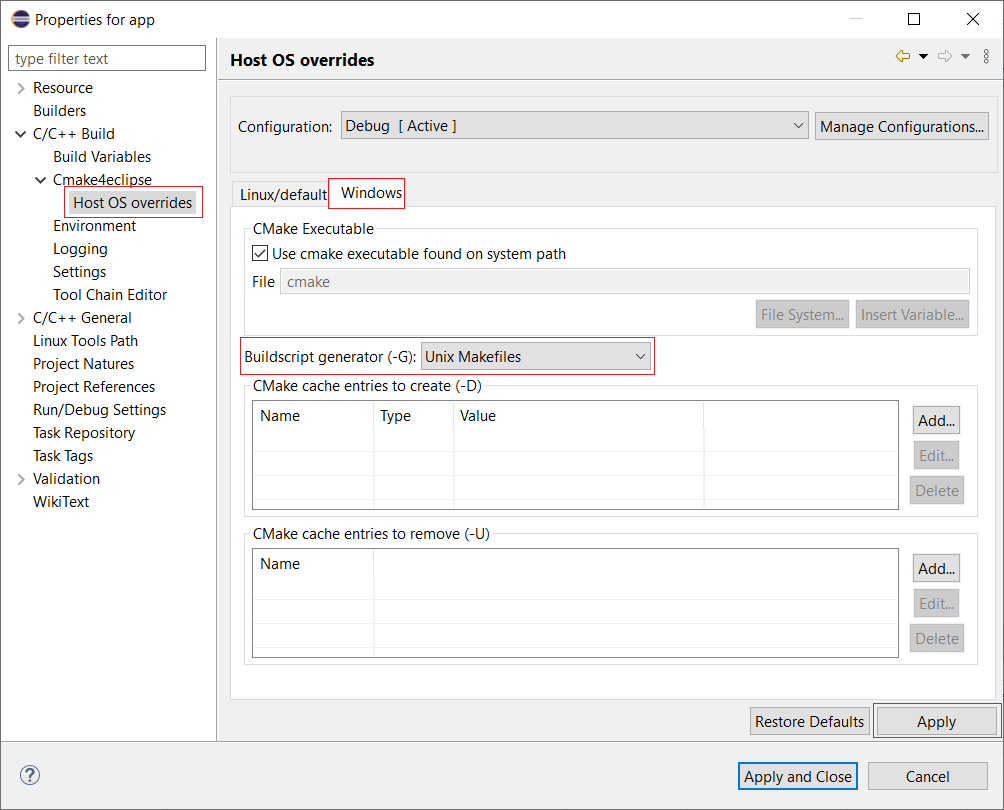
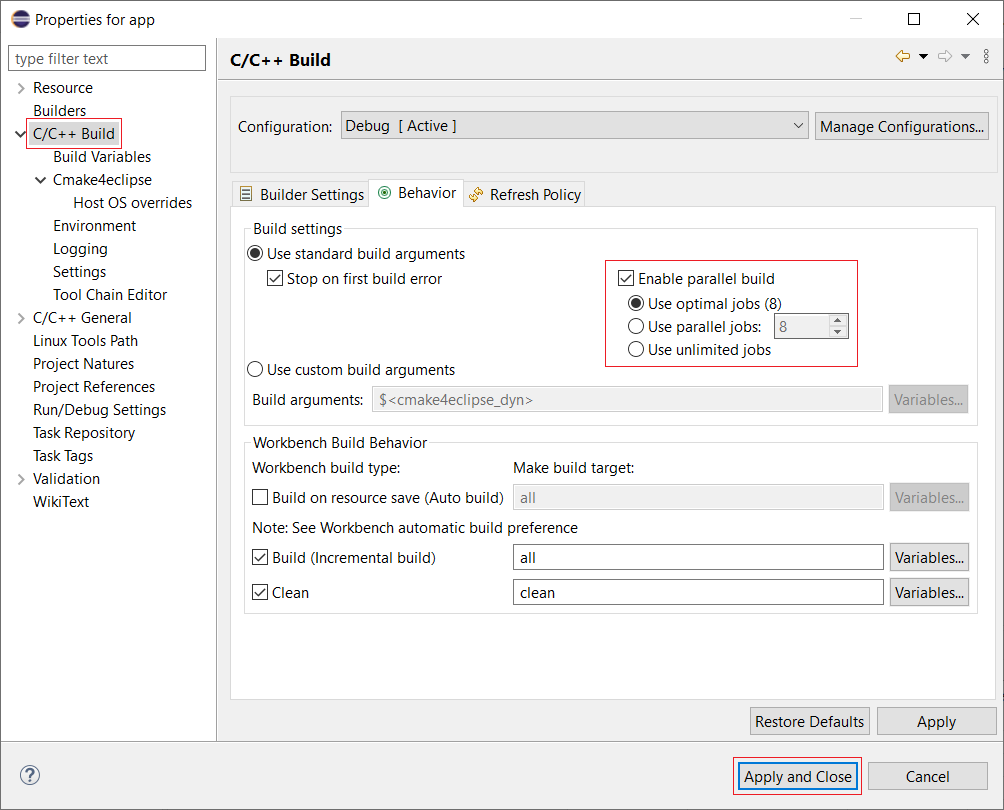
次にWindowsのみ、"Host OS overrides"を選択して、Buildscript generatorを"Unix Makefiles"に変更し、"Apply"ボタンを押してください。
そして、C/C++ Buildを選択して、"Use optimal jobs"を選択し、"Apply and Close"ボタンを押してください。
そして、"Project Explorer"で"app"を右クリックして、下記の"Build Project"を選択します。

ビルドが完了すると下記のような画面になります。

以上で、Projectの作成&ビルドが完了しました。
4.4 デバッグ準備
4.4.1 何もしないデザインの作成
2. ブート方法にて"ram"にブート可能なプログラムを書き込みました。しかしながらデバッグ時では、起動直後に何かアクセスすると、状態が変化し、都合が悪いです。特にprintfなどを使い、JTAG-UARTに表示を行っている場合、デバッグするプログラムの表示が期待通りならない可能性があります。そこで、ブートしても何もしないプログラムを作成します。具体的には下記のようにメインプログラムが何もない関数を用意しします。
void main() {
}
このmain.cを使用したプログラムを構築すれば、ほぼ何もしないプログラムが完成します。しかし、まだ内部レジスタなどは初期しますので、リセット直後に呼び出す"crt0.S"を書き換えます。
下記がそのコードです。リセットが解除されると、__resetにジャンプします。そして、tail _startで_start関数にジャンプし、初期化を続けます。このラベルを__resetに書き換えれば、リセットしても、ここで無限ループを行うため何もしません。これが今回作成する何もしないプログラムになります。
    .globl __reset
    .type __reset, @function
__reset:
/*
 * Jump to the _start entry point in the .text section if reset code
 * is allowed or if optimizing for RTL simulation.
 */
# if defined(ALT_ALLOW_CODE_AT_RESET) || defined(ALT_SIM_OPTIMIZE)
    /* Jump to the _start entry point in the .text section. */
    tail _start
では、実際のコマンドを示します。まず、software/nop_appディレクトリーを作成して、そこに、上記のmain関数をmain.cとして保存してください。続いて、下記コマンドでプロジェクトを作成します。
[niosv-shell] C:\workspace\base\NiosV\test> niosv-bsp -c --quartus-project=top.qpf --qsys=sys.qsys --type=hal software/nop_bsp/settings.bsp
[niosv-shell] C:\workspace\base\NiosV\test> niosv-app --bsp-dir=software/nop_bsp --app-dir=software/nop_app --srcs=software/nop_app --elf-name=nop.elf
プロジェクト作成後、nop_bsp/HAL/src/ctr0.Sを開き、下記のように_startを__resetに書き換えます。
    /* Jump to the _start entry point in the .text section. */
    tail __reset
では、下記コマンドでnop.elfをビルドします。
[niosv-shell] C:\workspace\base\NiosV\test> cmake -S software/nop_app -G "Unix Makefiles" -B software/nop_app/build
[niosv-shell] C:\workspace\base\NiosV\test> make -C software/nop_app/build
ビルド後は、nop_app/build/nop.elf.objdumpを開いてください。下記のように、263行目が"j 0 <__reset>"になっていれば、リセット直後に無限ループを行います。
Disassembly of section .entry:

00000000 <__reset>:
 * Jump to the _start entry point in the .text section if reset code
 * is allowed or if optimizing for RTL simulation.
 */
# if defined(ALT_ALLOW_CODE_AT_RESET) || defined(ALT_SIM_OPTIMIZE)
    /* Jump to the _start entry point in the .text section. */
    tail __reset
   0:	0000006f          	j	0 <__reset>
2.4 Hello uC/OS-IIをフルコンパイル無しで反映させるで行った同じ方法で、プログラム内容を反映させます。具体的なコマンド(ログは省略)は下記となります。
[niosv-shell] C:\workspace\base\NiosV\test> elf2hex software/nop_app/build/nop.elf  -w 32 -b 0x0 -e 0x7FFFF -o ram.hex
[niosv-shell] C:\workspace\base\NiosV\test> quartus_cdb top -c top --update_mif
[niosv-shell] C:\workspace\base\NiosV\test> quartus_asm --read_settings_files=on --write_settings_files=off top -c top
以上で、何もしないプログラムが組み込まれた、FPGAデザインの完成です。
4.4.2 OpenOCDコンフィグレーションファイルの生成
まず、下記コマンドで何もしないデザインをコンフィグレーションします。
Windows
[niosv-shell] C:\workspace\base\NiosV\test> quartus_pgm -c 1 -m JTAG -o p;top.sof@1
Linux
[intel@localhost test]$ quartus_pgm -c 1 -m JTAG -o p\;top.sof@1
FPGAコンフィグレーション後、下記コマンドでOpenOCD用コンフィグレーションファイルを生成します。
[niosv-shell] C:\workspace\base\NiosV\test> openocd-cfg-gen niosv-m.cfg
以上で、OpenOCD用コンフィグレーションファイルの作成が完了です。
4.4.3 デバッグコンフィグレーションの作成
現時点で使用した環境ではLinuxにおいて、Eclipseから"Open On-Chip Debugger 0.11.0-R21.3"(以降OpenOCD)がうまく起動せず、デバッグできませんでした。EclipseでのOpenOCD起動を止め、別Terminalで起動することでこの問題を回避できることを確認しています。以上より、今回は、Windows上では全て、Eclipseから起動させますが、LinuxではOpenOCDは別Termianlで実行させます。
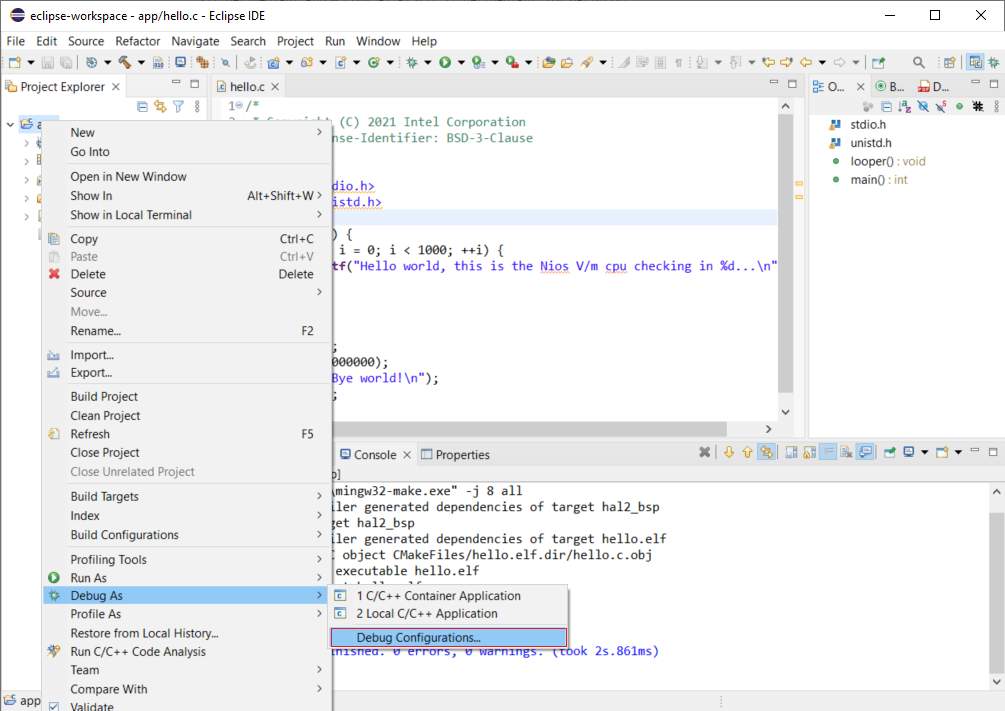
では、下記のように、"Project Explorer"で"app"を右クリックして、"Debug As->Debug Configurations...を選択します。
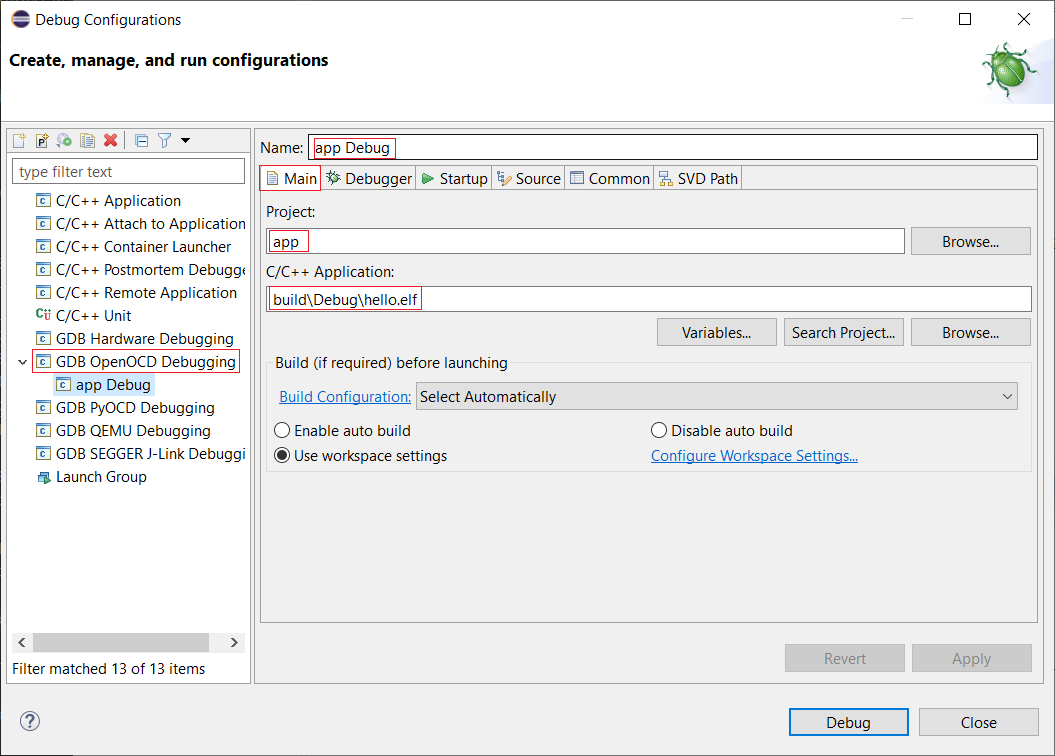
下記画面が表示されますので、"GDB OpenOCD Debugging"をクリックして、赤枠の部分を、下記のように設定して、"Apply"ボタンを押してください。
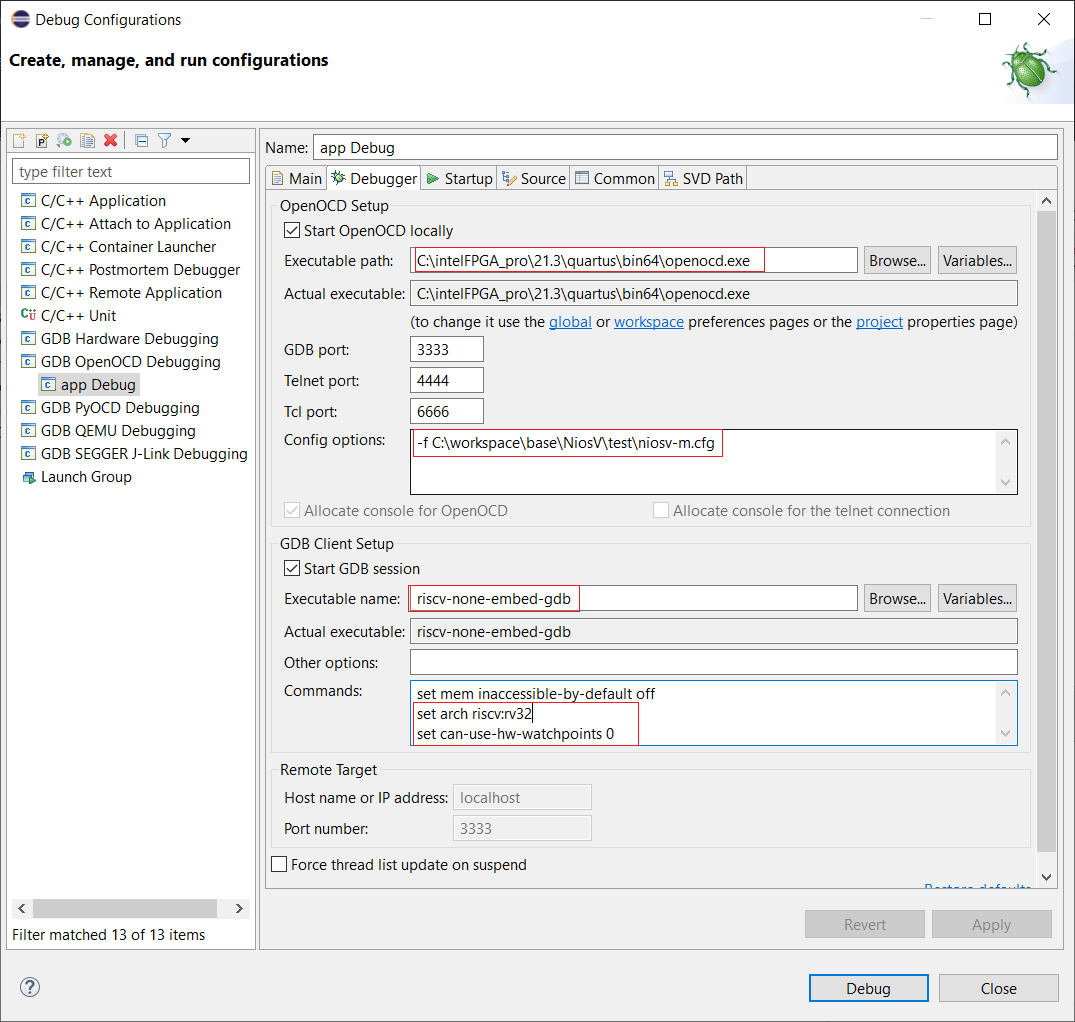
次に"Debugger"タブをクリックします。最初にWidnowsでの設定を示します。赤枠の部分を入力して"Apply"を押します。Config optionsは使用するOpenOCDコンフィグレーションファイルパスに併せて修正してください。
次にLinuxでの設定を下記に示します。Windowsの設定から"Start OpenOCD locally"のチェックを外した設定になっています。
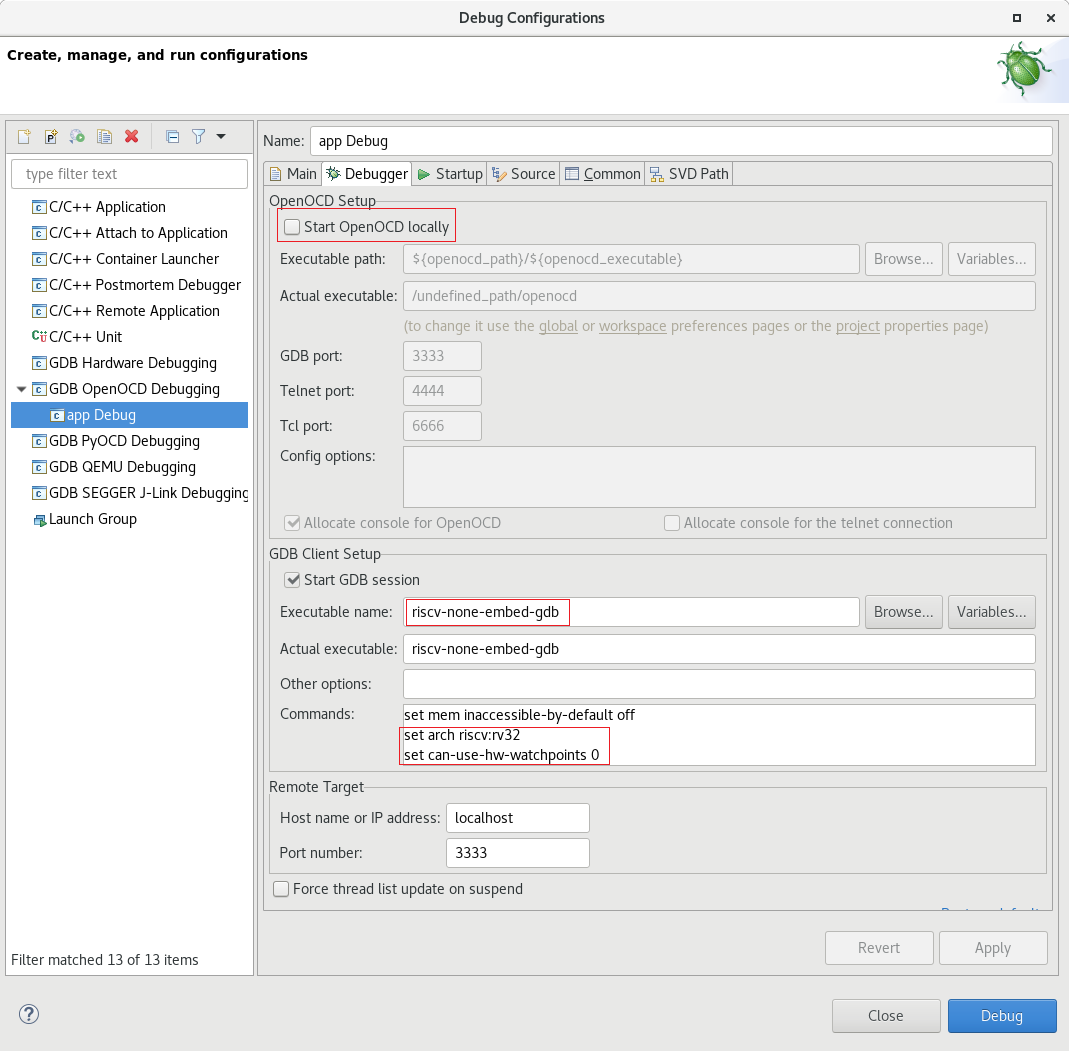
念のため、GDB Client SetupのCommandsに入力する追加オプションを下記に示します。
set arch riscv:rv32
set can-use-hw-watchpoints 0
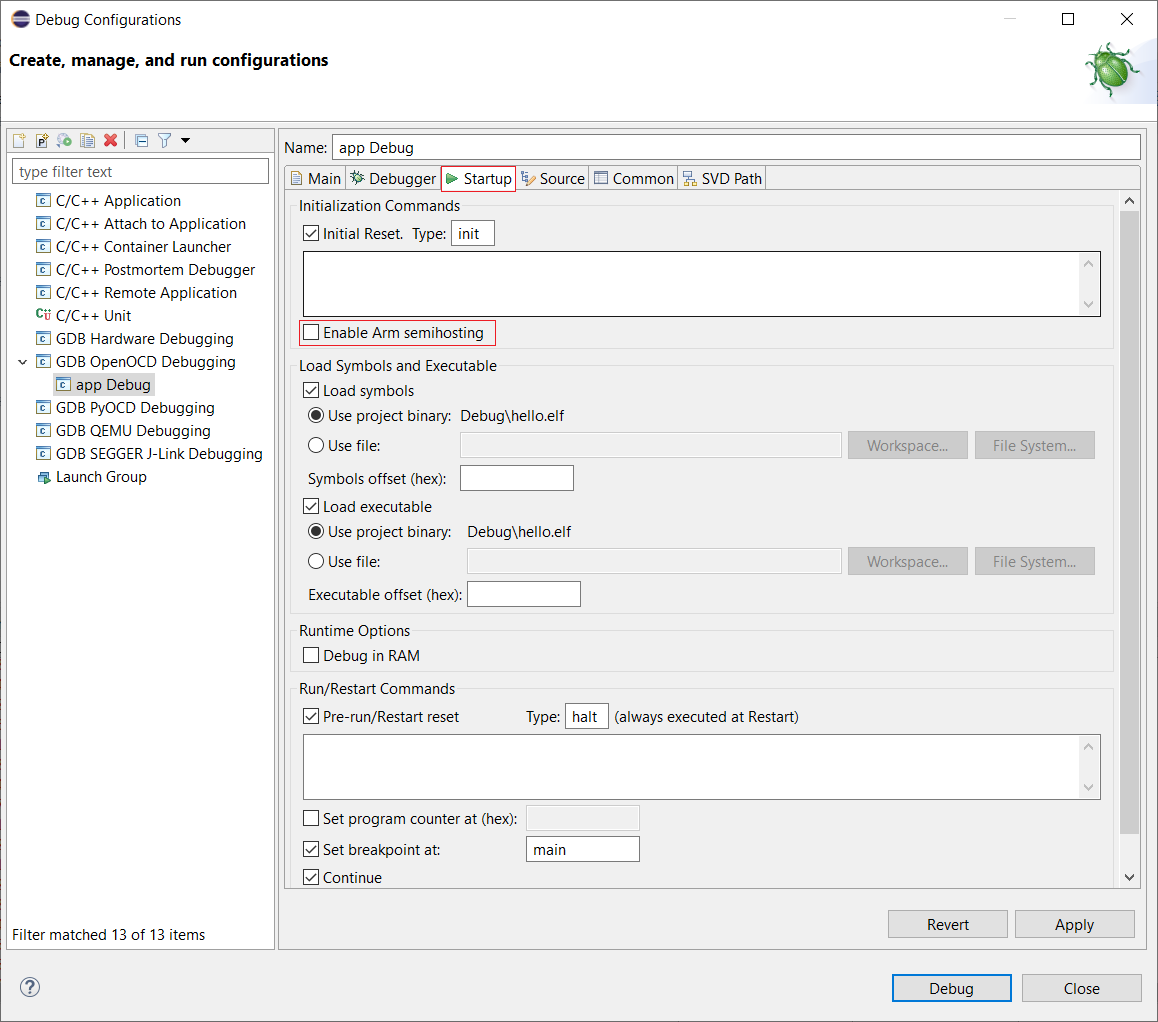
最後に、"Startup"タブをクリックして、"Enable Arm semihosting"のチェックを外して、"Apply"を押してください。
Linuxでは新規にTerminalを開き、環境変数を設定し、niosv-m.cfgのあるディレクトリーに移動します。下記コマンドを入力して、"OpenOCD"を待機状態にします。
[intel@localhost test]$ openocd -f ./niosv-m.cfg
Open On-Chip Debugger 0.11.0-R21.3
Licensed under GNU GPL v2
For bug reports, read
	http://openocd.org/doc/doxygen/bugs.html
Info : only one transport option; autoselect 'jtag'
Info : Application name is OpenOCD.20211207130713
Info : Attempting to find 'USB-BlasterII [1-9.3.4]'

Info : Cable 1: device_name=(null), hw_name=USB-BlasterII, server=(null), port=1-9.3.4, chain_id=0x556dddbc6c10, persistent_id=1, chain_type=0, features=2048, server_version_info=(null)
Info : TAP position 0 (2E050DD) has 3 SLD nodes
Info :     node  0 idcode=00486E00 position_n=0
Info :     node  1 idcode=08986E00 position_n=0
Info :     node  2 idcode=0C006E00 position_n=0
Info : TAP position 1 (4BA00477) has 0 SLD nodes
Info : Discovered 2 TAP devices
Info : Detected device (tap_position=0) device_id=02e050dd, instruction_length=10, features=4, device_name=10AS066H(1|2|3|3E2|4|4E2)/..
Info : Found an Intel device at tap_position 0.Currently assuming it is SLD Hub
Info : Detected device (tap_position=1) device_id=4ba00477, instruction_length=4, features=0, device_name=SOCVHPS
Info : Found a ARM device at tap_position 1. Currently assume it is JTAG-DP capable
Info : This adapter doesn't support configurable speed
Info : JTAG tap: tap_02E050DD.0 tap/device found: 0x02e050dd (mfg: 0x06e (Altera), part: 0x2e05, ver: 0x0)
Info : JTAG tap: tap_4BA00477.0 tap/device found: 0x4ba00477 (mfg: 0x23b (ARM Ltd), part: 0xba00, ver: 0x4)
Info : JTAG tap: tap_02E050DD.0 Parent Tap found: 0x02e050dd (mfg: 0x06e (Altera), part: 0x2e05, ver: 0x0)
Info : Virtual Tap/SLD node 0x08986E00 found at tap position 0 vtap position 1
Info : datacount=2 progbufsize=8
Info : Examined RISC-V core; found 1 harts
Info :  hart 0: XLEN=32, misa=0x40000101
Info : starting gdb server for tap_02E050DD.0.niosv_0.cpu on 3333
Info : Listening on port 3333 for gdb connections
Ready for Remote Connections
Info : Listening on port 6666 for tcl connections
Info : Listening on port 4444 for telnet connections
以上より、Windows, Linux共にデバッグの準備が整いました。
4.5 デバッグ開始
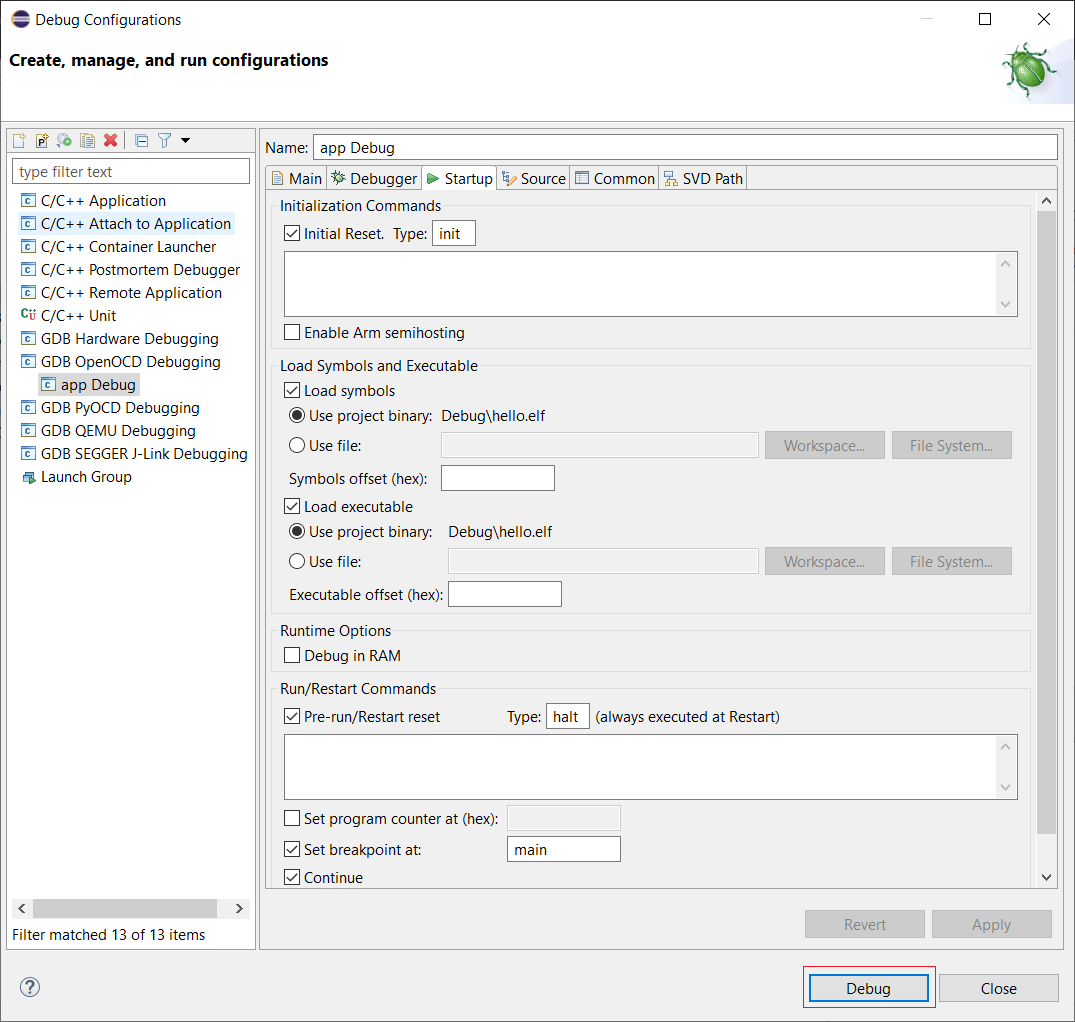
では、下記画面の"Debug"を押して、デバッグを開始します。
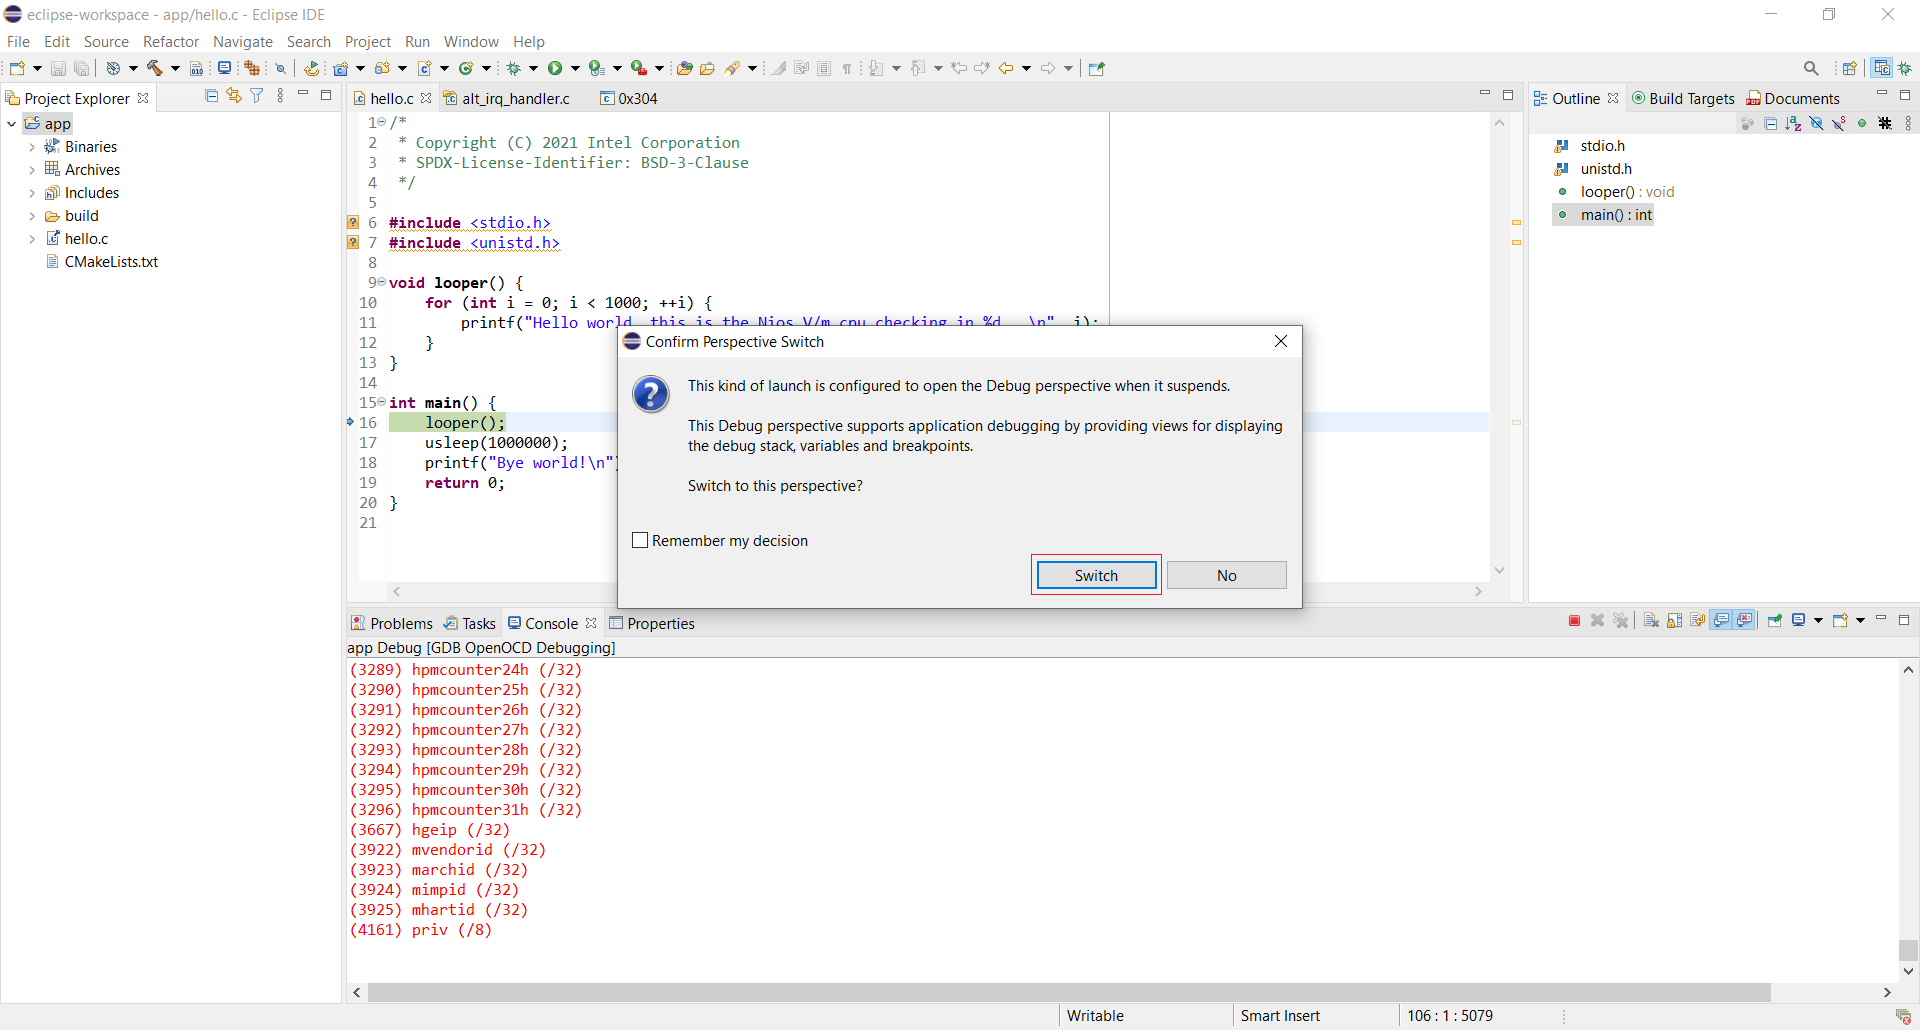
起動が完了すると、下記画面のように、デバッグ用画面に切り替えるか聞いてきますので、"Switch"を押して切り替えます。
下記がデバッグ用の画面です。主に使用するコマンドを赤枠で示してあります。
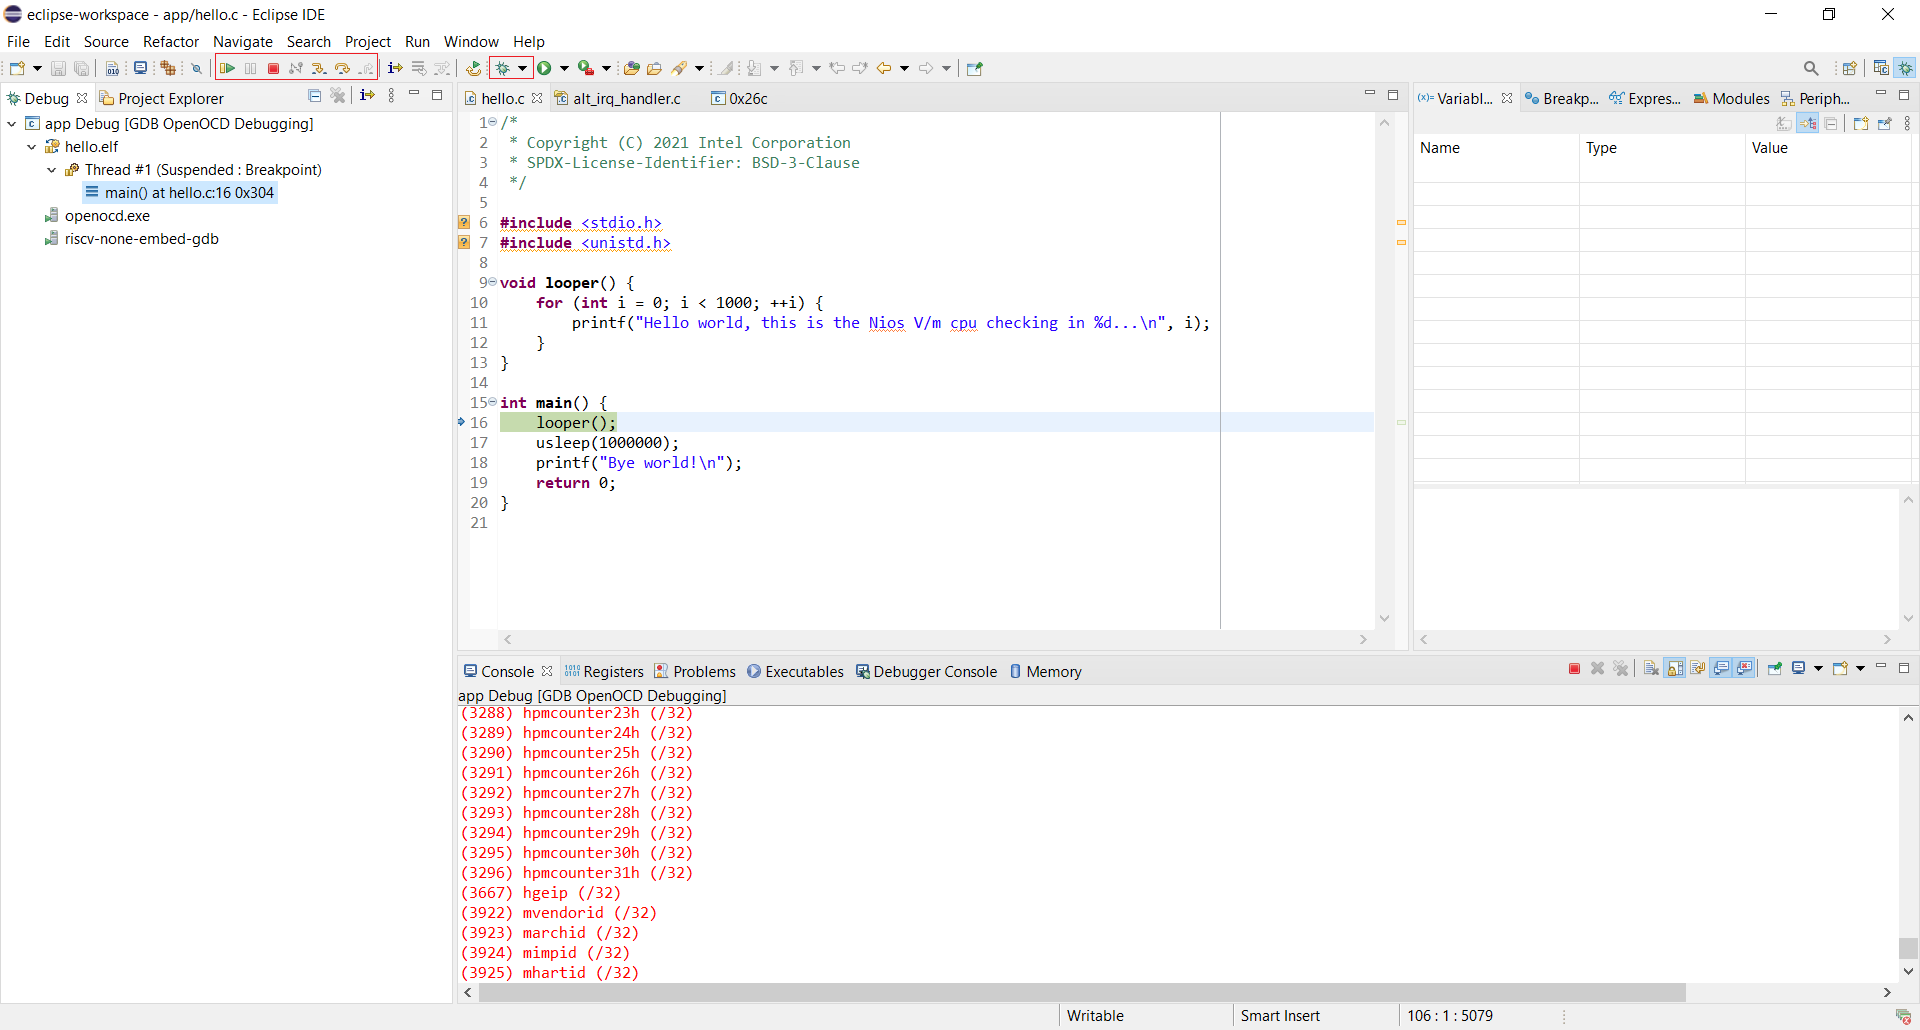
下記がデバッグよく使用するツールバーのコマンドです。

左から順に説明すると、
| No | Command | Description |
|---|---|---|
| 1 | Resume | 実行再開 |
| 2 | Suspend | 実行中断、現在中断しているため、アイコンは無効です |
| 3 | Terminalte | デバッグ終了 |
| 4 | Disconnect | ターゲットとの接続終了 |
| 5 | Step Into | コード実行、関数の場合はその関数内へジャンプ |
| 6 | Step Over | コード実行、関数の場合は、その関数をまるごと実行 |
| 7 | Step Return | コード実行、関数の場合は一つ上の呼び出し元に戻る |
| 8 | Instruction Stepping Mode | アセンブラ命令1命令単位で実行するか、ソース行単位で実行するかの切り替え。アセンブラレベルで1命令単位で実行する場合に使用 |
| 9 | Debug application | デバッグ開始、一回終了したデバッグを再接続 |
4.6 標準入出力
printfなどの、標準入出力を表示するには、1番目の方法は、別Terminalを開いて、juart-terminalと入力して、そのTerminalに表示させる方法です。
2番目の方法は、Eclipse上で、Terminal Windowを開いて、そこに表示させる方法です。
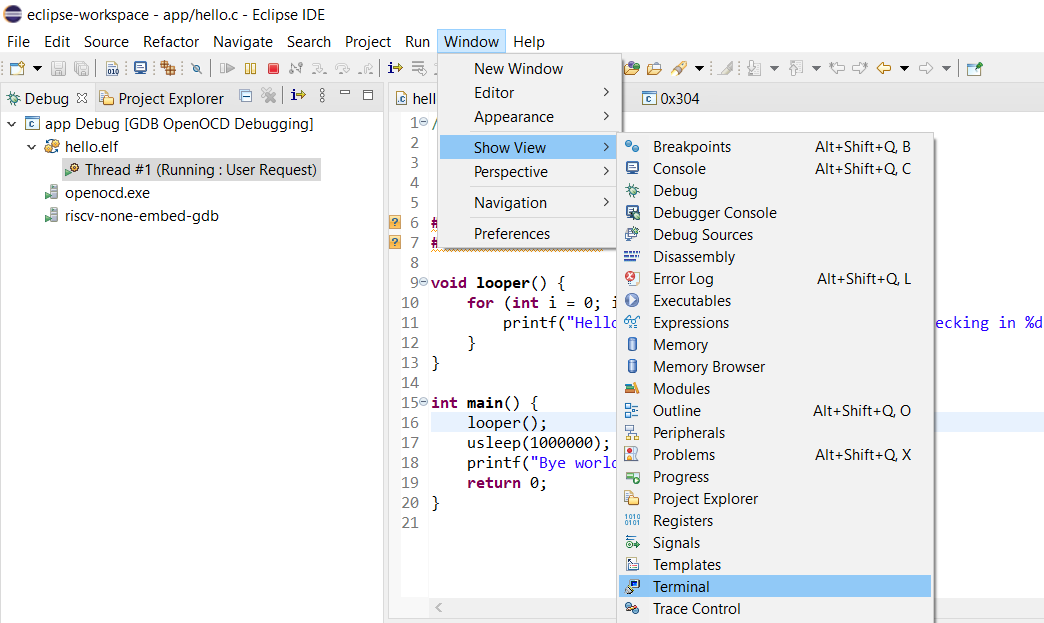
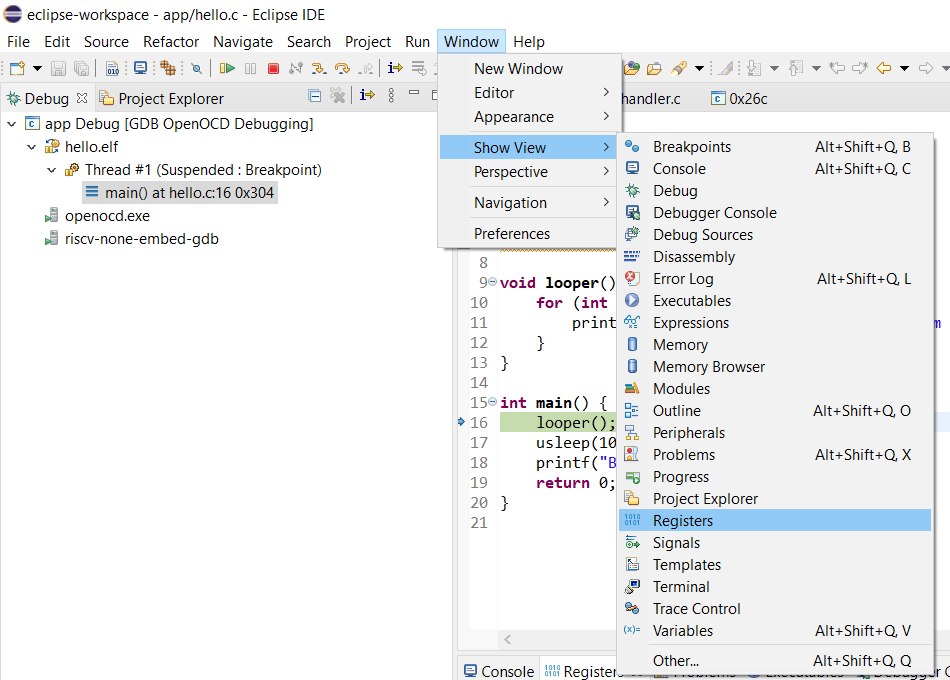
Eclipseでは、下記のように、Windowメニューより、"Show View->Terminal"を選択します。
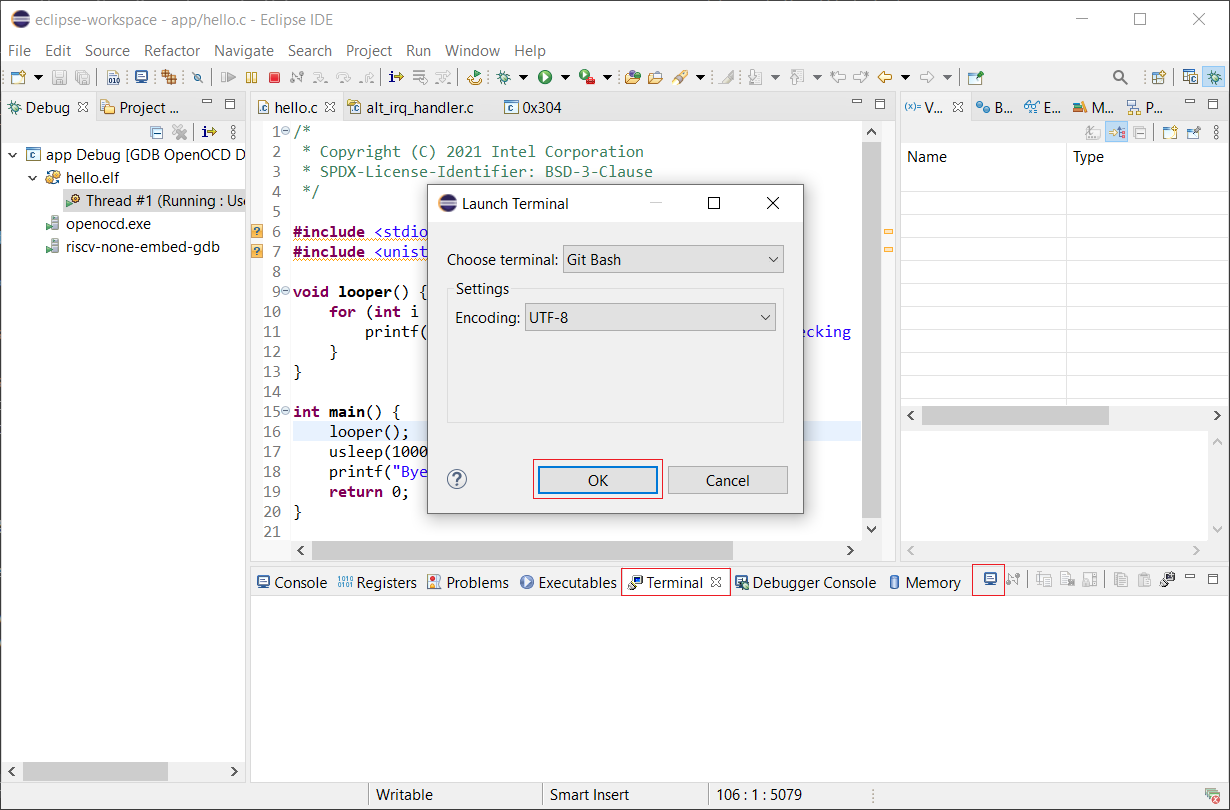
選択すると、下記Windowに"Terminal"タブが追加されますので、そのタブを選択し、右の"Open a Terminal"アイコンをクリックします。クリックすると、"Launch Terminal"画面が表示されますので、"OK"を押します。
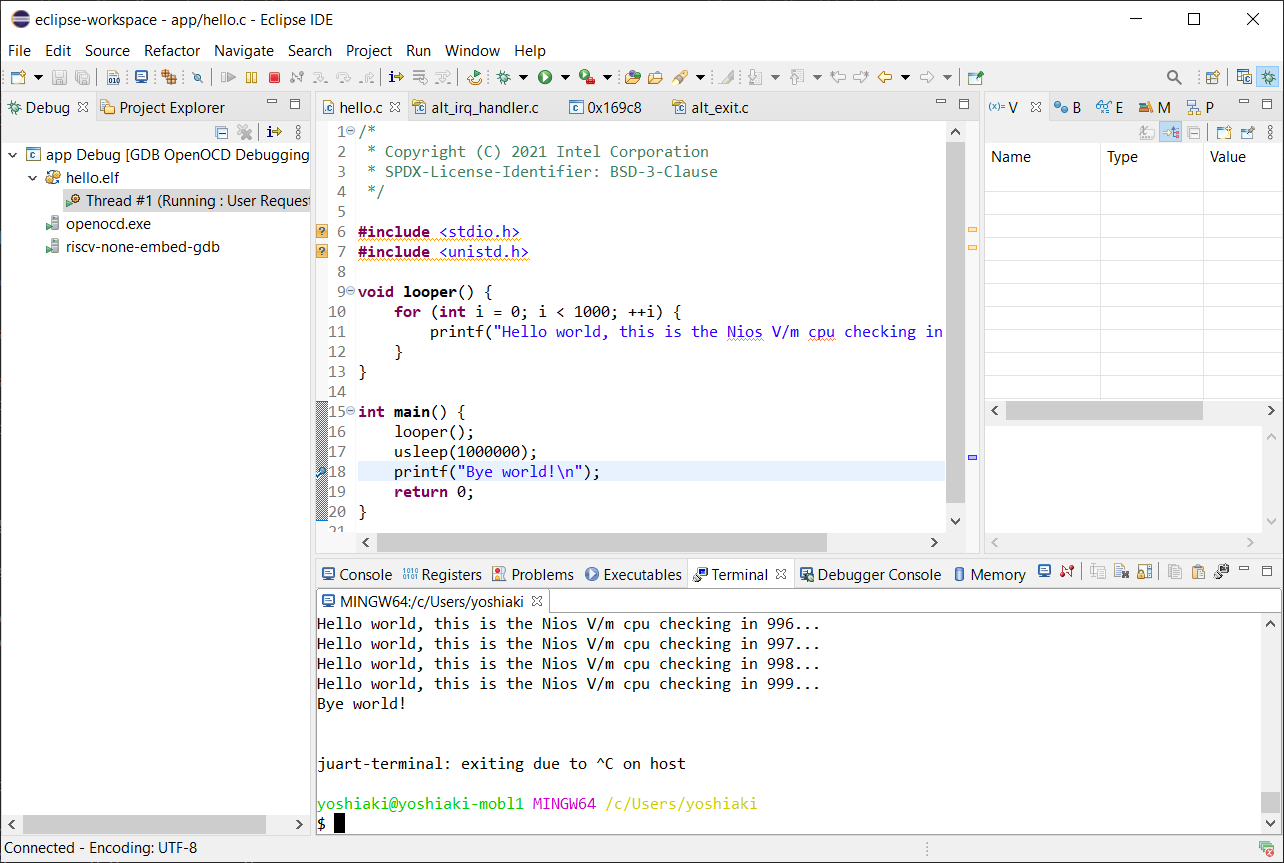
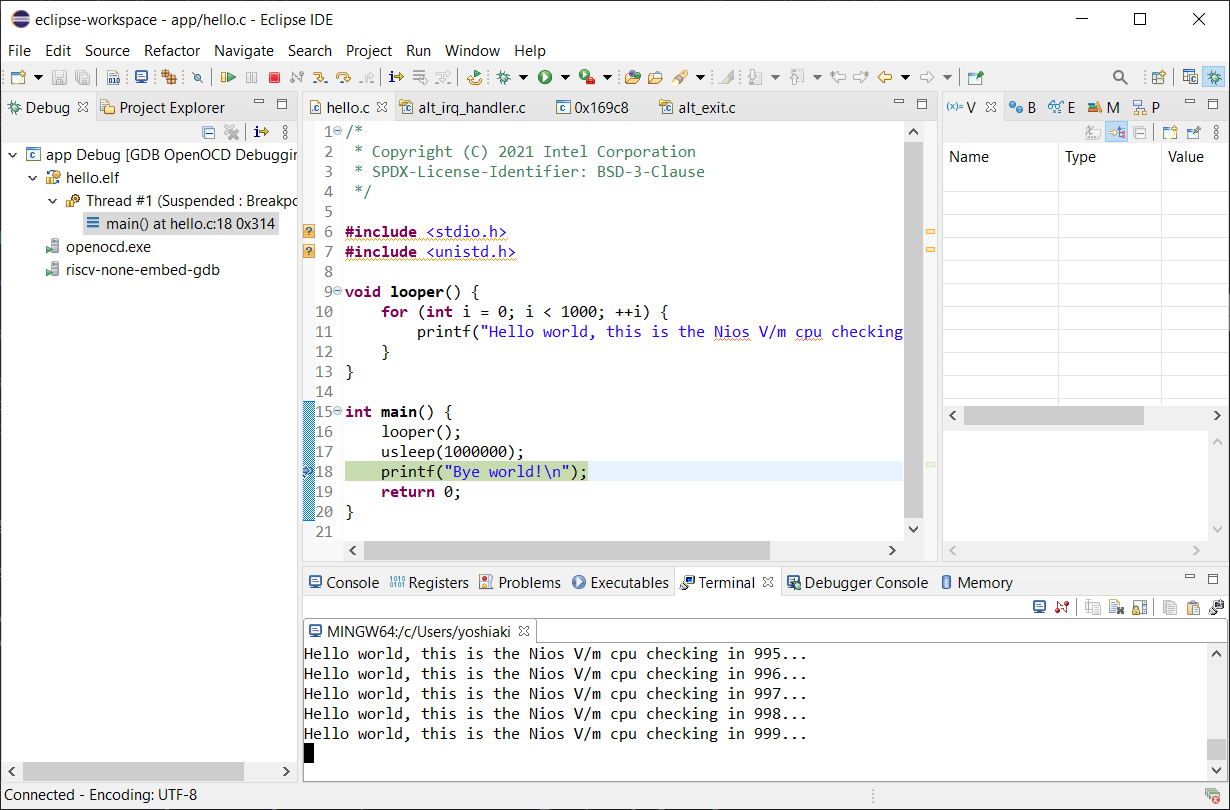
Terminal画面が開いたら、"juart-terminal"と入力して、入出力待ちにします。

これで、デバッグを再開すれば、下記のように、このTermainl Windowsに標準出力が表示されます。
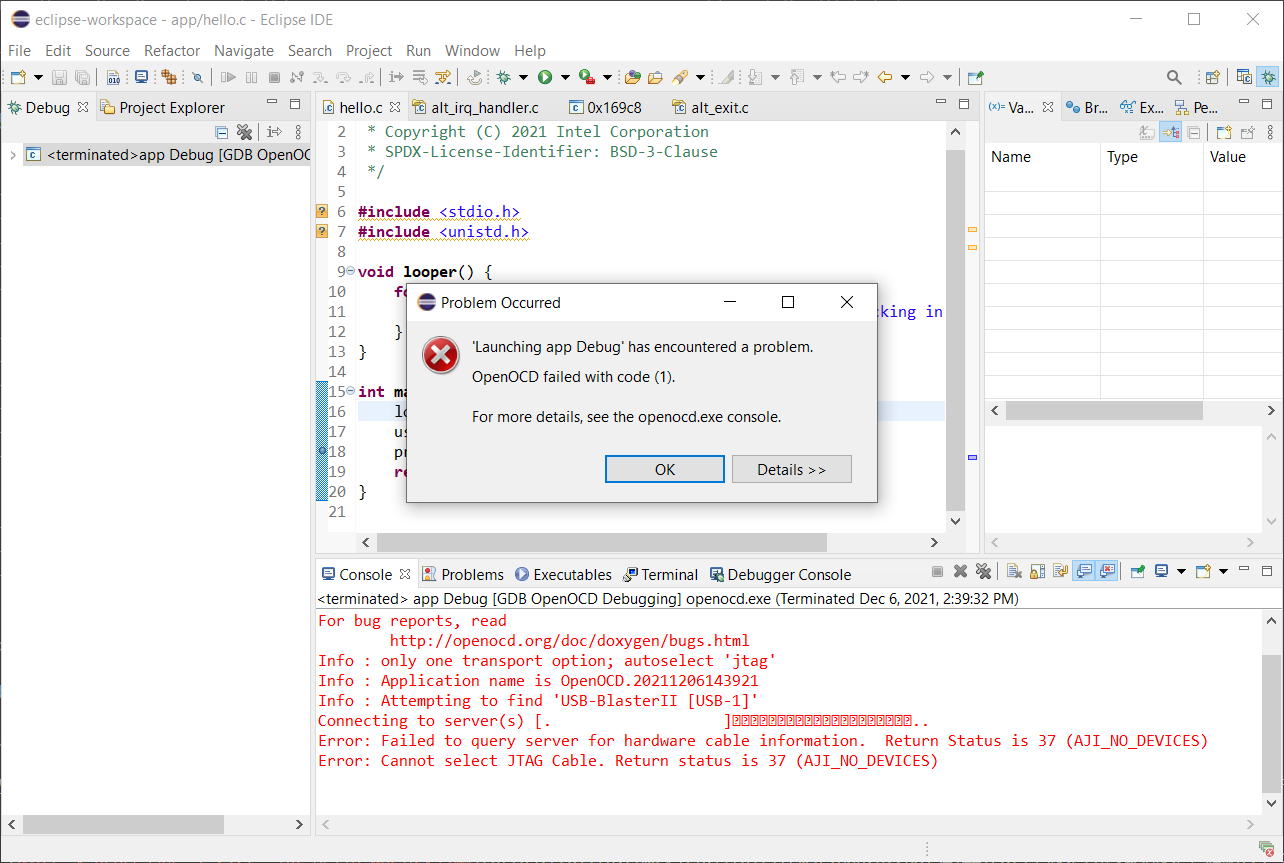
注 今回使用した環境では、Windows上のEclipseで表示させる場合、デバッグを終了させ、デバッグを再接続した場合、下記画面のようにエラーとなり、再開できません。これを回避するには、EclipseのTerminal画面で"Ctrl+C"を押し、juart-terminalを終了させた後は、再接続はできます。別Terminalで開いた場合はこのような問題は発生しませんでした。
再接続後は再度"juart-terminal"と入力する必要あり、手間がかかります。そのため、Windows上では別Terminalを開き、juart-terminalと入力して、そのTerminalに表示させる方法をお勧めします。
4.7 ブレイクポイント
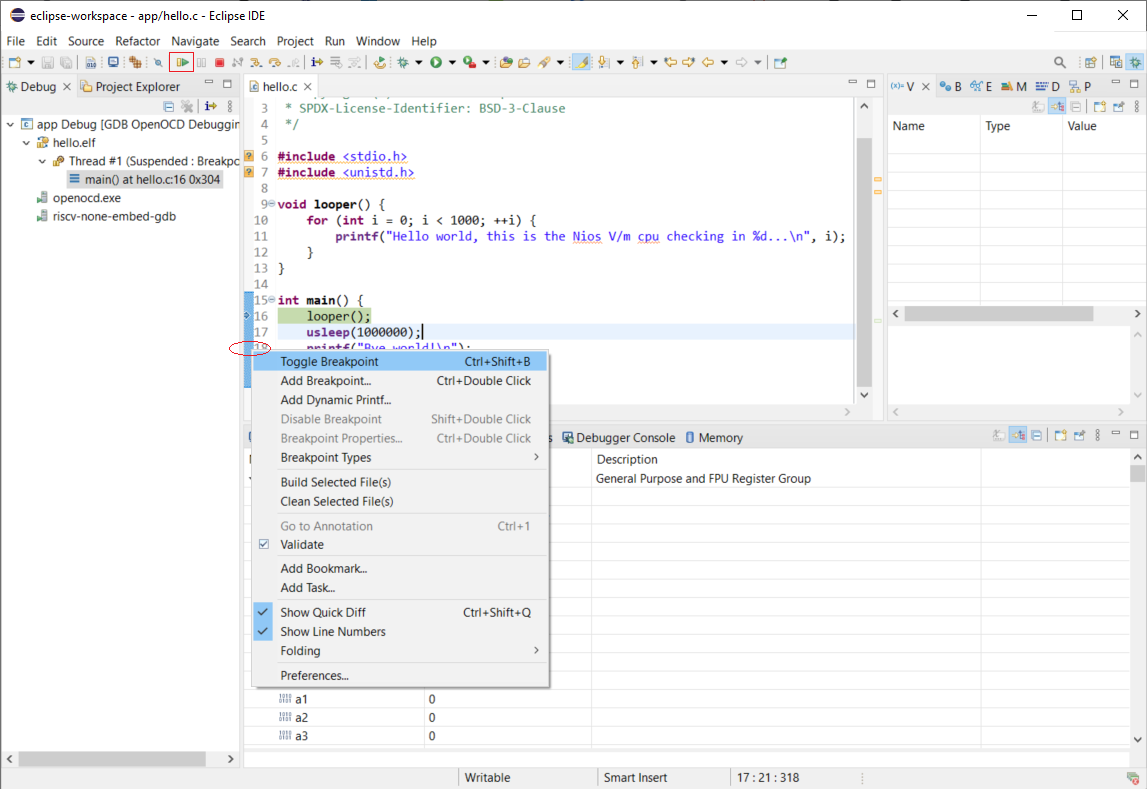
ブレイクポイントの設定は、ソースを開き、停止させたい行番号の少し左を右クリックして、下記のように"Toggle Breakpoint"を選択します。そして、ツールメニューの"Resume"ボタンを押せば、実行を再開します。
ブレークポイントまで実行が達した場合、下記によう中断します。
もう一度、"Toggle Breakpoint"を選択すれば、ブレイクポイントは削除できます。
4.8 レジスタ
レジスタを表示させるには、下記のように、Windowメニューより、"Show View->Registers"を選択します。
そして、下記画面のように、レジスタウインドウが追加されます。スクロールすればCSRも確認できます。
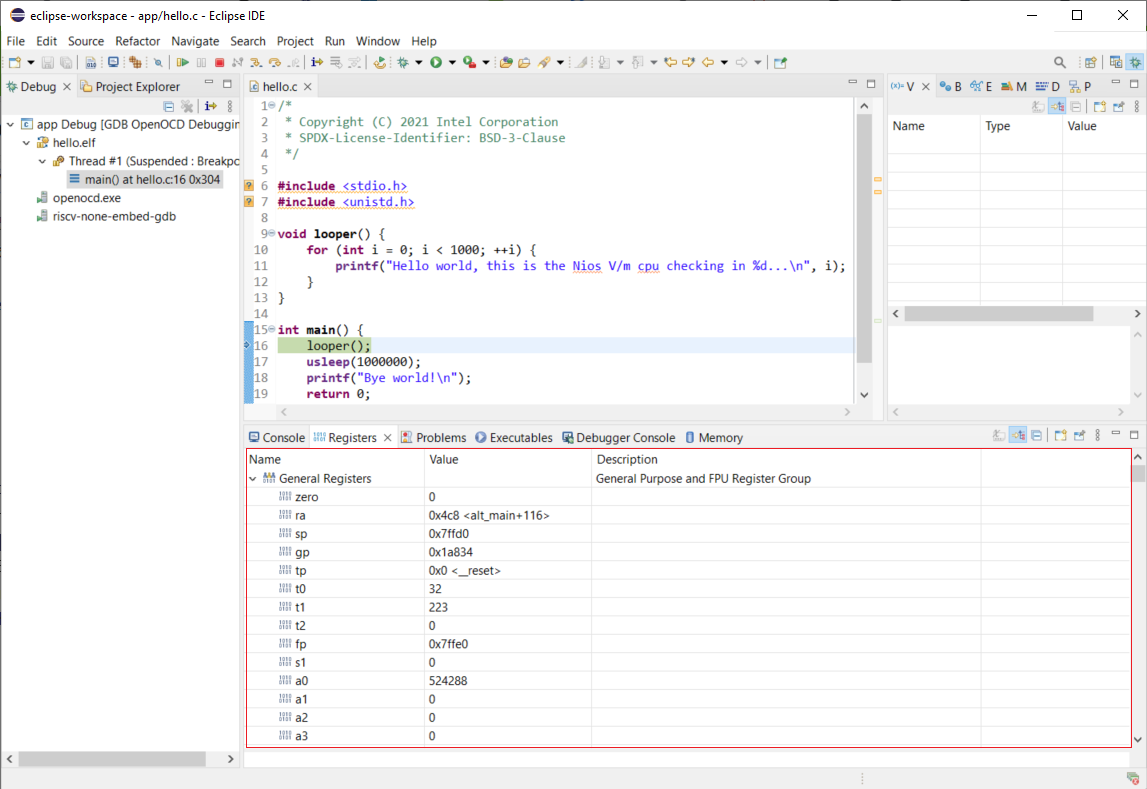
レジスタの名前はABI(Application Binary Interface)と呼ばれる記述方法になっているため、x0-x31までの表記とは異なります。下記に対応表を示します。
| Register | ABI Name | Description | Saver |
|---|---|---|---|
| x0 | zero | Hard-wired zero | — |
| x1 | ra | Return address | Caller |
| x2 | sp | Stack pointer | Callee |
| x3 | gp | Global pointer | — |
| x4 | tp | Thread pointer | — |
| x5 | t0 | Temporary/alternate link register | Caller |
| x6–7 | t1–2 | Temporaries | Caller |
| x8 | s0/fp | Saved register/frame pointer | Callee |
| x9 | s1 | Saved register | Callee |
| x10–11 | a0–1 | Function arguments/return values | Caller |
| x12–17 | a2–7 | Function arguments | Caller |
| x18–27 | s2–11 | Saved registers | Callee |
| x28–31 | t3–6 | Temporaries | Caller |
4.9 終了、再開
デバッグを終了するには、ツールバーの"Terminate"ボタンを押してください。そして、再開させたい場合は"Debug application"を押してください。ツールバーの詳細は4.5 デバッグ開始を参照してください。
5. その他
5.1 BSP-Editor
BSP(Board Support Package)は実行環境に必要なファイルを提供するパッケージです。現在、Nios® V processorではHAL(Hardware Abstraction Layer)とucosii(uC/OS-II)をサポートしています。このパッケージの設定を変更するには、BSP-EDITORを使用します。
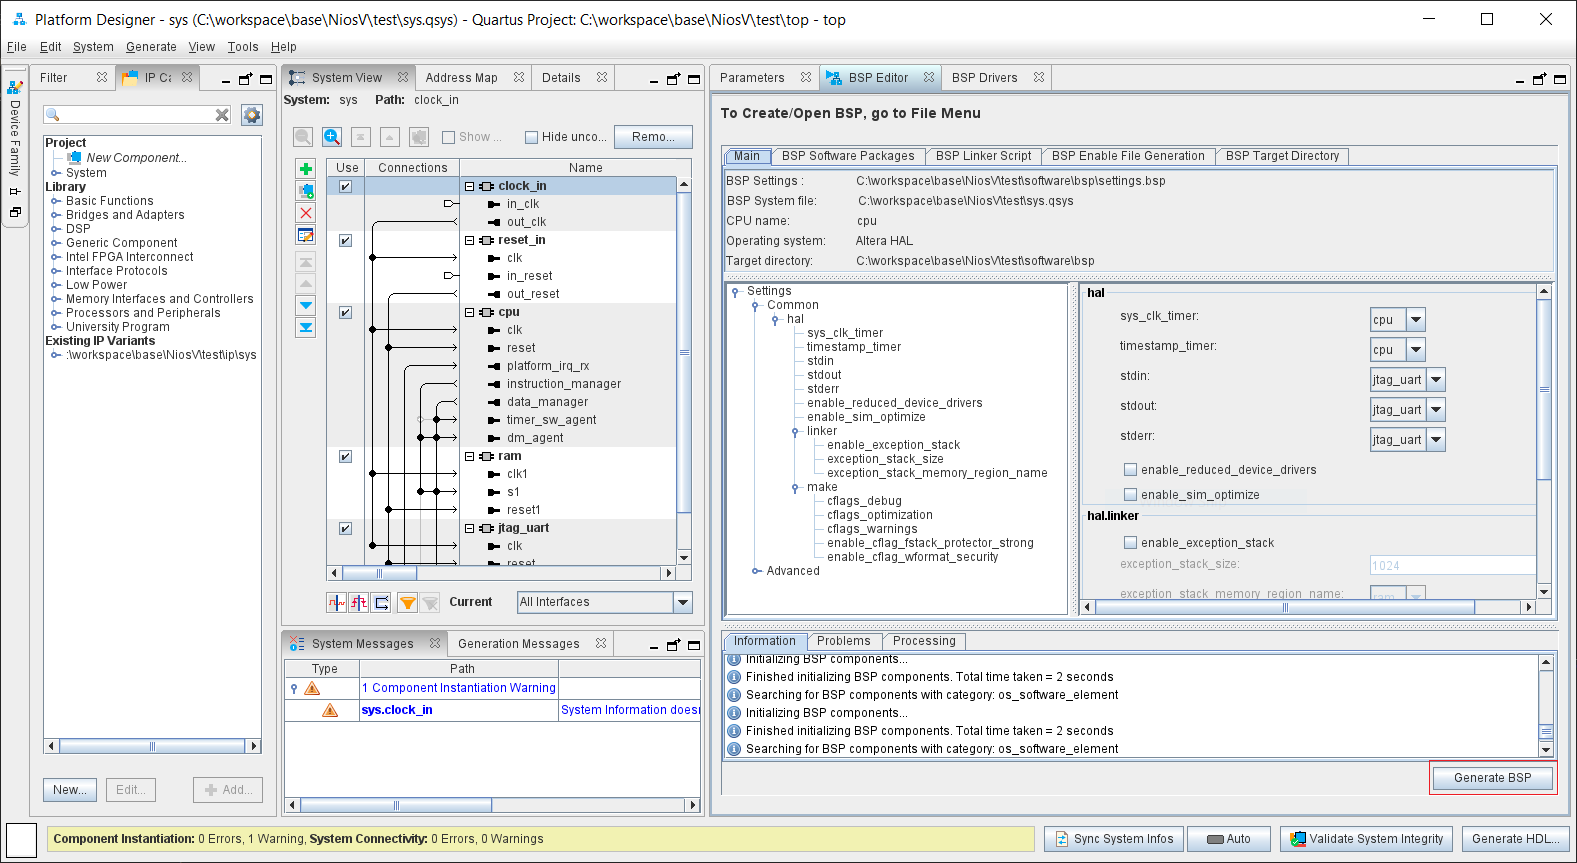
BSP-EDITORはPlatform Designerに統合されており、下記コマンドでPlatform Designerを開きます。
[niosv-shell] C:\workspace\base\NiosV\test> qsys-edit
下記画面が表示されますので、"BSP Editor"タブをクリックし、BSP-settingファイルを指定します。Hello Worldの場合は、右横のボタンをクリックして"software/bsp/settings.bsp"ファイルを選択します。
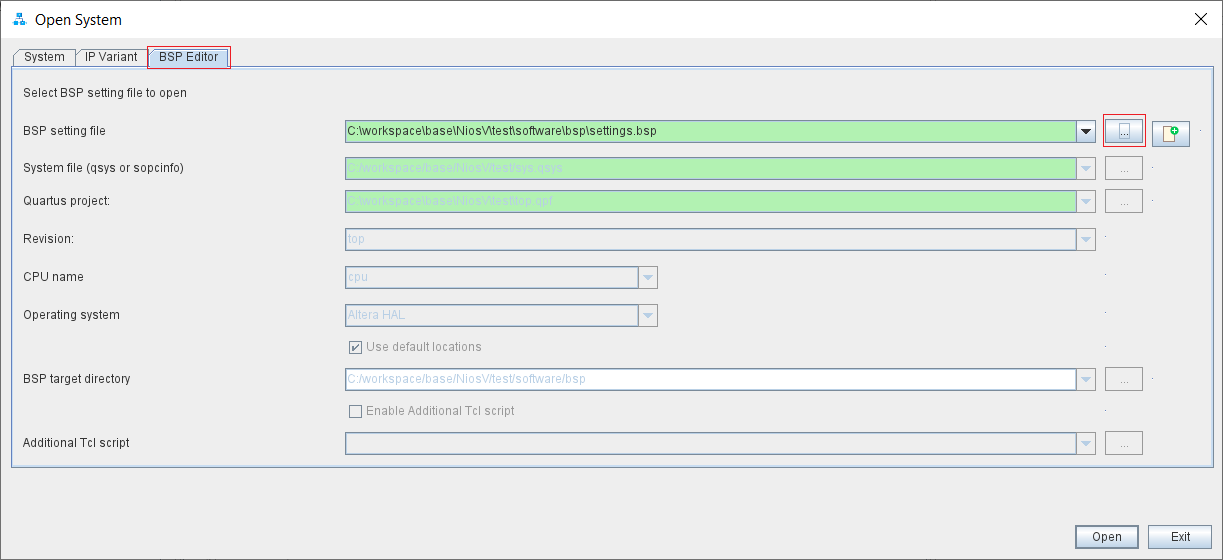
注 BSP-Editorでsettings.bspを開く場合、リビジョン指定が必要です。リビジョンはプロジェクトファイルである、top.qsfのPROJECT_REVISIONの値で、Hello Worldの場合はtopです。
これをniosv-bspコマンドを実行するときに"--rev"オプションで一緒に指定します。下記にコマンド例を示します。
[niosv-shell] C:\workspace\base\NiosV\test> niosv-bsp -c --quartus-project=top.qpf --qsys=sys.qsys --rev=top --type=hal software/nop_bsp/settings.bsp
下記画面が表示されますので、変更したい箇所を修正し、"Generate BSP"ボタンを押して、BSPを生成させ、BSP-Editorを終了させてください。
5.2 割り込み、例外処理概要
割り込み、例外処理はソフトウエア的には、同一例外処理とて扱われ、発生すると、Nios® V processorのIP設定で指定した、例外処理アドレスにジャンプします。今回のデザインでは0x0020です。そこでレジスタ退避を行い、HALの下記に関数を呼び出します。
software/bsp/HAL/src/alt_irq_handler.c: handle_trap()
alt_u32 handle_trap(alt_u32 cause, alt_u32 epc, alt_u32 tval){
    is_irq = (cause & ABBOTTS_LAKE_MCAUSE_INTERRUPT_MASK);
    exception_code = (cause & ~ABBOTTS_LAKE_MCAUSE_INTERRUPT_MASK);
    if (is_irq) {
        switch (exception_code) {
           case ABBOTTS_LAKE_TIMER_IRQ:
               alt_niosv_timer_interrupt_handler(cause, epc, tval);
               break;
          case ABBOTTS_LAKE_SOFTWARE_IRQ:
              alt_niosv_software_interrupt_handler(cause, epc, tval);
              break;
        default:
              if (exception_code >= 16) alt_irq_handler();
              break;
  } else {
       if (alt_instruction_exception_handler) {
         alt_exception_result handler_rc = alt_instruction_exception_handler(exception_code, epc, tval);
         epc = (handler_rc == ABBOTTS_LAKE_EXCEPTION_RETURN_REISSUE_INST) ? epc : (epc + 4);
       }  else {
          ABBOTTS_LAKE_EBREAK();
          while(1);
       }
   }
}
'case'引数はMachine Cause Register (mcause)の内容で、下記のように定義されています。ビット31が1の場合、割り込みを示し、0の場合は例外となります。下位ビットは例外コードになります。
| Interrupt | Exception Code | Description |
|---|---|---|
| 1 | 0 | User software interrupt |
| 1 | 1 | Supervisor software interrupt |
| 1 | 2 | Reserved for future standard use |
| 1 | 3 | Machine software interrupt |
| 1 | 4 | User timer interrupt |
| 1 | 5 | Supervisor timer interrupt |
| 1 | 6 | Reserved for future standard use |
| 1 | 7 | Machine timer interrupt |
| 1 | 8 | User external interrupt |
| 1 | 9 | Supervisor external interrupt |
| 1 | 10 | Reserved for future standard use |
| 1 | 11 | Machine external interrupt |
| 1 | 12-15 | Reserved for future standard use |
| 1 | >=16 | Reserved for platform use |
| 0 | 0 | Instruction address misaligned |
| 0 | 1 | Instruction access fault |
| 0 | 2 | Illegal instruction |
| 0 | 3 | Breakpoint |
| 0 | 4 | Load address misaligned |
| 0 | 5 | Load access fault |
| 0 | 6 | Store/AMO address misaligned |
| 0 | 7 | Store/AMO access fault |
| 0 | 8 | Environment call from U-mode |
| 0 | 9 | Environment call from S-mode |
| 0 | 10 | Reserved |
| 0 | 11 | Environment call from M-mode |
| 0 | 12 | Instruction page fault |
| 0 | 13 | Load page fault |
| 0 | 14 | Reserved for future standard use |
| 0 | 15 | Store/AMO page fault |
| 0 | 16-23 | Reserved for future standard use |
| 0 | 24-31 | Reserved for custom use |
| 0 | 32-47 | Reserved for future standard use |
| 0 | 48-63 | Reserved for custom use |
| 0 | >=64 | Reserved for future standard use |
現在のHALのhandle_trap関数は、割り込みに関して、
- Machine timer interrupt
- Machine software interrupt
- Machine external interrupt
を処理します。例外はalt_instruction_exception_handlerが定義されていれば、その関数に処理を移行させます。
では、割り込み処理関数について下記に示します。ほぼNios® II processorと同じ処理です。Machine Interrput Pending register(MIP)の値を読み、割り込み番号を特定し、その番号割り込みハンドラーを呼び出します。
software/bsp/HAL/src/alt_irq_handler.c: alt_irq_handler()
void alt_irq_handler (void)
{
    alt_u32 active, mask, i ;
    ALT_OS_INT_ENTER();
    active = alt_irq_pending();
    do {
        i = 0;
        mask = 1;
        do {
            if (active & mask) {
                alt_irq[i].handler(alt_irq[i].context);
                break;
            }
            mask <<= 1;
            i++;
        } while (1);
        active = alt_irq_pending();
    } while (active);
    ALT_OS_INT_EXIT();
}
以上が、割り込み、例外処理の概要になります。
5.3 uC/OS-II
Nios® V processorはBSPとしてuC/OS-IIをサポートしています。APIなどは特に触れませんでしたが、このRTOSのドキュメントがµC/OS-II Documentationに御座いますので、参照してください。
6. まとめ
今回、Nios® V processorのブート、シミュレーション、デバッグ方法などを説明してきました。この投稿が、Nios® V processorを使う上で、参考になれば幸いです。
どうもありがとうございました。
7. 参考資料
-
Introducing the Intel® Quartus® Prime Pro and Standard Edition Software User Guides
-
AMBA AXI and ACE Protocol Specification AXI3, AXI4, and AXI4-Lite ACE and ACE-Lite
Notices & Disclaimers
Intel technologies may require enabled hardware, software or service activation.
No product or component can be absolutely secure.
Your costs and results may vary.
© Intel Corporation. Intel, the Intel logo, and other Intel marks are trademarks of Intel Corporation or its subsidiaries. Other names and brands may be claimed as the property of others.
The products described may contain design defects or errors known as errata which may cause the product to deviate from published specifications. Current characterized errata are available on request.
Intel disclaims all express and implied warranties, including without limitation, the implied warranties of merchantability, fitness for a particular purpose, and non-infringement, as well as any warranty arising from course of performance, course of dealing, or usage in trade.