はじめに
Intel® Quartus® Prime Pro Edition 21.3リリースより、新たにNios® V/m Processorが加わりました。名前からなんとなく分かると思いますが、命令セットがRISC-Vに変わりました。資料は下記となります。
- Nios V Processor Quick Start Guide
- Nios V Processor Reference Manual
- Nios V tool setup for Eclipse CDT and OpenOCD
はじめてFPGAに触れる方を対象として、Nios® V/m Processorの概要、インストール、ハードウエア構築、Hello Worldの実行までを行います。既にFPGAの経験がある方は、インストールなど一部は読み流して頂ければよいかと思います。動作検証に使用したOSは下記となります。
Windows 10 Enterprise Version:20H2, Build:19042.1348
CentOS 7.9.2009, Kernel version:3.10.0-1160.21.1.el7.x86_64
基本的にはWindows上で作業を進め、実際のログを含めて説明します。しかし、Linuxでは明らかにコマンドが異なる場合はその都度説明します。また、シミュレーション、デバッグ、ブート方法などはNios® V processor ブート、シミュレーション、デバッグ編を参照してください。
もくじ
- 1. Nios® V/m Processor概要
- 2. ライセンス取得
- 3. インストール
- 4. ハードウエア構築
- 5. ソフトウエア構築&実行
- 6. まとめ
- 7. 参考資料
- Notices & Disclaimers
1. Nios® V/m Processor概要
1.1 命令セット
今回リリースされたNios® V/m ProcessorはRV32IA命令セットをサポートしています。RV32Iが32ビット整数命令セットを意味し、その後に続く記号が拡張機能を示します。主な拡張機能を下記に示します。
| Extension | Description |
|---|---|
| M | Integer Multiplication and Division |
| A | Atomic Instructions |
| F | Single-Precision Floating-Point |
| D | Double-Precision Floating-Point |
| Q | Quad-Precision Floating-Point |
| C | Compressed Instructions |
従って、R32IAは32ビット整数命令と排他制御命令をサポートしているプロセッサーとなります。整数レジスタは32ビット幅が32本実装され、M20Kなどのブロックメモリーで実装されています。また、拡張記号から解る通り、浮動小数点レジスタ(f0-f31,fcsr)は実装されていません。詳しくはRISC-V Unprivileged Spec v.20191213を参照してください。
1.2 構成
基本構成を示します。
| Item | 詳細 |
|---|---|
| General Purpose Register file | 32ビット幅x32本の整数汎用レジスタファイル |
| Arithmetic Logic Unit (ALU) | 算術、比較、論理、シフト演算を実行。ロード、ストアのアドレス生成にも使用 |
| Control and Status Registers (CSR) | 制御レジスタ |
| Exception Controller | 例外処理コントローラー |
| Interrupt Controller | 割り込みコントローラー、レベルトリガー |
| Instruction Bus | 命令バス |
| Data Bus | データバス |
| RISC-V based Debug Module | デバッグモジュール |
ここでNios® IIと主な違いを示します。
| 項目 | Nios® V/m Processor | Nios® II |
|---|---|---|
| バス | Arm* ABMA* AXI | Avalon-MM |
| 割り込み端子数 | 16 | 32 |
| デバッグ | Open OCD(On-Chip Debugger)準拠 | 独自仕様 |
1.3 命令、データバス
Nios® IIではバスはAvalon-MMを使用していましたが、Nios® V/m ProcessorからはArm* ABMA* AXIに変更されました。この変更により、AXIからのレスポンスがOKでない場合、Nios® V/m Processorに例外を発生させることができるようになりました。AXIの応答種類を下記に示します。
| RESP[1:0] | Response | Description |
|---|---|---|
| 2'b00 | OKAY | 通常アクセスOK |
| 2'b01 | EXOKAY | 排他アクセスOK |
| 2'b10 | SLVERR | スレーブがエラーを返した場合 |
| 2'b11 | DECERR | 指定したアドレスにスレーブが存在しない場合 |
詳しくはRead and write response structureをご参照ください。
1.4 パイプライン
Nios® V/m Processorは5ステージパイプラインCPUです。各ステージの概要を下記に示します。
| Stage | Denotation | Function |
|---|---|---|
| Instruction Fetch | F | • PC+4 calculation • Next instruction fetch • Pre-decode for register file read |
| Instruction Decode | D | • Decode the instruction • Register file read data available • Hazard resolution and data forwarding |
| Instruction Execute | E | • ALU operations • Memory address calculation • Branch resolution • CSR read/write |
| Memory | M | • Memory and multicycle operations • Register file write • Branch redirection |
| Write Back | W | • Facilitates data dependency resolution by providing General Purpose Register value. |
1.5 例外
現在定義されている例外を下記に示します。
| Exception | Description |
|---|---|
| Instruction Address Misaligned | 命令フェッチステージにて、プログラムカウンター(PC)が32ビット境界に整列していない(PCの下位2ビットが0でない)場合に例外発行 |
| Instruction Access Fault | 命令リード時のAXIの応答がOKAYでない場合に例外発行 |
| Illegal Instruction | 命令デコード時において、未実装、未定義の命令を検出した場合又は、実行ステージにおいて、未実装、未定義のCSRアクセスを検出した場合に例外発行 |
| Breakpoint | ブレイク命令を実行した場合にデコードステージにて例外発行 |
| Load Address Misaligned Store Address Misaligned |
メモリーアクセスステージにおいて、ロード、ストア命令のアクセスサイズにアドレスが整列していない場合に例外発行 |
| Load Access Fault Store Access Fault |
メモリアクセスにおいてAXIバスがOKAYでない応答を返した場合例外発行 |
| Environment call from M-mode | ECALL命令をM-modeで実行した場合例外発行 |
1.6 CSRレジスタ
下記にCSR領域にマップされているレジスタを示します。レジスタの詳細に関してはRISC-V Privileged Spec v.20190608を参照してください。
| Register Name | Description |
|---|---|
| mvendorid | Machine Vendor ID Register |
| marchid | Machine Architecture ID Register |
| mimpid | Machine Implementation ID Register |
| mhartid | Hart ID Register |
| mstatus | Machine Status Register |
| mtvec | Machine Trap-Vector Base-Address Register |
| mip | Machine interrupt-pending register |
| mie | Machine interrupt-enable register |
| mcounteren | Machine Counter-enable register |
| mepc | Machine Exception Program Counter |
| mcause | Machine Cause Register |
下記にメモリマップ領域にマップされているレジスタを示します。
| Register Name | Description | Offset |
|---|---|---|
| mtimecmp | Machine time register | 0x00 |
| mtime | Machine time register | 0x08 |
1.7 サポートデバイス
現在サポートしてFPGAデイバスは下記の通りです。
| Device Family |
|---|
| Intel® Cyclone® 10 device |
| Intel® Arria® 10 device |
| Intel® Stratix® 10 device |
| Intel® Agilex™ device |
2. ライセンス取得
Nios® V/m Processorを使用するには無償ライセンスを取得する必要があります。ここではライセンス取得手順について説明します。また、シミュレータとしてQuesta*-Intel® FPGA Edition Softwareのラインセスも併せて取得します。
2.1 Sign In
Self Service Licensing Centerをクリックします。
下記にようなSign In画面が表示されますので、自分のIntelアカウントでSign Inしてください。
Intelのアカウントをお持ちでない場合は、アカウントを作成してください。
2.2 Nios® V/m Processorライセンス取得
Sign Inが完了後、次のような画面が表示されますので、
Intel® FPGA IP IP-NIOSVMを選択し、"# of Seats"に1を入力して、右下の"Get License"をクリックしてください。
2.3 新規コンピュータ登録
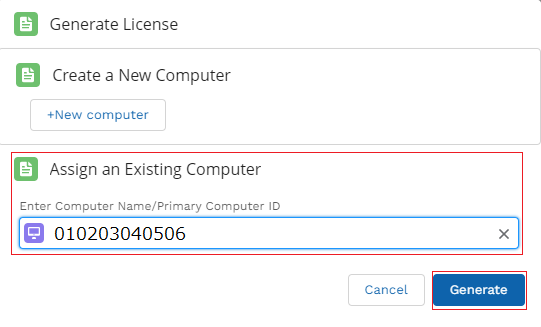
次の画面が表示されますので、
初めてライセンスを取得する方は”Create a New Computer"のを選択し、既に登録済の方は"Assign an Exisiting Computer"を選択し、右下の"Generate"ボタンをクックします。今回は新規でコンピューターを登録し、イーサネットのMACIDをIDとして作成します。
2.4 新規コンピュータ情報入力
次の画面が表示されますので、使用するコンピューターを設定します。
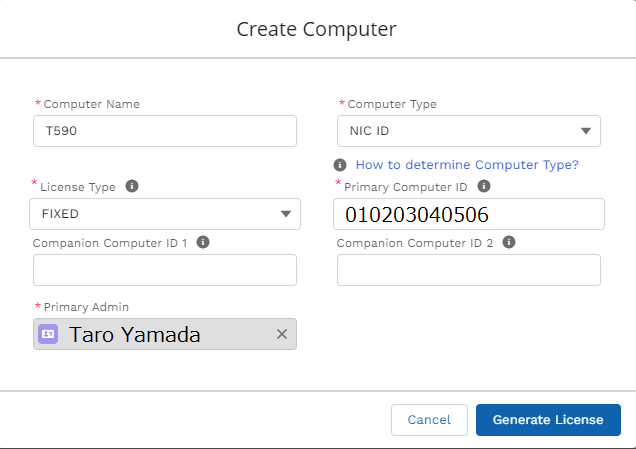
下記の必要な項目を入力して、"Generate License"をクリックしてください。
| Item | Description |
|---|---|
| Computer Name | 任意の名前入力 |
| License Type | FIXEDを選択 |
| Computer Name | NIC IDを選択 |
| Primary Computer ID | PCのイーサネットMACIDを入力 |
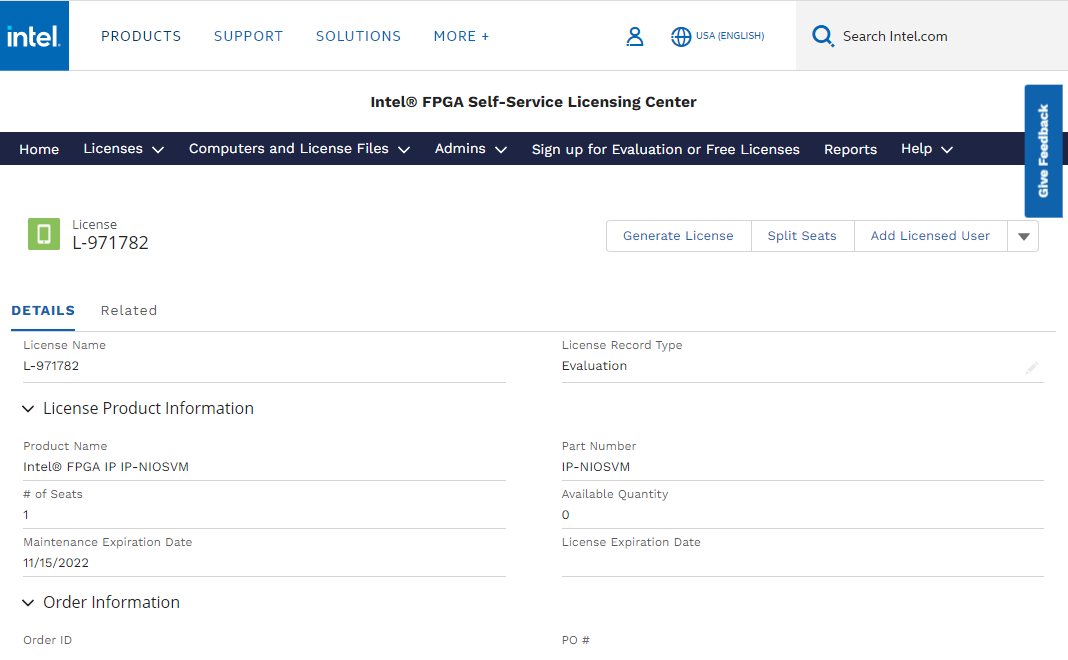
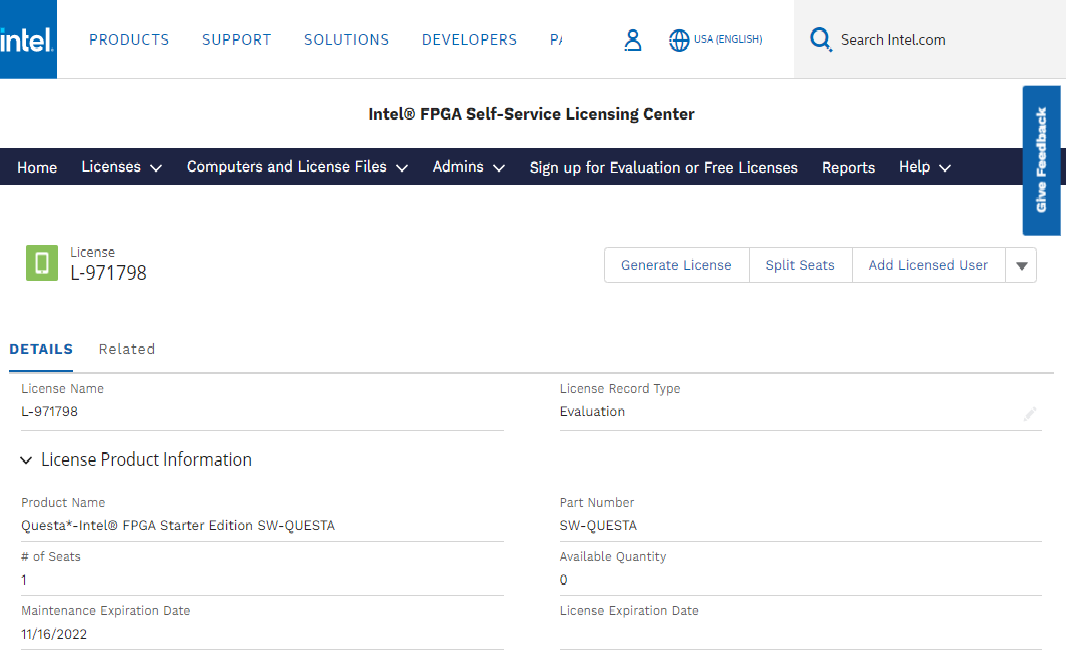
2.5 Nios® V/m Processorライセンスファイル確認
生成が成功すると下記の画面が表示され、登録したメールアドレスにライセンスファイルが送付されますの、ファイルを確認してください。
2.6 Questa*-Intel® FPGA Edition Softwareライセンス取得
同じ手順でQuesta*-Intel® FPGA Edition Softwareのラインセスを取得します。既にライセンスをお持ちの方は必要ありませんので次章に進んでください。前回と同じく、Self Service Licensing Centerをクリックします。
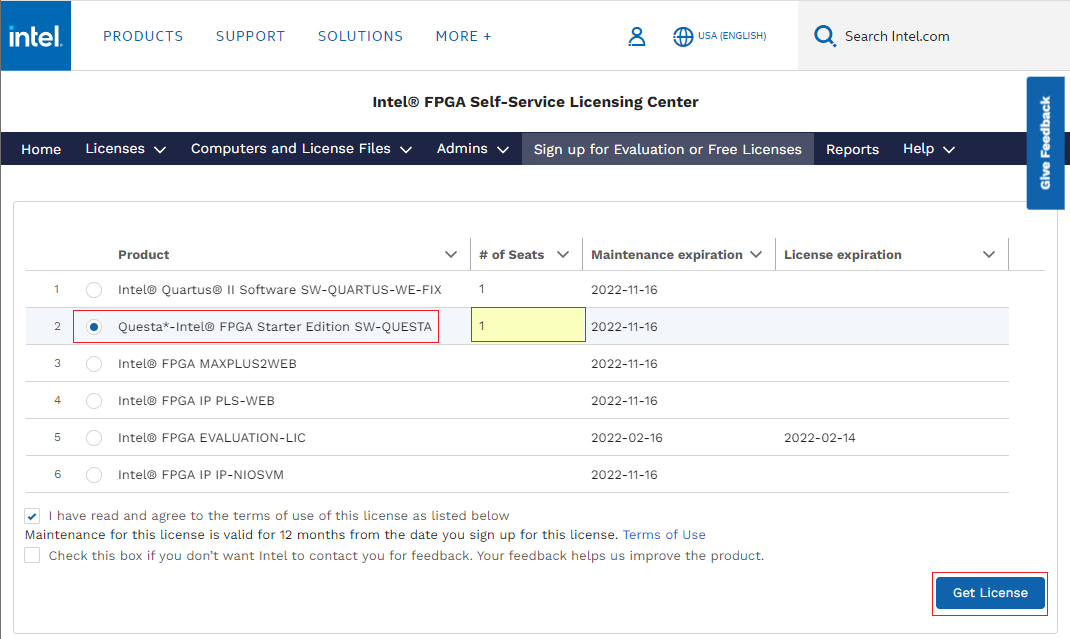
Questa*-Intel® FPGA Starter software Edition SW-QUESTAを選択し、"# of Seats"に1を入力して、右下の"Get License"をクリックしてください。
2.7 既存コンピュータへ追加
下記画面が表示されたら、先ほど登録したPCを指定しますので、"Assign an Existing Compture"を選び、MAXIDを入力して、右下の"Generate"ボタンを押します。
2.8 Questa*-Intel® FPGA Edition Softwareライセンスファイルの確認
生成が成功すると次の画面が表示され、登録したメールアドレスにライセンスファイルが送付されます。
これで、ライセンス取得は完了です。
3. インストール
本章では、Nios® V/m Processorに関するツールのインストール方法についてに説明します。Nios® II ProcessorではコンパラなどのツールはIntel® Quartus® Prime Softwareに含まれていましたが、Nios® V/m Processorではコンパラなどはオープンソースのツールを使用することになりました。そのため、別途インストールする必要があります。では順を追って説明します。
3.1 Intel® Quartus® Prime Pro Edition 21.3インストール
3.1.1 ダウンロード
まず、FPGA Software Download Centerをクリックして下記
ページに行き、OSの種類に従って、対応するIntel® Quartus® Prime Softwareのバージョンをクリックしてください。今回はWindows版でインストールの説明をします。また、本サイトへのアクセスにはアカウントが必要ですが、ライセンス取得にて作成しているものとして、話を進めます。
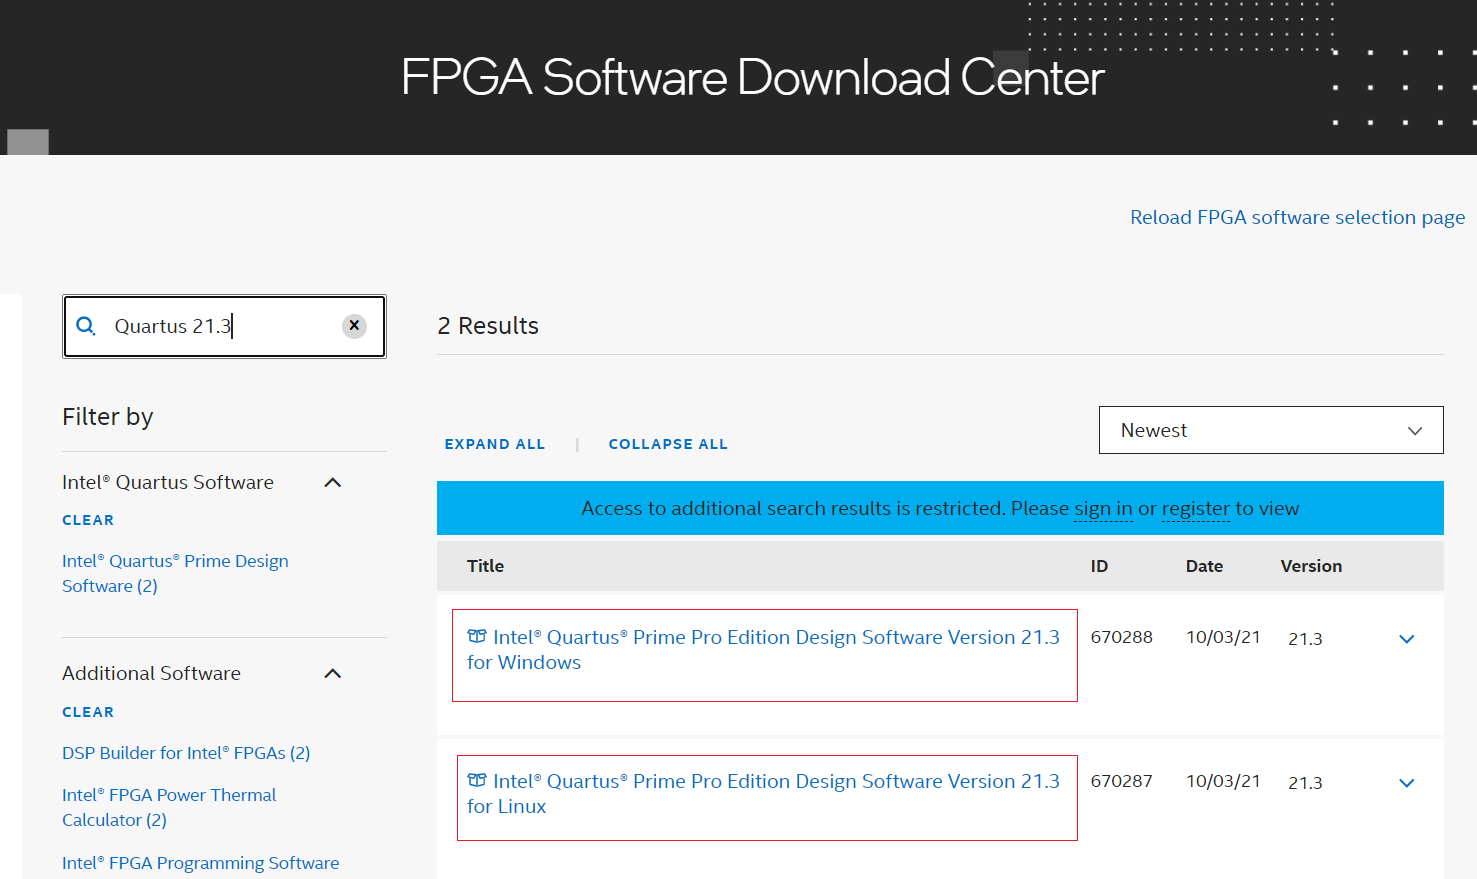
クリックすると下記ページが表示されますので、下にスクロールしてください。Linux版の場合はOperating SystemのチェックボックスをLinuxにしてください。
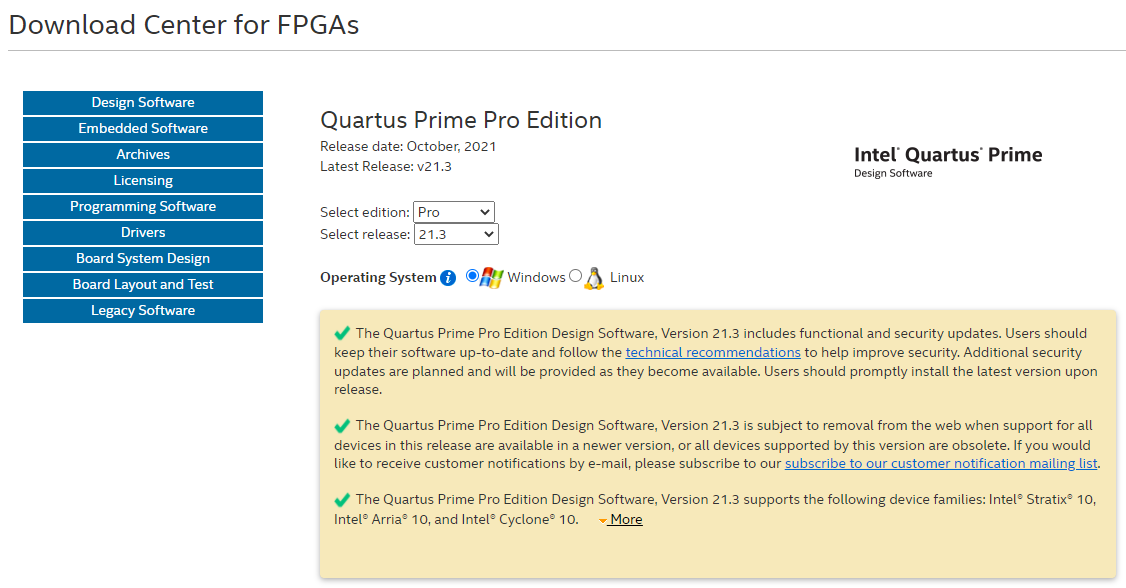
下記ページよりIntel® Quartus® Prime Pro Editionの項目の4つは全てダウンロードしてください。そして、Devicesからは使用するデバイスをダウンロードしてください。
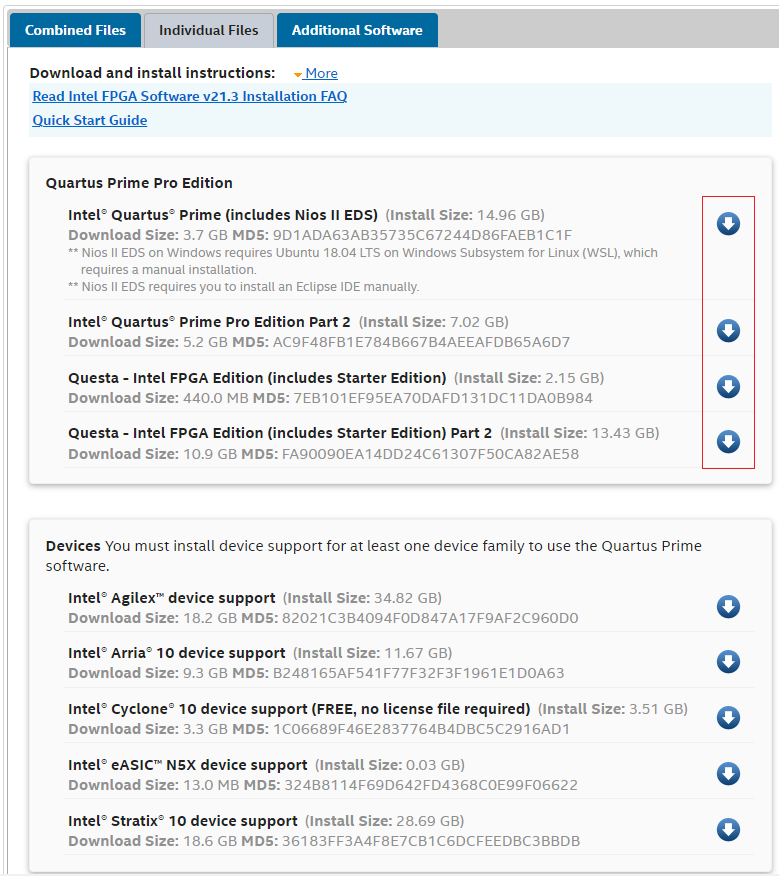
今回は対象をIntel® Arria® 10 deviceとしますので、OS毎に5つのファイルをダウンロードします。
Windowsの場合
| File Name | MD5 |
|---|---|
| QuartusProSetup-21.3.0.170-windows.exe | 9D1ADA63AB35735C67244D86FAEB1C1F |
| quartus_part2-21.3.0.170-windows.qdz | AC9F48FB1E784B667B4AEEAFDB65A6D7 |
| QuestaSetup-21.3.0.170-windows.exe | 7EB101EF95EA70DAFD131DC11DA0B984 |
| questa_part2-21.3.0.170-windows.qdz | FA90090EA14DD24C61307F50CA82AE58 |
| arria10-21.3.0.170.qdz | B248165AF541F77F32F3F1961E1D0A63 |
Linuxの場合
| File Name | MD5 |
|---|---|
| QuartusProSetup-21.3.0.170-linux.run | A57CF8A99AFF88CF21DF6799ABABF742 |
| quartus_part2-21.3.0.170-linux.qdz | B9262322D6512A6710E119B8D0ED9218 |
| QuestaSetup-21.3.0.170-linux.run | 43A0D70B17BF7B1A4AEB4E0F3B579164 |
| questa_part2-21.3.0.170-linux.qdz | 28DF55481D88AB836ED95C046632CF64 |
| arria10-21.3.0.170.qdz | B248165AF541F77F32F3F1961E1D0A63 |
3.1.2 ファイルの同一性確認
ここでダウンロードしたファイルに問題がないか、ハッシュ値を使って確認します。コマンドを使って計算した値がダウンロードページに記載してあったMD5値と一致すればファイルが同一であることが確認できます。
Windowsではスタートメニューよりコマンドプロンプトを開き、ダウンロードしたディレクトリーに移動し、下記コマンドを実行してMD5の値を計算します。
D:\ACDS\21.3pro> certutil -hashfile QuartusProSetup-21.3.0.170-windows.exe MD5
MD5 hash of QuartusProSetup-21.3.0.170-windows.exe:
9d1ada63ab35735c67244d86faeb1c1f
CertUtil: -hashfile command completed successfully.

D:\ACDS\21.3pro> certutil -hashfile quartus_part2-21.3.0.170-windows.qdz MD5
MD5 hash of quartus_part2-21.3.0.170-windows.qdz:
ac9f48fb1e784b667b4aeeafdb65a6d7
CertUtil: -hashfile command completed successfully.

D:\ACDS\21.3pro> certutil -hashfile QuestaSetup-21.3.0.170-windows.exe MD5
MD5 hash of QuestaSetup-21.3.0.170-windows.exe:
7eb101ef95ea70dafd131dc11da0b984
CertUtil: -hashfile command completed successfully.

D:\ACDS\21.3pro> certutil -hashfile questa_part2-21.3.0.170-windows.qdz MD5
MD5 hash of questa_part2-21.3.0.170-windows.qdz:
fa90090ea14dd24c61307f50ca82ae58
CertUtil: -hashfile command completed successfully.

D:\ACDS\21.3pro> certutil -hashfile arria10-21.3.0.170.qdz MD5
MD5 hash of arria10-21.3.0.170.qdz:
b248165af541f77f32f3f1961e1d0a63
CertUtil: -hashfile command completed successfully.
LinuxではTermialを開き、ダウンロードしたディレクトリーに移動し、下記のコマンドを実行します。
$ md5sum *
a57cf8a99aff88cf21df6799ababf742  QuartusProSetup-21.3.0.170-linux.run
b9262322d6512a6710e119b8d0ed9218  quartus_part2-21.3.0.170-linux.qdz
43a0d70b17bf7b1a4aeb4e0f3b579164  QuestaSetup-21.3.0.170-linux.run
28df55481d88ab836ed95c046632cf64  questa_part2-21.3.0.170-linux.qdz
b248165af541f77f32f3f1961e1d0a63  arria10-21.3.0.170.qdz
以上より、MD5値は全て一致していることが確認できたので、ファイルが同一であることが確認できました。
3.1.3 インストール
WindowsではQuartusProSetup-21.3.0.170-windows.exeをダブルクリックしてください。
LinuxではTerminalを開き、下記コマンドを入力するとインストーラーが起動します。
$ chmod +x *.run
$ ./QuartusProSetup-21.3.0.170-linux.run
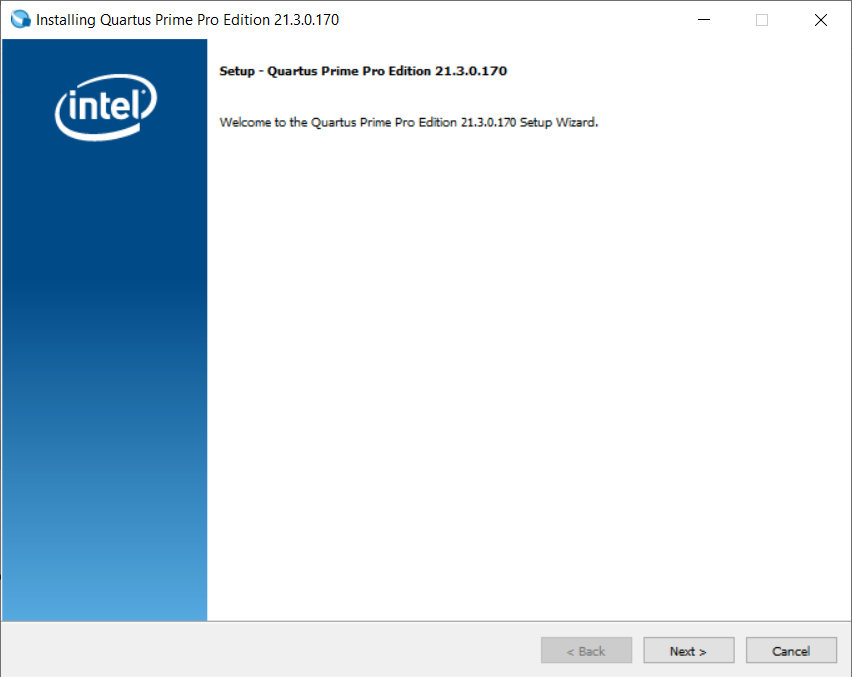
インストーラーが起動する下記にダイアログが開きますので、Nextをクリックします。
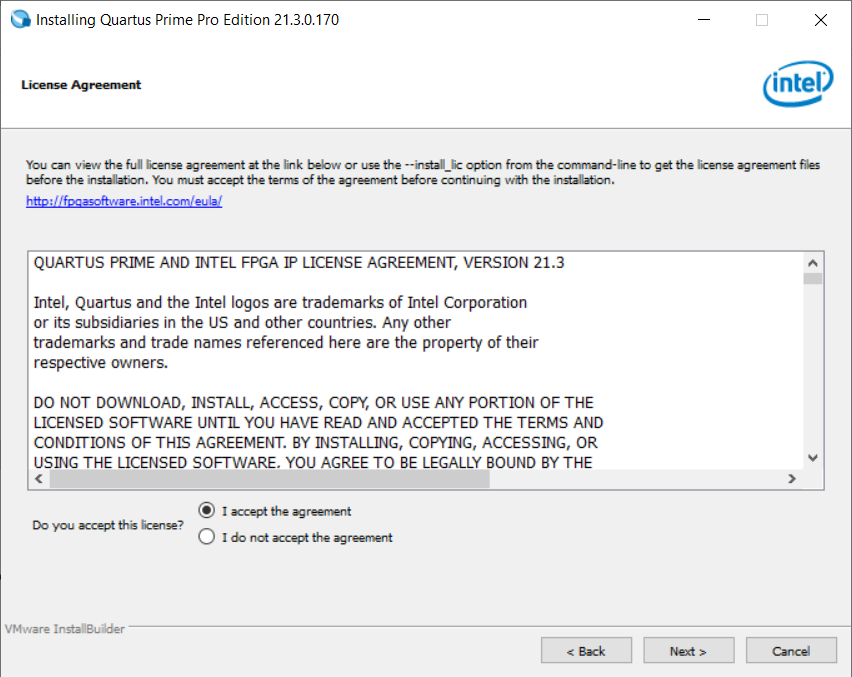
License Agreementを確認して"I accept the agreement"にチェックを入れ、Nextをクリックします。
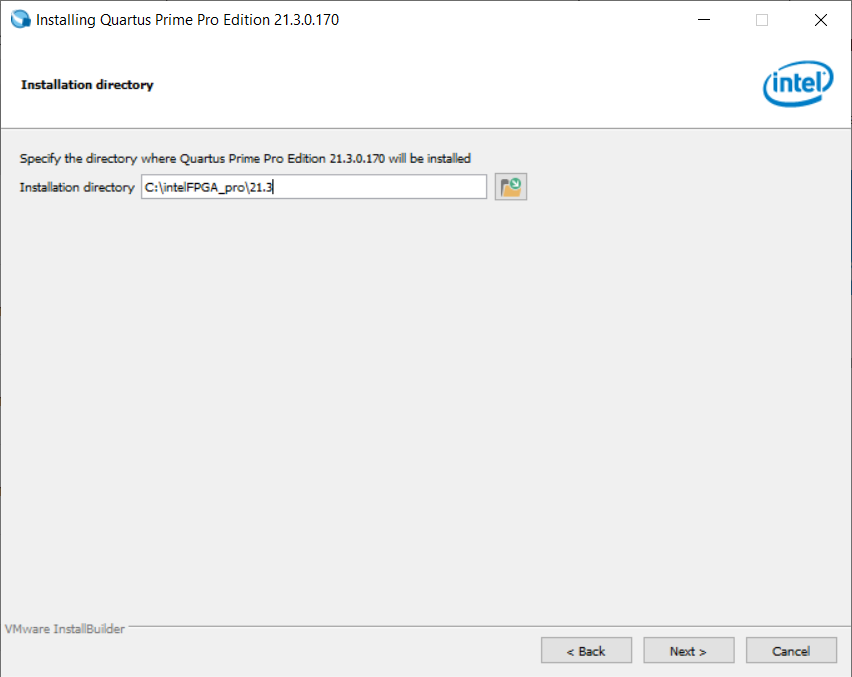
インストールディレクトリーを指定します。ディフォルトはWindowsが"C:\intelFPGA_pro\21.3", Linuxは"$HOME/intelFPGA_pro/21.3"です。今回はディフォルトディレクトリーにインストールするものとします。
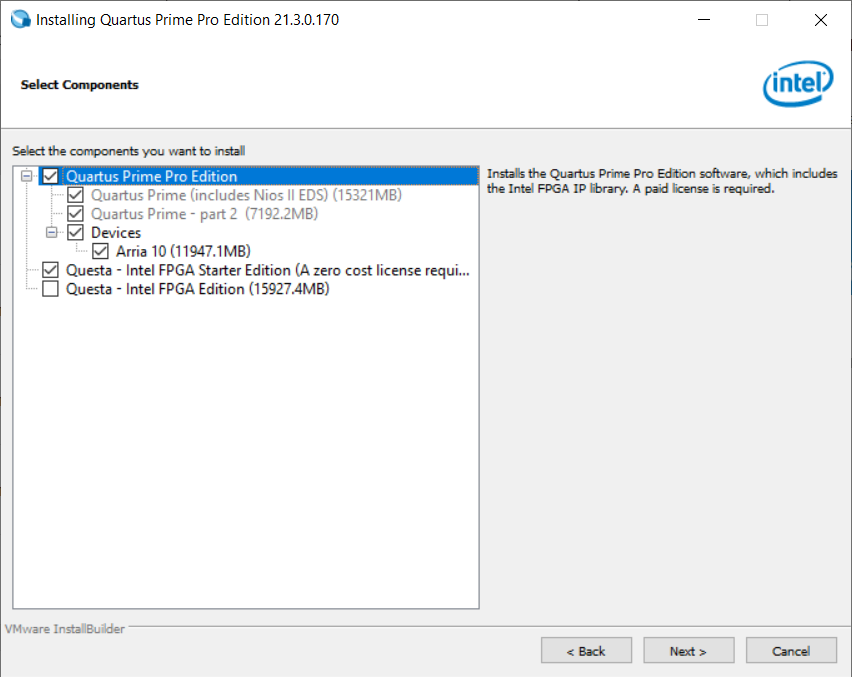
インストールするコンポーネントを選択します。今回はデバイスファイルがArria 10しかダウンロードしていないため、Arria 10のみ表示となっています。
他のデバイスファイルをダウンロードした方は使用するデバイスに併せて選択してください。
シミュレーターは有償版を使用する方は、下記のように"Questa - Intel FPGA Edition"を選択してください。

無償版を使用する方は、下記のように"Questa - Intel FPGA Starter Edition"を選択してください。選択は完了したら、Nextをクリックしてください。
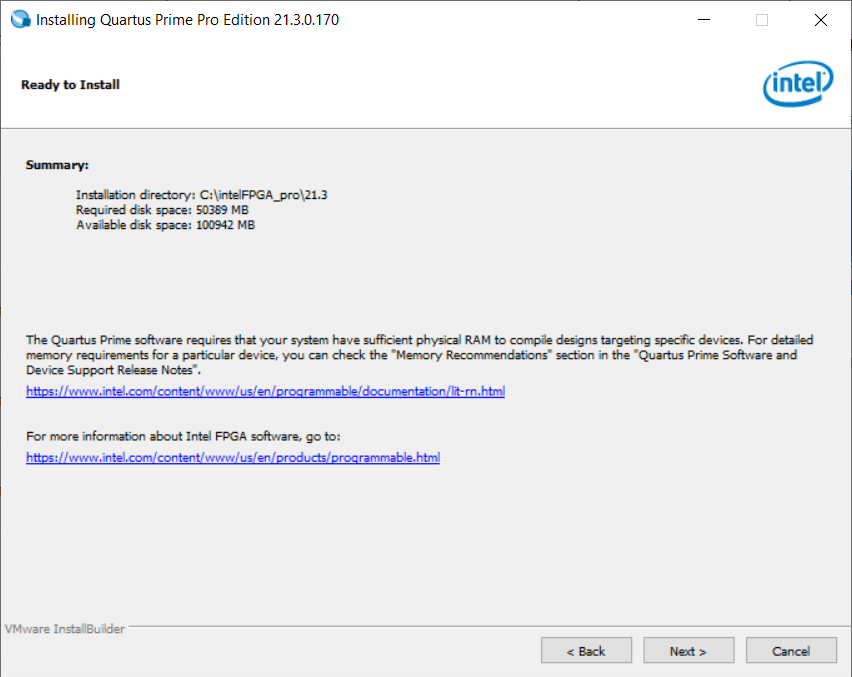
インストールディレクトリー、インストールサイズを確認して、Nextをクリックしてください。インストールが開始されます。
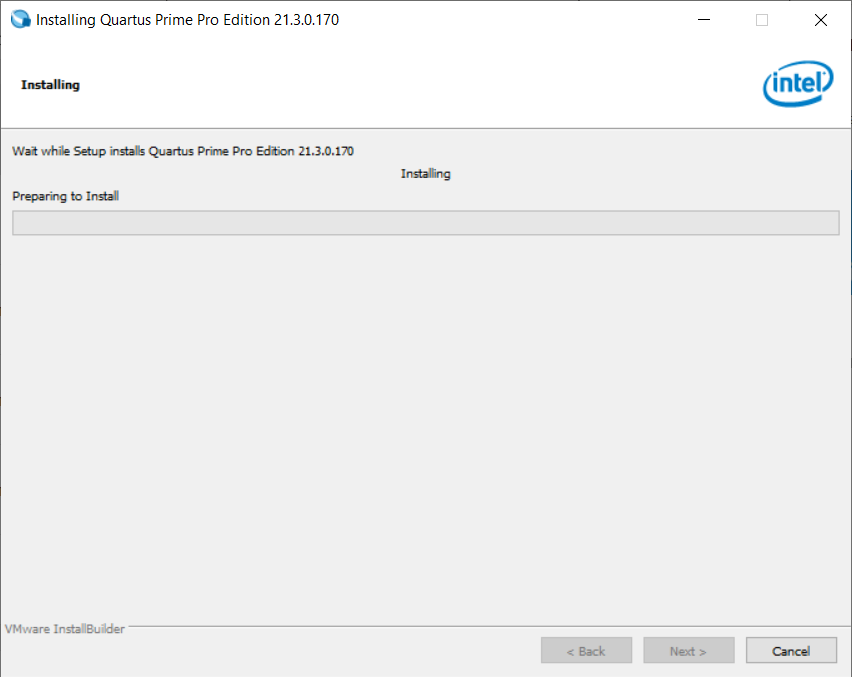
インストール中の画面です。
シミュレーターのインストール中です。

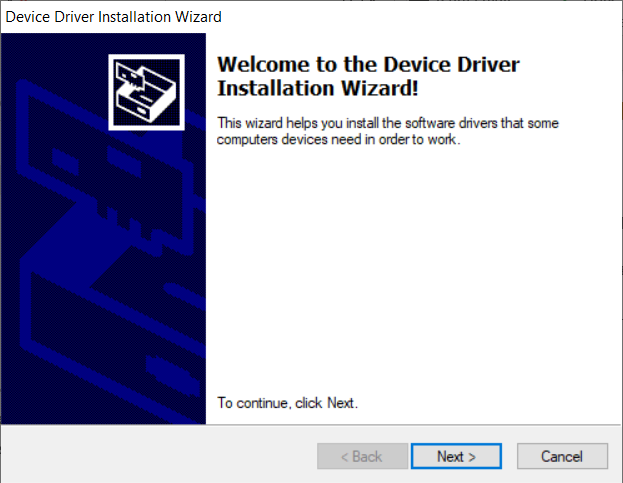
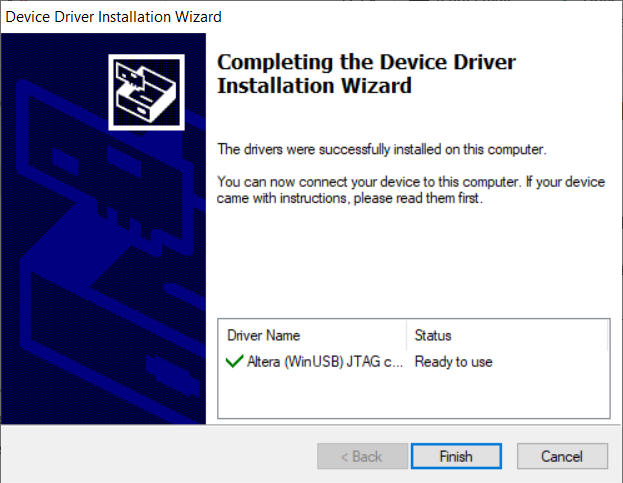
Intel® FPGA Download Cable II(旧USB Blaster II)なのどインストール選択画面です。Intel® FPGA Download Cable IIはFPGAをコンフィグレーションや、Nios® V/m Processorのデバッグに必要ですのでインストールしてください。
このインストールはWindowsのみです。Linuxの方はIntel® FPGA Download Cable II User Guideの
"1.6. Installing the Intel FPGA Download Cable II Driver on Linux Systems"に従ってください。
Intel® FPGA Download Cable(旧USB Blaster)ドライバーをインストールします。Nextをクリックしてください。

Finishをクリックしてください。

Intel® FPGA Download Cable II(旧USB Blaster II)ドライバーをインストールします。Nextをクリックしてください。
Finishをクリックしてください。
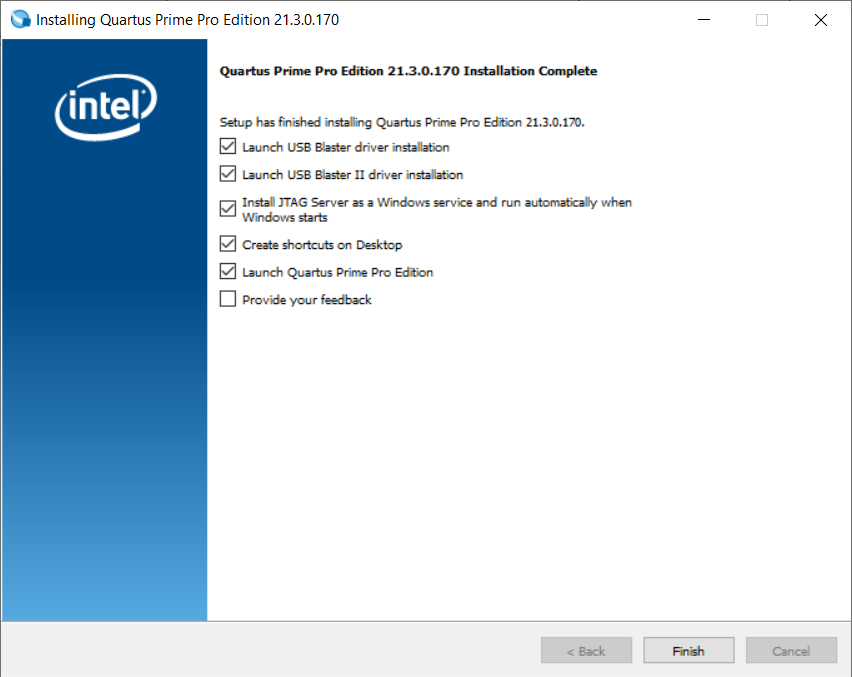
以上でIntel® Quartus® Prime Pro Editionのインストールは完了です。
3.2 ソフトウエア環境のインストール
Nios® V/m Processorソフトウエア開発にはxPack GNU RISC-V Embedded GCC、CMake、xPack Windows Build Tools(Windowsのみ)が必要です。ここでダウンロードしてインストールします。
また、バージョン依存性があり、今回確認したバージョンの組み合わせは以下の通りです。
| Tool | Windows | Linux |
|---|---|---|
| xPack GNU RISC-V Embedded GCC | 8.3.0-2.3 | 8.3.0-2.3 |
| CMake | 3.21.4 | 3.21.4 |
| xPack Windows Build Tools | 4.2.1-2 | N/A |
3.2.1 xpack-riscv-none-embed-gcc-8.3.0-2.3ダウンロード
下記サイトよりファイルをダウンロードします。

ファイルのリンクを下記に示しますので、OSに合わせてダウンロードしてください。ハッシュ値は拡張子が.shaファイルに保存されています。
| OS | Download Files | SHA256 |
|---|---|---|
| Windows x64 | xpack-riscv-none-embed-gcc-8.3.0-2.3-win32-x64.zip | 59d62abc7585ba76a69da5f4ba0254cf2301ef897d47ad8e5a94468f38449db8 |
| Linux x86_64 | xpack-riscv-none-embed-gcc-8.3.0-2.3-linux-x64.tar.gz | 708d0cb5ff12eb5ad070153594c4f7771cd86d4b6721a77b23f8fe695c8f9402 |
3.2.2 CMake 3.21.4ダウンロード
下記サイトよりファイルをダウンロードします。
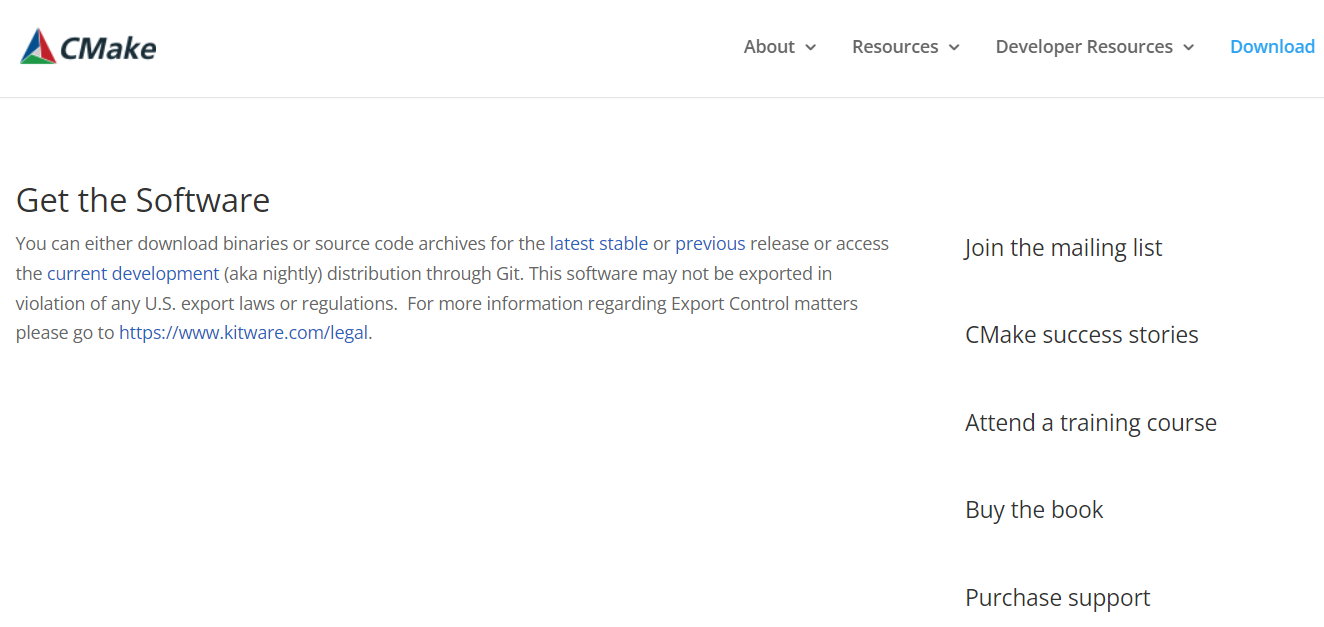
ファイルのリンクを下記に示しますので、OSに合わせてダウンロードしてください。ハッシュ値はcmake-3.21.4-SHA-256.txtファイルに保存されています。
| OS | Download Files | SHA256 |
|---|---|---|
| Windows x64 | cmake-3.21.4-windows-x86_64.zip | 360ee9bf77cd891d4a33997e4e214d0cd6a0fd7ae6051d023f403a74248914a8 |
| Linux x86_64 | cmake-3.21.4-linux-x86_64.tar.gz | eddba9da5b60e0b5ec5cbb1a65e504d776e247573204df14f6d004da9bc611f9 |
3.2.3 xPack Windows Build Toolsダウンロード
下記サイトよりファイルをダウンロードします。本ツールはWindowsのみです。
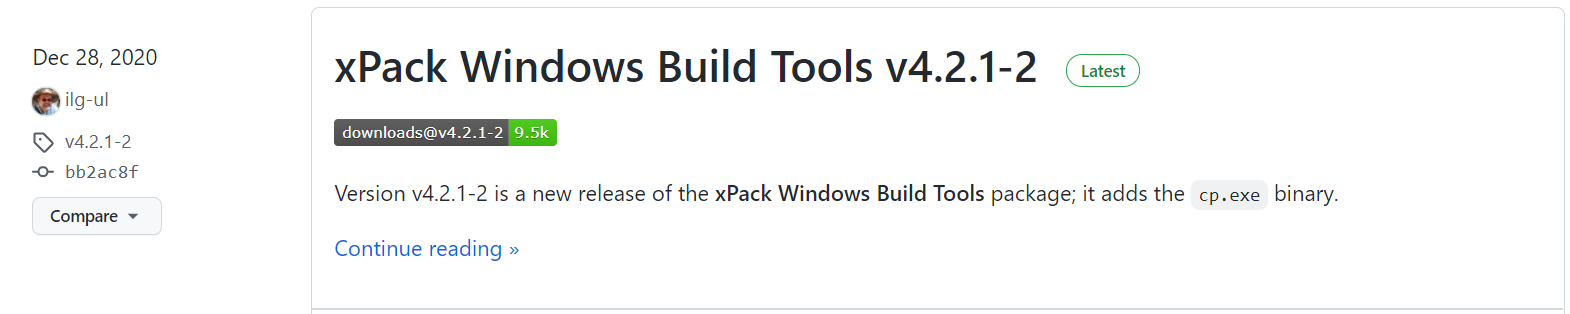
リンクを下記に示します。ハッシュ値は拡張子が.shaファイルに保存されています。
| Download Files | SHA256 |
|---|---|
| xpack-windows-build-tools-4.2.1-2-win32-x64.zip | b7a3cbe60639f0e913fb7d7309da01533e0d50c030fa2b6764f5c3940eeb7e91 |
3.2.4 ファイル同一性確認
ダウンロードが完了しましたら、SHA256のハッシュ値でファイル同一性の確認を行います。ハッシュ値が一致していれば、ファイルのダウンロードに成功しています。
Windowsではスタートメニューよりコマンドプロンプトを開き、ダウンロードしたディレクトリーに移動し、下記のコマンドを実行します。
C:\tools> certutil -hashfile xpack-riscv-none-embed-gcc-8.3.0-2.3-win32-x64.zip SHA256
SHA256 hash of xpack-riscv-none-embed-gcc-8.3.0-2.3-win32-x64.zip:
59d62abc7585ba76a69da5f4ba0254cf2301ef897d47ad8e5a94468f38449db8
CertUtil: -hashfile command completed successfully.

C:\tools> certutil -hashfile cmake-3.21.4-windows-x86_64.zip SHA256
SHA256 hash of cmake-3.21.4-windows-x86_64.zip:
360ee9bf77cd891d4a33997e4e214d0cd6a0fd7ae6051d023f403a74248914a8
CertUtil: -hashfile command completed successfully.

C:\tools> certutil -hashfile xpack-windows-build-tools-4.2.1-2-win32-x64.zip SHA256
SHA256 hash of xpack-windows-build-tools-4.2.1-2-win32-x64.zip:
b7a3cbe60639f0e913fb7d7309da01533e0d50c030fa2b6764f5c3940eeb7e91
CertUtil: -hashfile command completed successfully.
Linuxではターミナルを開き、ダウンロードしたディレクトリーに移動し、下記のコマンドを実行します。
$ sha256sum *.tar.gz
708d0cb5ff12eb5ad070153594c4f7771cd86d4b6721a77b23f8fe695c8f9402  xpack-riscv-none-embed-gcc-8.3.0-2.3-linux-x64.tar.gz
eddba9da5b60e0b5ec5cbb1a65e504d776e247573204df14f6d004da9bc611f9  cmake-3.21.4-linux-x86_64.tar.gz
上記より、ハッシュ値が一致していることが確認出来ました。
3.2.5 インストール
WindowsではこれらのツールをC:\toolsにインストールします。まず、ファイルエクスプローラーでtoolsディレクトリーを作成し、そこにダウンロードした3つのZIPファイルを解凍します。解凍後は下記のようになります。
C:\tools>dir
 Volume in drive C is OSDisk
 Volume Serial Number is D6C3-5E6D

 Directory of C:\tools

12/01/2021  10:13 AM    <DIR>          .
12/01/2021  10:13 AM    <DIR>          ..
11/30/2021  11:51 AM    <DIR>          cmake-3.21.4-windows-x86_64
11/30/2021  12:59 AM    <DIR>          xpack-riscv-none-embed-gcc-8.3.0-2.3
11/30/2021  12:01 PM    <DIR>          xpack-windows-build-tools-4.2.1-2
               0 File(s)              0 bytes
               5 Dir(s)  50,020,847,616 bytes free
Linuxでは$HOME/toolsにインストールします。Windowsと同様にTerminalでディレクトリーを作成し、ダウンロードした2のtar.gzファイルを解凍します。ダウンロードしたファイルが~/Downloadsに保存されている場合のコマンドは下記となります。
$ cd ~
$ mkdir tools
$ cd tools
$ tar zxf ~/Downloads/cmake-3.21.4-linux-x86_64.tar.gz -C .
$ tar zxf ~/Downloads/xpack-riscv-none-embed-gcc-8.3.0-2.3-linux-x64.tar.gz -C .
$ ls
cmake-3.21.4-linux-x86_64
xpack-riscv-none-embed-gcc-8.3.0-2.3
3.3 環境変数の設定
ここではインストールしたツールを有効にするための環境変数の設定を行います。
3.3.1 Windowsの設定
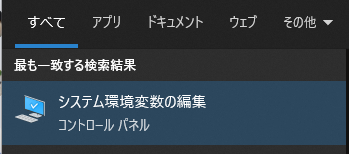
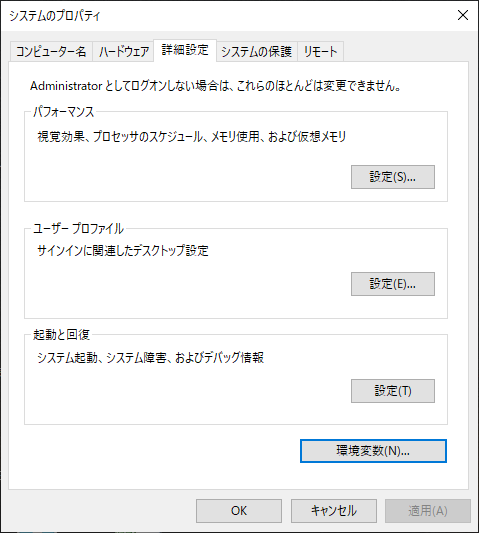
まず、右下のサーチボックスに"env"と入力してください。

そして表示される”システム環境変数の編集"を選択してください。
下記ダイアログが開きますので、"環境変数(N)..."をクリックしてください。
ユーザー環境変数の赤枠で囲んだ部分を修正します(この画面は英語版ですがご了承ください)。まずは、QSYS_ROOTDIR, QUARTUS_ROOTDIR, SOPC_KIT_NIOS2を追加して、下記のように設定してください。
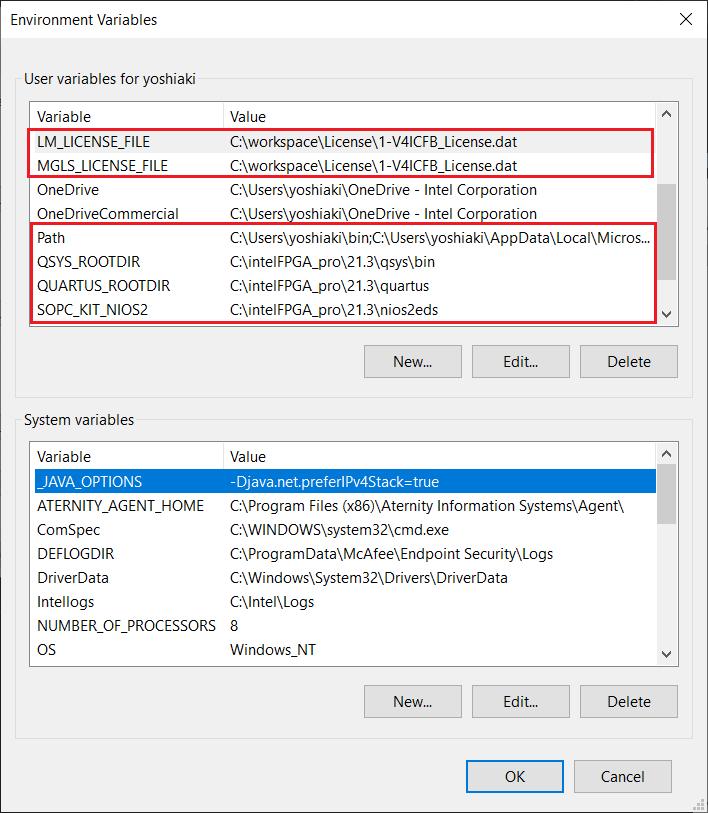
そして、ラインセスファイルをLM_LICENSE_FILE, MGLS_LICENSE_FILEへ指定します。ファイルが複数ある場合は";"で区切って指定してください。
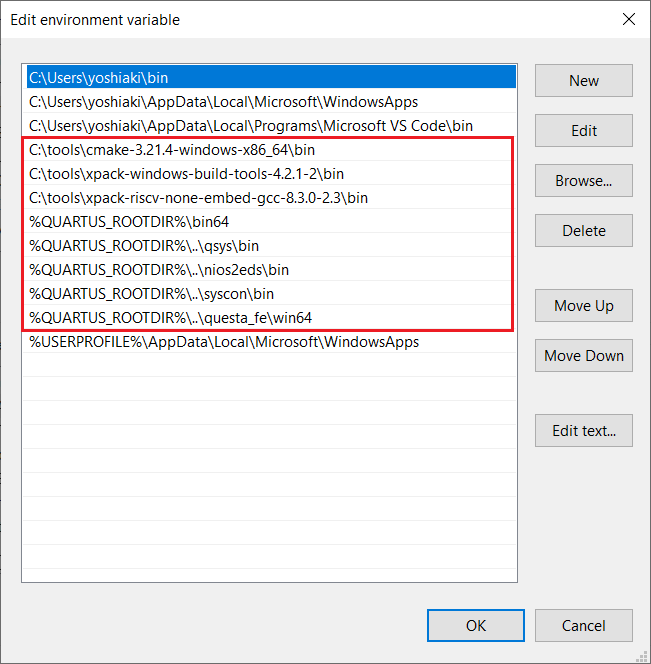
次に、”path”をクリックして、"Edit”ボタンを押してください(この画面は英語版ですがご了承ください)。赤枠の部分を追加してください。
これで、Windows版での環境設定は完了です。WindonwsのスタートメニューのQuartus Prime Pro Edition 21.3.0.170->Nios V Command Shell (Quartus Prime Pro 21.3)を開いてください。
そして、下記コマンドを実行し、インストールしたツールが正しく実行できるか確認します。
[niosv-shell] C:\workspace\base\NiosV\test> cmake --version
cmake version 3.21.4

CMake suite maintained and supported by Kitware (kitware.com/cmake).

[niosv-shell] C:\workspace\base\NiosV\test> riscv-none-embed-gcc --version
riscv-none-embed-gcc (xPack GNU RISC-V Embedded GCC, 64-bit) 8.3.0
Copyright (C) 2018 Free Software Foundation, Inc.
This is free software; see the source for copying conditions.  There is NO
warranty; not even for MERCHANTABILITY or FITNESS FOR A PARTICULAR PURPOSE.

[niosv-shell] C:\workspace\base\NiosV\test> make --version
GNU Make 4.2.1
Built for x86_64-w64-mingw32
Copyright (C) 1988-2016 Free Software Foundation, Inc.
License GPLv3+: GNU GPL version 3 or later <http://gnu.org/licenses/gpl.html>
This is free software: you are free to change and redistribute it.
There is NO WARRANTY, to the extent permitted by law.
以上より、Widnows版のツールが正しくインストールされていることが確認できました。
3.3.2 Linuxの設定
Linuxでは下記をenv.shファイルとして保存してください。この時、ライセンス作成の章で生成したファイルを指定します。ここでは、$HOME/Licenseに保存してある、1-V4ICFB_License.datを指定してます。
また、複数のライセンスファイルを指定する場合は":"で区切って指定してください。
# !/bin/bash
QUARTUS_ROOTDIR=$HOME/DATA/intelFPGA_pro/21.3/quartus
# Licence folder
QLDIR=$HOME/License
QUARTUS_LICENSE=$QLDIR/1-V4ICFB_License.dat
# Quartus Binaries
QBIN=$QUARTUS_ROOTDIR/bin
QSYSBIN=$QUARTUS_ROOTDIR/../qsys/bin
# NiosV binaries
NVBIN=$QUARTUS_ROOTDIR/../niosv/bin
# system console
SYSC=${QUARTUS_ROOTDIR}/../syscon/bin
# for elf2hex
NIOS2EDS=${QUARTUS_ROOTDIR}/../nios2eds/bin
# Questa Sim FPGA Edition
QSIM=${QUARTUS_ROOTDIR}/../questa_fe/bin    # FPGA Starter Editionの場合は questa_fseにパスを変更
# gcc toolchain
GCC=$HOME/tools/xpack-riscv-none-embed-gcc-8.3.0-2.3/bin
# cmake
CMAKE=$HOME/tools/cmake-3.21.4-linux-x86_64/bin

export PATH=${PATH}:${QBIN}:${QSYSBIN}:${NIOS2EDS}:${SYSC}:${NVBIN}:${QSIM}:${GCC}:${CMAKE}
export IP_ROOTDIR="${QUARTUS_ROOTDIR}/../ip"
export SOPC_KIT_NIOS2="${QUARTUS_ROOTDIR}/../nios2eds"

export LM_LICENSE_FILE=$QUARTUS_LICENSE
export MGLS_LICENSE_FILE=$QUARTUS_LICENSE
そして、sourceコマンドで環境変数を設定してください。
$ source env.sh
ここで、試しに各コマンドのバージョンを確認してみます。
$ cmake --version
cmake version 3.21.4

CMake suite maintained and supported by Kitware (kitware.com/cmake).

$ riscv-none-embed-gcc --version
riscv-none-embed-gcc (xPack GNU RISC-V Embedded GCC, 64-bit) 8.3.0
Copyright (C) 2018 Free Software Foundation, Inc.
This is free software; see the source for copying conditions.  There is NO
warranty; not even for MERCHANTABILITY or FITNESS FOR A PARTICULAR PURPOSE.
以上より、Linux版のツールが正しくインストールされていることが確認できました。
4. ハードウエア構築
4.1 デザインサンプル
ここでは、Nios® V/m Processorを用いたデザインを構築します。QuartusにはArria 10 SoC Devkit用のデザインが下記ディレクトリーに既に用意されています。
Windows
C:\intelFPGA_pro\21.3\ip\altera\soft_processor\intel_niosv_m\example_design\a10soc_niosv_m_example_design.zip
Linux
$HOME/intelFPGA_pro/21.3/ip/altera/soft_processor/intel_niosv_m/example_design/a10soc_niosv_m_example_design.zip
Windowsではこのファイルを、自分のワークディレクトリーにコピーして、右クリックによりファイルを展開してください。
Linuxでは、Terminalを開き、自分のワークディレクトリーに移動し、下記コマンドを実行するれば、ファイルが展開されます。
$ cp $QUARTUS_ROOTDIR/../ip/altera/soft_processor/intel_niosv_m/example_design/a10soc_niosv_m_example_design.zip .
$ unzip a10soc_niosv_m_example_design.zip
Archive:  a10soc_niosv_m_example_design.zip
  inflating: software/app/hello.c
  inflating: create_qsys.tcl
  inflating: readme.txt
  inflating: top.qpf
  inflating: top.qsf
  inflating: top.sdc
  inflating: top.v
  inflating: toggle_issp.tcl
展開後のtop.vを見てもらえれば、わかる通り本デザインは50MHzのクロック入力1本のみ使用しています。そのため、他のFPGAへの移植も容易です。詳細は4.5 他のFPGAへの移植を参照してください。リセットに関しては、ISSP(In-System Source & Probe)と呼ばれるJTAGより信号を制御するIPを使用して、toggle_issp.tclにより、リセットを行います。詳しくは5.1.6 ISSPによりCPUをリセットで説明します。
| File | Description |
|---|---|
| readme.txt | READMEファイル |
| top.qpf | Quartus Project file |
| top.qsf | Quartus Settings file |
| top.sdc | Synopsys Design Constraints file |
| top.v | Design TOP RTL file |
| create_qsys.tcl | Platform Designer作成スクリプト |
| toggle_issp.tcl | Reset実行スクリプト |
| software/app/hello.c | Hello Worldメインファイル |
4.2 Platform Designerデザイン構築
ここでは、Platform Designerの構築を行います。構築の前に、cretae_qsys.tclの33行目を編集し、下記のようにRAMサイズを512KBに変更します。
set_component_parameter_value memorySize {0x80000}
編集が完了したら、WindonwsではスタートメニューのQuartus Prime Pro Edition 21.3.0.170->Nios V Command Shell (Quartus Prime Pro 21.3)を、LinuxではTerminalを開いてください。
- 今後はTerminalと説明した場合、WindowsではNios V Command Shell (Quartus Prime Pro 21.3)を指すことします。そして主な作業はWindows上で行いますが、特に説明が無い場合はWindows、Linuxでコマンドは同一です。
では、下記コマンドを実行し、Platform Designer用ファイルを生成させます。
[niosv-shell] C:\workspace\base\NiosV\test> qsys-script --script=create_qsys.tcl --quartus-project=top.qpf

Ignoring env var, _JAVA_OPTIONS=-Djava.net.preferIPv4Stack=true
Please use env var, QSYS_EDIT_JVM_ARGS, to apply your JVM arguments to Qsys Pro
***************************************************************
Quartus is a registered trademark of Intel Corporation in the
US and other countries.  Portions of the Quartus Prime software
code, and other portions of the code included in this download
or on this DVD, are licensed to Intel Corporation and are the
copyrighted property of third parties. For license details,
refer to the End User License Agreement at
http://fpgasoftware.intel.com/eula.
***************************************************************

2021.11.30.16:01:34 Info: Doing: qsys-script --script=create_qsys.tcl --quartus-project=top.qpf
2021.11.30.16:01:40 Info: create_system sys
2021.11.30.16:01:41 Info: set_project_property DEVICE 10AS066N3F40E2SG
2021.11.30.16:01:41 Info: set_project_property DEVICE_FAMILY Arria 10
2021.11.30.16:01:41 Info: set_module_property FILE sys.qsys
2021.11.30.16:01:41 Info: set_module_property NAME sys
2021.11.30.16:01:41 Info: add_component clock_in ip/sys/sys_clock_in.ip altera_clock_bridge
2021.11.30.16:01:43 Info: clock_in: Generic Component instance footprint reloaded.
2021.11.30.16:01:43 Info: load_component clock_in
2021.11.30.16:01:43 Info: set_component_parameter_value EXPLICIT_CLOCK_RATE 50000000.0
2021.11.30.16:01:43 Info: save_component
2021.11.30.16:01:43 Info: add_component reset_in ip/sys/sys_reset_in.ip altera_reset_bridge
2021.11.30.16:01:44 Info: reset_in: Generic Component instance footprint reloaded.
2021.11.30.16:01:44 Info: add_component cpu ip/sys/cpu.ip intel_niosv_m
2021.11.30.16:01:46 Info: cpu: Generic Component instance footprint reloaded.
2021.11.30.16:01:46 Info: load_component cpu
2021.11.30.16:01:46 Info: set_component_parameter_value enableDebug 1
2021.11.30.16:01:46 Info: set_component_parameter_value exceptionOffset 32
2021.11.30.16:01:47 Info: set_component_parameter_value exceptionSlave ram.s1
2021.11.30.16:01:47 Info: set_component_parameter_value numGpr 32
2021.11.30.16:01:47 Info: set_component_parameter_value resetOffset 0
2021.11.30.16:01:47 Info: set_component_parameter_value resetSlave ram.s1
2021.11.30.16:01:47 Info: save_component
2021.11.30.16:01:47 Info: add_component ram ip/sys/ram.ip altera_avalon_onchip_memory2
2021.11.30.16:01:48 Info: ram: Generic Component instance footprint reloaded.
2021.11.30.16:01:48 Info: load_component ram
2021.11.30.16:01:48 Info: set_component_parameter_value memorySize 0x80000
2021.11.30.16:01:48 Info: set_component_parameter_value initMemContent 1
2021.11.30.16:01:48 Info: set_component_parameter_value initializationFileName ram.hex
2021.11.30.16:01:48 Info: set_component_parameter_value useNonDefaultInitFile 1
2021.11.30.16:01:48 Info: save_component
2021.11.30.16:01:48 Info: add_component jtag_uart ip/sys/jtag_uart.ip altera_avalon_jtag_uart
2021.11.30.16:01:49 Info: jtag_uart: Generic Component instance footprint reloaded.
2021.11.30.16:01:49 Info: add_connection clock_in.out_clk/cpu.clk
2021.11.30.16:01:49 Info: add_connection clock_in.out_clk/jtag_uart.clk
2021.11.30.16:01:49 Info: add_connection clock_in.out_clk/ram.clk1
2021.11.30.16:01:49 Info: add_connection clock_in.out_clk/reset_in.clk
2021.11.30.16:01:49 Info: add_connection cpu.data_manager/cpu.dm_agent
2021.11.30.16:01:49 Info: set_connection_parameter_value cpu.data_manager/cpu.dm_agent baseAddress 0x00080000
2021.11.30.16:01:49 Info: add_connection cpu.data_manager/cpu.timer_sw_agent
2021.11.30.16:01:49 Info: set_connection_parameter_value cpu.data_manager/cpu.timer_sw_agent baseAddress 0x00090000
2021.11.30.16:01:49 Info: add_connection cpu.data_manager/jtag_uart.avalon_jtag_slave
2021.11.30.16:01:49 Info: set_connection_parameter_value cpu.data_manager/jtag_uart.avalon_jtag_slave baseAddress 0x00090078
2021.11.30.16:01:49 Info: add_connection cpu.data_manager/ram.s1
2021.11.30.16:01:49 Info: set_connection_parameter_value cpu.data_manager/ram.s1 baseAddress 0x00000000
2021.11.30.16:01:49 Info: add_connection cpu.instruction_manager/cpu.dm_agent
2021.11.30.16:01:49 Info: set_connection_parameter_value cpu.instruction_manager/cpu.dm_agent baseAddress 0x00080000
2021.11.30.16:01:49 Info: add_connection cpu.instruction_manager/ram.s1
2021.11.30.16:01:49 Info: set_connection_parameter_value cpu.instruction_manager/ram.s1 baseAddress 0x00000000
2021.11.30.16:01:49 Info: add_connection cpu.platform_irq_rx/jtag_uart.irq
2021.11.30.16:01:49 Info: add_connection reset_in.out_reset/cpu.reset
2021.11.30.16:01:49 Info: add_connection reset_in.out_reset/jtag_uart.reset
2021.11.30.16:01:49 Info: add_connection reset_in.out_reset/ram.reset1
2021.11.30.16:01:49 Info: set_interface_property clk EXPORT_OF clock_in.in_clk
2021.11.30.16:01:49 Info: set_interface_property reset EXPORT_OF reset_in.in_reset
2021.11.30.16:01:50 Info: sync_sysinfo_parameters
2021.11.30.16:01:50 Info: Synchronizing System Information for clock_in
2021.11.30.16:01:51 Info: Synchronizing System Information for reset_in
2021.11.30.16:01:52 Info: Synchronizing System Information for cpu
2021.11.30.16:01:53 Info: Synchronizing System Information for ram
2021.11.30.16:01:53 Info: Synchronizing System Information for jtag_uart
2021.11.30.16:01:53 Info: save_system sys
2021.11.30.16:01:54 Info: Info: All modules have been converted to Generic Components.
4.3 Platform Designerデザイン確認
生成したPlatform DesignerのデザインをGUIで確認します。Platform Deisgnerの起動法は2つあり、一つ目は、Intel® Quartus® Primeソフトウェアを起動し、Platfrom Designerを起動する方法です。もう一つはTerminalよりコマンドで起動する方法です。
4.3.1 Intel® Quartus® PrimeソフトウェアよりPlatform Designer起動
1)Windowsの場合はスタートメニューからQuartus Prime Pro Edition 21.3.0.170->Quartus (Quartus Prime Pro 21.3)を選択してQuartusを起動します。LinuxではTerminalを開き、quartusと入力します。下記は起動後の画面です。

2)Fileメニューより"Open Project..."を選択し、top.qpfを指定し、"Open"をクリックします。
3)Toolsメニューより"Platform Designer"を選択します。
4)下記の"Open System"ダイアログが開いたら、赤枠をクリックして、sys.qsysファイルを指定してください。
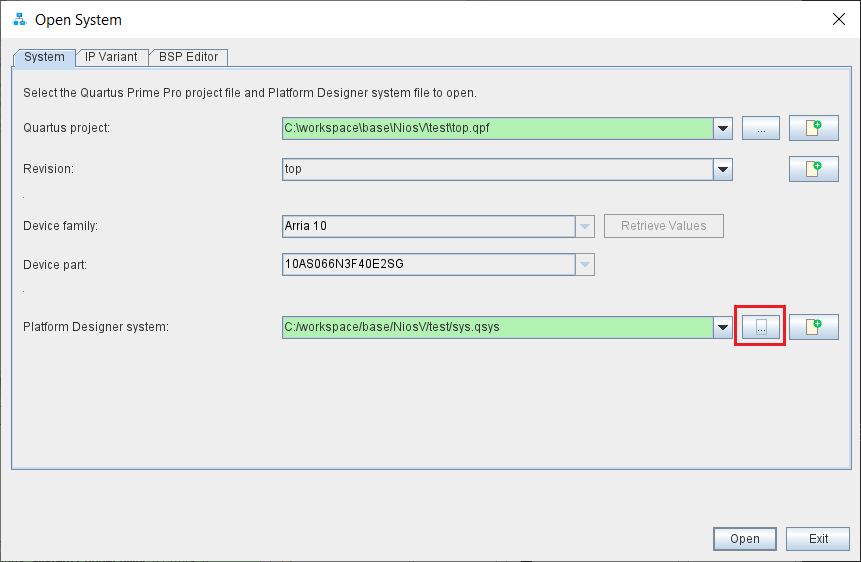
5)Openをクリックします。
4.3.2 TerminalよりPlatform Designer起動
Terminalを開き、下記コマンドを入力します。
[niosv-shell] C:\workspace\base\NiosV\test> qsys-edit --quartus-project=top.qpf sys.qsys
4.3.3 Platform Designerデザイン
ここでは、デザイン構成と各IPの設定を確認します。下記がデザインの全体構成です。
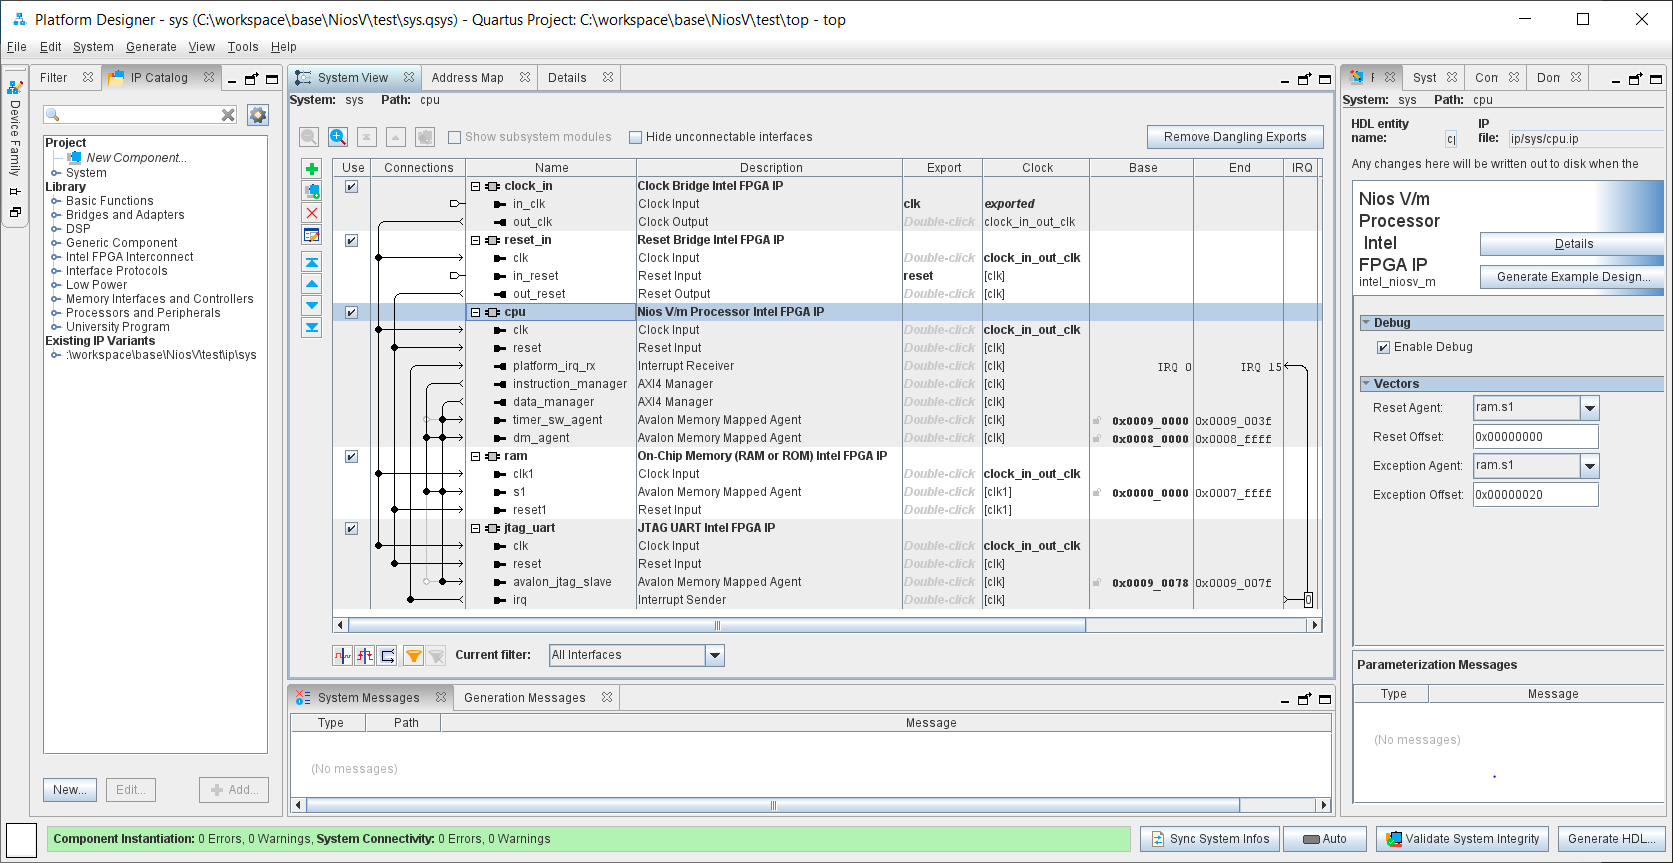
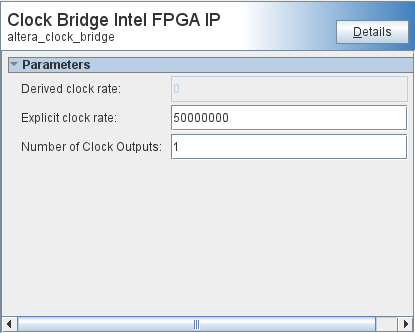
クロック入力IPの設定画面です。入力クロックが異なるはこの値を変更します。変更した場合はtop.sdcのクロック周期(周期はnsで指定)も併せて変更します。
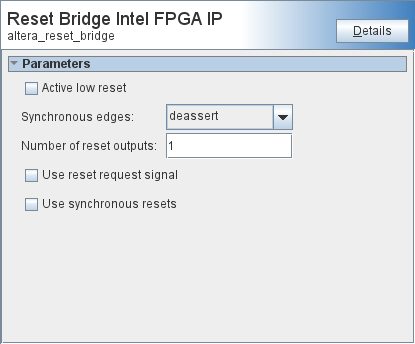
リセット入力IPの設定画面です。
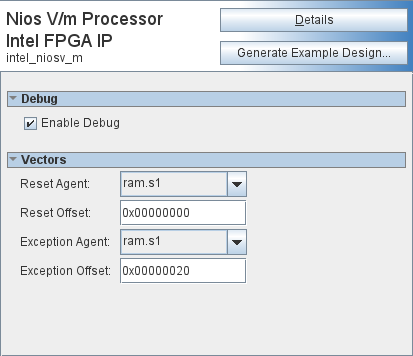
NiosV IPの設定画面です。
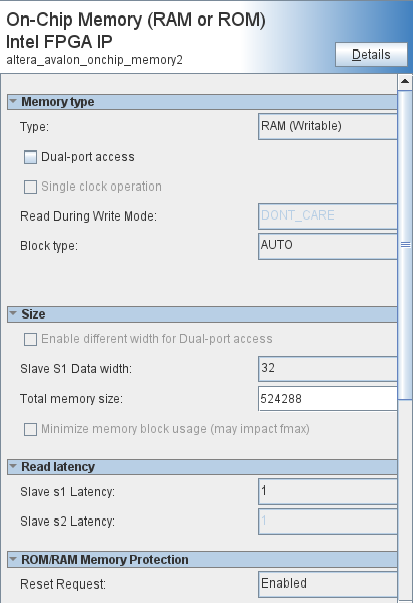
内蔵RAM IPの設定画面です。
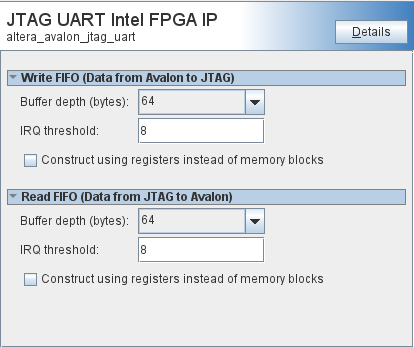
JTAG UART IPの設定画面です。
確認しましたら、Platform Designerは閉じてください。
4.4 デザインコンパイル
次にTerminalから、下記コマンドを実行し、デザインをコンパイルします。
[niosv-shell] C:\workspace\base\NiosV\test> quartus_sh --flow compile top
Info: *******************************************************************
Info: Running Quartus Prime Shell
    Info: Version 21.3.0 Build 170 09/23/2021 SC Pro Edition
    Info: Copyright (C) 2021  Intel Corporation. All rights reserved.
    Info: Your use of Intel Corporation's design tools, logic functions
    Info: and other software and tools, and any partner logic
    Info: functions, and any output files from any of the foregoing
    Info: (including device programming or simulation files), and any
    Info: associated documentation or information are expressly subject
    Info: to the terms and conditions of the Intel Program License
    Info: Subscription Agreement, the Intel Quartus Prime License Agreement,
    Info: the Intel FPGA IP License Agreement, or other applicable license
    Info: agreement, including, without limitation, that your use is for
    Info: the sole purpose of programming logic devices manufactured by
    Info: Intel and sold by Intel or its authorized distributors.  Please
    Info: refer to the applicable agreement for further details, at
    Info: https://fpgasoftware.intel.com/eula.
    Info: Processing started: Tue Nov 30 16:03:07 2021
    Info: System process ID: 18236
Info: Command: quartus_sh --flow compile top
Info: Quartus(args): compile top
Info: Project Name = C:/workspace/base/NiosV/test/top
Info: Revision Name = top
Info: Detected assignments have changed since last compile for: Analysis & Synthesis.
Info: Run task: IP Generation

.....
.....
.....

Info (19538): Reading SDC files took 00:00:01 cumulatively in this process.
Info: Run task: Assembler (Generate programming files)
Info: *******************************************************************
Info: Running Quartus Prime Assembler
    Info: Version 21.3.0 Build 170 09/23/2021 SC Pro Edition
    Info: Processing started: Tue Nov 30 16:11:58 2021
    Info: System process ID: 16616
Info: Command: quartus_asm --read_settings_files=on --write_settings_files=off top -c top
Info (16677): Loading final database.
Info (16734): Loading "final" snapshot for partition "root_partition".
Info (16734): Loading "final" snapshot for partition "auto_fab_0".
Info (16678): Successfully loaded final database: elapsed time is 00:00:04.
Info: Quartus Prime Assembler was successful. 0 errors, 0 warnings
    Info: Peak virtual memory: 4266 megabytes
    Info: Processing ended: Tue Nov 30 16:12:53 2021
    Info: Elapsed time: 00:00:55
    Info: System process ID: 16616
Info (21793): Quartus Prime Full Compilation was successful. 0 errors, 414 warnings
Info (23030): Evaluation of Tcl script c:/intelfpga_pro/21.3/quartus/common/tcl/internal/qsh_flowengine.tcl was successful
Info: Quartus Prime Shell was successful. 0 errors, 414 warnings
    Info: Peak virtual memory: 296 megabytes
    Info: Processing ended: Tue Nov 30 16:12:58 2021
    Info: Elapsed time: 00:09:51
    Info: System process ID: 18236
4.5 FPGAのコンフィグレーション
Terminalより、次のコマンドを実行して、FPGAをコンフィグレーションします。WindowsとLinuxではコマンドが微妙に異なるので注意してください。
Windows
[niosv-shell] C:\workspace\base\NiosV\test> quartus_pgm -c 1 -m JTAG -o p;top.sof@1
Info: *******************************************************************
Info: Running Quartus Prime Programmer
    Info: Version 21.3.0 Build 170 09/23/2021 SC Pro Edition
    Info: Copyright (C) 2021  Intel Corporation. All rights reserved.
    Info: Your use of Intel Corporation's design tools, logic functions
    Info: and other software and tools, and any partner logic
    Info: functions, and any output files from any of the foregoing
    Info: (including device programming or simulation files), and any
    Info: associated documentation or information are expressly subject
    Info: to the terms and conditions of the Intel Program License
    Info: Subscription Agreement, the Intel Quartus Prime License Agreement,
    Info: the Intel FPGA IP License Agreement, or other applicable license
    Info: agreement, including, without limitation, that your use is for
    Info: the sole purpose of programming logic devices manufactured by
    Info: Intel and sold by Intel or its authorized distributors.  Please
    Info: refer to the applicable agreement for further details, at
    Info: https://fpgasoftware.intel.com/eula.
    Info: Processing started: Mon Nov 29 10:34:42 2021
    Info: System process ID: 1204
Info: Command: quartus_pgm -c 1 -m JTAG -o p;top.sof@1
Info (213045): Using programming cable "USB-BlasterII [USB-1]"
Info (213011): Using programming file top.sof with checksum 0x1D3881A0 for device 10AS066N3F40@1
Info (209060): Started Programmer operation at Mon Nov 29 10:34:46 2021
Info (209016): Configuring device index 1
Info (209017): Device 1 contains JTAG ID code 0x02E050DD
Info (209007): Configuration succeeded -- 1 device(s) configured
Info (209011): Successfully performed operation(s)
Info (209061): Ended Programmer operation at Mon Nov 29 10:34:58 2021
Info: Quartus Prime Programmer was successful. 0 errors, 0 warnings
    Info: Peak virtual memory: 1298 megabytes
    Info: Processing ended: Mon Nov 29 10:34:58 2021
    Info: Elapsed time: 00:00:16
    Info: System process ID: 1204
Linux
[intel@localhost test]$ quartus_pgm -c 1 -m JTAG -o p\;top.sof@1
Info: *******************************************************************
Info: Running Quartus Prime Programmer
    Info: Version 21.3.0 Build 170 09/23/2021 Patches 0.11 SC Pro Edition
    Info: Copyright (C) 2021  Intel Corporation. All rights reserved.
    Info: Your use of Intel Corporation's design tools, logic functions
    Info: and other software and tools, and any partner logic
    Info: functions, and any output files from any of the foregoing
    Info: (including device programming or simulation files), and any
    Info: associated documentation or information are expressly subject
    Info: to the terms and conditions of the Intel Program License
    Info: Subscription Agreement, the Intel Quartus Prime License Agreement,
    Info: the Intel FPGA IP License Agreement, or other applicable license
    Info: agreement, including, without limitation, that your use is for
    Info: the sole purpose of programming logic devices manufactured by
    Info: Intel and sold by Intel or its authorized distributors.  Please
    Info: refer to the applicable agreement for further details, at
    Info: https://fpgasoftware.intel.com/eula.
    Info: Processing started: Mon Nov 29 20:53:58 2021
    Info: System process ID: 15402
Info: Command: quartus_pgm -c 1 -m JTAG -o p;top.sof@1
Info (213045): Using programming cable "USB-BlasterII [1-9.3.4]"
Info (213011): Using programming file top.sof with checksum 0x1D352269 for device 10AS066N3F40@1
Info (209060): Started Programmer operation at Mon Nov 29 20:54:06 2021
Info (209016): Configuring device index 1
Info (209017): Device 1 contains JTAG ID code 0x02E050DD
Info (209007): Configuration succeeded -- 1 device(s) configured
Info (209011): Successfully performed operation(s)
Info (209061): Ended Programmer operation at Mon Nov 29 20:54:17 2021
Info: Quartus Prime Programmer was successful. 0 errors, 0 warnings
    Info: Peak virtual memory: 1888 megabytes
    Info: Processing ended: Mon Nov 29 20:54:17 2021
    Info: Elapsed time: 00:00:19
    Info: System process ID: 15402
4.6 他のFPGAへの移植
本デザインを他のFPGAボードへ移植する場合は、デバイスと、クロックピンが主な変更点です。
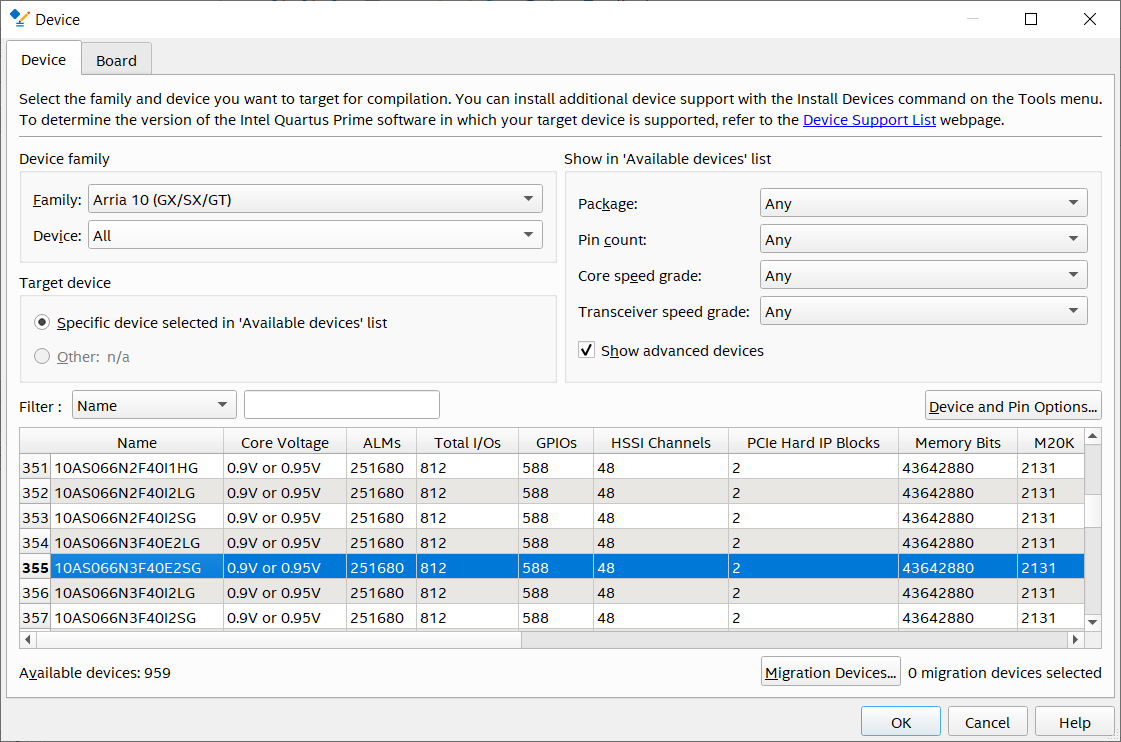
1)Assigmentsメニューより"Device..."を選択すると、下記ダイアログは表示されますので、使用するデバイスを指定してください。
2)Processingメニューより、”Start Compilation..."を選択し、コンパイルを実行します。クロックピンの設定を行っていないので、Fitterステージでエラーがでるかもしれませんが無視してください。
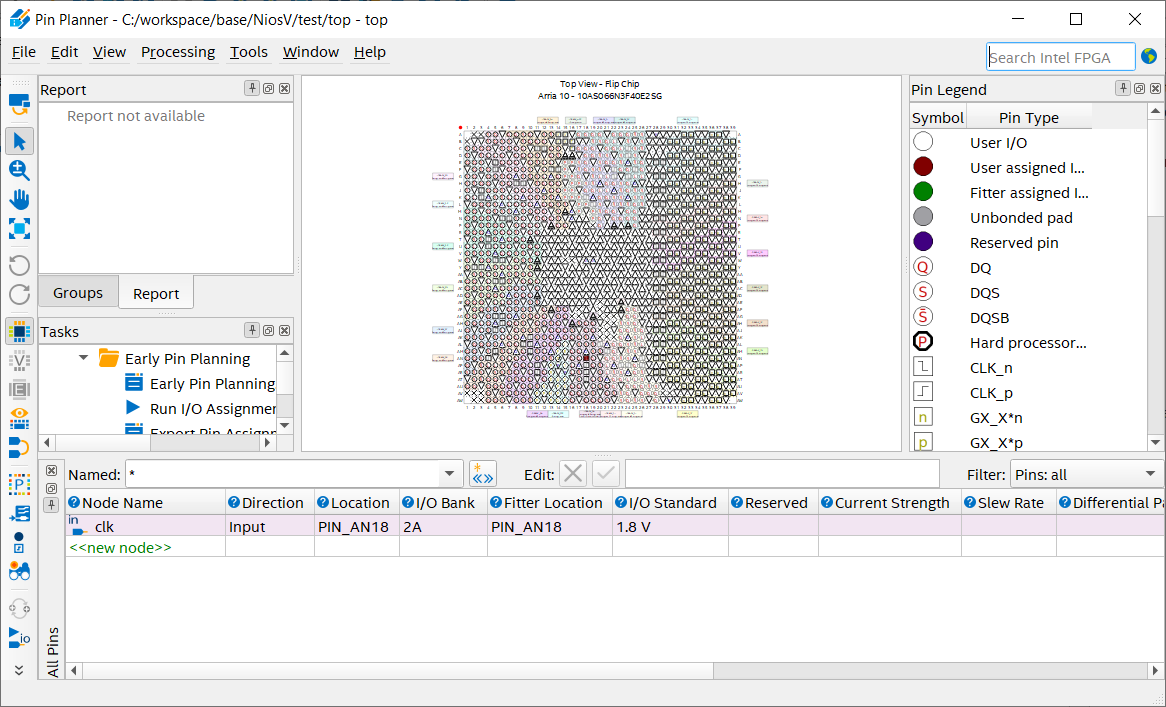
3)Assigmentsメニューより"Pin Planner..."を選択すると、下記ダイアログは表示されますので、クロックピンのLocationを更新します。併せてI/O Standardも更新してください。
4)Processingメニューより、”Start Compilation..."を選択し、コンパイルを再実行します。今回はエラーが無いことを確認してください。
5. ソフトウエア構築&実行
5.1 Hello world編
5.1.1 Board Support Package(BSP)生成
BSPの生成コマンドでは、Typeには現在hal, ucosiiが指定可能です。ここでは、Hello Worldにはhalを指定します。Terminalを開いて下記コマンドを入力してください。
[niosv-shell] C:\workspace\base\NiosV\test> niosv-bsp -c --quartus-project=top.qpf --qsys=sys.qsys --type=hal software/bsp/settings.bsp

Ignoring env var, _JAVA_OPTIONS=-Djava.net.preferIPv4Stack=true
Please use env var, QSYS_EDIT_JVM_ARGS, to apply your JVM arguments to Qsys Pro
2021.11.29.08:46:13 Info: Searching for BSP components with category: os_software_element
2021.11.29.08:46:17 Info: Creating BSP settings.
2021.11.29.08:46:17 Info: Searching for BSP components with category: driver_element
2021.11.29.08:46:17 Info: Searching for BSP components with category: software_package_element
2021.11.29.08:46:17 Info: Loading drivers from ensemble report.
2021.11.29.08:46:17 Info: Finished loading drivers from ensemble report.
2021.11.29.08:46:17 Info: Evaluating default script "C:\intelfpga_pro\21.3\quartus\..\niosv\scripts\bsp-defaults\bsp-set-defaults.tcl".
2021.11.29.08:46:17 Info: Tcl message: "STDIO character device is jtag_uart"
2021.11.29.08:46:17 Info: Tcl message: "System timer device is cpu"
2021.11.29.08:46:17 Info: Tcl message: "Default linker sections mapped to ram"
2021.11.29.08:46:17 Info: Tcl message: "No bootloader located at the reset address."
2021.11.29.08:46:17 Info: Tcl message: "Application ELF allowed to contain code at the reset address."
2021.11.29.08:46:17 Info: Tcl message: "The alt_load() facility is enabled."
2021.11.29.08:46:17 Info: Tcl message: "The .rwdata section is copied into RAM by alt_load()."
2021.11.29.08:46:17 Info: Saving BSP settings file.
2021.11.29.08:46:17 Info: Default memory regions will not be persisted in BSP Settings File.
2021.11.29.08:46:17 Info: Generated file "C:\workspace\base\NiosV\test\software\bsp\settings.bsp"
2021.11.29.08:46:17 Info: Generating BSP files in "C:\workspace\base\NiosV\test\software\bsp"
2021.11.29.08:46:17 Info: Default memory regions will not be persisted in BSP Settings File.
2021.11.29.08:46:17 Info: Generated file "C:\workspace\base\NiosV\test\software\bsp\settings.bsp"
2021.11.29.08:46:18 Info: Finished generating BSP files. Total time taken = 2 seconds
5.1.2 CMafileLists.txt生成
下記コマンドを実行して、アプリケーションのコンパイルに必要なCMafileLists.txtを生成させます。このコマンドを実行するにあたり、--srcsで指定したパスにソースファイルが無い場合エラーになります。エラーが発生した場合は、サンプルを展開した時、software/app/hello.cが生成されているか確認してください。
[niosv-shell] C:\workspace\base\NiosV\test> niosv-app --bsp-dir=software/bsp --app-dir=software/app --srcs=software/app --elf-name=hello.elf

Ignoring env var, _JAVA_OPTIONS=-Djava.net.preferIPv4Stack=true
Please use env var, QSYS_EDIT_JVM_ARGS, to apply your JVM arguments to Qsys Pro
2021.11.29.08:51:42 Info: Elf name is set to "hello.elf".
2021.11.29.08:51:42 Info: Source file "hello.c" added from directory "software\app".
2021.11.29.08:51:42 Info: "software\app\CMakeLists.txt" was generated.
5.1.3 Makefile生成
下記コマンドを実行して、CMafileLists.txtよりMakefileを生成します。ここでエラーが発生する場合はツールバージョンが正しくない場合です。バージョンを確認してください。
[niosv-shell] C:\workspace\base\NiosV\test> cmake -S software/app -G "Unix Makefiles" -B software/app/build
-- Defaulting build type to Debug.
-- The ASM compiler identification is GNU
-- Found assembler: C:/tools/xpack-riscv-none-embed-gcc-8.3.0-2.3/bin/riscv-none-embed-gcc.exe
-- The C compiler identification is GNU 8.3.0
-- Detecting C compiler ABI info
-- Detecting C compiler ABI info - done
-- Check for working C compiler: C:/tools/xpack-riscv-none-embed-gcc-8.3.0-2.3/bin/riscv-none-embed-gcc.exe - skipped
-- Detecting C compile features
-- Detecting C compile features - done
-- The CXX compiler identification is GNU 8.3.0
-- Detecting CXX compiler ABI info
-- Detecting CXX compiler ABI info - done
-- Check for working CXX compiler: C:/tools/xpack-riscv-none-embed-gcc-8.3.0-2.3/bin/riscv-none-embed-g++.exe - skipped
-- Detecting CXX compile features
-- Detecting CXX compile features - done
-- Configuring done
-- Generating done
-- Build files have been written to: C:/workspace/base/NiosV/test/software/app/build
5.1.4 hello.elf生成
下記コマンドを実行して、hello.elfを生成します。
[niosv-shell] C:\workspace\base\NiosV\test> make -C software/app/build
make: Entering directory 'C:/workspace/base/NiosV/test/software/app/build'
make[1]: Entering directory 'C:/workspace/base/NiosV/test/software/app/build'
make[2]: Entering directory 'C:/workspace/base/NiosV/test/software/app/build'
Scanning dependencies of target hal2_bsp
make[2]: Leaving directory 'C:/workspace/base/NiosV/test/software/app/build'
make[2]: Entering directory 'C:/workspace/base/NiosV/test/software/app/build'
[  1%] Building ASM object bsp/CMakeFiles/hal2_bsp.dir/HAL/src/alt_log_macro.S.obj
[  2%] Building ASM object bsp/CMakeFiles/hal2_bsp.dir/HAL/src/alt_mcount.S.obj
[  3%] Building ASM object bsp/CMakeFiles/hal2_bsp.dir/HAL/src/crt0.S.obj
[  4%] Building ASM object bsp/CMakeFiles/hal2_bsp.dir/HAL/src/machine_trap.S.obj
[  5%] Building C object bsp/CMakeFiles/hal2_bsp.dir/HAL/src/alt_alarm_start.c.obj
[  7%] Building C object bsp/CMakeFiles/hal2_bsp.dir/HAL/src/alt_busy_sleep.c.obj
[  8%] Building C object bsp/CMakeFiles/hal2_bsp.dir/HAL/src/alt_close.c.obj
[  9%] Building C object bsp/CMakeFiles/hal2_bsp.dir/HAL/src/alt_dcache_flush.c.obj
[ 10%] Building C object bsp/CMakeFiles/hal2_bsp.dir/HAL/src/alt_dcache_flush_all.c.obj
[ 11%] Building C object bsp/CMakeFiles/hal2_bsp.dir/HAL/src/alt_dcache_flush_no_writeback.c.obj
[ 13%] Building C object bsp/CMakeFiles/hal2_bsp.dir/HAL/src/alt_dev.c.obj
[ 14%] Building C object bsp/CMakeFiles/hal2_bsp.dir/HAL/src/alt_dev_llist_insert.c.obj
[ 15%] Building C object bsp/CMakeFiles/hal2_bsp.dir/HAL/src/alt_dma_rxchan_open.c.obj
[ 16%] Building C object bsp/CMakeFiles/hal2_bsp.dir/HAL/src/alt_dma_txchan_open.c.obj
[ 17%] Building C object bsp/CMakeFiles/hal2_bsp.dir/HAL/src/alt_do_ctors.c.obj
[ 19%] Building C object bsp/CMakeFiles/hal2_bsp.dir/HAL/src/alt_do_dtors.c.obj
[ 20%] Building C object bsp/CMakeFiles/hal2_bsp.dir/HAL/src/alt_env_lock.c.obj
[ 21%] Building C object bsp/CMakeFiles/hal2_bsp.dir/HAL/src/alt_environ.c.obj
[ 22%] Building C object bsp/CMakeFiles/hal2_bsp.dir/HAL/src/alt_errno.c.obj
[ 23%] Building C object bsp/CMakeFiles/hal2_bsp.dir/HAL/src/alt_execve.c.obj
[ 25%] Building C object bsp/CMakeFiles/hal2_bsp.dir/HAL/src/alt_exit.c.obj
[ 26%] Building C object bsp/CMakeFiles/hal2_bsp.dir/HAL/src/alt_fcntl.c.obj
[ 27%] Building C object bsp/CMakeFiles/hal2_bsp.dir/HAL/src/alt_fd_lock.c.obj
[ 28%] Building C object bsp/CMakeFiles/hal2_bsp.dir/HAL/src/alt_fd_unlock.c.obj
[ 29%] Building C object bsp/CMakeFiles/hal2_bsp.dir/HAL/src/alt_find_dev.c.obj
[ 30%] Building C object bsp/CMakeFiles/hal2_bsp.dir/HAL/src/alt_find_file.c.obj
[ 32%] Building C object bsp/CMakeFiles/hal2_bsp.dir/HAL/src/alt_flash_dev.c.obj
[ 33%] Building C object bsp/CMakeFiles/hal2_bsp.dir/HAL/src/alt_fork.c.obj
[ 34%] Building C object bsp/CMakeFiles/hal2_bsp.dir/HAL/src/alt_fs_reg.c.obj
[ 35%] Building C object bsp/CMakeFiles/hal2_bsp.dir/HAL/src/alt_fstat.c.obj
[ 36%] Building C object bsp/CMakeFiles/hal2_bsp.dir/HAL/src/alt_get_fd.c.obj
[ 38%] Building C object bsp/CMakeFiles/hal2_bsp.dir/HAL/src/alt_getchar.c.obj
[ 39%] Building C object bsp/CMakeFiles/hal2_bsp.dir/HAL/src/alt_getpid.c.obj
[ 40%] Building C object bsp/CMakeFiles/hal2_bsp.dir/HAL/src/alt_gettod.c.obj
[ 41%] Building C object bsp/CMakeFiles/hal2_bsp.dir/HAL/src/alt_gmon.c.obj
[ 42%] Building C object bsp/CMakeFiles/hal2_bsp.dir/HAL/src/alt_icache_flush.c.obj
[ 44%] Building C object bsp/CMakeFiles/hal2_bsp.dir/HAL/src/alt_icache_flush_all.c.obj
[ 45%] Building C object bsp/CMakeFiles/hal2_bsp.dir/HAL/src/alt_iic.c.obj
[ 46%] Building C object bsp/CMakeFiles/hal2_bsp.dir/HAL/src/alt_iic_isr_register.c.obj
[ 47%] Building C object bsp/CMakeFiles/hal2_bsp.dir/HAL/src/alt_instruction_exception_register.c.obj
[ 48%] Building C object bsp/CMakeFiles/hal2_bsp.dir/HAL/src/alt_io_redirect.c.obj
[ 50%] Building C object bsp/CMakeFiles/hal2_bsp.dir/HAL/src/alt_ioctl.c.obj
[ 51%] Building C object bsp/CMakeFiles/hal2_bsp.dir/HAL/src/alt_irq_handler.c.obj
[ 52%] Building C object bsp/CMakeFiles/hal2_bsp.dir/HAL/src/alt_isatty.c.obj
[ 53%] Building C object bsp/CMakeFiles/hal2_bsp.dir/HAL/src/alt_kill.c.obj
[ 54%] Building C object bsp/CMakeFiles/hal2_bsp.dir/HAL/src/alt_link.c.obj
[ 55%] Building C object bsp/CMakeFiles/hal2_bsp.dir/HAL/src/alt_load.c.obj
[ 57%] Building C object bsp/CMakeFiles/hal2_bsp.dir/HAL/src/alt_log_printf.c.obj
[ 58%] Building C object bsp/CMakeFiles/hal2_bsp.dir/HAL/src/alt_lseek.c.obj
[ 59%] Building C object bsp/CMakeFiles/hal2_bsp.dir/HAL/src/alt_main.c.obj
[ 60%] Building C object bsp/CMakeFiles/hal2_bsp.dir/HAL/src/alt_malloc_lock.c.obj
[ 61%] Building C object bsp/CMakeFiles/hal2_bsp.dir/HAL/src/alt_open.c.obj
[ 63%] Building C object bsp/CMakeFiles/hal2_bsp.dir/HAL/src/alt_printf.c.obj
[ 64%] Building C object bsp/CMakeFiles/hal2_bsp.dir/HAL/src/alt_putchar.c.obj
[ 65%] Building C object bsp/CMakeFiles/hal2_bsp.dir/HAL/src/alt_putcharbuf.c.obj
[ 66%] Building C object bsp/CMakeFiles/hal2_bsp.dir/HAL/src/alt_putstr.c.obj
[ 67%] Building C object bsp/CMakeFiles/hal2_bsp.dir/HAL/src/alt_read.c.obj
[ 69%] Building C object bsp/CMakeFiles/hal2_bsp.dir/HAL/src/alt_release_fd.c.obj
[ 70%] Building C object bsp/CMakeFiles/hal2_bsp.dir/HAL/src/alt_remap_cached.c.obj
[ 71%] Building C object bsp/CMakeFiles/hal2_bsp.dir/HAL/src/alt_remap_uncached.c.obj
[ 72%] Building C object bsp/CMakeFiles/hal2_bsp.dir/HAL/src/alt_rename.c.obj
[ 73%] Building C object bsp/CMakeFiles/hal2_bsp.dir/HAL/src/alt_sbrk.c.obj
[ 75%] Building C object bsp/CMakeFiles/hal2_bsp.dir/HAL/src/alt_settod.c.obj
[ 76%] Building C object bsp/CMakeFiles/hal2_bsp.dir/HAL/src/alt_stat.c.obj
[ 77%] Building C object bsp/CMakeFiles/hal2_bsp.dir/HAL/src/alt_tick.c.obj
[ 78%] Building C object bsp/CMakeFiles/hal2_bsp.dir/HAL/src/alt_times.c.obj
[ 79%] Building C object bsp/CMakeFiles/hal2_bsp.dir/HAL/src/alt_uncached_free.c.obj
[ 80%] Building C object bsp/CMakeFiles/hal2_bsp.dir/HAL/src/alt_uncached_malloc.c.obj
[ 82%] Building C object bsp/CMakeFiles/hal2_bsp.dir/HAL/src/alt_unlink.c.obj
[ 83%] Building C object bsp/CMakeFiles/hal2_bsp.dir/HAL/src/alt_usleep.c.obj
[ 84%] Building C object bsp/CMakeFiles/hal2_bsp.dir/HAL/src/alt_wait.c.obj
[ 85%] Building C object bsp/CMakeFiles/hal2_bsp.dir/HAL/src/alt_write.c.obj
[ 86%] Building C object bsp/CMakeFiles/hal2_bsp.dir/HAL/src/intel_niosv_m_irq.c.obj
[ 88%] Building C object bsp/CMakeFiles/hal2_bsp.dir/HAL/src/mtimer.c.obj
[ 89%] Building C object bsp/CMakeFiles/hal2_bsp.dir/alt_sys_init.c.obj
[ 90%] Building C object bsp/CMakeFiles/hal2_bsp.dir/drivers/src/altera_avalon_jtag_uart_fd.c.obj
[ 91%] Building C object bsp/CMakeFiles/hal2_bsp.dir/drivers/src/altera_avalon_jtag_uart_init.c.obj
[ 92%] Building C object bsp/CMakeFiles/hal2_bsp.dir/drivers/src/altera_avalon_jtag_uart_ioctl.c.obj
[ 94%] Building C object bsp/CMakeFiles/hal2_bsp.dir/drivers/src/altera_avalon_jtag_uart_read.c.obj
[ 95%] Building C object bsp/CMakeFiles/hal2_bsp.dir/drivers/src/altera_avalon_jtag_uart_write.c.obj
[ 96%] Linking C static library libhal2_bsp.a
make[2]: Leaving directory 'C:/workspace/base/NiosV/test/software/app/build'
[ 96%] Built target hal2_bsp
make[2]: Entering directory 'C:/workspace/base/NiosV/test/software/app/build'
make[2]: Leaving directory 'C:/workspace/base/NiosV/test/software/app/build'
make[2]: Entering directory 'C:/workspace/base/NiosV/test/software/app/build'
[ 97%] Building C object CMakeFiles/hello.elf.dir/hello.c.obj
[ 98%] Linking C executable hello.elf
make[2]: Leaving directory 'C:/workspace/base/NiosV/test/software/app/build'
[ 98%] Built target hello.elf
make[2]: Entering directory 'C:/workspace/base/NiosV/test/software/app/build'
make[2]: Leaving directory 'C:/workspace/base/NiosV/test/software/app/build'
make[2]: Entering directory 'C:/workspace/base/NiosV/test/software/app/build'
[100%] Creating hello.elf.objdump.
make[2]: Leaving directory 'C:/workspace/base/NiosV/test/software/app/build'
[100%] Built target create-objdump
make[1]: Leaving directory 'C:/workspace/base/NiosV/test/software/app/build'
make: Leaving directory 'C:/workspace/base/NiosV/test/software/app/build'
5.1.5 hello.elfファイルダウンロード
次に作成したELFファイルを下記のコマンドでターゲットのRAMにダウンロードします。
[niosv-shell] C:\workspace\base\NiosV\test> niosv-download software/app/build/hello.elf
INFO: Generating OpenOCD config file. Running "openocd-cfg-gen C:\temp\tmp22sivmbc\niosvm.cfg".
INFO: Starting OpenOCD. Running "openocd -c tcl_port disabled -c gdb_port 0 -c telnet_port 0 -f C:\temp\tmp22sivmbc\niosvm.cfg".
[OpenOCD output] Open On-Chip Debugger 0.11.0-R21.3
[OpenOCD output] Licensed under GNU GPL v2
[OpenOCD output] For bug reports, read
[OpenOCD output]        http://openocd.org/doc/doxygen/bugs.html
[OpenOCD output] Info : only one transport option; autoselect 'jtag'
[OpenOCD output] Info : Application name is OpenOCD.20211129103749
[OpenOCD output] Info : Attempting to find 'USB-BlasterII [USB-1]'
[OpenOCD output] Info : Cable 1: device_name=(null), hw_name=USB-BlasterII, server=(null), port=USB-1, chain_id=0000016348bd61d0, persistent_id=1, chain_type=1, features=2048, server_version_info=(null)
[OpenOCD output] Info : TAP position 0 (2E050DD) has 3 SLD nodes
[OpenOCD output] Info :     node  0 idcode=00486E00 position_n=0
[OpenOCD output] Info :     node  1 idcode=08986E00 position_n=0
[OpenOCD output] Info :     node  2 idcode=0C006E00 position_n=0
[OpenOCD output] Info : TAP position 1 (4BA00477) has 0 SLD nodes
[OpenOCD output] Info : Discovered 2 TAP devices
[OpenOCD output] Info : Detected device (tap_position=0) device_id=02e050dd, instruction_length=10, features=4, device_name=10AS066H(1|2|3|3E2|4|4E2)/..
[OpenOCD output] Info : Found an Intel device at tap_position 0.Currently assuming it is SLD Hub
[OpenOCD output] Info : Detected device (tap_position=1) device_id=4ba00477, instruction_length=4, features=0, device_name=SOCVHPS
[OpenOCD output] Info : Found a ARM device at tap_position 1. Currently assume it is JTAG-DP capable
[OpenOCD output] Info : This adapter doesn't support configurable speed
[OpenOCD output] Info : JTAG tap: tap_02E050DD.0 tap/device found: 0x02e050dd (mfg: 0x06e (Altera), part: 0x2e05, ver: 0x0)
[OpenOCD output] Info : JTAG tap: tap_4BA00477.0 tap/device found: 0x4ba00477 (mfg: 0x23b (ARM Ltd), part: 0xba00, ver: 0x4)
[OpenOCD output] Info : JTAG tap: tap_02E050DD.0 Parent Tap found: 0x02e050dd (mfg: 0x06e (Altera), part: 0x2e05, ver: 0x0)
[OpenOCD output] Info : Virtual Tap/SLD node 0x08986E00 found at tap position 0 vtap position 1
[OpenOCD output] Info : datacount=2 progbufsize=8
[OpenOCD output] Info : Examined RISC-V core; found 1 harts
[OpenOCD output] Info :  hart 0: XLEN=32, misa=0x40000101
[OpenOCD output] Info : starting gdb server for tap_02E050DD.0.niosv_0.cpu on 0
[OpenOCD output] Info : Listening on port 63674 for gdb connections
INFO: Found gdb port 63674
[OpenOCD output] Ready for Remote Connections
[OpenOCD output] Info : tcl server disabled
[OpenOCD output] Info : Listening on port 63675 for telnet connections
INFO: Found telnet port 63675
INFO: OpenOCD is ready.
INFO: Loading image via GDB. Running "riscv-none-embed-gdb -batch -ex set arch riscv:rv32 -ex set remotetimeout 60 -ex target extended-remote localhost:63674 -ex load software\app\build\hello.elf".
The target architecture is assumed to be riscv:rv32
__reset () at C:/workspace/base/NiosV/test/software/bsp/HAL/src\crt0.S:144
144         tail _start
Loading section .entry, size 0x20 lma 0x0
Loading section .exceptions, size 0x280 lma 0x20
Loading section .text, size 0x17970 lma 0x2a0
Loading section .rodata, size 0xd80 lma 0x17c10
Loading section .rwdata, size 0x1bdc lma 0x1a56c
Loading section .init_array.00000, size 0x4 lma 0x1c148
Start address 0x338, load size 107888
Transfer rate: 105 KB/sec, 8990 bytes/write.
[Inferior 1 (Remote target) detached]
5.1.6 ISSPによりCPUをリセット
デザイン作成時に説明したとおり、本デザインのリセット信号はISSPに接続されています。下記のコマンドを実行して、リセット信号をトグルさせ、デザインをリセットします。
[niosv-shell] C:\workspace\base\NiosV\test> quartus_stp -t toggle_issp.tcl
Info: *******************************************************************
Info: Running Quartus Prime Signal Tap
    Info: Version 21.3.0 Build 170 09/23/2021 SC Pro Edition
    Info: Copyright (C) 2021  Intel Corporation. All rights reserved.
    Info: Your use of Intel Corporation's design tools, logic functions
    Info: and other software and tools, and any partner logic
    Info: functions, and any output files from any of the foregoing
    Info: (including device programming or simulation files), and any
    Info: associated documentation or information are expressly subject
    Info: to the terms and conditions of the Intel Program License
    Info: Subscription Agreement, the Intel Quartus Prime License Agreement,
    Info: the Intel FPGA IP License Agreement, or other applicable license
    Info: agreement, including, without limitation, that your use is for
    Info: the sole purpose of programming logic devices manufactured by
    Info: Intel and sold by Intel or its authorized distributors.  Please
    Info: refer to the applicable agreement for further details, at
    Info: https://fpgasoftware.intel.com/eula.
    Info: Processing started: Mon Nov 29 10:40:56 2021
    Info: System process ID: 9288
Info: Command: quartus_stp -t toggle_issp.tcl
Info (23030): Evaluation of Tcl script toggle_issp.tcl was successful
Info: Quartus Prime Signal Tap was successful. 0 errors, 0 warnings
    Info: Peak virtual memory: 150 megabytes
    Info: Processing ended: Mon Nov 29 10:40:57 2021
    Info: Elapsed time: 00:00:01
    Info: System process ID: 9288
5.1.7 ターミナル上にHello worldを表示
下記コマンドを実行して、デザインに実装したJTAG-UARTをホスト上にメッセージ表示させます。JTAG-UARTはホストと通信が確立するまで待機していますので、メッセージが先頭から始まっているので確認できます。終了するには"CTRL+C"を押してください。
[niosv-shell] C:\workspace\base\NiosV\test> juart-terminal
juart-terminal: connected to hardware target using JTAG UART on cable
juart-terminal: "USB-BlasterII [USB-1]", device 1, instance 0
juart-terminal: (Use the IDE stop button or Ctrl-C to terminate)

Hello world, this is the Nios V/m cpu checking in 0...
Hello world, this is the Nios V/m cpu checking in 1...
Hello world, this is the Nios V/m cpu checking in 2...
Hello world, this is the Nios V/m cpu checking in 3...
Hello world, this is the Nios V/m cpu checking in 4...
Hello world, this is the Nios V/m cpu checking in 5...
Hello world, this is the Nios V/m cpu checking in 6...
Hello world, this is the Nios V/m cpu checking in 7...
Hello world, this is the Nios V/m cpu checking in 8...
Hello world, this is the Nios V/m cpu checking in 9...
Hello world, this is the Nios V/m cpu checking in 10...
.....
.....
Hello world, this is the Nios V/m cpu checking in 990...
Hello world, this is the Nios V/m cpu checking in 991...
Hello world, this is the Nios V/m cpu checking in 992...
Hello world, this is the Nios V/m cpu checking in 993...
Hello world, this is the Nios V/m cpu checking in 994...
Hello world, this is the Nios V/m cpu checking in 995...
Hello world, this is the Nios V/m cpu checking in 996...
Hello world, this is the Nios V/m cpu checking in 997...
Hello world, this is the Nios V/m cpu checking in 998...
Hello world, this is the Nios V/m cpu checking in 999...
Bye world!


juart-terminal: exiting due to ^C on host
Terminate batch job (Y/N)? y
5.2 uCOS-II編
次にuCOS-IIのサンプルをコンパイルし、実行します。ディレクトリーはhello_worldから変更し、ucosii_bsp/ucosii_appとします。
5.2.1 Board Support Package(BSP)生成
では下記コマンドを使用してBSPを生成します。Typeにucosiiを指定します。bspディレクリーはucosii_bspです。
[niosv-shell] C:\workspace\base\NiosV\test> niosv-bsp -c --quartus-project=top.qpf --qsys=sys.qsys --type=ucosii software/ucosii_bsp/settings.bsp

Ignoring env var, _JAVA_OPTIONS=-Djava.net.preferIPv4Stack=true
Please use env var, QSYS_EDIT_JVM_ARGS, to apply your JVM arguments to Qsys Pro
2021.11.29.12:02:37 Info: Searching for BSP components with category: os_software_element
2021.11.29.12:02:40 Info: Creating BSP settings.
2021.11.29.12:02:40 Info: Searching for BSP components with category: driver_element
2021.11.29.12:02:40 Info: Searching for BSP components with category: software_package_element
2021.11.29.12:02:40 Info: Loading drivers from ensemble report.
2021.11.29.12:02:40 Info: Finished loading drivers from ensemble report.
2021.11.29.12:02:40 Info: Evaluating default script "C:\intelfpga_pro\21.3\quartus\..\niosv\scripts\bsp-defaults\bsp-set-defaults.tcl".
2021.11.29.12:02:40 Info: Tcl message: "STDIO character device is jtag_uart"
2021.11.29.12:02:40 Info: Tcl message: "System timer device is cpu"
2021.11.29.12:02:40 Info: Tcl message: "Default linker sections mapped to ram"
2021.11.29.12:02:40 Info: Tcl message: "No bootloader located at the reset address."
2021.11.29.12:02:40 Info: Tcl message: "Application ELF allowed to contain code at the reset address."
2021.11.29.12:02:40 Info: Tcl message: "The alt_load() facility is enabled."
2021.11.29.12:02:40 Info: Tcl message: "The .rwdata section is copied into RAM by alt_load()."
2021.11.29.12:02:40 Info: Saving BSP settings file.
2021.11.29.12:02:40 Info: Default memory regions will not be persisted in BSP Settings File.
2021.11.29.12:02:40 Info: Generated file "C:\workspace\base\NiosV\test\software\ucosii_bsp\settings.bsp"
2021.11.29.12:02:40 Info: Generating BSP files in "C:\workspace\base\NiosV\test\software\ucosii_bsp"
2021.11.29.12:02:40 Info: Default memory regions will not be persisted in BSP Settings File.
2021.11.29.12:02:40 Info: Generated file "C:\workspace\base\NiosV\test\software\ucosii_bsp\settings.bsp"
2021.11.29.12:02:41 Info: Finished generating BSP files. Total time taken = 2 seconds
5.2.2 サンプルソースコピー
Hello Worldとは異なり、アプリケーションディレクトリーは無く、ソースファイルもありません。そのため、ディレクトリーを作成し、サンプルソースをコピーします。
Windows
[niosv-shell] C:\workspace\base\NiosV\test> cd software
[niosv-shell] C:\workspace\base\NiosV\test\software> mkdir ucosii_app
[niosv-shell] C:\workspace\base\NiosV\test\software> cd ..
[niosv-shell] C:\workspace\base\NiosV\test> copy C:\intelFPGA_pro\21.3\niosv\examples\software\hello_ucosii\hello_ucosii.c software\ucosii_app
        1 file(s) copied.
Linux
$ mkdir -p software/ucosii_app
$ cp $QUARTUS_ROOTDIR/../niosv/examples/software/hello_ucosii/hello_ucosii.c software/ucosii_app
5.2.3 CMafileLists.txt生成
Hello Worldと同様に、下記コマンドを実行して、アプリケーションのコンパイルに必要なCMafileLists.txtを生成させます。ディレクトリーが異なることに注意してください。
[niosv-shell] C:\workspace\base\NiosV\test> niosv-app --bsp-dir=software/ucosii_bsp --app-dir=software/ucosii_app --srcs=software/ucosii_app --elf-name=hello_ucosii.elf

Ignoring env var, _JAVA_OPTIONS=-Djava.net.preferIPv4Stack=true
Please use env var, QSYS_EDIT_JVM_ARGS, to apply your JVM arguments to Qsys Pro
2021.11.29.13:24:36 Info: Elf name is set to "hello_ucosii.elf".
2021.11.29.13:24:36 Info: Source file "hello_ucosii.c" added from directory "software\ucosii_app".
2021.11.29.13:24:36 Info: "software\ucosii_app\CMakeLists.txt" was generated.
5.2.4 Makefile生成
Hello Worldと同様に、下記コマンドを実行して、CMafileLists.txtよりMakefileを生成します。この時、ディレクトリー名だけ注意してください。
[niosv-shell] C:\workspace\base\NiosV\test> cmake -S software/ucosii_app -G "Unix Makefiles" -B software/ucosii_app/build
-- Defaulting build type to Debug.
-- The ASM compiler identification is GNU
-- Found assembler: C:/tools/xpack-riscv-none-embed-gcc-8.3.0-2.3/bin/riscv-none-embed-gcc.exe
-- The C compiler identification is GNU 8.3.0
-- Detecting C compiler ABI info
-- Detecting C compiler ABI info - done
-- Check for working C compiler: C:/tools/xpack-riscv-none-embed-gcc-8.3.0-2.3/bin/riscv-none-embed-gcc.exe - skipped
-- Detecting C compile features
-- Detecting C compile features - done
-- The CXX compiler identification is GNU 8.3.0
-- Detecting CXX compiler ABI info
-- Detecting CXX compiler ABI info - done
-- Check for working CXX compiler: C:/tools/xpack-riscv-none-embed-gcc-8.3.0-2.3/bin/riscv-none-embed-g++.exe - skipped
-- Detecting CXX compile features
-- Detecting CXX compile features - done
-- Configuring done
-- Generating done
-- Build files have been written to: C:/workspace/base/NiosV/test/software/ucosii_app/build
5.2.5 hello_ucosii.elf生成
下記コマンドを実行して、hello_ucosii.elfを生成します。
[niosv-shell] C:\workspace\base\NiosV\test>  make -C software/ucosii_app/build
make: Entering directory 'C:/workspace/base/NiosV/test/software/ucosii_app/build'
make[1]: Entering directory 'C:/workspace/base/NiosV/test/software/ucosii_app/build'
make[2]: Entering directory 'C:/workspace/base/NiosV/test/software/ucosii_app/build'
Scanning dependencies of target ucosii_hal2_bsp
make[2]: Leaving directory 'C:/workspace/base/NiosV/test/software/ucosii_app/build'
make[2]: Entering directory 'C:/workspace/base/NiosV/test/software/ucosii_app/build'
[  1%] Building ASM object ucosii_bsp/CMakeFiles/ucosii_hal2_bsp.dir/HAL/src/alt_log_macro.S.obj
[  2%] Building ASM object ucosii_bsp/CMakeFiles/ucosii_hal2_bsp.dir/HAL/src/alt_mcount.S.obj
[  3%] Building ASM object ucosii_bsp/CMakeFiles/ucosii_hal2_bsp.dir/HAL/src/crt0.S.obj
[  4%] Building ASM object ucosii_bsp/CMakeFiles/ucosii_hal2_bsp.dir/HAL/src/machine_trap.S.obj
[  5%] Building ASM object ucosii_bsp/CMakeFiles/ucosii_hal2_bsp.dir/HAL/src/os_cpu_a.S.obj
[  6%] Building C object ucosii_bsp/CMakeFiles/ucosii_hal2_bsp.dir/HAL/src/alt_alarm_start.c.obj
[  7%] Building C object ucosii_bsp/CMakeFiles/ucosii_hal2_bsp.dir/HAL/src/alt_busy_sleep.c.obj
[  8%] Building C object ucosii_bsp/CMakeFiles/ucosii_hal2_bsp.dir/HAL/src/alt_close.c.obj
[  9%] Building C object ucosii_bsp/CMakeFiles/ucosii_hal2_bsp.dir/HAL/src/alt_dcache_flush.c.obj
[ 10%] Building C object ucosii_bsp/CMakeFiles/ucosii_hal2_bsp.dir/HAL/src/alt_dcache_flush_all.c.obj
[ 11%] Building C object ucosii_bsp/CMakeFiles/ucosii_hal2_bsp.dir/HAL/src/alt_dcache_flush_no_writeback.c.obj
[ 12%] Building C object ucosii_bsp/CMakeFiles/ucosii_hal2_bsp.dir/HAL/src/alt_dev.c.obj
[ 13%] Building C object ucosii_bsp/CMakeFiles/ucosii_hal2_bsp.dir/HAL/src/alt_dev_llist_insert.c.obj
[ 14%] Building C object ucosii_bsp/CMakeFiles/ucosii_hal2_bsp.dir/HAL/src/alt_dma_rxchan_open.c.obj
[ 15%] Building C object ucosii_bsp/CMakeFiles/ucosii_hal2_bsp.dir/HAL/src/alt_dma_txchan_open.c.obj
[ 16%] Building C object ucosii_bsp/CMakeFiles/ucosii_hal2_bsp.dir/HAL/src/alt_do_ctors.c.obj
[ 17%] Building C object ucosii_bsp/CMakeFiles/ucosii_hal2_bsp.dir/HAL/src/alt_do_dtors.c.obj
[ 18%] Building C object ucosii_bsp/CMakeFiles/ucosii_hal2_bsp.dir/HAL/src/alt_environ.c.obj
[ 19%] Building C object ucosii_bsp/CMakeFiles/ucosii_hal2_bsp.dir/HAL/src/alt_errno.c.obj
[ 20%] Building C object ucosii_bsp/CMakeFiles/ucosii_hal2_bsp.dir/HAL/src/alt_execve.c.obj
[ 21%] Building C object ucosii_bsp/CMakeFiles/ucosii_hal2_bsp.dir/HAL/src/alt_exit.c.obj
[ 22%] Building C object ucosii_bsp/CMakeFiles/ucosii_hal2_bsp.dir/HAL/src/alt_fcntl.c.obj
[ 23%] Building C object ucosii_bsp/CMakeFiles/ucosii_hal2_bsp.dir/HAL/src/alt_fd_lock.c.obj
[ 24%] Building C object ucosii_bsp/CMakeFiles/ucosii_hal2_bsp.dir/HAL/src/alt_fd_unlock.c.obj
[ 25%] Building C object ucosii_bsp/CMakeFiles/ucosii_hal2_bsp.dir/HAL/src/alt_find_dev.c.obj
[ 26%] Building C object ucosii_bsp/CMakeFiles/ucosii_hal2_bsp.dir/HAL/src/alt_find_file.c.obj
[ 27%] Building C object ucosii_bsp/CMakeFiles/ucosii_hal2_bsp.dir/HAL/src/alt_flash_dev.c.obj
[ 28%] Building C object ucosii_bsp/CMakeFiles/ucosii_hal2_bsp.dir/HAL/src/alt_fork.c.obj
[ 29%] Building C object ucosii_bsp/CMakeFiles/ucosii_hal2_bsp.dir/HAL/src/alt_fs_reg.c.obj
[ 30%] Building C object ucosii_bsp/CMakeFiles/ucosii_hal2_bsp.dir/HAL/src/alt_fstat.c.obj
[ 31%] Building C object ucosii_bsp/CMakeFiles/ucosii_hal2_bsp.dir/HAL/src/alt_get_fd.c.obj
[ 32%] Building C object ucosii_bsp/CMakeFiles/ucosii_hal2_bsp.dir/HAL/src/alt_getchar.c.obj
[ 33%] Building C object ucosii_bsp/CMakeFiles/ucosii_hal2_bsp.dir/HAL/src/alt_getpid.c.obj
[ 34%] Building C object ucosii_bsp/CMakeFiles/ucosii_hal2_bsp.dir/HAL/src/alt_gettod.c.obj
[ 35%] Building C object ucosii_bsp/CMakeFiles/ucosii_hal2_bsp.dir/HAL/src/alt_gmon.c.obj
[ 36%] Building C object ucosii_bsp/CMakeFiles/ucosii_hal2_bsp.dir/HAL/src/alt_icache_flush.c.obj
[ 37%] Building C object ucosii_bsp/CMakeFiles/ucosii_hal2_bsp.dir/HAL/src/alt_icache_flush_all.c.obj
[ 38%] Building C object ucosii_bsp/CMakeFiles/ucosii_hal2_bsp.dir/HAL/src/alt_iic.c.obj
[ 39%] Building C object ucosii_bsp/CMakeFiles/ucosii_hal2_bsp.dir/HAL/src/alt_iic_isr_register.c.obj
[ 40%] Building C object ucosii_bsp/CMakeFiles/ucosii_hal2_bsp.dir/HAL/src/alt_instruction_exception_register.c.obj
[ 41%] Building C object ucosii_bsp/CMakeFiles/ucosii_hal2_bsp.dir/HAL/src/alt_io_redirect.c.obj
[ 42%] Building C object ucosii_bsp/CMakeFiles/ucosii_hal2_bsp.dir/HAL/src/alt_ioctl.c.obj
[ 43%] Building C object ucosii_bsp/CMakeFiles/ucosii_hal2_bsp.dir/HAL/src/alt_irq_handler.c.obj
[ 44%] Building C object ucosii_bsp/CMakeFiles/ucosii_hal2_bsp.dir/HAL/src/alt_isatty.c.obj
[ 45%] Building C object ucosii_bsp/CMakeFiles/ucosii_hal2_bsp.dir/HAL/src/alt_kill.c.obj
[ 46%] Building C object ucosii_bsp/CMakeFiles/ucosii_hal2_bsp.dir/HAL/src/alt_link.c.obj
[ 47%] Building C object ucosii_bsp/CMakeFiles/ucosii_hal2_bsp.dir/HAL/src/alt_load.c.obj
[ 48%] Building C object ucosii_bsp/CMakeFiles/ucosii_hal2_bsp.dir/HAL/src/alt_log_printf.c.obj
[ 50%] Building C object ucosii_bsp/CMakeFiles/ucosii_hal2_bsp.dir/HAL/src/alt_lseek.c.obj
[ 51%] Building C object ucosii_bsp/CMakeFiles/ucosii_hal2_bsp.dir/HAL/src/alt_main.c.obj
[ 52%] Building C object ucosii_bsp/CMakeFiles/ucosii_hal2_bsp.dir/HAL/src/alt_open.c.obj
[ 53%] Building C object ucosii_bsp/CMakeFiles/ucosii_hal2_bsp.dir/HAL/src/alt_printf.c.obj
[ 54%] Building C object ucosii_bsp/CMakeFiles/ucosii_hal2_bsp.dir/HAL/src/alt_putchar.c.obj
[ 55%] Building C object ucosii_bsp/CMakeFiles/ucosii_hal2_bsp.dir/HAL/src/alt_putcharbuf.c.obj
[ 56%] Building C object ucosii_bsp/CMakeFiles/ucosii_hal2_bsp.dir/HAL/src/alt_putstr.c.obj
[ 57%] Building C object ucosii_bsp/CMakeFiles/ucosii_hal2_bsp.dir/HAL/src/alt_read.c.obj
[ 58%] Building C object ucosii_bsp/CMakeFiles/ucosii_hal2_bsp.dir/HAL/src/alt_release_fd.c.obj
[ 59%] Building C object ucosii_bsp/CMakeFiles/ucosii_hal2_bsp.dir/HAL/src/alt_remap_cached.c.obj
[ 60%] Building C object ucosii_bsp/CMakeFiles/ucosii_hal2_bsp.dir/HAL/src/alt_remap_uncached.c.obj
[ 61%] Building C object ucosii_bsp/CMakeFiles/ucosii_hal2_bsp.dir/HAL/src/alt_rename.c.obj
[ 62%] Building C object ucosii_bsp/CMakeFiles/ucosii_hal2_bsp.dir/HAL/src/alt_sbrk.c.obj
[ 63%] Building C object ucosii_bsp/CMakeFiles/ucosii_hal2_bsp.dir/HAL/src/alt_settod.c.obj
[ 64%] Building C object ucosii_bsp/CMakeFiles/ucosii_hal2_bsp.dir/HAL/src/alt_stat.c.obj
[ 65%] Building C object ucosii_bsp/CMakeFiles/ucosii_hal2_bsp.dir/HAL/src/alt_tick.c.obj
[ 66%] Building C object ucosii_bsp/CMakeFiles/ucosii_hal2_bsp.dir/HAL/src/alt_times.c.obj
[ 67%] Building C object ucosii_bsp/CMakeFiles/ucosii_hal2_bsp.dir/HAL/src/alt_uncached_free.c.obj
[ 68%] Building C object ucosii_bsp/CMakeFiles/ucosii_hal2_bsp.dir/HAL/src/alt_uncached_malloc.c.obj
[ 69%] Building C object ucosii_bsp/CMakeFiles/ucosii_hal2_bsp.dir/HAL/src/alt_unlink.c.obj
[ 70%] Building C object ucosii_bsp/CMakeFiles/ucosii_hal2_bsp.dir/HAL/src/alt_usleep.c.obj
[ 71%] Building C object ucosii_bsp/CMakeFiles/ucosii_hal2_bsp.dir/HAL/src/alt_wait.c.obj
[ 72%] Building C object ucosii_bsp/CMakeFiles/ucosii_hal2_bsp.dir/HAL/src/alt_write.c.obj
[ 73%] Building C object ucosii_bsp/CMakeFiles/ucosii_hal2_bsp.dir/HAL/src/intel_niosv_m_irq.c.obj
[ 74%] Building C object ucosii_bsp/CMakeFiles/ucosii_hal2_bsp.dir/HAL/src/mtimer.c.obj
[ 75%] Building C object ucosii_bsp/CMakeFiles/ucosii_hal2_bsp.dir/HAL/src/os_cpu_c.c.obj
[ 76%] Building C object ucosii_bsp/CMakeFiles/ucosii_hal2_bsp.dir/UCOSII/src/alt_env_lock.c.obj
[ 77%] Building C object ucosii_bsp/CMakeFiles/ucosii_hal2_bsp.dir/UCOSII/src/alt_malloc_lock.c.obj
[ 78%] Building C object ucosii_bsp/CMakeFiles/ucosii_hal2_bsp.dir/UCOSII/src/os_core.c.obj
[ 79%] Building C object ucosii_bsp/CMakeFiles/ucosii_hal2_bsp.dir/UCOSII/src/os_dbg_r.c.obj
[ 80%] Building C object ucosii_bsp/CMakeFiles/ucosii_hal2_bsp.dir/UCOSII/src/os_flag.c.obj
[ 81%] Building C object ucosii_bsp/CMakeFiles/ucosii_hal2_bsp.dir/UCOSII/src/os_mbox.c.obj
[ 82%] Building C object ucosii_bsp/CMakeFiles/ucosii_hal2_bsp.dir/UCOSII/src/os_mem.c.obj
[ 83%] Building C object ucosii_bsp/CMakeFiles/ucosii_hal2_bsp.dir/UCOSII/src/os_mutex.c.obj
[ 84%] Building C object ucosii_bsp/CMakeFiles/ucosii_hal2_bsp.dir/UCOSII/src/os_q.c.obj
[ 85%] Building C object ucosii_bsp/CMakeFiles/ucosii_hal2_bsp.dir/UCOSII/src/os_sem.c.obj
[ 86%] Building C object ucosii_bsp/CMakeFiles/ucosii_hal2_bsp.dir/UCOSII/src/os_task.c.obj
[ 87%] Building C object ucosii_bsp/CMakeFiles/ucosii_hal2_bsp.dir/UCOSII/src/os_time.c.obj
[ 88%] Building C object ucosii_bsp/CMakeFiles/ucosii_hal2_bsp.dir/UCOSII/src/os_tmr.c.obj
[ 89%] Building C object ucosii_bsp/CMakeFiles/ucosii_hal2_bsp.dir/UCOSII/src/ucos_ii.c.obj
[ 90%] Building C object ucosii_bsp/CMakeFiles/ucosii_hal2_bsp.dir/alt_sys_init.c.obj
[ 91%] Building C object ucosii_bsp/CMakeFiles/ucosii_hal2_bsp.dir/drivers/src/altera_avalon_jtag_uart_fd.c.obj
[ 92%] Building C object ucosii_bsp/CMakeFiles/ucosii_hal2_bsp.dir/drivers/src/altera_avalon_jtag_uart_init.c.obj
[ 93%] Building C object ucosii_bsp/CMakeFiles/ucosii_hal2_bsp.dir/drivers/src/altera_avalon_jtag_uart_ioctl.c.obj
[ 94%] Building C object ucosii_bsp/CMakeFiles/ucosii_hal2_bsp.dir/drivers/src/altera_avalon_jtag_uart_read.c.obj
[ 95%] Building C object ucosii_bsp/CMakeFiles/ucosii_hal2_bsp.dir/drivers/src/altera_avalon_jtag_uart_write.c.obj
[ 96%] Linking C static library libucosii_hal2_bsp.a
make[2]: Leaving directory 'C:/workspace/base/NiosV/test/software/ucosii_app/build'
[ 96%] Built target ucosii_hal2_bsp
make[2]: Entering directory 'C:/workspace/base/NiosV/test/software/ucosii_app/build'
make[2]: Leaving directory 'C:/workspace/base/NiosV/test/software/ucosii_app/build'
make[2]: Entering directory 'C:/workspace/base/NiosV/test/software/ucosii_app/build'
[ 97%] Building C object CMakeFiles/hello_ucosii.elf.dir/hello_ucosii.c.obj
[ 98%] Linking C executable hello_ucosii.elf
make[2]: Leaving directory 'C:/workspace/base/NiosV/test/software/ucosii_app/build'
[ 98%] Built target hello_ucosii.elf
make[2]: Entering directory 'C:/workspace/base/NiosV/test/software/ucosii_app/build'
make[2]: Leaving directory 'C:/workspace/base/NiosV/test/software/ucosii_app/build'
make[2]: Entering directory 'C:/workspace/base/NiosV/test/software/ucosii_app/build'
[100%] Creating hello_ucosii.elf.objdump.
make[2]: Leaving directory 'C:/workspace/base/NiosV/test/software/ucosii_app/build'
[100%] Built target create-objdump
make[1]: Leaving directory 'C:/workspace/base/NiosV/test/software/ucosii_app/build'
make: Leaving directory 'C:/workspace/base/NiosV/test/software/ucosii_app/build'
5.2.6 hello_ucosii.elfファイルダウンロード
次に作成したELFファイルを下記のコマンドでターゲットのRAMにダウンロードします。
[niosv-shell] C:\workspace\base\NiosV\test> niosv-download software/ucosii_app/build/hello_ucosii.elf
INFO: Generating OpenOCD config file. Running "openocd-cfg-gen C:\temp\tmpymwy6lf8\niosvm.cfg".
INFO: Starting OpenOCD. Running "openocd -c tcl_port disabled -c gdb_port 0 -c telnet_port 0 -f C:\temp\tmpymwy6lf8\niosvm.cfg".
[OpenOCD output] Open On-Chip Debugger 0.11.0-R21.3
[OpenOCD output] Licensed under GNU GPL v2
[OpenOCD output] For bug reports, read
[OpenOCD output]        http://openocd.org/doc/doxygen/bugs.html
[OpenOCD output] Info : only one transport option; autoselect 'jtag'
[OpenOCD output] Info : Application name is OpenOCD.20211129133053
[OpenOCD output] Info : Attempting to find 'USB-BlasterII [USB-1]'
[OpenOCD output] Info : Cable 1: device_name=(null), hw_name=USB-BlasterII, server=(null), port=USB-1, chain_id=0000029d2bd66960, persistent_id=1, chain_type=1, features=2048, server_version_info=(null)
[OpenOCD output] Info : TAP position 0 (2E050DD) has 3 SLD nodes
[OpenOCD output] Info :     node  0 idcode=00486E00 position_n=0
[OpenOCD output] Info :     node  1 idcode=08986E00 position_n=0
[OpenOCD output] Info :     node  2 idcode=0C006E00 position_n=0
[OpenOCD output] Info : TAP position 1 (4BA00477) has 0 SLD nodes
[OpenOCD output] Info : Discovered 2 TAP devices
[OpenOCD output] Info : Detected device (tap_position=0) device_id=02e050dd, instruction_length=10, features=4, device_name=10AS066H(1|2|3|3E2|4|4E2)/..
[OpenOCD output] Info : Found an Intel device at tap_position 0.Currently assuming it is SLD Hub
[OpenOCD output] Info : Detected device (tap_position=1) device_id=4ba00477, instruction_length=4, features=0, device_name=SOCVHPS
[OpenOCD output] Info : Found a ARM device at tap_position 1. Currently assume it is JTAG-DP capable
[OpenOCD output] Info : This adapter doesn't support configurable speed
[OpenOCD output] Info : JTAG tap: tap_02E050DD.0 tap/device found: 0x02e050dd (mfg: 0x06e (Altera), part: 0x2e05, ver: 0x0)
[OpenOCD output] Info : JTAG tap: tap_4BA00477.0 tap/device found: 0x4ba00477 (mfg: 0x23b (ARM Ltd), part: 0xba00, ver: 0x4)
[OpenOCD output] Info : JTAG tap: tap_02E050DD.0 Parent Tap found: 0x02e050dd (mfg: 0x06e (Altera), part: 0x2e05, ver: 0x0)
[OpenOCD output] Info : Virtual Tap/SLD node 0x08986E00 found at tap position 0 vtap position 1
[OpenOCD output] Info : datacount=2 progbufsize=8
[OpenOCD output] Info : Examined RISC-V core; found 1 harts
[OpenOCD output] Info :  hart 0: XLEN=32, misa=0x40000101
[OpenOCD output] Info : starting gdb server for tap_02E050DD.0.niosv_0.cpu on 0
[OpenOCD output] Info : Listening on port 65167 for gdb connections
INFO: Found gdb port 65167
[OpenOCD output] Ready for Remote Connections
[OpenOCD output] Info : tcl server disabled
[OpenOCD output] Info : Listening on port 65168 for telnet connections
INFO: Found telnet port 65168
INFO: OpenOCD is ready.
INFO: Loading image via GDB. Running "riscv-none-embed-gdb -batch -ex set arch riscv:rv32 -ex set remotetimeout 60 -ex target extended-remote localhost:65167 -ex load software\ucosii_app\build\hello_ucosii.elf".
The target architecture is assumed to be riscv:rv32
__reset () at C:/workspace/base/NiosV/test/software/ucosii_bsp/HAL/src\crt0.S:144
144         tail _start
Loading section .entry, size 0x20 lma 0x0
Loading section .exceptions, size 0x280 lma 0x20
Loading section .text, size 0x21374 lma 0x2a0
Loading section .rodata, size 0xfd0 lma 0x21618
Loading section .rwdata, size 0x1bf4 lma 0x241dc
Loading section .init_array.00000, size 0x4 lma 0x25dd0
Start address 0x608, load size 147932
Transfer rate: 107 KB/sec, 10566 bytes/write.
[Inferior 1 (Remote target) detached]
5.2.7 ISSPによりCPUをリセット
Hello Worldと同様に、下記のコマンドを実行して、リセット信号をトグルさせ、デザインをリセットします。
[niosv-shell] C:\workspace\base\NiosV\test> quartus_stp -t toggle_issp.tcl
Info: *******************************************************************
Info: Running Quartus Prime Signal Tap
    Info: Version 21.3.0 Build 170 09/23/2021 SC Pro Edition
    Info: Copyright (C) 2021  Intel Corporation. All rights reserved.
    Info: Your use of Intel Corporation's design tools, logic functions
    Info: and other software and tools, and any partner logic
    Info: functions, and any output files from any of the foregoing
    Info: (including device programming or simulation files), and any
    Info: associated documentation or information are expressly subject
    Info: to the terms and conditions of the Intel Program License
    Info: Subscription Agreement, the Intel Quartus Prime License Agreement,
    Info: the Intel FPGA IP License Agreement, or other applicable license
    Info: agreement, including, without limitation, that your use is for
    Info: the sole purpose of programming logic devices manufactured by
    Info: Intel and sold by Intel or its authorized distributors.  Please
    Info: refer to the applicable agreement for further details, at
    Info: https://fpgasoftware.intel.com/eula.
    Info: Processing started: Mon Nov 29 13:32:11 2021
    Info: System process ID: 12772
Info: Command: quartus_stp -t toggle_issp.tcl
Info (23030): Evaluation of Tcl script toggle_issp.tcl was successful
Info: Quartus Prime Signal Tap was successful. 0 errors, 0 warnings
    Info: Peak virtual memory: 150 megabytes
    Info: Processing ended: Mon Nov 29 13:32:13 2021
    Info: Elapsed time: 00:00:02
    Info: System process ID: 12772
5.2.8 ターミナル上にHello from taskを表示
Hello Worldと同様に、下記コマンドを実行して、デザインに実装したJTAG-UARTをホスト上にメッセージ表示させます。終了するには"CTRL+C"を押してください。
[niosv-shell] C:\workspace\base\NiosV\test> juart-terminal
juart-terminal: connected to hardware target using JTAG UART on cable
juart-terminal: "USB-BlasterII [USB-1]", device 1, instance 0
juart-terminal: (Use the IDE stop button or Ctrl-C to terminate)

Hello from main...
Task1 -- TOS: 0x27e34, BOS: 0x25e38
Task2 -- TOS: 0x29e38, BOS: 0x27e3c
Task3 -- TOS: 0x2be38, BOS: 0x29e3c
Stat -- TOS: 0x2cdc0, BOS: 0x2c5c4
Idle -- TOS: 0x2d7d4, BOS: 0x2cfd8
Hello from task1: 0

Hello from task2: 0

Hello from task3: 0

Hello from task3: 1

Hello from task2: 1

Hello from task3: 2

Hello from task1: 1

Hello from task3: 3

Hello from task2: 2

Hello from task3: 4

Hello from task3: 5

Hello from task2: 3

Hello from task1: 2

Hello from task3: 6

Hello from task3: 7

Hello from task2: 4

Hello from task3: 8

Hello from task1: 3

Hello from task2: 5

Hello from task3: 9

....

juart-terminal: exiting due to ^C on host
6. まとめ
今回、Nios® V/m Processorを使用するための最低限のツールのインストール、Hello Worldの実行を確認できました。次回はシミュレーション、デバッグ、ブート方法など実践的な内容について説明したいと思います。
7. 参考資料
Notices & Disclaimers
Intel technologies may require enabled hardware, software or service activation.
No product or component can be absolutely secure.
Your costs and results may vary.
© Intel Corporation. Intel, the Intel logo, and other Intel marks are trademarks of Intel Corporation or its subsidiaries. Other names and brands may be claimed as the property of others.
The products described may contain design defects or errors known as errata which may cause the product to deviate from published specifications. Current characterized errata are available on request.
Intel disclaims all express and implied warranties, including without limitation, the implied warranties of merchantability, fitness for a particular purpose, and non-infringement, as well as any warranty arising from course of performance, course of dealing, or usage in trade.