はじめに
このエントリでは ImageMagick の減色処理について語ります。 
減色とは、画像内で使われる色の種類を減らす事です。英語では color reduction(色削減)、広い意味で色の階調を減らす事でもあるので量子化 quantization(量子化)とも呼ばれます。
画像ファイルを PNG8(パレット方式のPNG) や GIF に変換すると、暗黙的に 256色以下に減色されるので知らぬ間に減色処理を使っている人も多いでしょう。
ImageMagick の減色
ImageMagick は3つの方法で減色できます。
- ビット足切り: 色のビット数を単純に減らす
- 決め打ちパレット: 指定した色パレットに含まれる色しか使わない
- 色決定アルゴリズム: 色分布を元にして似た色をまとめる
決め打ちパレットと色決定アルゴリズムの2つは、ディザ処理をかけられます。(デフォルトで on です)
(追記) ImageMagick-7.0.9-10(2019年12月22日)に -kmeans が追加されました。今のところディザが効かず、また超重たいので利用シーンはそこそこ限定されそうです。ディザは -kmeans した画像をパレットとして -map を更にかければ良さそうです。
ImageMagick 7 系では -map が廃止されました。代わりに -remap を使います。
https://imagemagick.org/script/porting.php#cli
ビット足切り
-depth を使うと下位ビットを4捨5入(2進数だと0捨1入)して、階調を荒くします。狭義の量子化(quantization)処理です。
% convert 26040.png -depth 4  26040-depth4.png
% convert 26040.png -depth 2  26040-depth2.png
| 8bit | 4bit | 2bit | |
|---|---|---|---|
| 画像 | 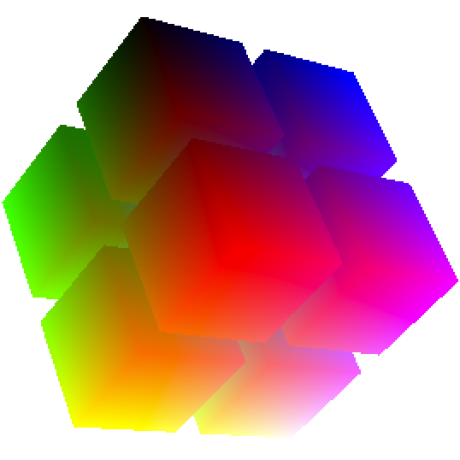 |
 |
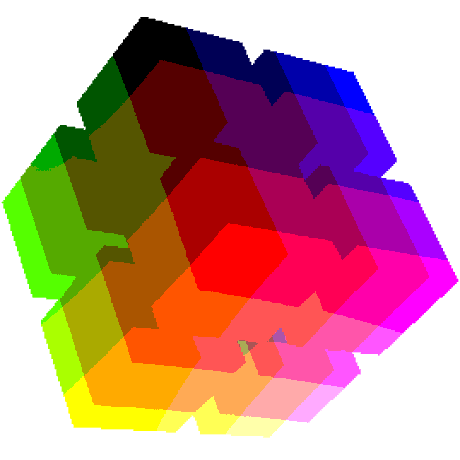 |
| ヒストグラム | 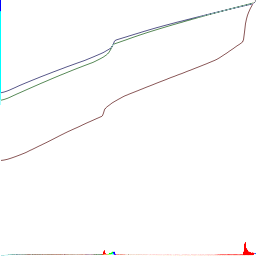 |
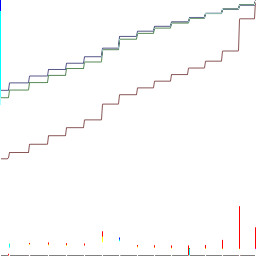 |
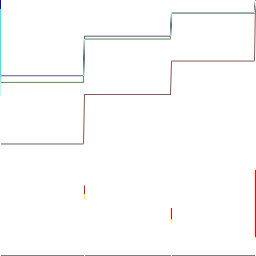 |
具体的には一定区間を1つの輝度に代表させる処理です。
 |
見ての通り、雑ですが処理自体は早いです。
なお、ビットを減らすだけの処理でも、どの区間をどこに代表させるかで幾つか方法が考えられます。
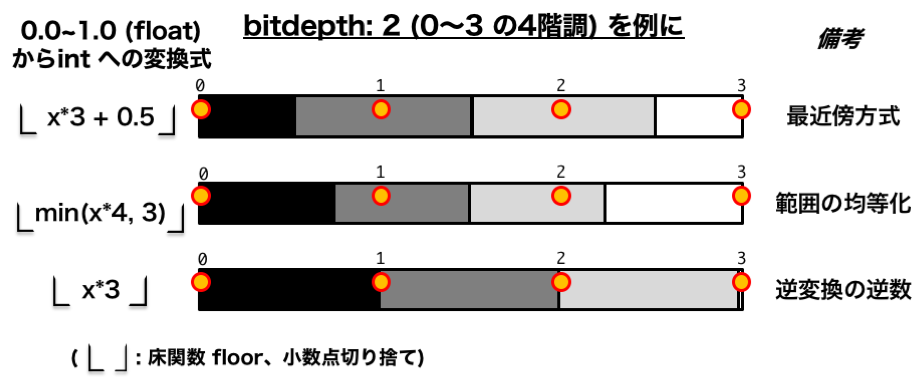 |
ImageMagick はこのうち、一番上の方式を採用しています。画像処理では大抵この方式を使うはずです。
画質を犠牲にしても高速化したい。またはもともとバイアスがかかっていて逆バイアスをかけたい。みたいな時に下2つで実装する処理系も世の中には存在します。
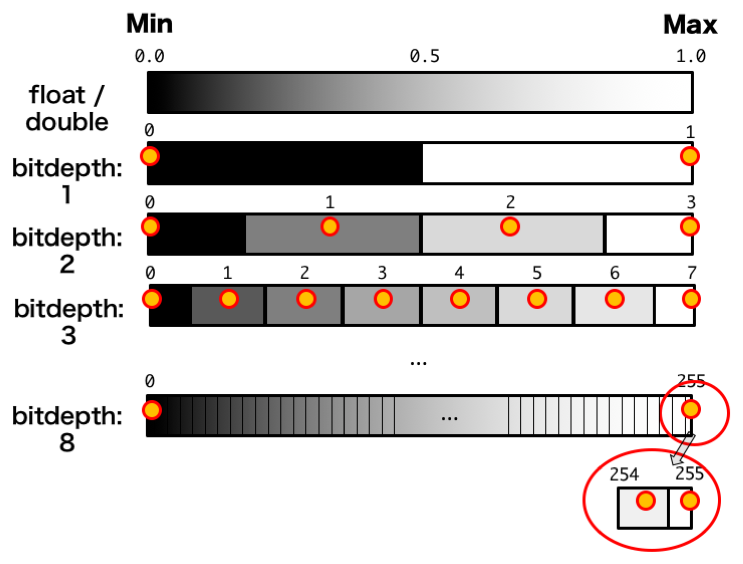
色の量子化自体の詳細はこちらを参考にどうぞ。
- RGB ビット深度のうんちく
決め打ちパレット
-map で画像を指定すると、指定した画像をパレットとしてその中の色のみ使うように出来ます。デフォルトで dither がかかります。+dither で外す場合と両方の例を並べてみます。
% convert 26040.png +dither -map palette.png  26040+dither-map.png
% convert 26040.png -map palette.png  26040-map.png
| 26040.png | palette.png | 26040+dither-map.png | 26040-map.png |
|---|---|---|---|
|
 |
 |
 |
|
 |
 |
 |
(右下の -map した Opaopa 画像が真っ暗なのは多分、不具合です。透明度ありのディザだと駄目なのかな?)
実は、先ほどの -depth オプションだと -dither が使えません。代わりに -map を使う事でそれ相当の処理をさせられます。詳しくは以下のエントリをどうぞ。
- RGB444 変換で劣化しない画像を ImageMagick で作る
色決定アルゴリズム
-colors で少ない色数を指定すると、色決定アルゴリズムを使ってパレットをいい感じに小さくします。
具体的には画像中の色を全部持つパレットを生成して、そのパレットの色数が指定した値かそれより小さくなるまで似た色をまとめる処理をします。
% convert 26040.png +dither -colors 256  26040+dither-colors256.png
% convert 26040.png -colors 256  26040-colors256.png
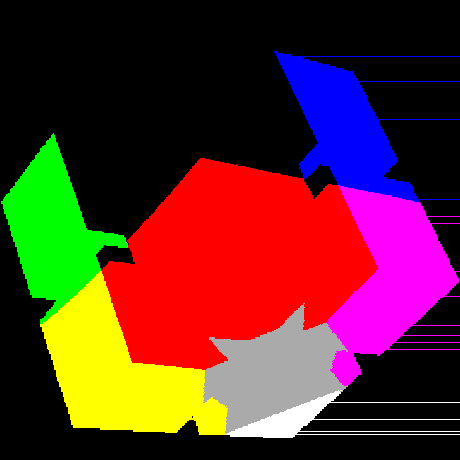
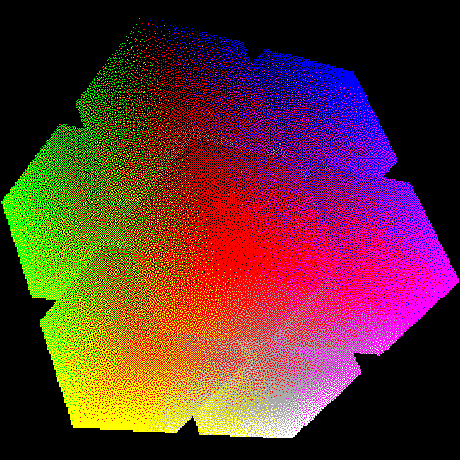
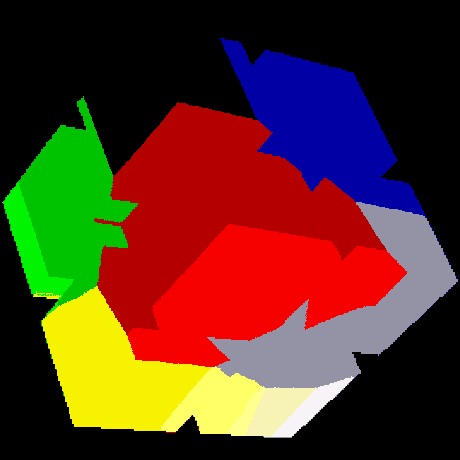
| 26040.png | 26040+dither-colors256.png | 26040-colors256.png |
|---|---|---|
|
 |
 |
色決定アルゴリズムには様々な手法があり、ImageMagick は Octree 実装のようです。詳細はこちらをどうぞ。
- ImageMagick の減色処理解説
ディザ
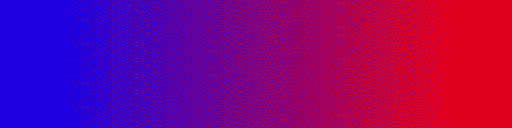
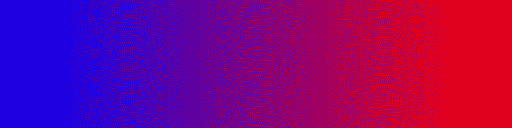
減色で特に困る問題にバンディングがあります。例えばグラデーション画像の色を単純に減らすとこうなります。
% convert -size 128x512 gradient:red-blue -rotate 90  red-blue.png
% convert red-blue.png +dither -colors 10  red-blue+dither-colors10.png
| red-blue.png |
|---|
 |
| red-blue+dither-colors10.png |
 |
(ちなみに -colors 10 は10以下に色数を減らす指定で、結果的に6色まで減ってます。1 )
ここまであからさまな階調が出る事は滅多にないですが、この階段が現れる事をバンディングと呼びます。
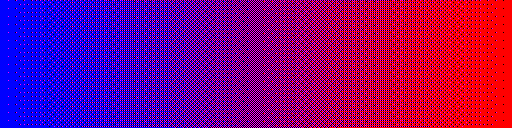
ディザはパレットの色を複数用いて、パレットに存在しない色を表示する技術です。併置加法混色の原理を利用します。
これによって大分見た目が改善されます。
% convert red-blue.png -colors 10 red-blue-colors10.png
| red-blue-colors10.png |
|---|
 |
なお、ディザの方式として FloydSteinberg と Riemersma 、あと組織的ディザに対応しています。
% convert red-blue.png -dither FloydSteinberg -colors 10  red-blue+dither_FS-colors10.png
% convert red-blue.png -dither Riemersma -colors 10  red-blue+dither_R-colors10.png
% convert red-blue.png -ordered-dither o8x8 -colors 10  red-blue+dither_o8x8-colors10.png
| red-blue+dither_FS-colors10.png (FloydSteinberg) |
|---|
 |
| red-blue+dither_R-colors10.png (Riemersma) |
 |
| red-blue+dither_o8x8-colors10.png |
 |
ImageMagick 内部の話
ImageMagick-7 系だと MagickCore、-6 系では magick フォルダ以下の quantize.c に減色処理が集約されています。
Color Cube
あらかじめパレットの色を RGB なら8分木、RGBAなら16分木のツリー構造で格納して、ツリーを辿って処理をします。
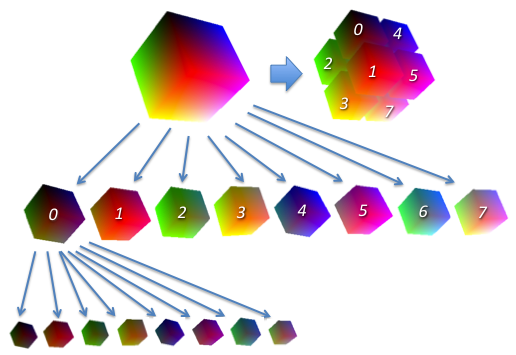 |
|---|
| (c) https://labs.gree.jp/blog/2012/09/4824/rgb-octree/ |
typedef struct _NodeInfo
{
  struct _NodeInfo
    *parent,
    *child[16];

  MagickSizeType
    number_unique;

  DoublePixelPacket
    total_color;

  double
    quantize_error;

  size_t
    color_number,
    id,
    level;
} NodeInfo;

typedef struct _CubeInfo
{
  NodeInfo
    *root;

  size_t
    colors,
    maximum_colors;
(略)
}
Closest Color
ツリーを辿って色距離が一番近い色を記録します。分割された色空間で隣り合うブロックだけ見れば良いはずだけど、全数探索してるような(?)
  /*
    Traverse any children.
  */
  number_children=cube_info->associate_alpha == MagickFalse ? 8UL : 16UL;
  for (i=0; i < (ssize_t) number_children; i++)
    if (node_info->child[i] != (NodeInfo *) NULL)
      ClosestColor(image,cube_info,node_info->child[i]);
  if (node_info->number_unique != 0)
    {
      double
        pixel;

      register double
        alpha,
        beta,
        distance;

      register DoublePixelPacket
        *magick_restrict q;

      register PixelInfo
        *magick_restrict p;

      /*
        Determine if this color is "closest".
      */
      p=image->colormap+node_info->color_number;
      q=(&cube_info->target);
      alpha=1.0;
      beta=1.0;
      if (cube_info->associate_alpha != MagickFalse)
        {
          alpha=(double) (QuantumScale*p->alpha);
          beta=(double) (QuantumScale*q->alpha);
        }
      pixel=alpha*p->red-beta*q->red;
      distance=pixel*pixel;
      if (distance <= cube_info->distance)
        {
          pixel=alpha*p->green-beta*q->green;
          distance+=pixel*pixel;
          if (distance <= cube_info->distance)
            {
              pixel=alpha*p->blue-beta*q->blue;
              distance+=pixel*pixel;
              if (distance <= cube_info->distance)
                {
                  if (cube_info->associate_alpha != MagickFalse)
                    {
                      pixel=p->alpha-q->alpha;
                      distance+=pixel*pixel;
                    }
                  if (distance <= cube_info->distance)
                    {
                      cube_info->distance=distance;
                      cube_info->color_number=node_info->color_number;
                    }
                }
            }
        }
    }
QuantizeImage
減色処理は QuantizeImage と ReduceImageColors がキモです。
MagickExport MagickBooleanType QuantizeImage(const QuantizeInfo *quantize_info,
  Image *image,ExceptionInfo *exception)
(略)
  /*
    Initialize color cube.
  */
  cube_info=GetCubeInfo(quantize_info,depth,maximum_colors);
  if (cube_info == (CubeInfo *) NULL)
    ThrowBinaryException(ResourceLimitError,"MemoryAllocationFailed",
      image->filename);
  status=ClassifyImageColors(cube_info,image,exception);
  if (status != MagickFalse)
    {
      /*
        Reduce the number of colors in the image if it contains more than the
        maximum, otherwise we can disable dithering to improve the performance.
      */
      if (cube_info->colors > cube_info->maximum_colors)
        ReduceImageColors(image,cube_info);
      else
        cube_info->quantize_info->dither_method=NoDitherMethod;
      status=AssignImageColors(image,cube_info,exception);
    }
  DestroyCubeInfo(cube_info);
ClassifyImageColors で画像中の色をツリー構造に載せ替えて、ReduceImageColors でツリー構造上にある色を減らしていきます。
ReduceImageColors
元々は後半だけの処理でしたが、1色減らすごとにツリー全検索していて重たかったので、前半で目的の色数以下に落とす色差の閾値を算出して、ごそっと消すようにしました。その為、処理は圧倒的に速くなりましたが、指定した色数より大分多めに減ったりもします。
犯人コミットしたの僕です。御免なさい。
static void ReduceImageColors(const Image *image,CubeInfo *cube_info)
{
#define ReduceImageTag  "Reduce/Image"

  MagickBooleanType
    proceed;

  MagickOffsetType
    offset;

  size_t
    span;

  cube_info->next_threshold=0.0;
  if (cube_info->colors > cube_info->maximum_colors)
    {
      double
        *quantize_error;

      /*
        Enable rapid reduction of the number of unique colors.
      */
      quantize_error=(double *) AcquireQuantumMemory(cube_info->nodes,
        sizeof(*quantize_error));
      if (quantize_error != (double *) NULL)
        {
          (void) QuantizeErrorFlatten(cube_info,cube_info->root,0,
            quantize_error);
          qsort(quantize_error,cube_info->nodes,sizeof(double),
            QuantizeErrorCompare);
          if (cube_info->nodes > (110*(cube_info->maximum_colors+1)/100))
            cube_info->next_threshold=quantize_error[cube_info->nodes-110*
              (cube_info->maximum_colors+1)/100];
          quantize_error=(double *) RelinquishMagickMemory(quantize_error);
        }
  }
  for (span=cube_info->colors; cube_info->colors > cube_info->maximum_colors; )
  {
    cube_info->pruning_threshold=cube_info->next_threshold;
    cube_info->next_threshold=cube_info->root->quantize_error-1;
    cube_info->colors=0;
    Reduce(cube_info,cube_info->root);
    offset=(MagickOffsetType) span-cube_info->colors;
    proceed=SetImageProgress(image,ReduceImageTag,offset,span-
      cube_info->maximum_colors+1);
    if (proceed == MagickFalse)
      break;
  }
}
最後に
真っ黒な画像を貼った場所があるように -map (dither有り)で変な不具合を見つけてしまったので、そのうちコミットするかも。パレット画像に PNG32 画像を指定すると駄目みたいですね。
あと、ClosestColor の処理が無駄に見えるので、もう少し調査してみようかと。。ReduceImageColors が呼ぶ Reduce の先で色を減らす処理では従兄弟ノードまで参照する場所があるようにツリーを有効活用してるはずですが、実際に挙動を見るとそうでもなく、ちぐはぐ感がありますね。
-
指定した色数ぴったりでなくした犯人は僕です。高速化の都合でこうしました。 https://www.imagemagick.org/discourse-server/viewtopic.php?f=2&t=24324 ↩