最新の UIFlow(M5Stackシリーズのビジュアルプログラミング環境)で BLE通信を実装するためのブロックが追加されたため、以前、M5Stack Core2 とブラウザとの間での BLE通信を試しました(ブラウザ側では Web Bluetooth API を利用)。
●【JavaScript 2020】 #UIFlow の BLE UART を使ったブラウザから #M5Stack_Core2 ( #M5Stack )への文字の送信 - Qiita
https://qiita.com/youtoy/items/3da58570972803134f6c
この時は双方向の通信は試せておらず、ブラウザから M5Stack Core2 への文字列送信のみ試していました。
そこで今回、M5Stack Core2 から ブラウザへの文字列送信も試し、双方向通信を実装してみます。
注意
冒頭で紹介した記事の前に書いた、以下の記事の中で記載しているのですが、現状で UIFlow の BLE UART を利用できるのは、「M5Stack Fire」か「M5Stack Core2」のどちらかになりそうです。
●#UIFlow の BLE UART を使った文字のやりとりを #M5Stack_Core2 で試してみた( #M5Stack ) - Qiita
https://qiita.com/youtoy/items/0aeac01927d60c33f421
双方向の通信を実装する
今回、実装した内容の掲載をメインにします。
UIFlow での設定・プログラムの作成
設定
画面上にラベルを 1つ配置し、日本語が扱えるようにフォントは「Unicode 24」を選択しています。
プログラム
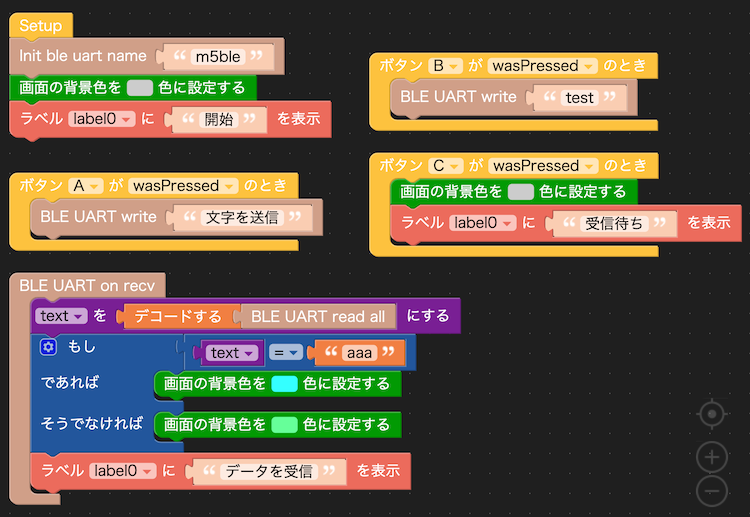
ブロックを組み合わせて作ったプログラムは以下のとおりです。
ブラウザ側のソースコード
ブラウザ側で、M5Stack Core2 からデータを受信して画面に表示したり、M5Stack Core2 にデータを送ったりするためのソースは以下のとおりです。これを HTMLファイルとしてローカルに保存します。
<!DOCTYPE html>
<html>
  <head>
    <meta charset="utf-8" />
    <meta name="viewport" content="width=device-width, initial-scale=1" />
    <title>UIFlow と BLE</title>
  </head>

  <body>
    <h1>UIFlow と BLE</h1>
    <button onclick="onStartButtonClick()">接続</button>
    <br />
    <button onclick="sendMessage()">テキスト書き込み</button>
    <br />
    <textarea id="text"></textarea>

    <script>
      const UUID_1 = "6e400001-b5a3-f393-e0a9-e50e24dcca9e";
      const UUID_2 = "6e400002-b5a3-f393-e0a9-e50e24dcca9e"; // Write
      const UUID_3 = "6e400003-b5a3-f393-e0a9-e50e24dcca9e"; // Notify

      let bluetoothDevice;
      let characteristic_A, characteristic_B;
      const textarea = document.getElementById("text");

      async function onStartButtonClick() {
        try {
          console.log("Requesting Bluetooth Device...");
          const device = await navigator.bluetooth.requestDevice({
            filters: [{ namePrefix: "m5ble" }],
            optionalServices: [UUID_1],
          });
          console.log("Connecting to GATT Server...");
          const server = await device.gatt.connect();
          console.log("Getting Service...");
          const service = await server.getPrimaryService(UUID_1);
          console.log("Getting Characteristic...");
          characteristic_A = await service.getCharacteristic(UUID_2);
          console.log("Getting Characteristic...");
          characteristic_B = await service.getCharacteristic(UUID_3);
          await characteristic_B.startNotifications();
          console.log("> Notifications started");
          characteristic_B.addEventListener(
            "characteristicvaluechanged",
            handleNotifications
          );
        } catch (error) {
          console.log("Argh! " + error);
        }
      }

      async function sendMessage() {
        if (!characteristic_A) {
          return;
        }
        const text = "aaa";
        const arrayBuffe = new TextEncoder().encode(text);
        try {
          await characteristic_A.writeValue(arrayBuffe);
        } catch (error) {
          console.log("Argh! " + error);
        }
      }

      async function handleNotifications(event) {
        if (characteristic_B) {
          try {
            let value = event.target.value;
            const text = new TextDecoder().decode(value);
            textarea.textContent = text;
            console.log(text);
          } catch (error) {
            console.log("Argh! " + error);
          }
        }
      }
    </script>
  </body>
</html>
この中で設定している 3つの UUID は、冒頭に掲載していた以前の記事を書いた際に調べたものです。
双方向の通信を試す
上記の HTMLファイルをブラウザで開き、ページ内の「接続」ボタンを押して M5Stack Core2 とのペアリングを行ってください。
その後、ブラウザで開いたページ内の「テスト書き込み」ボタンを押すと、M5Stack Core2 の画面の背景の文字・テキストが変化します。なお、M5Stack Core2 の Cボタンを押すと、背景の色が最初の色に戻ります。
また、M5Stack Core2 の Aボタン・Bボタンをそれぞれ押すと、ブラウザで開いたページ内のテキストエリアに文字が表示されます。この文字は、M5Stack Core2 から送信された内容を表示しています。
実際に動作している時の様子は、以下のとおりです。
#UIFlow の BLE UART を使った #M5Stack_Core2 ( #M5Stack )とブラウザとの双方向無線通信。
— you (@youtoy) January 19, 2021
M5Stack Core2 のボタンを押すとテキストデータが送信され、それがブラウザのテキストエリアに表示されたり、
ブラウザ側でボタンを押すと M5Stack Core2 の背景色などが変わるという動作です。 pic.twitter.com/oXLKmIk13F
うまく動作しました!
ただ、プログラムでは「データを受信」という文字を表示するようにしていたはずなのに、端末上の表示で「デタを受信」となってたりするので、マルチバイト文字の部分は要チェックなところがありそう。
【追記】 ブラウザ側で可視化をする処理を入れたものを作ってみた
M5Stack Core2 のタッチスクリーンの触れられた位置座標を送信データにして、それをブラウザ側でリアルタイムに描画する、というものも作ってみました。
●#UIFlow の BLE UART を使った #M5Stack_Core2 ( #M5Stack )からブラウザへのデータ送信とグラフ化 - Qiita
https://qiita.com/youtoy/items/1bf6e9390b5dc5d2ba51
#UIFlow の BLE UART を引き続きお試し。#M5Stack_Core2 の画面上でタッチされた座標を BLE でブラウザに送り、リアルタイムにグラフとして描画してみた。
— you (@youtoy) January 20, 2021
送る値を途中で 、x座標にするか y座標にするか、入れ替えてます。#M5Stack pic.twitter.com/wHvN4vdoB8

