この記事は下記の #GWアドベントカレンダー の 1日目の記事になります。
●日数分だけ記事を書く!( @youtoy ) | GWアドベントカレンダー

はじめに
この記事で書く内容は、下記の動画にある M5GO のボタンを押下したら Discord にメッセージが送られる(UIFlow で実装)というものと、Fetch API を使ってメッセージを送るのを試した話です。
Discord に Webhook を使って投稿するやつ、
— you (@youtoy) April 25, 2020
curl で試したあと、M5GO のボタン押下でメッセージが投稿されるようにしてみた。#M5Stack pic.twitter.com/p8RzexxlBF
ちなみに、UIFlow を使った M5GO(M5Stack系のデバイス)からのメッセージング関連では、最近いくつかのサービスのものを試しています。
そして例えば LINEアプリへの通知(LINE Notify を利用)は、試した内容を下記の記事に書きました。
●LINE Notify を利用して UIFlow のプログラムで LINE に通知を送る(日本語テキストも送信) #M5Stack - Qiita
https://qiita.com/youtoy/items/76586479c2d4c5893c5b
それでは、以下で記事の本題の「Discord へのメッセージング」の話に入っていきます。
cURL によるメッセージング
まずは、Discord側の設定をしつつ、コマンドラインからメッセージを送ってみます。
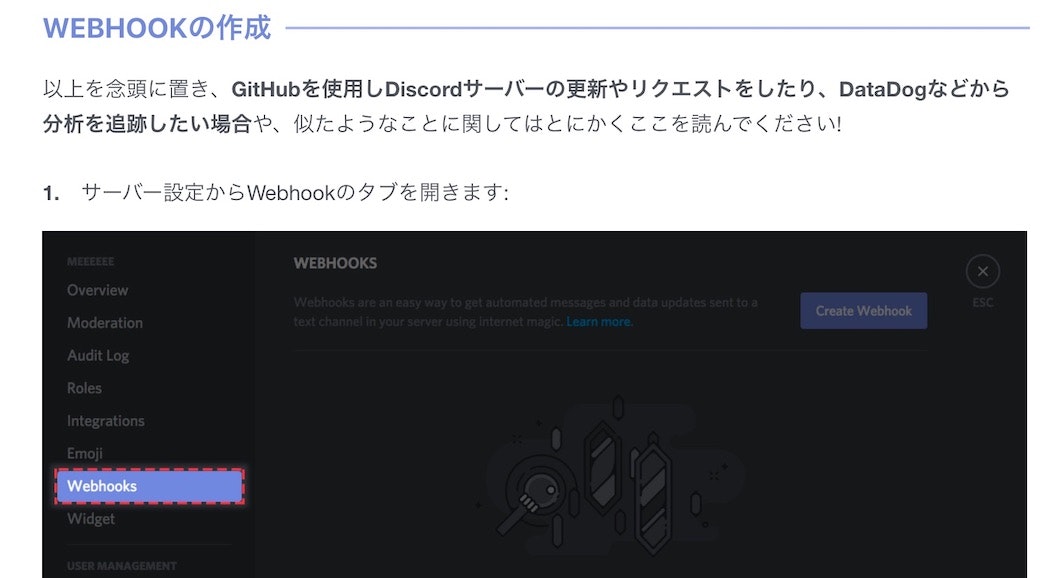
Discord側の設定などは、公式の以下の内容をご確認ください。
●タイトル: Webhooksへの序章 – Discord
https://support.discordapp.com/hc/ja/articles/228383668-%E3%82%BF%E3%82%A4%E3%83%88%E3%83%AB-Webhooks%E3%81%B8%E3%81%AE%E5%BA%8F%E7%AB%A0
Discord側の設定が終わったら、今度は cURL を使って投稿をしてみます。
●cURL · Discord Webhooks Guide
https://birdie0.github.io/discord-webhooks-guide/tools/curl.html
curl -H "Content-Type: application/json" -X POST -d '{"username": "test", "content": "hello"}' 【上記で設定した際の https://discordapp.com/api/webhooks/○○○ となるURL】

# -H "Content-Type: application/json" - header that tells server that you are sending JSON data
# -X POST - use POST method
# -d '{"username": "test", "content": "hello"}' - adds data to request
username や content の内容を変更したりして、メッセージ送信をした結果が以下です。
無事に成功しました。
Discord に Webhook を使って投稿するやつ、
— you (@youtoy) April 25, 2020
curl からは簡単にできた。 https://t.co/gkWf10mwzc pic.twitter.com/M2yuAK9bQP
UIFlow によるメッセージング
それでは、UIFlow でもメッセージングを試してみます。
基本的な構成は、冒頭で紹介した別記事の「IFTTTを使った例」の部分で説明した内容と同じです。
Method に POST を指定して、URL には Discord の Webhook用の URL を指定し(以下の画像の 2つの緑矢印のうち上側のほう)、Data の部分で key・value のペアを 2つ設定する形(以下の画像の 2つの緑矢印のうち下側のほう)です。

これで、冒頭に紹介した動画の内容を実現できます。
Fetch API によるメッセージング
今度は、以下を参考にして Fetch API でのメッセージングを試してみます。
●Fetch を使う - Web API | MDN
https://developer.mozilla.org/ja/docs/Web/API/Fetch_API/Using_Fetch
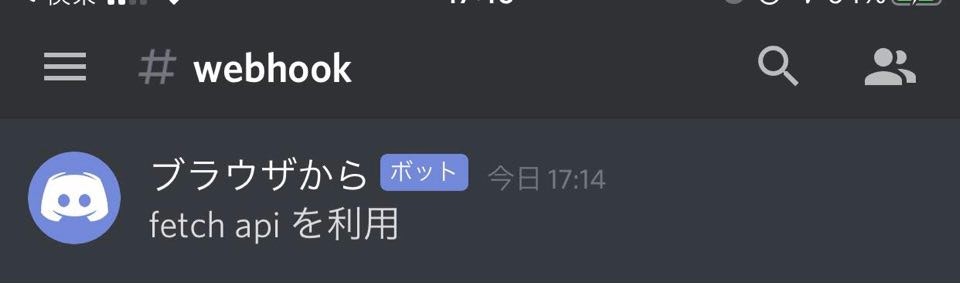
プログラムの中で、メッセージングに関わる Fetch API を利用した部分のみ抜粋します。
const url = "【上記で設定した際の https://discordapp.com/api/webhooks/○○○ となるURL】";
const message = {"username":"ブラウザから","content":"fetch api を利用"};

postData(url, message)
  .then(data => console.log(data))
  .catch(error => console.error(error));

function postData(url = ``, data = {}) {
    return fetch(url, {
        method: "POST",
        mode: "cors",
        headers: {
          'Content-type': 'application/json'
        },
        body: JSON.stringify(data),
    })
    .then(response => response.text());
}
これで、以下のとおり Discord にメッセージを送ることができました。
ただし、これを自分以外が見えるところに公開してしまうと、Webhook を送るキー情報が埋め込まれたものが他の人に見えてしまうという...
おわりに
今回、シンプルなメッセージングを試しましたが、下記の記事にあるような画像付きのものなど、リッチな見た目のメッセージングも Webhook で実現できるようです。
●DiscordにWebhookでいろいろ投稿する - Qiita
https://qiita.com/Eai/items/1165d08dce9f183eac74
追記
HTML+JavaScript で書いた内容全体も載せておきます。
<!DOCTYPE html>
<html lang="ja">
  <head>
    <meta charset="utf-8" />
    <title>Discord の Webhook を試す</title>
  </head>
  <body>
    <button onclick="send()">メッセージを送る</button>
    <script>
      const url = "【上記で設定した際の https://discordapp.com/api/webhooks/○○○ となるURL】";
      const message = { username: "test", content: "ブラウザからメッセージ送信" };

      function send() {
        postData(url, message)
          .then((data) => console.log(data))
          .catch((error) => console.error(error));

        function postData(url = ``, data = {}) {
          return fetch(url, {
            method: "POST",
            mode: "cors",
            headers: {
              "Content-type": "application/json",
            },
            body: JSON.stringify(data),
          }).then((response) => response.text());
        }
      }
    </script>
  </body>
</html>