以下の記事に出てくるお試しにも登場した、また、ブラウザで Google Meet や Zoom等を使った場合で画面共有をする時に使われる「MediaDevices.getDisplayMedia() / Screen Capture API」の話です。
●【概要編】1つのHTMLファイルに「カメラ映像・スライド・コメント表示」などの複数のものを同時に表示させてみる(3パターン) - Qiita
https://qiita.com/youtoy/items/e104921ad5caa99019ad
デモ
まずは、デモサイトで動作確認をします。
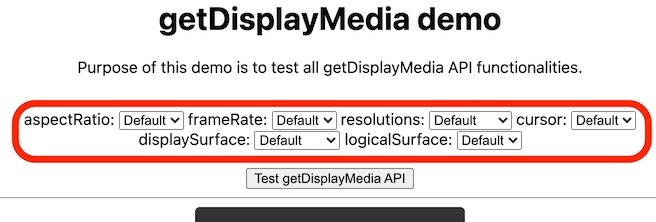
●getDisplayMedia demo
https://www.webrtc-experiment.com/getDisplayMedia/
とりあえず、「Test getDisplayMedia API」というボタンを押した後に、共有対象のウィンドウやタブを何か選んでみてください。
その共有操作を行った後にいったん、共有対象にしたウィンドウやタブにフォーカスがあたるかもしれません。
その共有が行われている状態で、上記のデモページに戻ってくると、共有対象として選んだウィンドウやタブの表示部分が、上記のデモページ内でも表示されます。
ブラウザの API で画面共有を実行。
— you (@youtoy) November 28, 2021
デモサイトで試した時の動作の様子。
●getDisplayMedia demo
https://t.co/pPIUD6735a pic.twitter.com/ErJ6gLw4EV
上のツイートに添付した画像は、この記事を書いていたタブを共有対象にしてみた様子で、画像の真ん中辺りに出ている枠で囲まれている部分が、キャプチャ&表示している部分です。
技術的な部分
上記のデモサイトのオプション
上記のデモサイトで、とりあえず共有を試しましたが、いくつかのオプションを選ぶこともできるようになっています。

アスペクト比・フレームレート・解像度・カーソル表示の有無などといった、いくつかの内容を指定できるようです。
この後のお試しでは、カーソル関連のオプションのみ利用してみます。
技術情報が掲載されたページを見てみる
次に、技術情報が掲載されたページをいくつか見てみようと思います。
以下は、W3C・MDN のサイトで「MediaDevices.getDisplayMedia() / Screen Capture API」が説明されているところです。
- Screen Capture
- MediaDevices.getDisplayMedia() - Web APIs | MDN
- Using the Screen Capture API - Web APIs | MDN
ソースコード(元にするもの)
上記 3つのリンクのうち、3つ目の中を見ていきます。
その中で「Examples ⇒ Simple screen capture」という部分があるので、それを活用して簡単な画面共有を試します。
いくつか、お試しのもとにする部分をピックアップします。
const videoElem = document.getElementById("video");
const logElem = document.getElementById("log");
const startElem = document.getElementById("start");
const stopElem = document.getElementById("stop");

// Options for getDisplayMedia()

var displayMediaOptions = {
  video: {
    cursor: "always"
  },
  audio: false
};

// Set event listeners for the start and stop buttons
startElem.addEventListener("click", function(evt) {
  startCapture();
}, false);

stopElem.addEventListener("click", function(evt) {
  stopCapture();
}, false);
async function startCapture() {
  logElem.innerHTML = "";

  try {
    videoElem.srcObject = await navigator.mediaDevices.getDisplayMedia(displayMediaOptions);
    dumpOptionsInfo();
  } catch(err) {
    console.error("Error: " + err);
  }
}
function stopCapture(evt) {
  let tracks = videoElem.srcObject.getTracks();

  tracks.forEach(track => track.stop());
  videoElem.srcObject = null;
}
<p>This example shows you the contents of the selected part of your display.
Click the Start Capture button to begin.</p>
<p><button id="start">Start Capture</button> <button id="stop">Stop Capture</button></p>
<video id="video" autoplay></video>
<br>
<strong>Log:</strong>
<br>
<pre id="log"></pre>
ソースコード(お試し用)
上記のログ出力まわりは削りつつ、最小限の部分を残して作ってみます。
具体的には、以下のようになりました。
<html>
<head>
<meta charset="UTF-8">
<title>test</title>
</head>
<body>
<p>This example shows you the contents of the selected part of your display.
Click the Start Capture button to begin.</p>
<p><button id="start">Start Capture</button> <button id="stop">Stop Capture</button></p>
<video id="video" autoplay></video>
<br>
</body>
<script>
const videoElem = document.getElementById("video");
const startElem = document.getElementById("start");
const stopElem = document.getElementById("stop");
// Options for getDisplayMedia()
var displayMediaOptions = {
video: {
cursor: "always"
},
audio: false
};
// Set event listeners for the start and stop buttons
startElem.addEventListener("click", function (evt) {
startCapture();
}, false);
stopElem.addEventListener("click", function (evt) {
stopCapture();
}, false);
async function startCapture() {
try {
videoElem.srcObject = await navigator.mediaDevices.getDisplayMedia(displayMediaOptions);
} catch (err) {
console.error("Error: " + err);
}
}
function stopCapture(evt) {
let tracks = videoElem.srcObject.getTracks();
tracks.forEach(track => track.stop());
videoElem.srcObject = null;
}
</script>
</html>
お試し版を実行してみる
上記のお試し用のプログラムを実行してみます。
以下のツイートの添付画像のとおり、他ウィンドウの内容を取得して表示することができました。
ブラウザでの画面共有でも使われる「MediaDevices.getDisplayMedia() / Screen Capture API」を使ったお試しプログラムを、自前でテスト実装して、動作確認している時の様子。
— you (@youtoy) November 28, 2021
別タブの Qiita の記事(このお試しについて書いている記事)を、画面内に取り込んで表示できています。 pic.twitter.com/tCHYPE25in
キャプチャ元の画面が、でかでかと表示されています。
このあたりは、うまく API のオプションや、表示側での工夫を入れることで、良い感じのサイズにする必要がありそうです。
【追記1】 良い感じの表示にする
上記で、「キャプチャしたウィンドウ・タブの表示が、表示側で大きく出すぎていたりする問題」は、 object-fit: contain; を使うことで、良い感じの表示にできました。
「object-fit: contain;」を使えば、良い感じになるのか! pic.twitter.com/vcJSg5R7Yn
— you (@youtoy) November 28, 2021
上記ツイートの内容は、元のお試し用のビデオタグの部分を以下のように変更したものです。
なお HTMLタグ内に追記をしていますが、CSS で指定しても大丈夫です。
変更前
<video id="video" autoplay></video>
変更後
<video id="video" autoplay width="640" height="480" style="object-fit: contain;"></video>
この対応は、「追記2」として書いた MDN のサンプルで CSS 内容をチェックしたあとに、以下のページで object-fit: contain; まわりの内容を確認しました。
●【CSS】object-fitはCSSだけで画像をコンテナーにフィットさせてトリミングもできるとっても素晴らしいプロパティー | WEBDESIGNDAY
https://webdesignday.jp/inspiration/technique/css/7976/
【追記2】
MDN のサンプル
MDN のページ内で、iframe を使って表示されていたデモページがあったのですが、以下の URL で直接アクセスできるようでした。
●Using the Screen Capture API - Simple_screen_capture - code sample
https://yari-demos.prod.mdn.mozit.cloud/en-US/docs/Web/API/Screen_Capture_API/Using_Screen_Capture/_sample_.Simple_screen_capture.html
【追記3】 p5.js との組み合わせ
p5.js を使ったプログラムで、今回の話を活用して、パワポのプレゼン画面を p5.js のキャンバスに取り込むということをやってみました。
#p5js と「MediaDevices.getDisplayMedia() / Screen Capture API」を使って、
— you (@youtoy) November 28, 2021
パワポのウィンドウ(発表者モード)でプレゼンしている画面を、p5.js のキャンバスに取り込んでみた!
パワポ部分は、PCの画面でも別アプリのウィンドウでもOKで、活用法を何か考えてみたいな。 pic.twitter.com/fh1XXU5ikU