以前も、以下のようにいくつか記事を書いている、Android Studio を使った Flutterアプリ開発の話です。
- Flutter を使った Androidアプリ開発など:TensorFlow形式から変換した LiteRT(TensorFlow Lite)のモデルを使った際のメモ - Qiita
- FVM で Windows上での Flutter の開発構築のメモ(+ Androidアプリの開発環境も) - Qiita
- Flutter・Androidアプリの開発環境を作った時のメモ(Mac) - Qiita
今回、サンプルとして出てくる内容に対して、少しずつ適当に手を加えてみてコード・挙動の変化を見てみました。
思いつきでの追加実装を、ChatGPT(o3-mini-high)も使いつつやっていきます。
実際に試していく
ベースとなるコード
ベースとなるサンプルは、以下のコードです。
import 'package:flutter/material.dart';

void main() {
  runApp(const MyApp());
}

class MyApp extends StatelessWidget {
  const MyApp({super.key});

  @override
  Widget build(BuildContext context) {
    return MaterialApp(
      title: 'Flutter Demo',
      theme: ThemeData(
        colorScheme: ColorScheme.fromSeed(seedColor: Colors.deepPurple),
        useMaterial3: true,
      ),
      home: const MyHomePage(title: 'Flutter Demo Home Page'),
    );
  }
}

class MyHomePage extends StatefulWidget {
  const MyHomePage({super.key, required this.title});

  final String title;

  @override
  State<MyHomePage> createState() => _MyHomePageState();
}

class _MyHomePageState extends State<MyHomePage> {
  int _counter = 0;

  void _incrementCounter() {
    setState(() {
      _counter++;
    });
  }

  @override
  Widget build(BuildContext context) {
    return Scaffold(
      appBar: AppBar(
        backgroundColor: Theme.of(context).colorScheme.inversePrimary,
        title: Text(widget.title),
      ),
      body: Center(
        child: Column(
          mainAxisAlignment: MainAxisAlignment.center,
          children: <Widget>[
            const Text(
              'You have pushed the button this many times:',
            ),
            Text(
              '$_counter',
              style: Theme.of(context).textTheme.headlineMedium,
            ),
          ],
        ),
      ),
      floatingActionButton: FloatingActionButton(
        onPressed: _incrementCounter,
        tooltip: 'Increment',
        child: const Icon(Icons.add),
      ),
    );
  }
}
以下のような動作をするものになります。
書き換え:1回目
書きかえの 1回目です。
とりあえず、UI のパーツと数字を減少させる機能を、それぞれ追加してみます。
プロンプト
元のコードを維持しつつ、少しだけ手を加えたコードを見てみたかったので「先ほどのコードに最小限の変更を加える形で実現して。」という文章をつけています(これが影響を及ぼしているかは未確認ですが)。
【プロンプト】
右下にある + ボタンの左隣に ー ボタンを追加して。
ー ボタンが押されると数字を1ずつ減らしてください。
ー ボタンは青系の色で。
先ほどのコードに最小限の変更を加える形で実現して。
出力されたコード
出力されたコードは以下のとおりです。
ビルドしてそのまま動くものが出てきていました。
import 'package:flutter/material.dart';

void main() {
  runApp(const MyApp());
}

class MyApp extends StatelessWidget {
  const MyApp({super.key});

  @override
  Widget build(BuildContext context) {
    return MaterialApp(
      title: 'Flutter Demo',
      theme: ThemeData(
        colorScheme: ColorScheme.fromSeed(seedColor: Colors.deepPurple),
        useMaterial3: true,
      ),
      home: const MyHomePage(title: 'Flutter Demo Home Page'),
    );
  }
}

class MyHomePage extends StatefulWidget {
  const MyHomePage({super.key, required this.title});

  final String title;

  @override
  State<MyHomePage> createState() => _MyHomePageState();
}

class _MyHomePageState extends State<MyHomePage> {
  int _counter = 0;

  // 既存のインクリメント処理
  void _incrementCounter() {
    setState(() {
      _counter++;
    });
  }

  // 新たに追加したデクリメント処理
  void _decrementCounter() {
    setState(() {
      _counter--;
    });
  }

  @override
  Widget build(BuildContext context) {
    return Scaffold(
      appBar: AppBar(
        backgroundColor: Theme.of(context).colorScheme.inversePrimary,
        title: Text(widget.title),
      ),
      body: Center(
        child: Column(
          mainAxisAlignment: MainAxisAlignment.center,
          children: <Widget>[
            const Text(
              'You have pushed the button this many times:',
            ),
            Text(
              '$_counter',
              style: Theme.of(context).textTheme.headlineMedium,
            ),
          ],
        ),
      ),
      // floatingActionButton を Row に変更して、左右にボタンを配置
      floatingActionButton: Row(
        mainAxisSize: MainAxisSize.min,
        children: [
          FloatingActionButton(
            onPressed: _decrementCounter,
            tooltip: 'Decrement',
            backgroundColor: Colors.blue, // 青系の色指定
            child: const Icon(Icons.remove),
          ),
          const SizedBox(width: 8),
          FloatingActionButton(
            onPressed: _incrementCounter,
            tooltip: 'Increment',
            child: const Icon(Icons.add),
          ),
        ],
      ),
    );
  }
}
主に、以下のコメントが挿入されているあたりに、コードが追加されているのが分かります。
- 新たに追加したデクリメント処理
- floatingActionButton を Row に変更して、左右にボタンを配置
得られた結果
アプリの画面のスクリーンショットを掲載してみます。
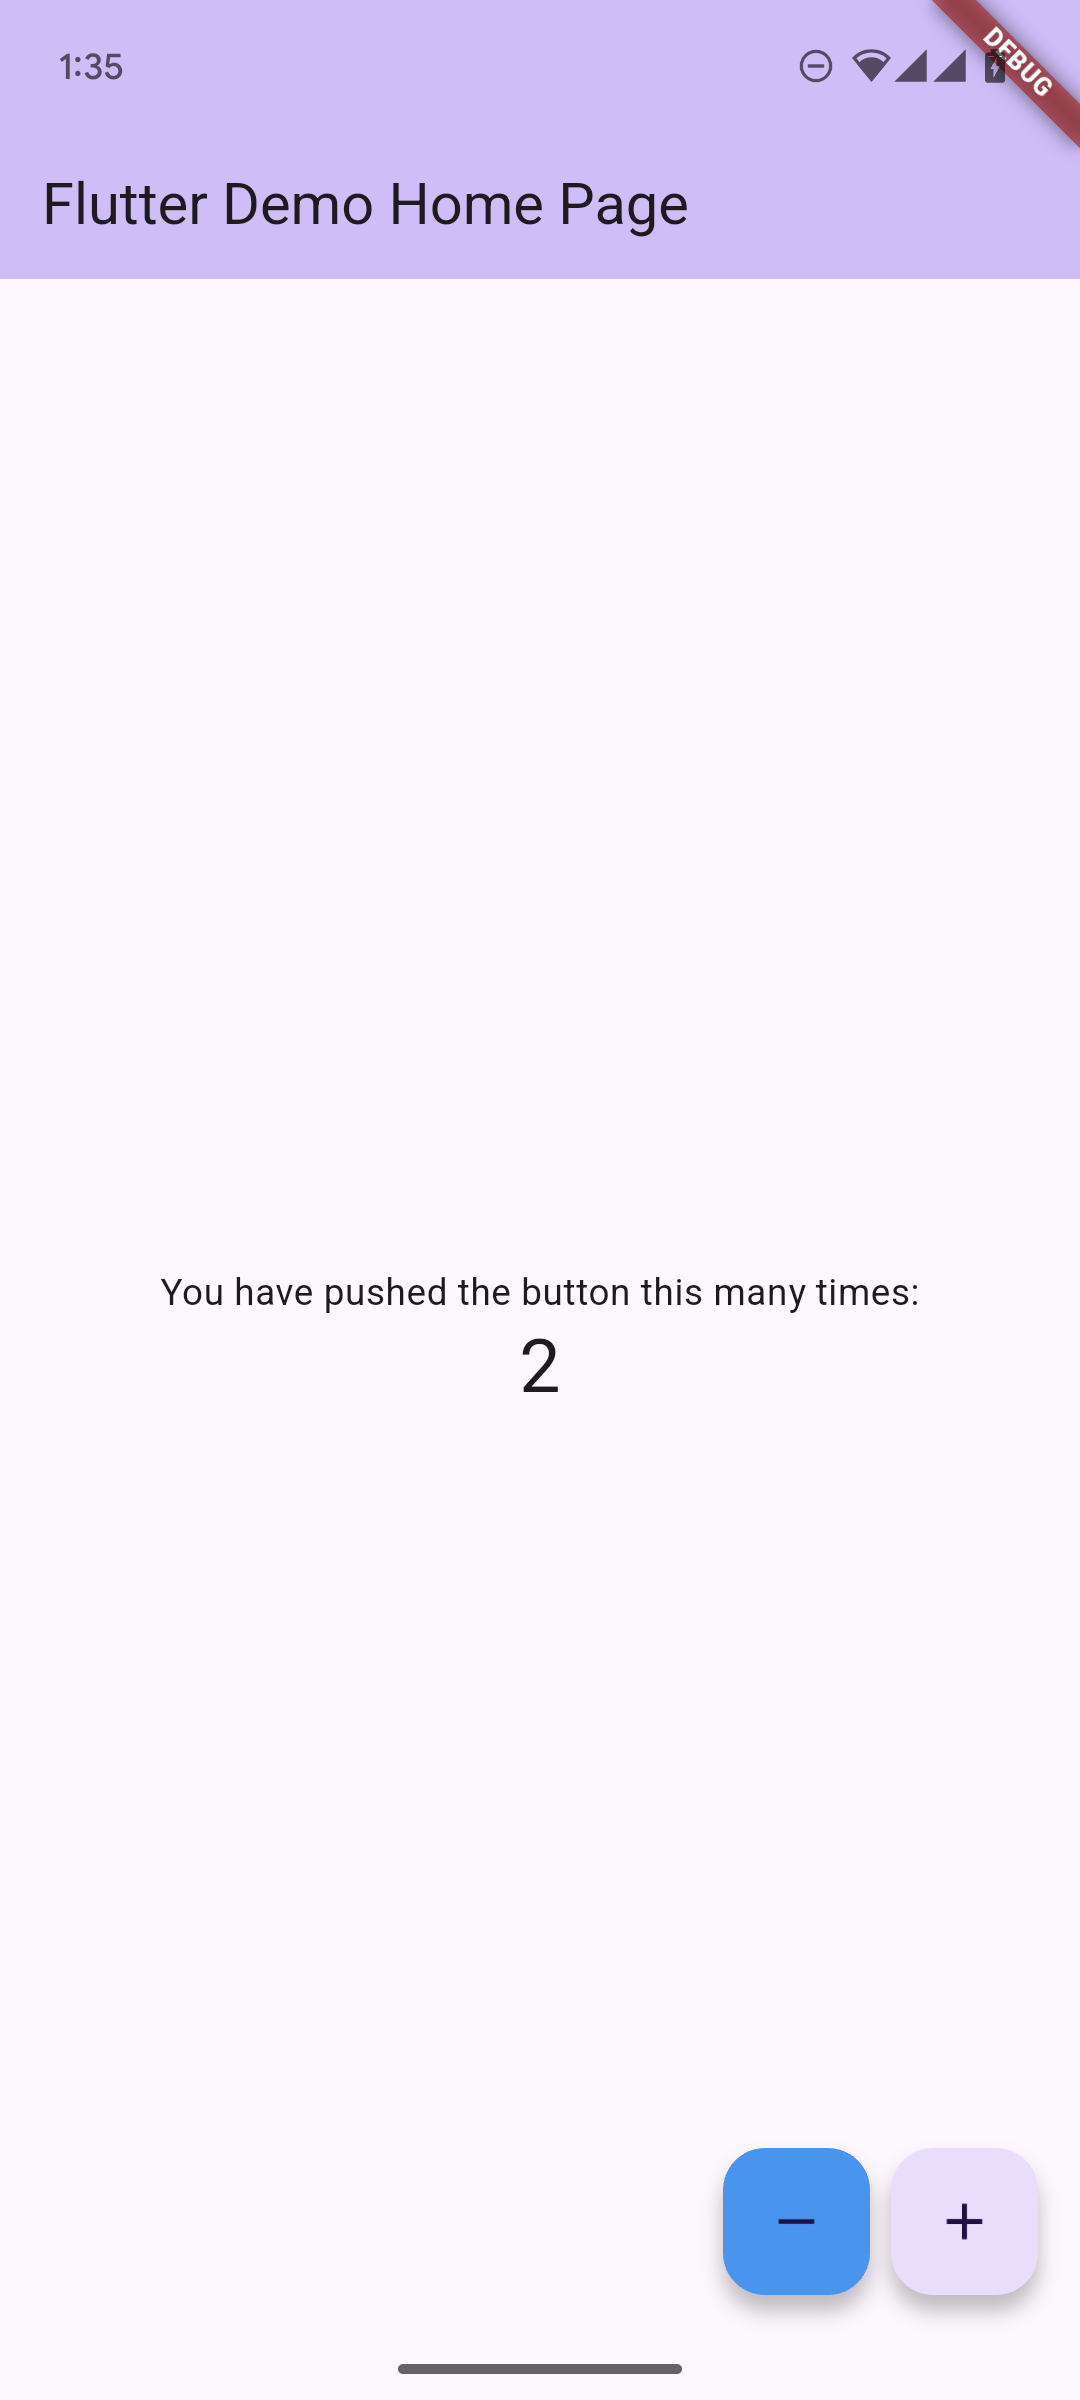
コードで少し気になる部分はあるものの、機能的には意図通りの実装が行われました。
書き換え:2回目
次に、UIパーツの表示位置を変えてみたり、テキストを表示する部分を追加してみます。
プロンプト
プロンプトは以下のとおりです。
【プロンプト】
中央にある固定のテキストと数字の表示を、センタリングは維持したまま、縦方向は上から1/3くらいの位置になるようにして。
また、下から1/3くらいの場所に、直近で押されたボタンが「インクリメント」「デクリメント」のどちらかを表示する動的なテキストを表示させて。
先ほどのコードに最小限の変更を加える形で実現して。
出力されたコード
出力されたコードは以下のとおりで、そのまま動作するものが出力されました。
import 'package:flutter/material.dart';

void main() {
  runApp(const MyApp());
}

class MyApp extends StatelessWidget {
  const MyApp({super.key});

  @override
  Widget build(BuildContext context) {
    return MaterialApp(
      title: 'Flutter Demo',
      theme: ThemeData(
        colorScheme: ColorScheme.fromSeed(seedColor: Colors.deepPurple),
        useMaterial3: true,
      ),
      home: const MyHomePage(title: 'Flutter Demo Home Page'),
    );
  }
}

class MyHomePage extends StatefulWidget {
  const MyHomePage({super.key, required this.title});

  final String title;

  @override
  State<MyHomePage> createState() => _MyHomePageState();
}

class _MyHomePageState extends State<MyHomePage> {
  int _counter = 0;
  String _lastAction = ''; // 直近の動作を記憶するための状態変数

  void _incrementCounter() {
    setState(() {
      _counter++;
      _lastAction = 'インクリメント';
    });
  }

  void _decrementCounter() {
    setState(() {
      _counter--;
      _lastAction = 'デクリメント';
    });
  }

  @override
  Widget build(BuildContext context) {
    return Scaffold(
      appBar: AppBar(
        backgroundColor: Theme.of(context).colorScheme.inversePrimary,
        title: Text(widget.title),
      ),
      // Stack を使い、固定テキスト&カウンター、動的テキストを別々に配置
      body: Stack(
        children: [
          // 上部1/3程度に固定テキストとカウンター表示を配置
          Align(
            alignment: const Alignment(0, -0.33),
            child: Column(
              mainAxisSize: MainAxisSize.min,
              children: <Widget>[
                const Text('You have pushed the button this many times:'),
                Text(
                  '$_counter',
                  style: Theme.of(context).textTheme.headlineMedium,
                ),
              ],
            ),
          ),
          // 下部1/3程度に直近で押されたボタンの動的テキストを配置
          Align(
            alignment: const Alignment(0, 0.33),
            child: Text(
              _lastAction,
              style: Theme.of(context).textTheme.headlineSmall,
            ),
          ),
        ],
      ),
      // 以前追加したフローティングアクションボタン(-ボタンは青色)
      floatingActionButton: Row(
        mainAxisSize: MainAxisSize.min,
        children: [
          FloatingActionButton(
            onPressed: _decrementCounter,
            tooltip: 'Decrement',
            backgroundColor: Colors.blue,
            child: const Icon(Icons.remove),
          ),
          const SizedBox(width: 8),
          FloatingActionButton(
            onPressed: _incrementCounter,
            tooltip: 'Increment',
            child: const Icon(Icons.add),
          ),
        ],
      ),
    );
  }
}
追加された箇所などは、今回もコメントをもとに確認できました。
得られた結果
アプリの画面のスクリーンショットを掲載してみます。

これも、機能的には意図通りのものになりました。
書き換え:3回目
次は、パッケージを追加して機能を足してみます。
利用するパッケージは、以前見かけて気になった以下の記事を見て、適当に 1つ選んでみました。
●mixi2ライセンスページから学ぶ、便利なFlutterパッケージ【120over】 - くらげになりたい。
https://www.memory-lovers.blog/entry/2024/12/19/085505
インテントで別アプリの機能を呼び出すというものが、挙動として分かりやすそうです。
具体的には、以下を使う処理になります。
●android_intent_plus | Flutter package
https://pub.dev/packages/android_intent_plus

プロンプト
そこで、画面左下にボタンの追加と、android_intent_plus を使ったカメラアプリの起動追加してもらうことにします。
プロンプトは以下としました。
【プロンプト】
画面左下にボタンを1つ追加して。
そのボタンが押された時は、android_intent_plus を使ったカメラアプリの起動を行って。
先ほどのコードに最小限の変更を加える形で実現して。
出力されたコード
出力されたコードは以下のとおりです。
今回は、パッケージ追加を行っていないので、以下をそのままビルドしても動きません。
import 'package:flutter/material.dart';
import 'package:android_intent_plus/android_intent.dart'; // 追加

void main() {
  runApp(const MyApp());
}

class MyApp extends StatelessWidget {
  const MyApp({super.key});

  @override
  Widget build(BuildContext context) {
    return MaterialApp(
      title: 'Flutter Demo',
      theme: ThemeData(
        colorScheme: ColorScheme.fromSeed(seedColor: Colors.deepPurple),
        useMaterial3: true,
      ),
      home: const MyHomePage(title: 'Flutter Demo Home Page'),
    );
  }
}

class MyHomePage extends StatefulWidget {
  const MyHomePage({super.key, required this.title});

  final String title;

  @override
  State<MyHomePage> createState() => _MyHomePageState();
}

class _MyHomePageState extends State<MyHomePage> {
  int _counter = 0;
  String _lastAction = ''; // 直近の動作を記憶するための状態変数

  void _incrementCounter() {
    setState(() {
      _counter++;
      _lastAction = 'インクリメント';
    });
  }

  void _decrementCounter() {
    setState(() {
      _counter--;
      _lastAction = 'デクリメント';
    });
  }

  // 追加: カメラアプリ起動用のメソッド
  void _launchCamera() async {
    final AndroidIntent intent = AndroidIntent(
      action: 'android.media.action.IMAGE_CAPTURE',
    );
    await intent.launch();
  }

  @override
  Widget build(BuildContext context) {
    return Scaffold(
      appBar: AppBar(
        backgroundColor: Theme.of(context).colorScheme.inversePrimary,
        title: Text(widget.title),
      ),
      // Stack によるレイアウトに、左下配置のボタンを追加
      body: Stack(
        children: [
          Align(
            alignment: const Alignment(0, -0.33),
            child: Column(
              mainAxisSize: MainAxisSize.min,
              children: <Widget>[
                const Text('You have pushed the button this many times:'),
                Text(
                  '$_counter',
                  style: Theme.of(context).textTheme.headlineMedium,
                ),
              ],
            ),
          ),
          Align(
            alignment: const Alignment(0, 0.33),
            child: Text(
              _lastAction,
              style: Theme.of(context).textTheme.headlineSmall,
            ),
          ),
          // 追加: 画面左下にカメラ起動用のボタンを配置
          Align(
            alignment: Alignment.bottomLeft,
            child: Padding(
              padding: const EdgeInsets.all(16.0),
              child: FloatingActionButton(
                onPressed: _launchCamera,
                tooltip: 'Launch Camera',
                child: const Icon(Icons.camera_alt),
              ),
            ),
          ),
        ],
      ),
      // 既存の右下に配置したフローティングアクションボタン(インクリメント・デクリメント)
      floatingActionButton: Row(
        mainAxisSize: MainAxisSize.min,
        children: [
          FloatingActionButton(
            onPressed: _decrementCounter,
            tooltip: 'Decrement',
            backgroundColor: Colors.blue,
            child: const Icon(Icons.remove),
          ),
          const SizedBox(width: 8),
          FloatingActionButton(
            onPressed: _incrementCounter,
            tooltip: 'Increment',
            child: const Icon(Icons.add),
          ),
        ],
      ),
    );
  }
}
今回も、処理が追加された部分は、コメントを見ればすぐに見つけられそうです。
インテントの処理では action: 'android.media.action.IMAGE_CAPTURE' が使われていました。
Android の開発者ガイドのページで言うと、以下に該当する機能が使われているかと思います。

パッケージの追加
現状は、パッケージの追加を行っていないので、ビルドをすると当然エラーが出ます。

パッケージ追加は前に行ったことがあるので、今回は手動ですませてしまいます。
以下のページの「Installing」を選ぶと、コマンドを使ったパッケージの追加方法などが表示されます。
●android_intent_plus | Flutter package
https://pub.dev/packages/android_intent_plus

Android Studio の左下メニューの以下を選び、上記に書かれたコマンドを入力します。

自分は FVM を使って環境を作っているので(そしてエイリアスの設定などは行っていないので)、 fvm flutter pub add android_intent_plus というコマンドを実行する形になります。
コマンド実行後、処理が終わった後に以下の「pubspec.yaml」を見ると、 android_intent_plus: ^5.3.0 という行が追加されてました。

dependencies:
  flutter:
    sdk: flutter

  ...
  android_intent_plus: ^5.3.0
ビルドエラーと対処
それでは、あらためてビルドしてみます。
しかしエラーが出て、その後に以下のメッセージが表示された状態になりました。

どうやら、AGP のバージョンに絡むエラーのようです。
メッセージの下の方にある 2つのリンクを開き、ざっと内容も見てみました。
●Android Gradle Plugin failed with JavaVersion.VERSION_11 and OpenJDK 21 ea [294137077] - Issue Tracker
https://issuetracker.google.com/issues/294137077?pli=1
●Android plugins: Failed to transform core-for-system-modules.jar to match attributes errors with JDK 21 · Issue #156304 · flutter/flutter
https://github.com/flutter/flutter/issues/156304
とりあえず解決策の 1つは、自分の環境だと android/settings.gradle を変えてやる方法があるようでした。
以下の id "com.android.application" version "8.1.0" apply false という部分の "8.1.0" を "8.2.1" にするだけです。

動作確認
その後、再ビルドしたところ、無事に実機で動作させられました。
おわりに
とりあえず、適当な UI・機能の追加を試しつつ、どんなコードが追加されるかを見てみました。
毎回、変更内容がシンプルで小規模だったので、そのまま動作するコードが出力された形でした。