この記事は、toio Advent Calendar 2020 の 13日目の記事です。
(カレンダー登録日より投稿は1日早くなった)
記事の内容は、一昨日に書いた記事でも使った toio のモーションセンサーと Web Bluetooth API に関するものです。モーションセンサーについて、一昨日の記事はシェイク検出使ってみてましたが、今回の記事で使ったものは姿勢検出です。
toio を手持ちで使うコントローラーみたいに使うような仕組みを作れないかと思い、2台の姿勢を一定の時間間隔で検知しつつ、特定の姿勢の組み合わせになっている時に特定の処理をする(今回は、Webページ上に表示された絵文字を変える)ということをやってみます。
実際にそれが動作している様子は以下となります。
#toio の姿勢検出の情報を Web Bluetooth API を使ってブラウザで受け取って、ブラウザ上に表示させた絵文字を変化させてみた。
— you (@youtoy) December 12, 2020
2台ある toio の姿勢の組み合わせによって変わるようにしています。 pic.twitter.com/Ztlo2ChuUn
使った仕組み・技術
toio の姿勢検出
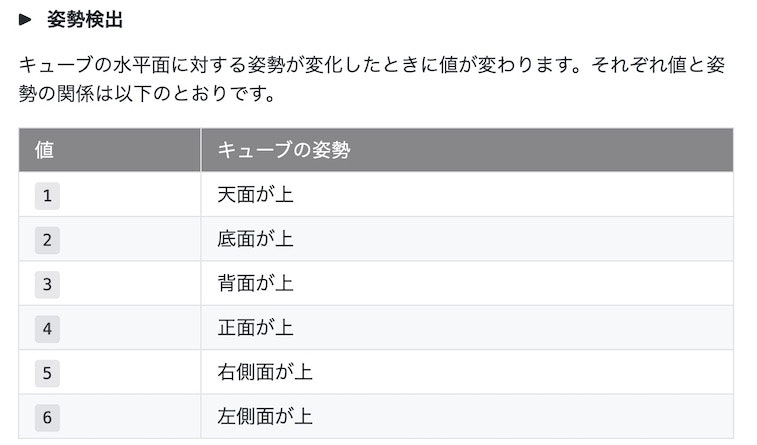
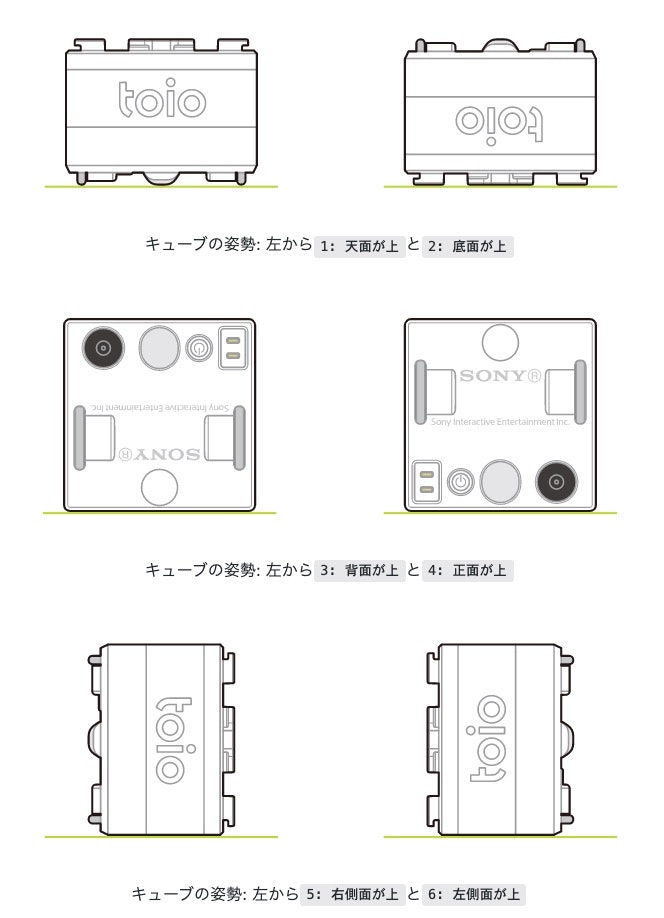
今回、toio 側で利用した機能は、モーションセンサーの「姿勢検出」です。
前に軽く試してみたことはあったのですが、今回はこの姿勢検出を 2台でやってみようと思います。
Web Bluetooth API
こちらは一昨日の記事や、それ以前に書いた記事でも書いているので、それらをご参照ください。
toio の姿勢検出を試す
情報取得を試す
それでは、まずは 1台分の toio の姿勢検出の情報を取得してみます。
モーションセンサーの各種情報を取得する処理については、以前書いた「toio を Web Bluetooth API で制御(「通知・読み出し・書き込み」を行う)」という記事の「通知の ON/OFF」という部分や、一昨日のシェイク検出を扱った記事内で使ったものをベースにします。
とりあえず、姿勢検出の情報を取得して、単純にログとして表示してみようと思います。「toio を Web Bluetooth API で制御(「通知・読み出し・書き込み」を行う)」という記事のほうで以下のようにしていた部分を書きかえて、姿勢検出の情報をログとして表示していきます。
function handleNotifications(event) {
  let value = event.target.value;
  let a = [];
  for (let i = 0; i < value.byteLength; i++) {
    a.push('0x' + ('00' + value.getUint8(i).toString(16)).slice(-2));
  }
  console.log('> ' + a.join(' '));
}
toio の姿勢検出の仕様を見ると、こんな感じです。
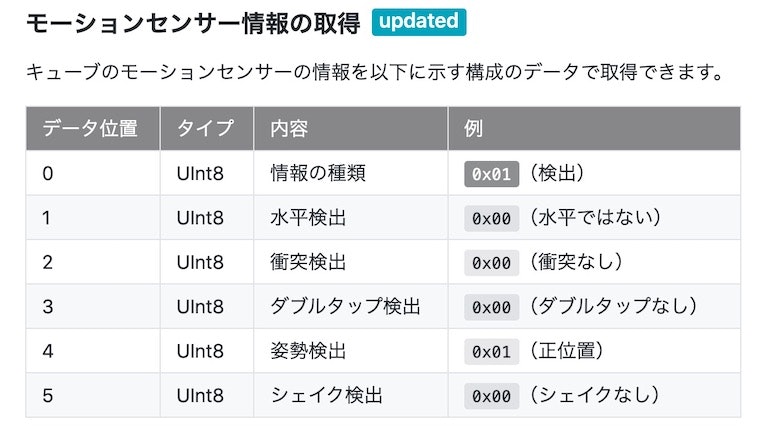
6バイトで構成されるデータの中で、5バイト目を見てやれば良さそうです。
出力部分を以下のようにして、仕様通りの値がとれるのを確認できました。
function handleNotifications(event) {
  let value = event.target.value;
  const posture = value.getUint8(4);

  console.log('姿勢: '+posture);
}
2台分取得して組み合わせる
さらに以下のような構成・処理となるように、プログラムを書きかえてみました。
- Webページ上
- toio の姿勢によって表示が変わる絵文字の表示部分
- toio 2台分の接続処理ボタンと定期的にセンサーの情報を読み出す処理の On/Offボタン
- JavaScript の処理
- toio との接続を行う処理(2台の toio を扱える形に)
- toio からセンサー情報の通知を自動で受けとる処理
- toio からセンサー情報を一定間隔で能動的に読み出す処理
- 能動的な読み出しで toio の姿勢が特定の組み合わせだった時に絵文字の表示を変える処理
ソースコードは以下の通りです。
<!DOCTYPE html>
<html>
  <head>
    <meta charset="utf-8" />
    <meta name="viewport" content="width=device-width, initial-scale=1" />
    <title>Web Bluetooth API による姿勢検出</title>
    <link
      rel="stylesheet"
      href="https://cdn.jsdelivr.net/npm/bulma@0.9.1/css/bulma.css"
    />
  </head>
  <body>
    <section class="section">
      <div class="container">
        <h1 class="title">グラフと操作用ボタン</h1>
        <p id="show_info" style="font-size: 3rem">🙂</p>
        <div class="buttons" style="margin-top: 1.5rem">
          <button class="button is-success is-light"
            type="button" id="connect01">1つ目: 接続+通知ON</button>
          <button class="button is-success is-light"
            type="button" id="connect02">2つ目: 接続+通知ON</button>
        </div>
        <div class="buttons">
          <button class="button is-info is-light" type="button" id="timer_on">
            読み出し開始
          </button>
          <button class="button is-light" type="button" id="timer_off">
            読み出し停止
          </button>
        </div>
      </div>
    </section>

    <script>
      const showInformation = document.getElementById("show_info");

      const TOIO_SERVICE_UUID = "10b20100-5b3b-4571-9508-cf3efcd7bbae";
      const MOTION_CHARACTERISTIC_UUID = "10b20106-5b3b-4571-9508-cf3efcd7bbae";

      let myCharacteristic;
      let readTimer;

      const button01 = document.getElementById("connect01");
      const button02 = document.getElementById("connect02");
      button01.addEventListener("click", function () {onStartButtonClick(cube1);}, false);
      button02.addEventListener("click", function () {onStartButtonClick(cube2);}, false);
      const timer_on = document.getElementById("timer_on");
      timer_on.addEventListener("click", function () {startTimer();}, false);
      const timer_off = document.getElementById("timer_off");
      timer_off.addEventListener("click", clearTimer, false);

      const cube1 = {
        deviceCube: undefined,
        idSensorChar: undefined,
      };
      const cube2 = {
        deviceCube: undefined,
        idSensorChar: undefined,
      };

      async function onStartButtonClick(cube) {
        let serviceUuid = TOIO_SERVICE_UUID;
        let characteristicUuid = MOTION_CHARACTERISTIC_UUID;

        try {
          console.log("Requesting Bluetooth Device...");
          cube.deviceCube = await navigator.bluetooth.requestDevice({
            filters: [{ services: [serviceUuid] }],
          });
          cube.deviceCube.addEventListener(
            "gattserverdisconnected",
            clearTimer
          );
          console.log("Connecting to GATT Server...");
          const server = await cube.deviceCube.gatt.connect();
          console.log("Getting Service...");
          const service = await server.getPrimaryService(serviceUuid);

          cube.idSensorChar = await service.getCharacteristic(
            characteristicUuid
          );
          await cube.idSensorChar.startNotifications();
          console.log("> Notifications started");
          cube.idSensorChar.addEventListener(
            "characteristicvaluechanged",
            handleNotifications
          );
        } catch (error) {
          console.log("Argh! " + error);
        }
      }

      function handleNotifications(event) {
        let value = event.target.value;

        const posture = value.getUint8(4);
        console.log("姿勢: " + posture);
      }

      function startTimer() {
        let posture01, posture02;

        console.log("定期的な読み出しを開始");
        readTimer = setInterval(async function () {
          if (cube1.idSensorChar && cube2.idSensorChar) {
            try {
              console.log("Reading ...");

              await cube1.idSensorChar.readValue().then((value) => {
                posture01 = value.getUint8(4);
              });
              await cube2.idSensorChar.readValue().then((value) => {
                posture02 = value.getUint8(4);
              });

              if (posture01 === 4 && posture02 === 4) {
                showInformation.innerHTML = "✨";
              } else if (posture01 === 1 && posture02 === 4) {
                showInformation.innerHTML = "🙌";
              } else if (posture01 === 4 && posture02 === 1) {
                showInformation.innerHTML = "👏";
              } else {
                showInformation.innerHTML = "🙂";
              }
            } catch (error) {
              console.log("Argh! " + error);
            }
          } else {
            console.log("Can't find two cubes");
          }
        }, 500);
      }

      function clearTimer() {
        console.log(">Stop Timer");
        if (readTimer) {
          clearInterval(readTimer);
        }
      }
    </script>
  </body>
</html>
そして、冒頭にも掲載していましたが、実際に動作させた際の様子は以下の通りです。
#toio の姿勢検出の情報を Web Bluetooth API を使ってブラウザで受け取って、ブラウザ上に表示させた絵文字を変化させてみた。
— you (@youtoy) December 12, 2020
2台ある toio の姿勢の組み合わせによって変わるようにしています。 pic.twitter.com/Ztlo2ChuUn
まとめ
今回、toio を手持ちで使うコントローラーみたいに使うような仕組みを作れないかと思い、toio 2台の姿勢が変わったことを検出して、特定の条件の場合に決められた処理を行うようなことを試しました。
今回、toio の姿勢に連動して変わる処理内容は、とりあえず絵文字表示を変えるというものにしましたが、光・音を使ったものにしてみたり、例えばゲーム的なものにしてみたりなど、あれこれ応用を考えていければと思います。
また、姿勢検出だけでなくシェイク検出も使ってみたり、それらモーションセンサーの仕組みだけでなく例えば読み取りセンサー(+専用マット)を組み合わせてみたり、そういったものを3・4台使った構成を考えてみて等ということも、何らかやっていければと思います。