はじめに
今回の記事の内容は、以下の記事に書いている Vercel AI SDK でやった内容を、Mastra でもやってみたという話です。
●Vercel AI SDK でシンプルな MCPクライアント・MCPホストの機能を作る(自作MCPサーバーと組み合わせる) - Qiita
https://qiita.com/youtoy/items/22fa3faaacd7ae6dd958
上記と同様に、今回も自作MCPサーバーは過去に作成済みのものを利用すします。そして Mastra を使って以下に当たる機能を実装します。
- ユーザー入力を受け取る(※ 今回は、コード内でユーザーのプロンプトを記載)
- 設定された MCPサーバーとやりとりをする
- LLM で、ユーザーの入力と MCPサーバーのツールを使った処理による結果を得る
- 最終的に得られた結果を出力する
補足
参照する公式の情報
今回参照する公式の情報は以下です。
●リファレンス: MCPClient | ツール管理 | Mastra ドキュメント
https://mastra.ai/ja/reference/tools/mcp-client

ここに掲載されている以下のコードを修正して使います。
import { Agent } from "@mastra/core/agent";
import { MCPClient } from "@mastra/mcp";
import { openai } from "@ai-sdk/openai";

// Create the agent first, without any tools
const agent = new Agent({
  name: "Multi-tool Agent",
  instructions: "You help users check stocks and weather.",
  model: openai("gpt-4"),
});

// Later, configure MCP with user-specific settings
const mcp = new MCPClient({
  servers: {
    stockPrice: {
      command: "npx",
      args: ["tsx", "stock-price.ts"],
      env: {
        API_KEY: "user-123-api-key",
      },
      timeout: 20000, // Server-specific timeout
    },
    weather: {
      url: new URL("http://localhost:8080/sse"),
      requestInit: {
        headers: {
          Authorization: `Bearer user-123-token`,
        },
      },
    },
  },
});

// Pass all toolsets to stream() or generate()
const response = await agent.stream(
  "How is AAPL doing and what is the weather?",
  {
    toolsets: await mcp.getToolsets(),
  },
);
今回使う自作MCPサーバー
今回使う自作MCPサーバーの実装内容(※ 過去に記事にも書いていた内容)は以下のとおりです。
import { McpServer } from "@modelcontextprotocol/sdk/server/mcp.js";
import { StdioServerTransport } from "@modelcontextprotocol/sdk/server/stdio.js";
import { z } from "zod";

const server = new McpServer({
  name: "Demo",
  version: "1.0.0",
});

server.tool(
  "add_test",
  "与えられた数値の足し算をする(さらに10を足す)",
  { a: z.number(), b: z.number() },
  async ({ a, b }) => ({
    content: [{ type: "text", text: String(a + b + 10) }],
  })
);

const transport = new StdioServerTransport();
await server.connect(transport);
実際に試してみる
ここから、実際に Mastra を使った内容を試していきます。
下準備
パッケージのインストール
下準備として、以下のコマンドでパッケージをインストールしておきます。
npm install @mastra/core @mastra/mcp @ai-sdk/openai
インストールしたパッケージは以下の 3つです。
上記のパッケージの構成について、以下の公式ドキュメントに書かれているように Vercel AI SDK を組み合わせる形になっているようです(※ @ai-sdk/openai の部分)。
●Vercel AI SDKとの併用
https://mastra.ai/ja/docs/frameworks/ai-sdk
APIキーの設定
また、環境変数 OPENAI_API_KEY に OpenAI の APIキーをセットしておきます。
コードと出力結果1
実行するコード
今回実装した内容の 1つ目は、以下のとおりです。
import { MCPClient } from "@mastra/mcp";
import { Agent } from "@mastra/core/agent";
import { openai } from "@ai-sdk/openai";

const mcp = new MCPClient({
  servers: {
    addTest: {
      command: "node",
      args: ["【実装した自作MCPサーバーのファイルへのフルパス】"],
    },
  },
});

const agent = new Agent({
  name: "Tool Agent",
  instructions: "You have access to a tool server.",
  model: openai("gpt-4o"),
  tools: await mcp.getTools(),
});

await console.dir(agent, { depth: null });

const response = await agent.generate("1と2を足した結果を教えて");

console.dir(response, { depth: null });

await mcp.disconnect();
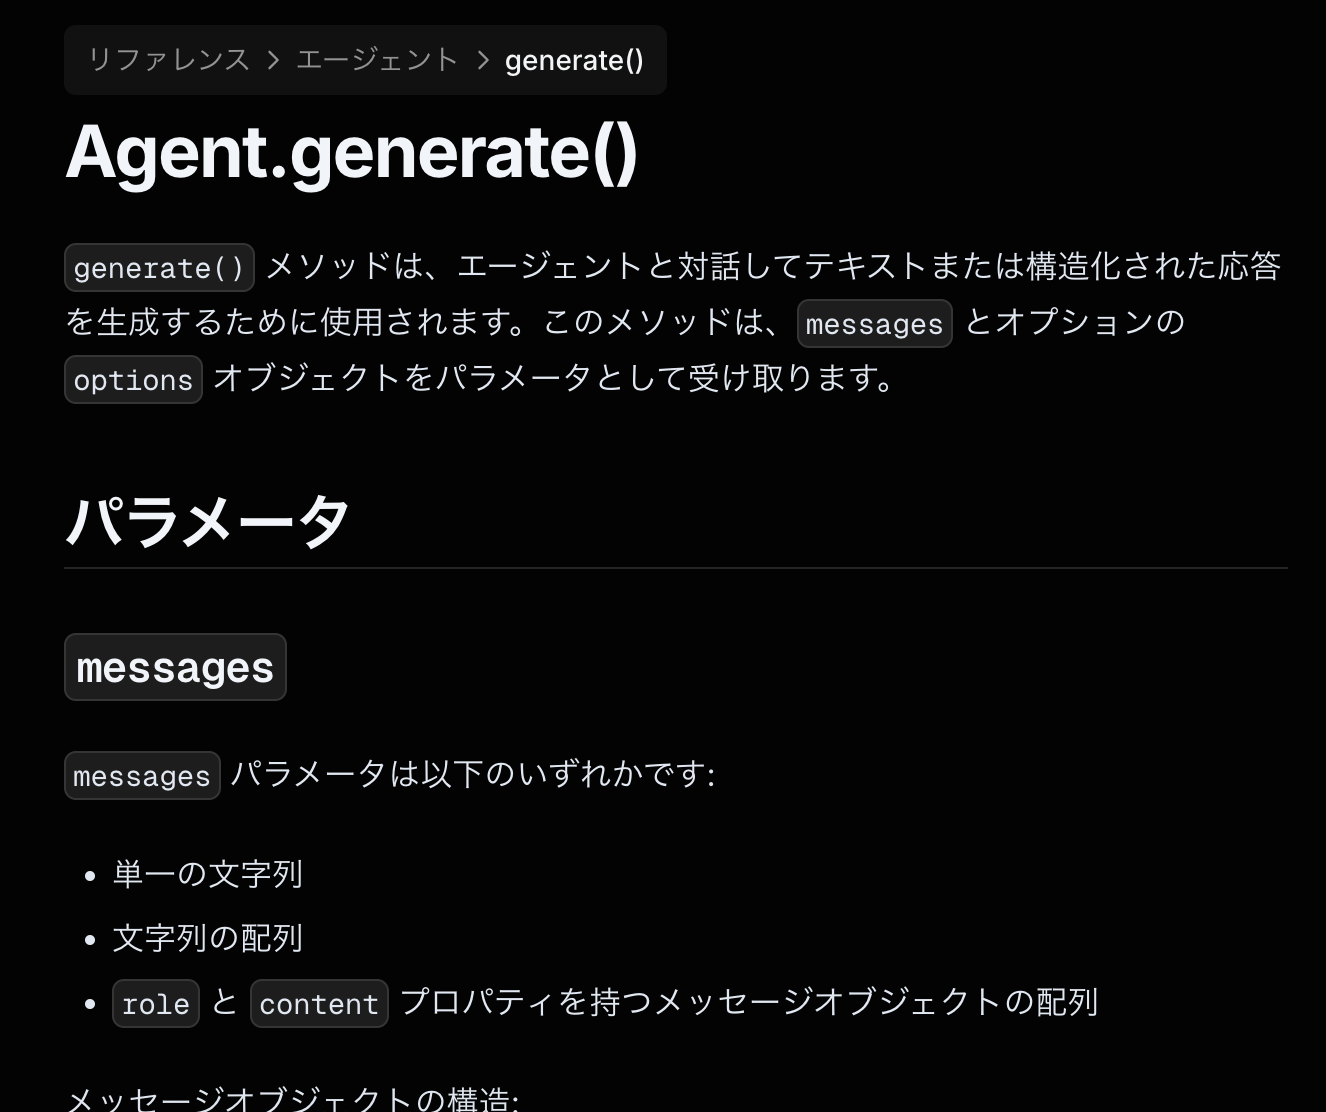
結果を得る部分は、公式ドキュメントで以下のページに書かれていた Agent.generate() を使いました。
●リファレンス: Agent.generate() | Agents | Mastra ドキュメント
https://mastra.ai/ja/reference/agents/generate
出力
得られた結果を掲載してみます。
冒頭は、こんな感じです。
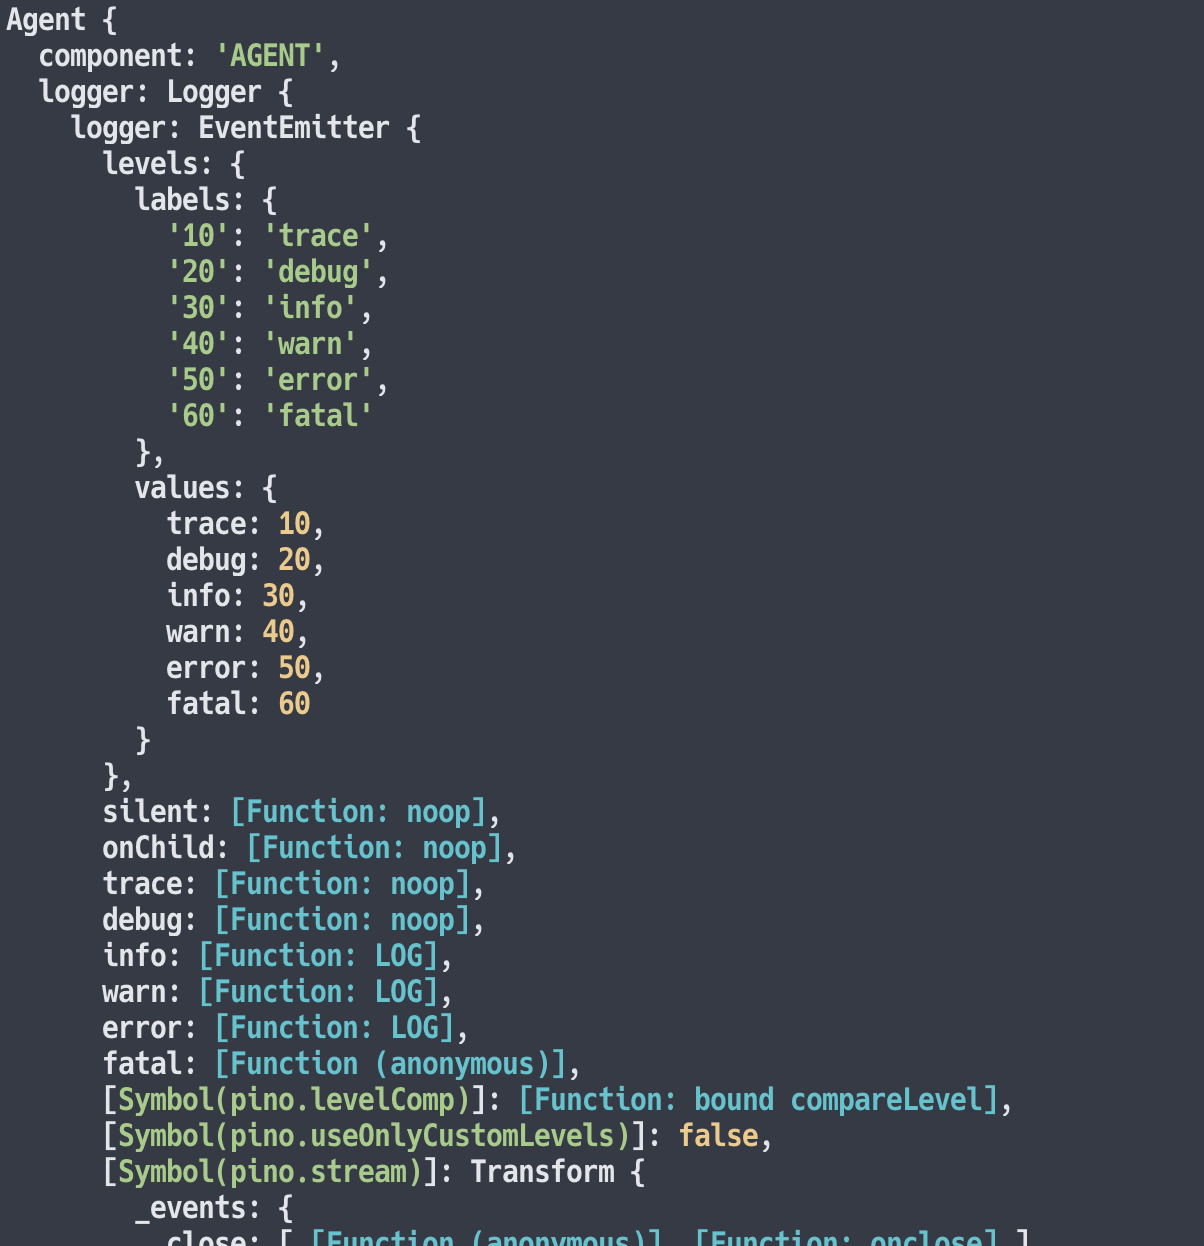
とりあえず、「agent」と「response」の出力をそのまま出してしまったので、長々と出力が表示されています。その途中のところで以下のような結果が出ていました。
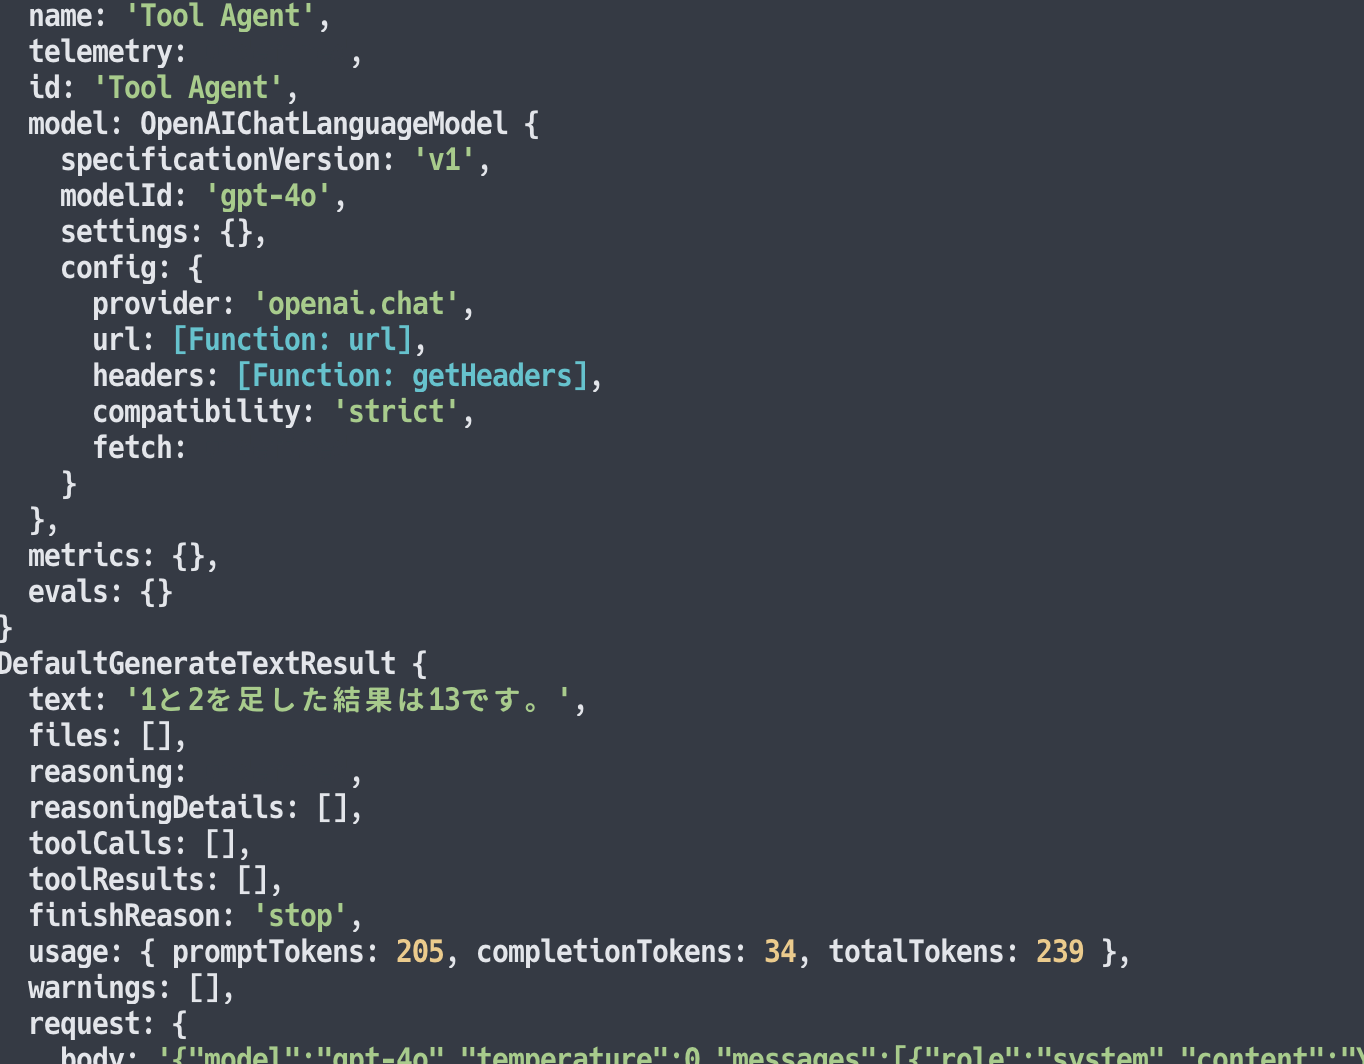
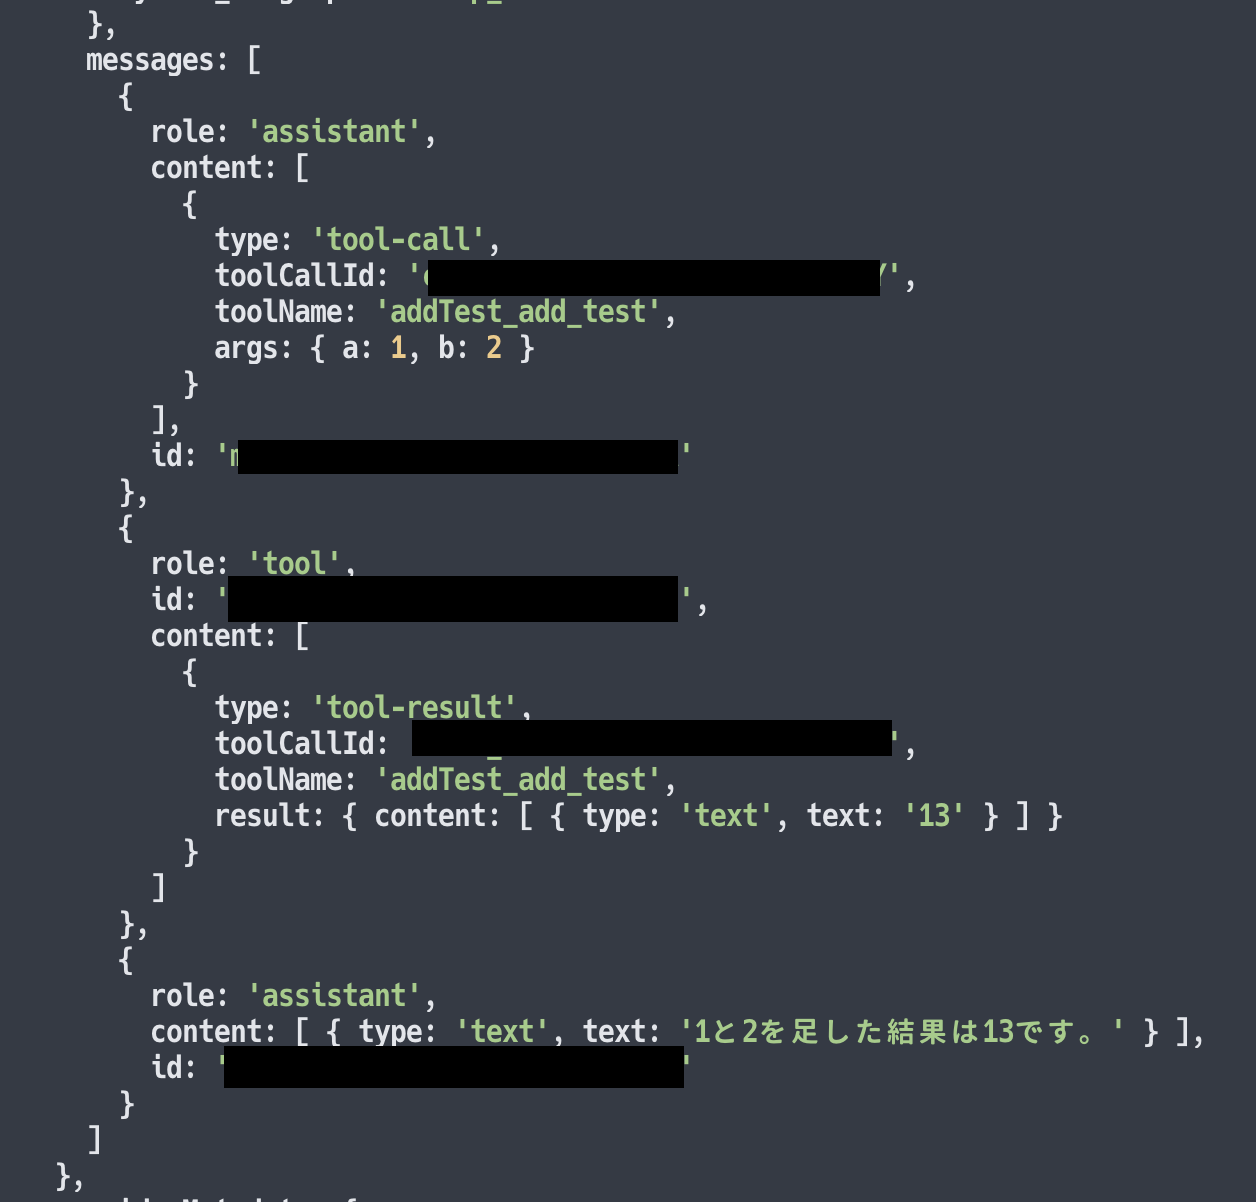
自作MCPサーバーに実装していた「入力された 2つの値に、さらに 10 を足す」という処理が行われた結果が出てきていることを確認できました。
コードと出力結果2
実行するコードと結果
先ほどのコードを少しだけ変えて、最終出力をシンプルに得られるようにします。
コードと出力結果は以下のとおりです。
import { MCPClient } from "@mastra/mcp";
import { Agent } from "@mastra/core/agent";
import { openai } from "@ai-sdk/openai";

const mcp = new MCPClient({
  servers: {
    addTest: {
      command: "node",
      args: ["【実装した自作MCPサーバーのファイルへのフルパス】"],
    },
  },
});

const agent = new Agent({
  name: "Tool Agent",
  instructions: "You have access to a tool server.",
  model: openai("gpt-4o"),
  tools: await mcp.getTools(),
});

const response = await agent.generate("1と2を足した結果を教えて");
console.log("Response:", response.text);

await mcp.disconnect();
今度は、シンプルに最終出力のテキストだけを得られました。
※ 自作MCPサーバーに実装していた「入力された 2つの値に、さらに 10 を足す」という処理が行われた結果です

おわりに
今回、Mastra を使った処理で、「自作MCPサーバーのツール」+「OpenAI のモデルによる処理」を組み合わせることはできました。現状、とりあえず動かしてみただけという感じなので、Mastra でできることを調べてみて、さらにお試しをやってみたいと思います。
【追記】
ばらばらと公式ドキュメントを見て進めるより、以下のエージェントの公式サンプル の 1つ(ツールを使うサンプル)を見て進めたほうが早かったかも...(と、後になって気がきました)
●mastra/examples/basics/agents/using-a-tool at main · mastra-ai/mastra
https://github.com/mastra-ai/mastra/tree/main/examples/basics/agents/using-a-tool
また他にも、以下にたくさんサンプルがあるので、これも見ていければと思いました。
●mastra/examples at main · mastra-ai/mastra
https://github.com/mastra-ai/mastra/tree/main/examples
【追記2】
実験的機能の AgentNetwork を使った複数エージェントの利用と、MCPサーバーの組み合わせも試しました。
●Mastra の AgentNetwork を使って「複数エージェントと MCPサーバーの組み合わせ」を試す - Qiita
https://qiita.com/youtoy/items/8a20d6c1a2af6d82826c