Flutterの書き方で注意すべきことをベースにメモ【随時更新】
- ※登場するソース・イメージは一部公式より拝借してます
- ドキュメントが充実しているので公式見る方がいいと思います
日本語で見たいんだ
という人は是非見てください。
StatefulWidgetの構成
- 2つのクラスから成る
- Widgetクラス:Stateを作成して返す
- Stateクラス:状態を保持し、Widgetを描画(build)する
Widgetクラス:Stateを作成して返す
StatefulWidgetで必ず行うこと
-
createdStateメソッドを定義してStateを作成し、返す
class FavoriteWidget extends StatefulWidget {
  @override
  _FavoriteWidgetState createState() => _FavoriteWidgetState();
}
Stateクラス:状態を保持し、Widgetを描画(build)する
-
extendsには
State<上記で作ったWidgetクラスを入れる> -
buildメソッド内にWidgetの内容を記述する
class _FavoriteWidgetState extends State<FavoriteWidget> {
  // ···
  @override
  Widget build(BuildContext context) {
    return Row(
      mainAxisSize: MainAxisSize.min,
      children: [
        Container(
          padding: EdgeInsets.all(0),
          child: IconButton(
            icon: (_isFavorited ? Icon(Icons.star) : Icon(Icons.star_border)),
            color: Colors.red[500],
            onPressed: _toggleFavorite,
          ),
        ),
        SizedBox(
          width: 18,
          child: Container(
            child: Text('$_favoriteCount'),
          ),
        ),
      ],
    );
  }
}
状態管理している値を変更したいとき
- 必ず
setStateメソッドを使う(これを怠るとflutterが変更を検知してくれない)
class _FavoriteWidgetState extends State<FavoriteWidget> {
  bool _isFavorited = true;
  int _favoriteCount = 41;
  // ···

  void _toggleFavorite() {
  setState(() {
    if (_isFavorited) {
      _favoriteCount -= 1;
      _isFavorited = false;
    } else {
      _favoriteCount += 1;
      _isFavorited = true;
    }
  });
}
}
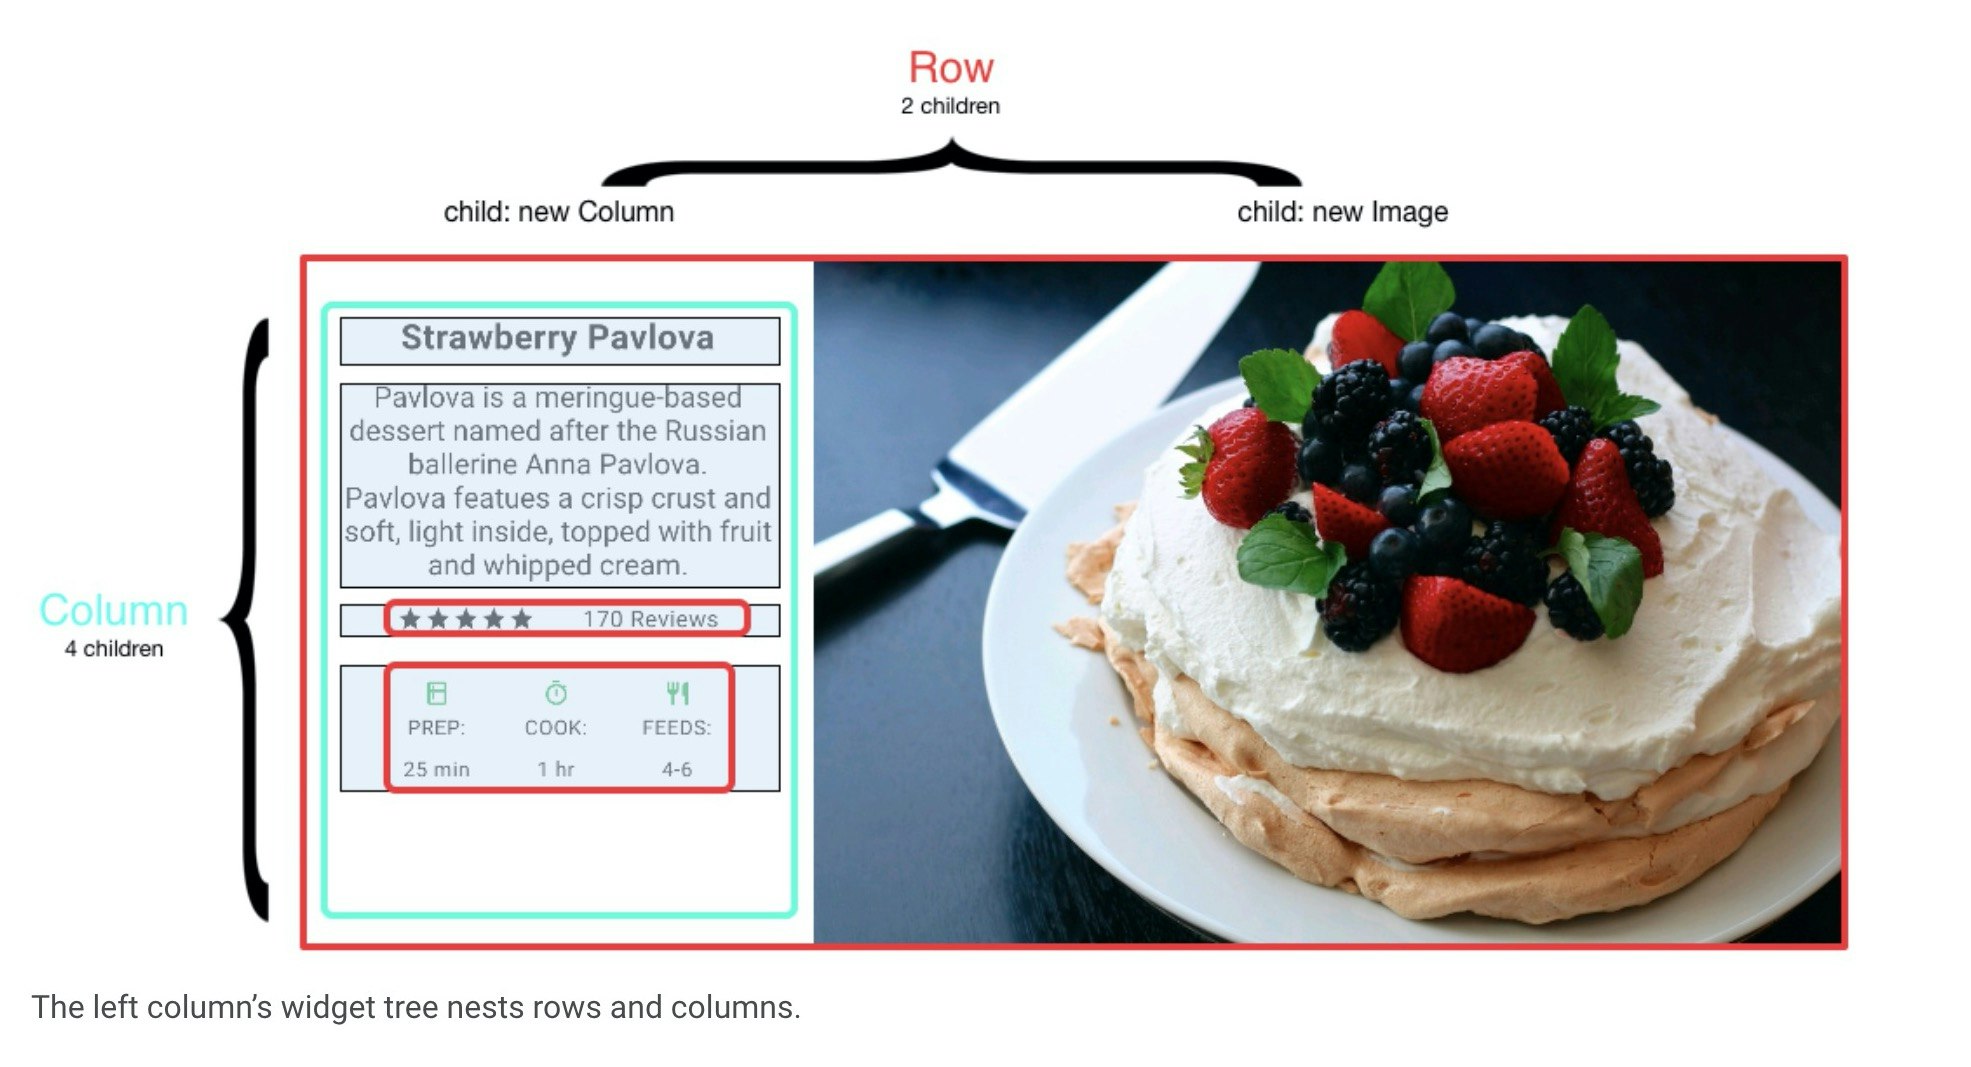
row・columnを使ったレイアウト
- その名の通り行・列を使用しレイアウトを構成していく
- childにアイコン・画像を入れ込むことも可能
rowのchildrenの挙動はこんな感じ(横に連なる)
Row(
  mainAxisAlignment: MainAxisAlignment.spaceEvenly,
  children: [
    Image.asset('images/pic1.jpg'),
    Image.asset('images/pic2.jpg'),
    Image.asset('images/pic3.jpg'),
  ],
);

columnのchildrenの挙動はこんな感じ(縦に連なる)
Column(
  mainAxisAlignment: MainAxisAlignment.spaceEvenly,
  children: [
    Image.asset('images/pic1.jpg'),
    Image.asset('images/pic2.jpg'),
    Image.asset('images/pic3.jpg'),
  ],
);

サイジング
- レイアウトが大きすぎてデバイスに収まらない場合は、影響を受けるエッジに沿って黄色と黒の縞模様が表示されます。

-
ExpandedWidgetを使用することでこの問題を回避できるようです
Row(
  crossAxisAlignment: CrossAxisAlignment.center,
  children: [
    Expanded(
      child: Image.asset('images/pic1.jpg'),
    ),
    Expanded(
      child: Image.asset('images/pic2.jpg'),
    ),
    Expanded(
      child: Image.asset('images/pic3.jpg'),
    ),
  ],
);
- 補正後の画像

特定の要素のサイズを変更する
- これを実現する方法は簡単でExpandedWidgetの
flexプロパティを使用することで可能になります。 - 真ん中の写真だけ2倍の大きさにする例
Row(
  crossAxisAlignment: CrossAxisAlignment.center,
  children: [
    Expanded(
      child: Image.asset('images/pic1.jpg'),
    ),
    // 真ん中だけ2倍にする
    Expanded(
      flex: 2,
      child: Image.asset('images/pic2.jpg'),
    ),
    Expanded(
      child: Image.asset('images/pic3.jpg'),
    ),
  ],
);
SafeArea
- 端末に応じたレイアウトをいい感じにやってくれる。使い方は
SafeAreaでラップするだけ
body: SafeArea(
        child: ListView.builder(itemBuilder: (BuildContext context, int index) {
          return Text(
            "This text is safe.",
            style: TextStyle(
              fontSize: 30,
            ),
          );
        }),
      ),
Widget間のデータの受け渡し
- 上位ツリーから下位ツリーへコンストラクタとしてデータを渡すことができる(Javaとかと似ているので割愛)
上位・下位ツリーの直接参照
- GlobalKeyを用いると下位に存在する
StatefulWidgetのStateへアクセスが可能になる
実装手順
- 1・GlobalKeyのインスタンス化とkeyプロパティの追加
- 1-1・下位ツリーを識別するためのGlobalKeyをインスタンス化
- 1-2・下位ツリーインスタンスを生成する際(
buildメソッド)のkeyプロパティに追加する
- 2・GlobalKeyを生成した上位ツリーで
globalKey.currentState.widgetで参照する
1-1〜2
class _MyWidgetState extends State<MyWidget> {
  ImportantData importantData = ImportantData();
  // 1-1 ※型は参照する下位ツリーのStateクラスを指定する
  GlobalKey<AnotherWidgetState> anotherWidgetStateGlobalKey = GlobalKey();

  _doImportantThings() {
    setState(() {
      importantData.increment();
    });
  }

  @override
  Widget build(BuildContext context) {
    debugPrint("MyWidget is built");
    return Inherited(
        importantData: importantData,
        child: Scaffold(
          appBar: AppBar(title: Text(widget.title)),
          body: Center(
            child: Column(
              children: <Widget>[
                Text("MyWidget"),
                // 2・宣言したGlobalKey.currentState.widget.参照したい値で下位ツリーの値を取得できる
                Text("Another Widget 直接参照:
                ${anotherWidgetStateGlobalKey.currentState?.widget?.importantData?.count ?? "empty"}"),
               // 1-2・AnotherWidgetを識別するkeyプロパティに1-1で宣言した変数を追加する
                AnotherWidget(
                    key: anotherWidgetStateGlobalKey,
                    importantData: importantData),
                const NoRefToImportantDataWidget()
              ],
            ),
          ),
          floatingActionButton: FloatingActionButton(
            onPressed: _doImportantThings,
            tooltip: 'Increment',
            child: Icon(Icons.add),
          ),
          backgroundColor: Colors.green,
        ));
  }
}
上位ツリーへの参照
- BuildContextの
ancestorWidgetOfExactTypeを利用する -
myWidget.state.参照したい値で取得可能
// コレを参照したいとする
import 'package:inherited_widget_sample/my_widget.dart';


class AnotherWidgetState extends State<AnotherWidget> {
  ImportantData get _importantData => widget.importantData;

  @override
  Widget build(BuildContext context) {
    debugPrint("AnotherWidget is built");
    final MyWidget myWidget = context.ancestorWidgetOfExactType(MyWidget);
    return Container(
        height: 400,
        decoration: BoxDecoration(color: Colors.cyan),
        child: Column(children: <Widget>[
          Text("AnotherWidget"),
          Text(
              "Parent Direct Reference ${myWidget.state?.importantData?.count ?? "empty"}"),
          YetAnotherWidget(importantData: _importantData)
        ]));
  }
}