はじめに
Google Colaboratoryを使ってYOLOXの自前データでの学習を行います。自前のPCでYOLOXを学習しようとするとメモリ不足でできませんでした。。とりあえず学習できればいいやという突貫自分用メモです。
データセットの準備
自作します。適当なアノテーションツールを使ってCOCOフォーマットでtrain用とvalidation用のjsonファイルをそれぞれ作成します。バウンディングボックスは[left,top,width,height]です。以下の例ではNumberPlateの検出のアノテーションをしています。
{
  "images": [
    {
      "id": 0,
      "width": 768,
      "height": 1024,
      "file_name": "0-0058.jpg",
      "date_captured": "2022-03-15 09:00:00"
    },
    {
      "id": 1,
      "width": 1200,
      "height": 693,
      "file_name": "0-0059.jpg",
      "date_captured": "2022-03-15 09:00:00"
    },
            :
            :
            :
  ],
  "annotations": [
    {
      "id": 1,
      "iscrowd": 0,
      "category_id": 0,
      "image_id": 0,
      "bbox": [
        393.8461439999999,
        642.23744,
        123.29088000000002,
        61.638656
      ],
      "area": 7599.484140257281
    },
    {
      "id": 2,
      "iscrowd": 0,
      "category_id": 0,
      "image_id": 1,
      "bbox": [
        145.8192,
        546.3262035,
        152.508,
        71.318709
      ],
      "area": 10876.673672172
    },
            :
            :
            :
  ],
  "categories": [
    {
      "id": 0,
      "name": "NumberPlate"
    }
  ]
}
参考までに、YOLO-Labelを使ってアノテーションしたものをこの形式にするのに以下のコードを書きました。
import json
import glob
import os
import re
import cv2
mode = 'validation'
js = glob.glob(f'./number_plate/{mode}/*.txt')

images = []
file2image_id = {}
image_id2size = {}
for i,j in enumerate(js):
    base,_ = os.path.splitext(os.path.basename(j))
    file2image_id[base] = i
    t = [f for f in glob.glob(f'./number_plate/{mode}/{base}.*') if not re.search('.txt',f)]
    id = i
    img = cv2.imread(t[0])
    height,width = img.shape[:2]
    file_name = os.path.basename(os.path.basename(t[0]))
    data_captured = "2022-03-15 09:00:00"
    image = {
        'id':id,
        'width':width,
        'height':height,
        'file_name':file_name,
        'date_captured':data_captured
    }
    images.append(image)
    image_id2size[id] = (width,height)

categories = []
with open('./obj_names.txt','r') as f:
    obj_names = f.read()
for i,name in enumerate(obj_names.split('\n')):
    cate = {
        'id': i,
        'name': name
    }
    categories.append(cate)

annotations = []
anno_id = 1
for i,j in enumerate(js):
    base,_ = os.path.splitext(os.path.basename(j))
    with open(j,'r') as f:
        annos = f.read()
    for row in annos.split('\n'):
        if row == '':
            continue
        anno = [float(n) for n in row.split(' ')]
        image_id = file2image_id[base]
        category_id = int(anno[0])
        w,h = image_id2size[image_id]
        bbox = [w*(anno[1]-anno[3]/2),h*(anno[2]-anno[4]/2),w*anno[3],h*anno[4]]
        annotation = {
            'id': anno_id,
            'iscrowd': 0,
            'category_id': category_id,
            'image_id': image_id,
            'bbox': bbox,
            'area': (bbox[2])*(bbox[3])
        }
        anno_id = anno_id+1
        annotations.append(annotation)

data = {
    'images':images,
    'annotations':annotations,
    'categories':categories
}

data = json.dumps(data,indent=2)
with open(f'./{mode}.json','w') as f:
    f.write(data)
YOLO-Labelは出力されるテキストが、(クラス、BBの中心のX座標、BBの中心のY座標、幅、高さ)担っているので注意が必要です。
Colaboratoryでの学習
こちらの記事を参考に進めていきます。この参考記事の環境構築、推論デモまで行ってください。
先ほどアノテーションしたデータを以下のフォルダ構成になるようにアップロードします。
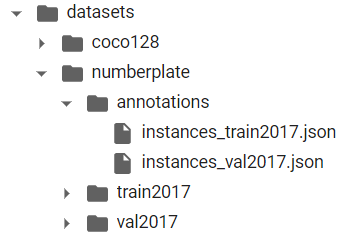
instances_train2017.jsonが上で作成したtrain用のアノテーションデータ、instances_val2017.jsonはvaliadtion用のアノテーションデータです。instances_train2017.jsonなどの名前はこの通りにします。train2017、val2017にそれぞれtrain用、validation用の画像が入っています。
次に、モデルをダウンロードします。yolox_x.pthで学習をしたい場合は_sを_xに変えるとダウンロードできます。
!wget https://github.com/Megvii-BaseDetection/YOLOX/releases/download/0.1.1rc0/yolox_s.pth
続いて、expファイルを作成します。exps/example/custom/yolox_s.pyをコピーしてexps/example/custom/numberplate.pyというファイルを作り、以下のようにします。ここでエポック数(max_epochs)や分類するクラスの数(num_classes)を与えます。また、学習過程のモデルを保存したい場合は、self.save_history_ckptをTrueにします(Googleドライブをかなり圧迫します)。yolox_x.pthで学習する場合は、exps/default/yolox_x.pyを参考にdepthやwidthなどのパラメータを書き換えてください。
import os

from yolox.exp import Exp as MyExp

class Exp(MyExp):
    def __init__(self):
        super(Exp, self).__init__()
        self.depth = 0.33
        self.width = 0.50
        self.exp_name = os.path.split(os.path.realpath(__file__))[1].split(".")[0]

        # Define yourself dataset path
        self.data_dir = "datasets/numberplate"
        self.train_ann = "instances_train2017.json"
        self.val_ann = "instances_val2017.json"

        self.num_classes = 1

        self.max_epoch = 100
        self.data_num_workers = 4
        self.eval_interval = 1

        self.save_history_ckpt = False
これで学習の準備は完了です。以下を実行します(yolox_x.pthで学習をしたい人は書き換えてください)。
!python tools/train.py -f exps/example/custom/numberplate.py -d 1 -b 8 --fp16 -o -c yolox_s.pth
引数の意味は、先ほどの参考記事を見るか、githubのソースコードを見てみてください。
学習が終わるとYOLOX_outputs/numberplate/にモデルが作成されていると思います。
ログのAPの指標などはこのサイトなどが参考になります。
推論
とりあえず学習したモデルで推論できればいいやということで突貫工事的にやっていきます。
tools/以下に適当な名前(ここではdemo_numberplate.py)でファイルを作成し、tools/demo.pyの中身をコピペします。demo.pyでは、305行目あたりでPredicterにCOCO_LABELSを渡してラベルを与えていますが、今回は自前データのラベルですので例えば以下のように書き換えます。
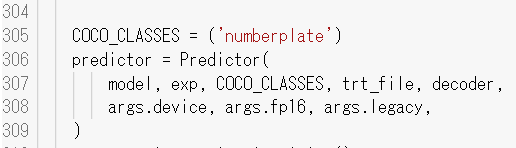
複数ラベルがあればCOCO_CLASSES=("person","dog","cat")という感じです。
次に、expファイルを作ります。exps/default/best_ckpt.pyを作成し、以下のようにします。num_classesなどは自前データに合わせてください。
import os

from yolox.exp import Exp as MyExp

class Exp(MyExp):
    def __init__(self):
        super(Exp, self).__init__()
        self.depth = 0.33
        self.width = 0.50
        self.exp_name = os.path.split(os.path.realpath(__file__))[1].split(".")[0]
        self.num_classes = 1
以下のコマンドで推論ができます。
!python tools/demo_numberplate.py image -n best_ckpt -c YOLOX_outputs/yolox_s/best_ckpt.pth --path datasets/numberplate/test.jpg --conf 0.25 --nms 0.45 --tsize 640 --save_result --device gpu
YOLOX_outputs/best_ckpt/vis/に推論結果が保存されます。
おわりに
学習画像の数にもよるかと思いますが、50枚くらいの画像でバッチサイズ4ならyolox_xを使って学習ができました。ファイル名などはexpとかを適切に設定すれば自由に変えられるんじゃないかと思います。