はじめに
Google Maps APIを利用して、複数地点のルート検索する方法を紹介します。本記事では、RailsでGoogle Mapを表示させるgem、Google-Maps-for-Railsを使用しています。
使用した環境
- Rails 5.1.4
- Ruby 2.4.1
- gem’gmaps4rails’(https://github.com/apneadiving/Google-Maps-for-Rails)
- Google Maps JavaScript API (ルートサービス)
手順
1. 地図とマーカーを表示する
Googe-Maps-for-Railsを利用して、地図上にマーカーを表示します。
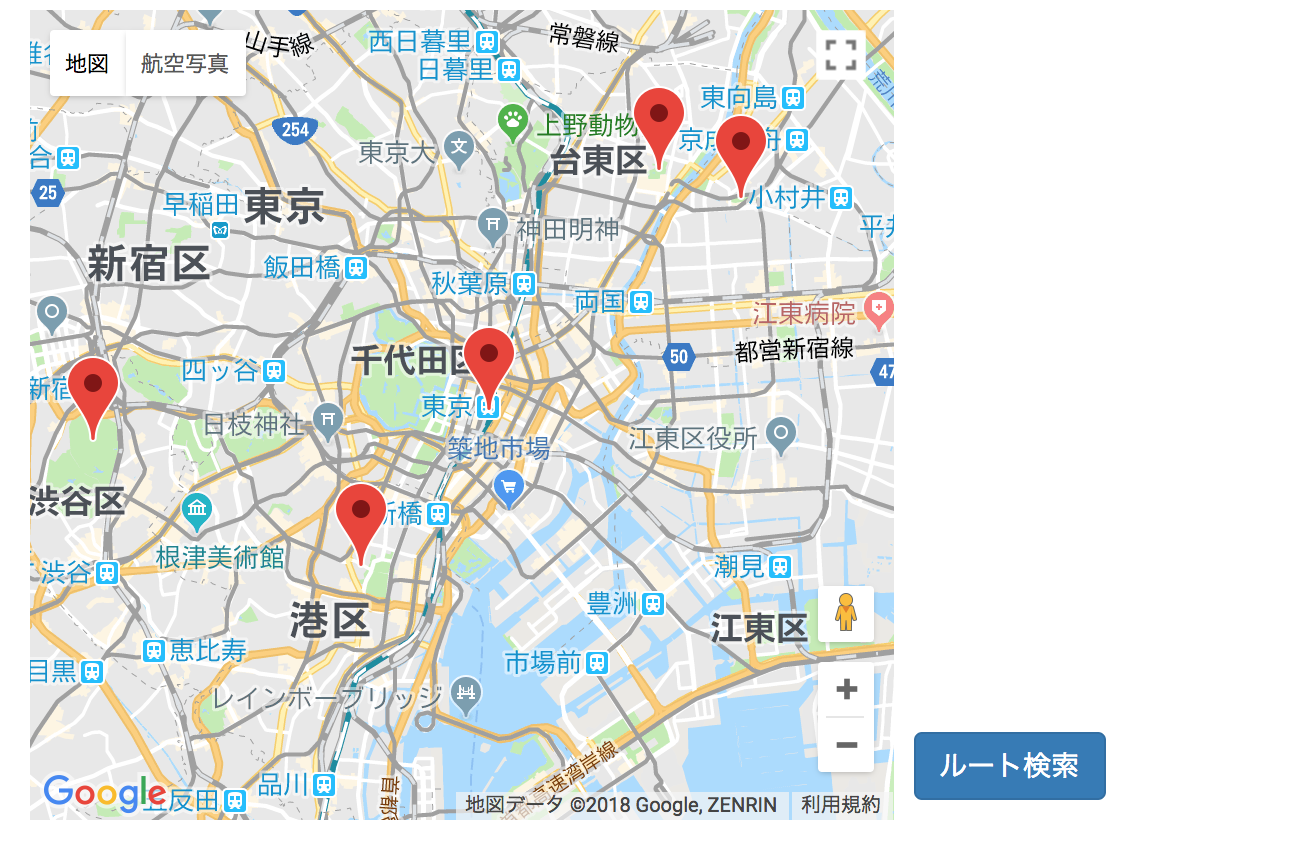
下のように、地図、地点リスト、ボタンを作成します。
app/view/map/index.html.erb
<div class="map-container">
  <div id="map" class="map-canvas"></div>
  <div class="map-route">
    <ul id="route-list" class="list-group"></ul>
  </div>
  <div class="map-search">
    <%= button_tag "ルート検索", id: "btn-search", class: "btn btn-primary", onclick: "search()" %>
  </div>
</div>
app/assets/stylesheets/map.scss
.map-container {
    position: relative;
    width: 100%;
    margin-bottom: 20px;
    padding-bottom: 56.25%;
}

.map-canvas {
    position: absolute;
    top: 0;
    right: 40%;
    bottom: 0;
    left: 0;
    margin: 0;
    padding: 0;
}
.map-route {
    overflow: scroll;
    position: absolute;
    top: 0;
    right: 0;
    bottom: 54px;
    left: 60%;
    margin: 0;
    padding: 10px;
}

.map-search {
    position: absolute;
    height: 54px;
    right: 0;
    bottom: 0;
    left: 60%;
    margin: 0;
    padding: 10px;
}
次に、Googe-Maps-for-Railsを利用して、地図とマーカーを表示します。
app/controllers/map_controller.rb
class MapController < ApplicationController
  def index
    @places = Place.all
    @hash = Gmaps4rails.build_markers(@places) do |place, marker|
      marker.lat place.latitude
      marker.lng place.longitude
      marker.infowindow render_to_string( partial: "map/infowindow",
                                          locals: {place:place} )
    end
  end
end
app/view/map/index.html.erb
<script type="text/javascript">
    handler = Gmaps.build('Google');
    handler.buildMap({ provider: {}, internal: {id: 'map'}}, function(){
      markers = handler.addMarkers(<%= raw @hash.to_json %>);
      handler.bounds.extendWith(markers);
      handler.fitMapToBounds();
      handler.getMap().setCenter(new google.maps.LatLng(35.679899, 139.762507));
      handler.getMap().setZoom(12);
      handler.getMap().setOptions({ draggableCursor: "default" });
      directionsDisplay.setMap(handler.getMap());
    });
</script>
2. 地点をリストに追加する
情報ウィンドウの追加ボタンで、地点をリストに追加します。

情報ウィンドウは、下のように作成しています。
app/view/map/_infowindow.html.erb
<div id="info-window-name">
  <%= link_to "#{place.name}", place %>
</div>
<div id="info-wondow-btn">
  <%= button_tag "経路に追加", id: "btn-add", class: "btn btn-primary btn-sm",
    onclick: "addPlace('#{place.name}',#{place.latitude}, #{place.longitude})" %>
</div>
追加ボタンのクリックイベントです。リストの重複をチェックした後、その場所の緯度・経度の情報を付加したリスト要素を追加しています。
app/assets/javascripts/map.js
// リストに追加する
function addPlace(name, lat, lng){
    var li = $('<li>', {
        text: name,
        "class": "list-group-item"
    });
    li.attr("data-lat", lat);
    li.attr("data-lng", lng);

    // 重複チェックしてリストに追加
    if(!isExistList(li)) {
        $('#route-list').append(li);
    }
}
// リストの重複をチェックする
function isExistList(li) {
    var exist = false;
    $('#route-list li').each(function() {
        if($(this).text() == $(li).text()) {
            exist = true;
        }
    })
    return exist;
}
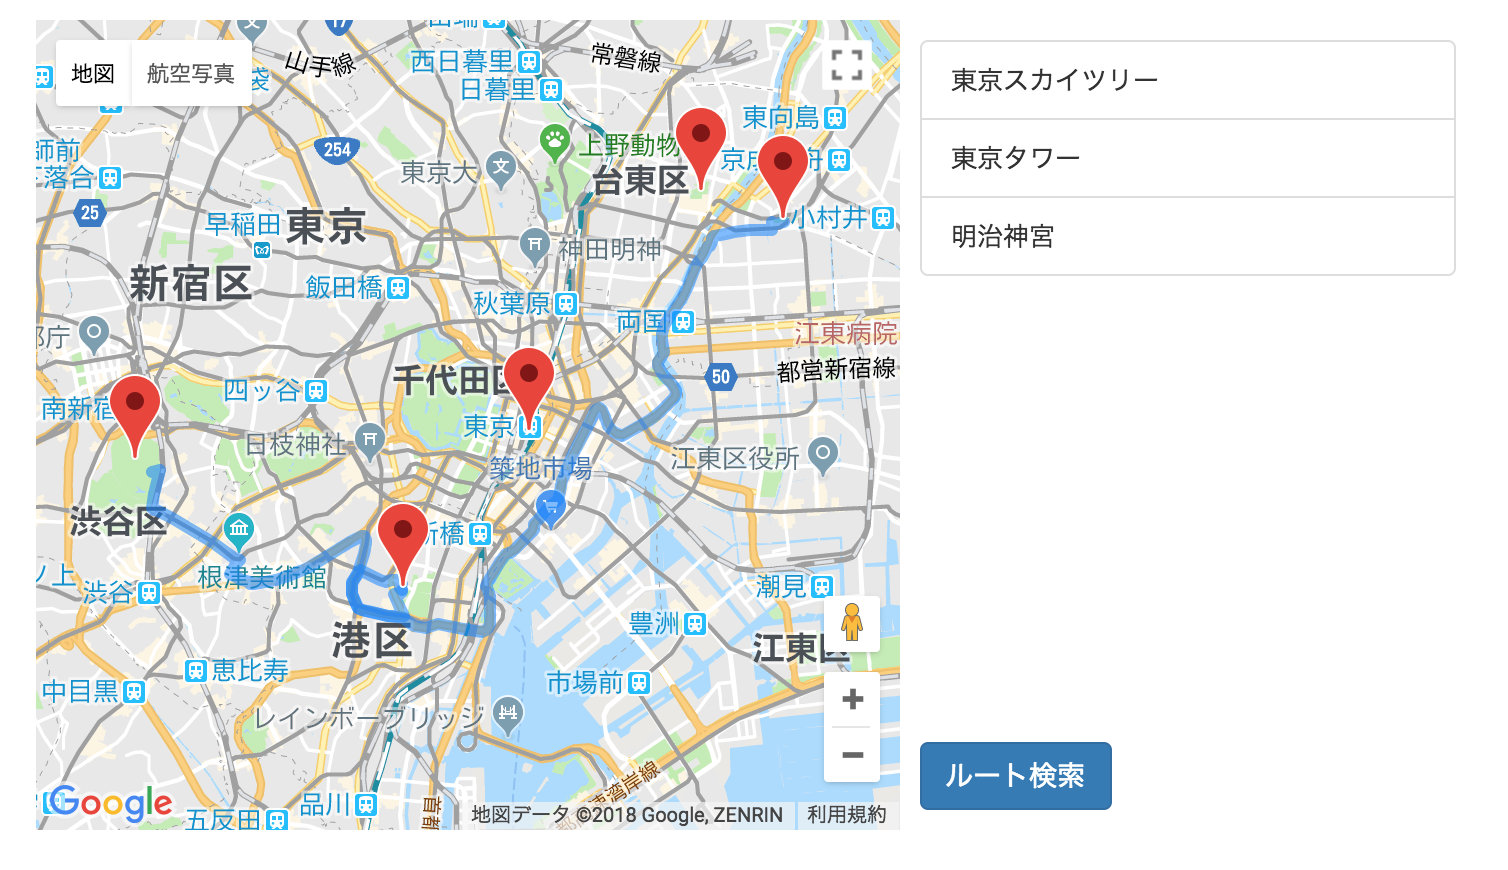
3. ルート検索する
ルート検索ボタンのクリックイベントで、地点リストのルート検索を行います。リストに2地点以上あるとき、Google Maps JavaScript APIのルートサービスのリクエストを行います。
app/assets/javascripts/map.js
var rendererOptions = {
    suppressMarkers : true
}
var directionsDisplay = new google.maps.DirectionsRenderer(rendererOptions);
var directionsService = new google.maps.DirectionsService();

// 複数地点のルートを検索する
function search() {
    var points = $('#route-list li');

    // 2地点以上のとき
    if (points.length >= 2){
        var origin; // 開始地点
        var destination; // 終了地点
        var waypoints = []; // 経由地点

        // origin, destination, waypointsを設定する
        for (var i = 0; i < points.length; i++) {
            points[i] = new google.maps.LatLng($(points[i]).attr("data-lat"), $(points[i]).attr("data-lng"));
            if (i == 0){
                origin = points[i];
            } else if (i == points.length-1){
                destination = points[i];
            } else {
                waypoints.push({ location: points[i], stopover: true });
            }
        }
        // リクエスト作成
        var request = {
            origin:      origin,
            destination: destination,
            waypoints: waypoints,
            travelMode:  google.maps.TravelMode.DRIVING
        };
        // ルートサービスのリクエスト
        directionsService.route(request, function(response, status) {
            if (status == google.maps.DirectionsStatus.OK) {
                // 結果を表示する
                directionsDisplay.setDirections(response);
            }
        });
    }
}
結果として、下のように地点のルートが表示されます。
ルートの距離/時間を取得する
検索したルートの距離と時間を取得するには、以下のようにします。
app/assets/javascripts/map.js
directionsService.route(request, function(response, status) {
    if (status == google.maps.DirectionsStatus.OK) {
        directionsDisplay.setDirections(response);

        //距離、時間を表示する
        var data = response.routes[0].legs;
        for (var i = 0; i < data.length; i++) {
            console.log(data[i].distance.text);
            console.log(data[i].duration.text);

        }
    }
});
下の図のように、距離/時間の情報を取得することができます。ここでは、コンソールに出力しています。

おわりに
Google Maps APIを利用して、複数地点のルート検索する方法を紹介しました。この方法を利用して、Railsの地図アプリなどでルート検索を作成することができます。