はじめに
以前の記事でSAP CloudPlatform Trial環境でのMTAプロジェクト(Multi Target Application)を作成し、
DBModuleやJavaModuleを作成しました。
本投稿は下記内容が前提となっています。
MTAプロジェクト内に作成したODataServiceをUI(Fiori画面)からリクエストし、
ODataから取得した情報をUI画面上に表示してみます。
【DBModuleの追加】
SAP CP Trial環境でMulti Target Applicationを作ってみる【DBModuleの作り方】
【JavaModuleの追加】
SAP CP Trial環境でMulti Target Applicationを作ってみる【JavaアプリとDBModuleの連携】
【ODataService V2(Java)の追加】
SAP CP Trial環境でMulti Target Applicationを作ってみる【ODataService_V2の作成】
HTML5モジュールの追加
まずはHTML5(UI)のモジュールを追加します。
UIを作成したいMTAプロジェクトを右クリック -> New -> HTML5 Moduleを選択します。
任意のモジュール名とNameSpaceを決定します。

↓↓細かい手順は下記に記載してます。
新しくなったSAP CloudPlatform Trial環境にSAPUI5アプリをデプロイしてみた
MTAプロジェクト:demoApp配下にHTML5モジュール:demoUIModを作成しました。
demoUIModは単一のSAPUI5プロジェクトとなっています。

UI⇔OData連携設定
同一MTA内のODataServiceをUIから呼び出すためにmta.yamlとHTML5モジュール内のxs-app.jsonに設定を追加します。
approuterからODataに宛先設定
mta.yamlを編集し、approuterがODataのURLにリクエストできるよう、宛先設定を行います。
呼出先であるODataServiceのJavaModuleにprovidesが設定されていることを確認します。
  - name: demoODSv2
    type: java
    path: demoODSv2
    parameters:
      memory: 512M
    provides:
      - name: demoODSv2_api
        properties:
          url: '${default-url}'
    requires:
      - name: demoDBReUse
        properties:
          JBP_CONFIG_RESOURCE_CONFIGURATION: '[tomcat/webapps/ROOT/META-INF/context.xml: {"service_name_for_DefaultDB" : "~{hdi-container-name}"}]'
providesに記載されている設定をapprouterのrequiresに以下のように追加します。
providesで定義されている公開URL(名称:demoODSv2_api)をdestinations(名称:dest_demoODSv2)として定義しています。
      - name: demoODSv2_api
        group: destinations
        properties:
          forwardAuthToken: true
          name: dest_demoODSv2
          url: '~{url}'
          timeout: 300000
上記を踏まえて、approuterモジュールの記載は以下のようになります。
modules:
~~省略~~
  - name: demoapp-approuter
    type: approuter.nodejs
    path: demoapp-approuter
    parameters:
      disk-quota: 256M
      memory: 256M
    requires:
      - name: demoApp_html5_repo_runtime
      - name: uaa_demoApp
      - name: demoODSv2_api
        group: destinations
        properties:
          forwardAuthToken: true
          name: dest_demoODSv2
          url: '~{url}'
          timeout: 300000
~~省略~~
※approuterを使用していないMTAプロジェクトの場合は、
destinationsの設定をUIモジュールのrequiresに記載する必要があります。
宛先URLへのルーティングを定義
HTML5モジュール配下にあるxs-app.jsonで先ほど追加したapprouterの宛先設定を利用するための設定を行います。
特定のパスにリクエストした際、宛先設定を経由してODataにリクエストされるようにします。
xs-app.jsonのroutesに以下を追加します。
	{
      "source": "^/ODSv2/(.*)$",
      "target": "/odata/v2/$1",
      "authenticationType": "none",
      "destination": "dest_demoODSv2",
      "csrfProtection": false
    }
設定内容は以下の通りです。
| 項目 | 設定内容 |
|---|---|
| source | 宛先設定を経由するURLのパターンを定義します(正規表現) |
| target | 宛先設定を経由してリクエストするURLのパスを定義します(正規表現) |
| destination | approuterのrequiresで定義した宛先名を指定します |
上記設定ではUI画面から
https://xxxxxxx.com/<UIPath>/ODSv2/DemoServece/$metadata
とリクエストした場合、ODataServiceに対して以下のリクエストを行った結果と一致します。
https://xxxxxxx.com/odata/v2/DemoServece/$metadata
上記を踏まえて、xs-app.json全体は以下のようになります。
注意点として、routesの順番は新しく設定した(条件の多い)ルート設定を上に記載する必要があります。
※おそらく、デフォルトの"source": "^(.*)$",の記載を先にすると、/ODSv2にリクエストしてもデフォルト設定が優先されてしまうので宛先に対してリクエストされないっぽいです。
{
  "welcomeFile": "/index.html",
  "authenticationMethod": "route",
  "logout": {
    "logoutEndpoint": "/do/logout"
  },
  "routes": [
	{
      "source": "^/ODSv2/(.*)$",
      "target": "/odata/v2/$1",
      "authenticationType": "none",
      "destination": "dest_demoODSv2",
      "csrfProtection": false
    },
    {
      "source": "^(.*)$",
      "target": "$1",
      "service": "html5-apps-repo-rt",
      "authenticationType": "xsuaa"
    }
  ]
}
以上で、HTML5モジュールからODataServiceのJavaモジュールに対してリクエストを行う設定が完了しました。
HTML5モジュールにOData呼出を追加
HTML5モジュールからODataを呼び出せるようにモジュール内のUI5アプリケーションにいくつかの変更を加えます。
この変更はUI5アプリケーションとして共通のため、MTAプロジェクト内であることの影響はありません。
呼び出すODataは前回の投稿で作成したDemoServiceとします。
URL・Metadataは以下の通りです。
| URL |
|---|
| /odata/v2/DemoService/People |
<edmx:Edmx xmlns:edmx="http://schemas.microsoft.com/ado/2007/06/edmx" xmlns:sap="http://www.sap.com/Protocols/SAPData"
	xmlns:ux="http://www.sap.com/Protocols/OData4SAP/UX" xmlns:gp="http://www.sap.com/Protocols/SAPData/GenericPlayer" Version="1.0">
	<edmx:DataServices xmlns:m="http://schemas.microsoft.com/ado/2007/08/dataservices/metadata" m:DataServiceVersion="2.0">
		<Schema xmlns="http://schemas.microsoft.com/ado/2008/09/edm" Namespace="demo">
			<EntityType Name="Person">
				<Key>
					<PropertyRef Name="UniqueId"/>
				</Key>
				<Property Name="UniqueId" Type="Edm.Int32"/>
				<Property Name="Name" Type="Edm.String"/>
			</EntityType>
			<EntityContainer Name="container" m:IsDefaultEntityContainer="true">
				<EntitySet Name="People" EntityType="demo.Person"/>
			</EntityContainer>
		</Schema>
	</edmx:DataServices>
</edmx:Edmx>
データソース・モデル設定を追加
manifest.jsonを編集します。
manifest.jsonのsap.app配下に下記を追加
		"dataSources": {
			"DemoService": {
				"uri": "/ODSv2/DemoService/",
				"type": "OData",
				"settings": {
					"localUri": "localService/metadata.xml",
					"annotations": []
				}
			}
		}
manifest.jsonのsap.ui5 -> models配下に下記を追加
			"DemoServiceModel": {
				"type": "sap.ui.model.odata.v2.ODataModel",
				"settings": {
					"defaultOperationMode": "Server",
					"defaultBindingMode": "OneWay",
					"defaultCountMode": "Request",
					"useBatch": false
				},
				"dataSource": "DemoService",
				"preload": true
			}
上記の変更後、manifest.json全体は以下のようになります。
{
	"_version": "1.12.0",
	"sap.app": {
		"id": "jp.co.kyoso.demo.demoUIMod",
		"type": "application",
		"i18n": "i18n/i18n.properties",
		"applicationVersion": {
			"version": "1.0.0"
		},
		"title": "{{appTitle}}",
		"description": "{{appDescription}}",
		"sourceTemplate": {
			"id": "html5moduletemplates.basicSAPUI5ApplicationProjectModule",
			"version": "1.40.12"
		},
		"dataSources": {
			"DemoService": {
				"uri": "/ODSv2/DemoService/",
				"type": "OData",
				"settings": {
					"localUri": "localService/metadata.xml",
					"annotations": []
				}
			}
		}
	},

	"sap.ui": {
		"technology": "UI5",
		"icons": {
			"icon": "",
			"favIcon": "",
			"phone": "",
			"phone@2": "",
			"tablet": "",
			"tablet@2": ""
		},
		"deviceTypes": {
			"desktop": true,
			"tablet": true,
			"phone": true
		}
	},

	"sap.ui5": {
		"flexEnabled": false,
		"rootView": {
			"viewName": "jp.co.kyoso.demo.demoUIMod.view.View1",
			"type": "XML",
			"async": true,
			"id": "View1"
		},
		"dependencies": {
			"minUI5Version": "1.65.6",
			"libs": {
				"sap.ui.core": {},
				"sap.m": {},
				"sap.ui.layout": {}
			}
		},
		"contentDensities": {
			"compact": true,
			"cozy": true
		},
		"models": {
			"i18n": {
				"type": "sap.ui.model.resource.ResourceModel",
				"settings": {
					"bundleName": "jp.co.kyoso.demo.demoUIMod.i18n.i18n"
				}
			},
			"DemoServiceModel": {
				"type": "sap.ui.model.odata.v2.ODataModel",
				"settings": {
					"defaultOperationMode": "Server",
					"defaultBindingMode": "OneWay",
					"defaultCountMode": "Request",
					"useBatch": false
				},
				"dataSource": "DemoService",
				"preload": true
			}
		},
		"resources": {
			"css": [{
				"uri": "css/style.css"
			}]
		},
		"routing": {
			"config": {
				"routerClass": "sap.m.routing.Router",
				"viewType": "XML",
				"async": true,
				"viewPath": "jp.co.kyoso.demo.demoUIMod.view",
				"controlAggregation": "pages",
				"controlId": "app",
				"clearControlAggregation": false
			},
			"routes": [{
				"name": "RouteView1",
				"pattern": "RouteView1",
				"target": ["TargetView1"]
			}],
			"targets": {
				"TargetView1": {
					"viewType": "XML",
					"transition": "slide",
					"clearControlAggregation": false,
					"viewId": "View1",
					"viewName": "View1"
				}
			}
		}
	}
}
画面にODataの取得結果を表示する処理を追加
簡単に結果を表示する処理を追加します。
初期表示されるViewファイルを以下のように変更します。
<mvc:View controllerName="jp.co.kyoso.demo.demoUIMod.controller.View1" xmlns:mvc="sap.ui.core.mvc" displayBlock="true" xmlns="sap.m">
	<Shell id="shell">
		<App id="app">
			 <pages>
                <Page id="page" title="{i18n>title}">
                    <content>
                        <List items="{DemoServiceModel>/People}">
                            <items>
                                <StandardListItem type="Navigation" title="{DemoServiceModel>Name}" description="ID: {DemoServiceModel>UniqueId}"/>
                            </items>
                        </List>
                    </content>
                </Page>
            </pages>
		</App>
	</Shell>
</mvc:View>
UI⇔OData連携の画面表示
HTML5モジュールへの変更が完了したら、ODataServiceのJavaモジュールを実行します。
Javaモジュールが実行している状態でHTML5モジュールを選択して右クリック -> Run -> Run index.htmlを選択します。

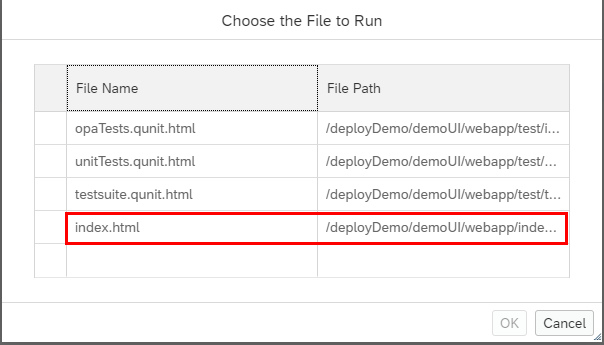
※Run index.htmlが表示されない場合はRun as Web Applicationを押下し、
下記のダイアログが表示されたらindex.htmlを選択してください。
うまくいったら以下のような画面が表示されます。

HDIコンテナのPeopleテーブルに格納したデータが表示されていることが確認できました。

おわりに
Trial環境からWebIDEが使えなくなってしまう前にまとめておけてよかったです。。
mta.yamlの記述に関してはむずかしい部分が多く、わかりやすいドキュメントがあればいいなとおもいました。