THETA プラグインと IFTTT で時間記録 【導入編】
はじめに
こんにちは、リコーの@yomura_です。
RICOH THETA のプラグインと IFTTT で簡易的な時間記録の仕組みを作ってみました。
今回は導入編です。

RICOH THETA プラグインについて
THETA プラグインをご存じない方はこちらをご覧ください。
興味を持たれた方はTwitterのフォローと THETA プラグイン開発コミュニティ(Slack)への参加もよろしくお願いします。
IFTTT について
IFTTT は IF This Then That の形で外部サービス同士をつなぐサービスで、扱うサービスは SNS から IoT 機器まで様々です。
本記事では Thisをトリガー、Thatをアクションと呼び、この組み合わせのことをアプレットと呼んでいます。
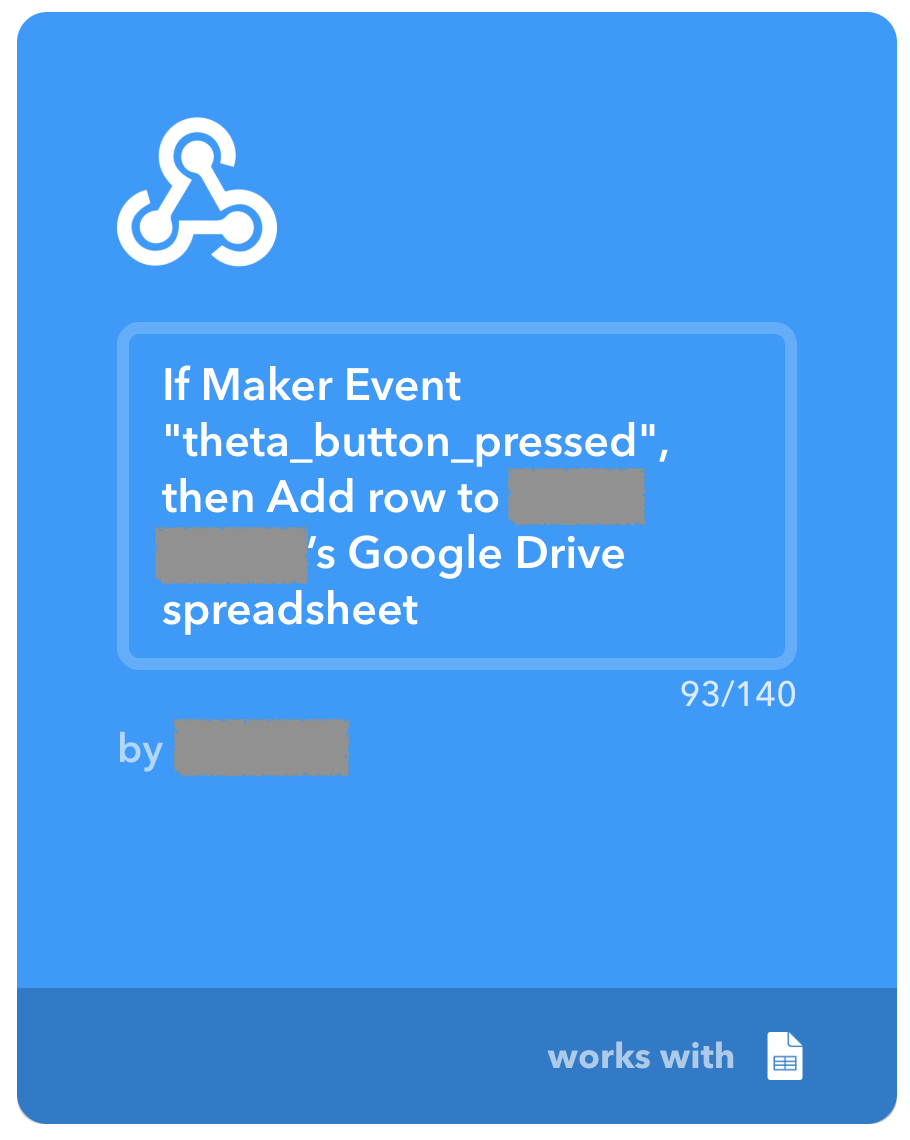
今回は Webhooksサービスをトリガーとして Google Sheets に新規の行を追加するアクションを行うアプレットを作成しました。
アプレットの作成
以下のような手順でアプレットを作成していきます。
- https://ifttt.com/create から新規アプレットを作成
- this(トリガー) に
Webhooksを選択-
Receive a web requestを選択してEvent Nameを入力- 今回は
theta_button_pressedとしました (この名前は後ほど使います)
- 今回は
-
- that(アクション) に
Google Sheetsを選択-
Add row to spreadsheetを選択して各項目を入力 (Formatted rowについては後述)
-
この作業で、指定の URL に POST するとスプレッドシートに 1 行追加するアプレットの作成が完了しました。
Formatted row について
記録する行のフォーマットを変更することができます。
また、下記 5 つを変数として埋め込むができます。
-
OccurredAt: イベントの発生時刻 (今回はこの時間を記録するのが目的です) -
EventName: Webhook トリガー作成時のイベント名 -
Value1: 任意の値 -
Value2: 任意の値 -
Value3: 任意の値

実装
今回は IFTTT アプレットのトリガーとなる URL に POST するためのタスクと、それを実行させる部分を実装しました。
このプラグインのサンプルソースコードは GitHub で公開しています。
WebhookTask
WebhookTask.kt
package com.theta360.iftttsample.task

import android.util.Log

import com.google.gson.Gson
import com.google.gson.JsonObject
import okhttp3.*

import java.net.HttpURLConnection.HTTP_OK

class WebhookTask(private val url: String) {

    private val httpClient = OkHttpClient()

    fun request(): Boolean {

        val body = JsonObject().apply {
            addProperty("value1", "hoge")
            addProperty("value2", "fuga")
            addProperty("value3", "piyo")
        }

        val requestBody = RequestBody.create(
                MediaType.parse("application/json; charset=UTF-8"), GSON.toJson(body))
        val request = Request.Builder()
                .url(url)
                .post(requestBody)
                .addHeader("Accept", "application/json")
                .addHeader("X-XSRF-Protected", "1")
                .build()

        Log.d(TAG, "START - http request")
        val response = httpClient.newCall(request).execute()
        Log.d(TAG, "FINISH - http request")

        Log.d(TAG, "Status code: ${response.code()}")
        val responseBody = response.body()
        if (responseBody != null)
            Log.d(TAG, responseBody.string())
        return response.code() == HTTP_OK
    }

    companion object {
        private val TAG: String = WebhookTask::class.java.simpleName
        private val GSON = Gson()
    }
}
任意文字列の追加
リクエストのボディに JSON で value1,value2,value3 キーに文字列を指定することで、スプレッドシートに任意の文字列を記録できます。
今回は良い使い方が思いつかなかったのでこんな感じになっています。
val body = JsonObject().apply {
    addProperty("value1", "hoge")
    addProperty("value2", "fuga")
    addProperty("value3", "piyo")
}
MainActivity
MainActivity.java
package com.theta360.iftttsample;

import android.os.Bundle;
import android.util.Log;
import android.view.KeyEvent;
import com.theta360.iftttsample.task.TakePictureTask;
import com.theta360.iftttsample.task.TakePictureTask.Callback;
import com.theta360.iftttsample.task.WebhookTask;
import com.theta360.pluginlibrary.activity.PluginActivity;
import com.theta360.pluginlibrary.callback.KeyCallback;
import com.theta360.pluginlibrary.receiver.KeyReceiver;
import com.theta360.pluginlibrary.values.LedColor;
import com.theta360.pluginlibrary.values.LedTarget;

import java.util.concurrent.ExecutorService;
import java.util.concurrent.Executors;
import java.util.concurrent.atomic.AtomicBoolean;

public class MainActivity extends PluginActivity {

    private static final String TAG = MainActivity.class.getSimpleName();
    private static final String WEBHOOK_KEY = "write ifttt webhook key here";
    private static final String WEBHOOK_EVENT_NAME = "write ifttt webhook event name here";
    private static final String WEBHOOK_URL = "https://maker.ifttt.com/trigger/" + WEBHOOK_EVENT_NAME + "/with/key/" + WEBHOOK_KEY;
    private final ExecutorService executor = Executors.newSingleThreadExecutor();
    private AtomicBoolean isProceeding = new AtomicBoolean();
    private WebhookTask webhookTask = new WebhookTask(WEBHOOK_URL);

    private TakePictureTask.Callback mTakePictureTaskCallback = new Callback() {
        @Override
        public void onTakePicture(String fileUrl) {

        }
    };

    @Override
    protected void onCreate(Bundle savedInstanceState) {
        super.onCreate(savedInstanceState);
        setContentView(R.layout.activity_main);

        // Set enable to close by pluginlibrary, If you set false, please call close() after finishing your end processing.
        setAutoClose(true);
        // Set a callback when a button operation event is acquired.
        setKeyCallback(new KeyCallback() {
            @Override
            public void onKeyDown(int keyCode, KeyEvent event) {
                if (keyCode == KeyReceiver.KEYCODE_CAMERA) {
                    /*
                     * To take a static picture, use the takePicture method.
                     * You can receive a fileUrl of the static picture in the callback.
                     */
//                    new TakePictureTask(mTakePictureTaskCallback).execute();
                    if (isProceeding.get()) {
                        Log.d(TAG, "Skip to post webhook.");
                        return;
                    }
                    executor.submit(() -> {
                        isProceeding.set(true);
                        notificationAudioOpen();
                        try {
                            if (webhookTask.request()) {
                                Log.d(TAG, "Succeeded to post webhook.");
                                notificationAudioClose();
                            }
                        } catch (Exception e) {
                            Log.e(TAG, "Failed to post webhook.", e);
                            notificationAudioWarning();
                        } finally {
                            isProceeding.set(false);
                        }
                    });
                }
            }

            @Override
            public void onKeyUp(int keyCode, KeyEvent event) {
                /**
                 * You can control the LED of the camera.
                 * It is possible to change the way of lighting, the cycle of blinking, the color of light emission.
                 * Light emitting color can be changed only LED3.
                 */
                notificationLedBlink(LedTarget.LED3, LedColor.BLUE, 1000);
            }

            @Override
            public void onKeyLongPress(int keyCode, KeyEvent event) {

            }
        });
    }

    @Override
    protected void onResume() {
        super.onResume();

        if (isApConnected()) {

        }
    }

    @Override
    protected void onPause() {
        // Do end processing
        //close();

        super.onPause();
    }
}
Webhook キーとイベント名の設定
IFTTT の Webhook キーと Webhook イベント名を URL に含める必要があります。
WEBHOOK_EVENT_NAME にはアプレット作成時に設定した Event Name を入力します。
WEBHOOK_KEY は https://ifttt.com/maker_webhooks の Documentation から確認できます。
private static final String WEBHOOK_KEY = "write ifttt webhook key here";
private static final String WEBHOOK_EVENT_NAME = "write ifttt webhook event name here";
タスクの実行
非同期処理には Executors.newSingleThreadExecutor() を使いました。
このexecutorで別スレッドを生成して非同期処理を実行させています。
import java.util.concurrent.ExecutorService;

public class MainActivity extends PluginActivity {
     private ExecutorService executor = Executors.newSingleThreadExecutor();
     ...
作成したWebhookTaskは onKeyDown メソッド内で実行しています。
これで THETA の撮影ボタンを押した時に指定の URL に POST リクエストを送信しています。
executor.submit(() -> {
    isProceeding.set(true);
    notificationAudioOpen();
    try {
        if (webhookTask.request()) {
            Log.d(TAG, "Succeeded to post webhook.");
            notificationAudioClose();
        }
    } catch (Exception e) {
        Log.e(TAG, "Failed to post webhook.", e);
        notificationAudioWarning();
    } finally {
        isProceeding.set(false);
    }
});
タスク実行中のチェック
AtomicBoolean 型の変数 isProceeding を処理中であることを示すフラグとして使用しています。これにより、タスク完了前に KEYCODE_CAMERA イベントが発生した場合はスキップしています。
if (keyCode == KeyReceiver.KEYCODE_CAMERA) {
    if (isProceeding.get()) {
        Log.d(TAG, "Skip to post webhook.");
        return;
    }
    ...
実行結果
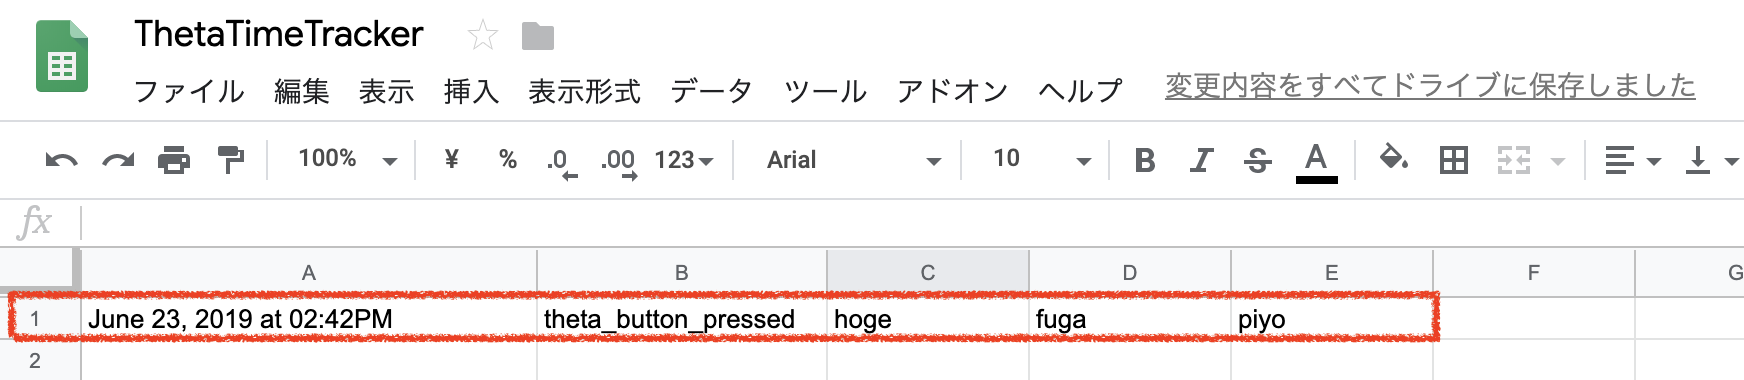
THETA プラグインを起動して撮影ボタンを押すとスプレッドシートに 1 行追加されました。
おわりに
今回は THETA のボタンを直接押してスプレッドシートに記録するところまでを紹介しました。
次回はボタンを直接押す以外の方法で記録する方法にチャレンジしてみたいです。
応用 1: OpenCV との組み合わせ
THETA で画像処理ライブラリの OpenCV が使えるので、人の動きを検知してスプレッドシートに記録することができれば便利そうです。
動体検知したタイミングで撮影して、人物の認識までできれば簡単な入退室管理ができるかもしれません。
THETA の中で OpenCV を動かす【プレビューフレーム応用編】
応用 2: BLE ボタンとの組み合わせ
THETA プラグインで BLE (Bluetooth Low Energy) の電波を受信することができます。
スマートフォンが近づくと記録するなど、いろいろな活用ができそうです。