Advent Calendar 2016 10日目の記事になります。
iOSのAutoLayoutをコードから設定する方法を紹介します。
いつもはSnapKitでAutoLayoutを指定していますが、今回はあえてNSLayoutConstraintでAutoLayoutを指定してみます。
参考
http://qiita.com/bonegollira/items/5c973206b82f6c4d55ea
こちらを参考にさせて頂きました。
AutoLayoutについて
AutoLayoutはviewに制約(Constraint)を付けることで、viewとviewの関係を指定することができます。
AutoLayoutを使用すれば、画面の大きさや向きに応じて動的に変化する、レイアウトを作ることができます。
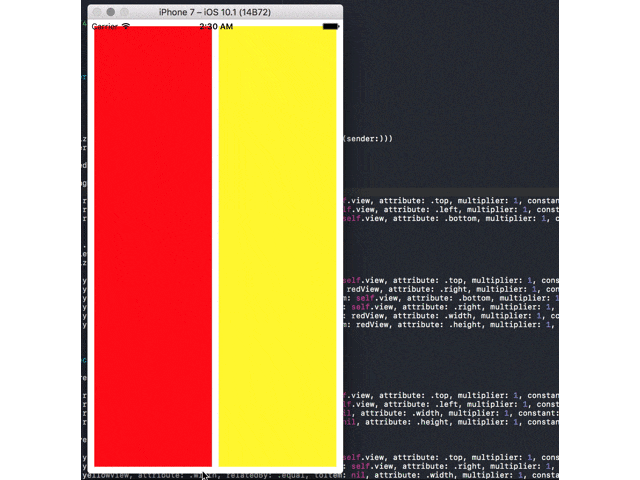
今回作るレイアウト
※最後にViewController.swiftのコードとGithubのリンクを貼ってあります。
AutoLayoutをコードから指定する
NSLayoutConstraintでレイアウトを指定する
NSLayoutConstraintを使って以下のように、AutoLayoutを指定します。
注意:AutoLayoutを指定したいViewの親Viewに対して addConstraints をする必要があります。
redView.translatesAutoresizingMaskIntoConstraints = false
self.view.addConstraints([
    NSLayoutConstraint(item: redView, attribute: .top, relatedBy: .equal, toItem: self.view, attribute: .top, multiplier: 1, constant: 10),
    NSLayoutConstraint(item: redView, attribute: .left, relatedBy: .equal, toItem: self.view, attribute: .left, multiplier: 1, constant: 10),
    NSLayoutConstraint(item: redView, attribute: .bottom, relatedBy: .equal, toItem: self.view, attribute: .bottom, multiplier: 1, constant: -10)
])

yellowView.translatesAutoresizingMaskIntoConstraints = false
self.view.addConstraints([
    NSLayoutConstraint(item: yellowView, attribute: .top, relatedBy: .equal, toItem: self.view, attribute: .top, multiplier: 1, constant: 10),
    NSLayoutConstraint(item: yellowView, attribute: .left, relatedBy: .equal, toItem: redView, attribute: .right, multiplier: 1, constant: 10),
    NSLayoutConstraint(item: yellowView, attribute: .bottom, relatedBy: .equal, toItem: self.view, attribute: .bottom, multiplier: 1, constant: -10),
    NSLayoutConstraint(item: yellowView, attribute: .right, relatedBy: .equal, toItem: self.view, attribute: .right, multiplier: 1, constant: -10),
    NSLayoutConstraint(item: yellowView, attribute: .width, relatedBy: .equal, toItem: redView, attribute: .width, multiplier: 1, constant: 0),
    NSLayoutConstraint(item: yellowView, attribute: .height, relatedBy: .equal, toItem: redView, attribute: .height, multiplier: 1, constant: 0)
]
translatesAutoresizingMaskIntoConstraintsは false にしてください。
このプロパティはAutoLayout以前に使われていた、AutosizingをAutoLayoutに変換するかのフラグです。
デフォルトでは true になっているので、AutoLayoutを指定できない場合があります。
アニメーションさせながらAutoLayoutを変更する
removeConstraints、NSLayoutConstraintで再度レイアウトを指定する
self.view.removeConstraints(redView.constraints)
self.view.addConstraints([
    NSLayoutConstraint(item: redView, attribute: .top, relatedBy: .equal, toItem: self.view, attribute: .top, multiplier: 1, constant: 10),
    NSLayoutConstraint(item: redView, attribute: .left, relatedBy: .equal, toItem: self.view, attribute: .left, multiplier: 1, constant: 10),
    NSLayoutConstraint(item: redView, attribute: .width, relatedBy: .equal, toItem: nil, attribute: .width, multiplier: 1, constant: 150),
    NSLayoutConstraint(item: redView, attribute: .height, relatedBy: .equal, toItem: nil, attribute: .height, multiplier: 1, constant: 150)
])
self.view.removeConstraints(yellowView.constraints)
self.view.addConstraints([
    NSLayoutConstraint(item: yellowView, attribute: .top, relatedBy: .equal, toItem: self.view, attribute: .top, multiplier: 1, constant: 10),
    NSLayoutConstraint(item: yellowView, attribute: .right, relatedBy: .equal, toItem: self.view, attribute: .right, multiplier: 1, constant: -10),
    NSLayoutConstraint(item: yellowView, attribute: .width, relatedBy: .equal, toItem: nil, attribute: .width, multiplier: 1, constant: 150),
    NSLayoutConstraint(item: yellowView, attribute: .height, relatedBy: .equal, toItem: nil, attribute: .height, multiplier: 1, constant: 110)
])

UIView.animate(withDuration: 1.0, animations: { _ in
    self.view.layoutIfNeeded()
})
animateの処理の中では、親Viewの layoutIfNeededを呼ぶだけにしましょう。
以上で、AutoLayoutの設定は完了です。
全体のコード
import UIKit

class ViewController: UIViewController {

    let redView: UIView = UIView()
    let yellowView: UIView = UIView()

    override func viewDidLoad() {
        super.viewDidLoad()
        let tap = UITapGestureRecognizer(target: self, action: #selector(ViewController.onTap(sender:)))
        self.view.addGestureRecognizer(tap)

        redView.backgroundColor = .red
        self.view.addSubview(redView)
        redView.translatesAutoresizingMaskIntoConstraints = false
        self.view.addConstraints([
            NSLayoutConstraint(item: redView, attribute: .top, relatedBy: .equal, toItem: self.view, attribute: .top, multiplier: 1, constant: 10),
            NSLayoutConstraint(item: redView, attribute: .left, relatedBy: .equal, toItem: self.view, attribute: .left, multiplier: 1, constant: 10),
            NSLayoutConstraint(item: redView, attribute: .bottom, relatedBy: .equal, toItem: self.view, attribute: .bottom, multiplier: 1, constant: -10)
        ])

        yellowView.backgroundColor = .yellow
        self.view.addSubview(yellowView)
        yellowView.translatesAutoresizingMaskIntoConstraints = false
        self.view.addConstraints([
            NSLayoutConstraint(item: yellowView, attribute: .top, relatedBy: .equal, toItem: self.view, attribute: .top, multiplier: 1, constant: 10),
            NSLayoutConstraint(item: yellowView, attribute: .left, relatedBy: .equal, toItem: redView, attribute: .right, multiplier: 1, constant: 10),
            NSLayoutConstraint(item: yellowView, attribute: .bottom, relatedBy: .equal, toItem: self.view, attribute: .bottom, multiplier: 1, constant: -10),
            NSLayoutConstraint(item: yellowView, attribute: .right, relatedBy: .equal, toItem: self.view, attribute: .right, multiplier: 1, constant: -10),
            NSLayoutConstraint(item: yellowView, attribute: .width, relatedBy: .equal, toItem: redView, attribute: .width, multiplier: 1, constant: 0),
            NSLayoutConstraint(item: yellowView, attribute: .height, relatedBy: .equal, toItem: redView, attribute: .height, multiplier: 1, constant: 0)
        ])
    }

    func onTap(sender: UITapGestureRecognizer) {

        self.view.removeConstraints(redView.constraints)
        self.view.addConstraints([
            NSLayoutConstraint(item: redView, attribute: .top, relatedBy: .equal, toItem: self.view, attribute: .top, multiplier: 1, constant: 10),
            NSLayoutConstraint(item: redView, attribute: .left, relatedBy: .equal, toItem: self.view, attribute: .left, multiplier: 1, constant: 10),
            NSLayoutConstraint(item: redView, attribute: .width, relatedBy: .equal, toItem: nil, attribute: .width, multiplier: 1, constant: 150),
            NSLayoutConstraint(item: redView, attribute: .height, relatedBy: .equal, toItem: nil, attribute: .height, multiplier: 1, constant: 150)
        ])
        self.view.removeConstraints(yellowView.constraints)
        self.view.addConstraints([
            NSLayoutConstraint(item: yellowView, attribute: .top, relatedBy: .equal, toItem: self.view, attribute: .top, multiplier: 1, constant: 10),
            NSLayoutConstraint(item: yellowView, attribute: .right, relatedBy: .equal, toItem: self.view, attribute: .right, multiplier: 1, constant: -10),
            NSLayoutConstraint(item: yellowView, attribute: .width, relatedBy: .equal, toItem: nil, attribute: .width, multiplier: 1, constant: 150),
            NSLayoutConstraint(item: yellowView, attribute: .height, relatedBy: .equal, toItem: nil, attribute: .height, multiplier: 1, constant: 110)
        ])

        UIView.animate(withDuration: 1.0, animations: { _ in
            self.view.layoutIfNeeded()
        })
    }


    override func didReceiveMemoryWarning() {
        super.didReceiveMemoryWarning()
        // Dispose of any resources that can be recreated.
    }
}
ソースコード: AutoLayout_sample
まとめ
SnapKitの方が楽に綺麗に書けるので、便利ですねー。。。