
PythonSCADコミュニティ・開発者に感謝申し上げます。ありがとうございます。
参考サイト
本プログラムのシーン構成および曲線の方程式は、以下の素晴らしい作品・解説を
参考に(インスパイアされて)Pythonコードとして新たに再構築したものです。
素敵な知見を共有してくださった作者様に深く感謝いたします。
ありがとうございます。
便利です。ありがとうございます。
01. スーパー楕円(|x/a|^n + |y/b|^n = 1)の輪郭
スーパー楕円(|x/a|^n + |y/b|^n = 1)の輪郭で、
小物トレイを作って。ピート・ハインと同じ n=2.5、
縦横比は6:5。外寸180×150mm、高さ22mm、
壁と底は3mm。底は平らにして、
1. 完成コード(PythonSCAD)
# ==========================================
# スーパー楕円トレイ(ピート・ハイン n=2.5)
# 作成日: 2026/08/28
# ==========================================

from pythonscad import *
from math import pi, sin, cos

# --- パラメータ設定 (単位: mm) ---
outer_width      = 180.0   # 外寸 X方向
outer_depth      = 150.0   # 外寸 Y方向
tray_height      = 22.0    # 全体高さ Z方向
wall_thickness   = 3.0     # 壁厚
bottom_thickness = 3.0     # 底厚
super_n          = 2.5     # ピート・ハインのスーパー楕円指数
point_count      = 160     # 輪郭の分割数
fn_val           = 80      # 円形補助用
eps              = 0.1     # ブーリアン演算のチラつき防止

body_color       = "skyblue"


# --- 関数(モジュール)定義 ---

def signed_power(v, p):
    """
    符号を保ったまま累乗するための関数。
    スーパー楕円では cos, sin がマイナスになる区間があるため使う。
    """
    if v >= 0:
        return abs(v) ** p
    else:
        return -((abs(v)) ** p)


def create_superellipse_2d(width, depth, n, steps):
    """
    スーパー楕円 |x/a|^n + |y/b|^n = 1 の2D輪郭を作る。
    a = width / 2, b = depth / 2
    """
    a = width / 2.0
    b = depth / 2.0
    power = 2.0 / n

    pts = []

    for i in range(steps):
        t = 2.0 * pi * i / steps
        x = a * signed_power(cos(t), power)
        y = b * signed_power(sin(t), power)
        pts.append([x, y])

    return polygon(pts)


def create_body():
    """
    外形の立体を作る。
    底面は Z=0、上面は Z=tray_height になるよう center=False で押し出す。
    """
    outer_2d = create_superellipse_2d(
        outer_width,
        outer_depth,
        super_n,
        point_count
    )

    body = linear_extrude(outer_2d, height=tray_height)
    return body


def create_cutter():
    """
    内側をくり抜くカッターを作る。
    壁厚3mm・底厚3mmを残すため、
    内側のスーパー楕円は外寸から壁厚ぶん小さくする。
    """
    inner_width = outer_width - 2.0 * wall_thickness
    inner_depth = outer_depth - 2.0 * wall_thickness

    inner_2d = create_superellipse_2d(
        inner_width,
        inner_depth,
        super_n,
        point_count
    )

    cavity_height = tray_height - bottom_thickness + eps

    cavity = linear_extrude(inner_2d, height=cavity_height)

    # Z=bottom_thickness から上方向にくり抜く
    cavity = translate(cavity, [0, 0, bottom_thickness])

    return cavity


# --- メイン処理 ---

# 1. 外形とくり抜きカッターを生成
body = create_body()
cutter = create_cutter()

# 2. 一括くり抜き
result = body - cutter

# 3. 色をつける
result = color(result, body_color)

# 4. 3Dプレビュー表示
show(result)
2. 形状のポイント
-
外形はスーパー楕円
[
|x/a|^{2.5} + |y/b|^{2.5} = 1
]
の輪郭です。 -
外寸は
180 mm × 150 mm
なので、縦横比は
[
180:150 = 6:5
]
になっています。 -
高さは 22 mm。
-
壁厚は 3 mm。
-
底厚も 3 mm。
-
底面は
linear_extrude(..., height=tray_height)を使っているので、
Z=0 の平らな底面になります。
3. 学習ポイント
スーパー楕円は、普通の楕円よりも少し四角に近い、やわらかい形になります。
指数 n を変えると形が変わります。
super_n = 2.0
にすると普通の楕円に近くなります。
super_n = 4.0
にすると、より角の丸い長方形に近づきます。
今回の
super_n = 2.5
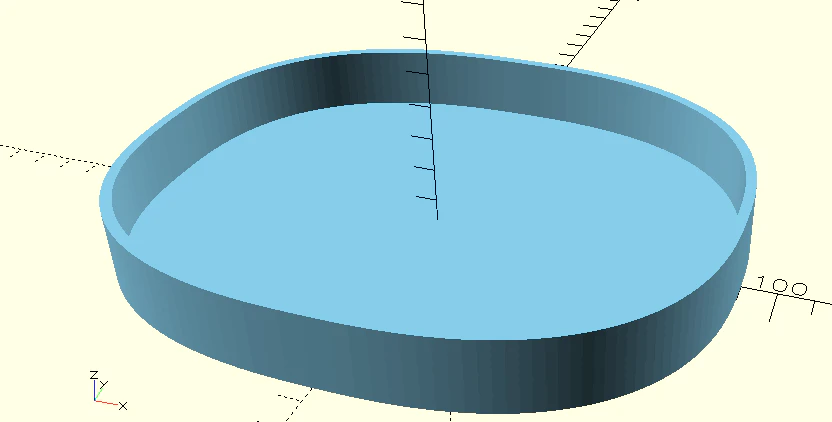
は、ピート・ハインがデザインで使った有名なスーパー楕円に近い値です。
縁の広がり 0.12として、上に向かって 1.12倍 なので、scale=[outer_scale, outer_scale]
linear_extrude() に scale=[outer_scale, outer_scale] を指定すると、下側の輪郭を基準にして、上面が 1.12 倍に広がる形になります。
outer_scale = 1.0 + rim_flare  # 1.12
body = linear_extrude(outer_2d, height=tray_height, scale=[outer_scale, outer_scale])
注意点
-
scale=[1.12, 1.12]は X方向・Y方向を同じ倍率で拡大します。 - したがって、スーパー楕円の縦横比 6:5 は保たれます。
- 外寸 180×150mm を「底面寸法」と考えるなら、上面は
201.6×168mm になります。 - 外寸 180×150mm を「上面の最大寸法」としたいなら、底面寸法を
180/1.12,150/1.12にする必要があります。
今回は「上に向かって 1.12倍」とのことなので、底面が 180×150mm、上面が 1.12倍になる形として書くと、以下のようになります。
修正版コード例
# ==========================================
# スーパー楕円トレイ(上に向かって広がるタイプ)
# 作成日: 2026/08/29
# ==========================================

from pythonscad import *
from math import pi, sin, cos

# --- パラメータ設定 (単位: mm) ---
outer_width      = 180.0   # 底面側の外寸 X方向
outer_depth      = 150.0   # 底面側の外寸 Y方向
tray_height      = 22.0    # 全体高さ Z方向
wall_thickness   = 3.0     # 壁厚
bottom_thickness = 3.0     # 底厚

super_n          = 2.5     # ピート・ハインのスーパー楕円指数
rim_flare        = 0.12    # 縁の広がり率
outer_scale      = 1.0 + rim_flare  # 上面は1.12倍

point_count      = 160
fn_val           = 80
eps              = 0.1

body_color       = "skyblue"


# --- 関数定義 ---

def signed_power(v, p):
    """符号を保った累乗"""
    if v >= 0:
        return abs(v) ** p
    else:
        return -((abs(v)) ** p)


def create_superellipse_2d(width, depth, n, steps):
    """
    スーパー楕円 |x/a|^n + |y/b|^n = 1 の2D輪郭を作る
    """
    a = width / 2.0
    b = depth / 2.0
    power = 2.0 / n

    pts = []

    for i in range(steps):
        t = 2.0 * pi * i / steps
        x = a * signed_power(cos(t), power)
        y = b * signed_power(sin(t), power)
        pts.append([x, y])

    return polygon(pts)


def create_body():
    """
    外形本体。
    scale=[outer_scale, outer_scale] により、
    Z=0 の底面から Z=tray_height の上面に向かって 1.12倍に広がる。
    """
    outer_2d = create_superellipse_2d(
        outer_width,
        outer_depth,
        super_n,
        point_count
    )

    body = linear_extrude(
        outer_2d,
        height=tray_height,
        scale=[outer_scale, outer_scale]
    )

    return body


def create_cutter():
    """
    内側をくり抜くカッター。
    内側も上に向かって広げることで、トレイらしい開いた形にする。
    """
    inner_width = outer_width - 2.0 * wall_thickness
    inner_depth = outer_depth - 2.0 * wall_thickness

    inner_2d = create_superellipse_2d(
        inner_width,
        inner_depth,
        super_n,
        point_count
    )

    cavity_height = tray_height - bottom_thickness + eps

    cavity = linear_extrude(
        inner_2d,
        height=cavity_height,
        scale=[outer_scale, outer_scale]
    )

    # 底厚を残すため、くり抜き開始位置を Z=bottom_thickness にする
    cavity = translate(cavity, [0, 0, bottom_thickness])

    return cavity


# --- メイン処理 ---

body = create_body()
cutter = create_cutter()

result = body - cutter
result = color(result, body_color)

show(result)
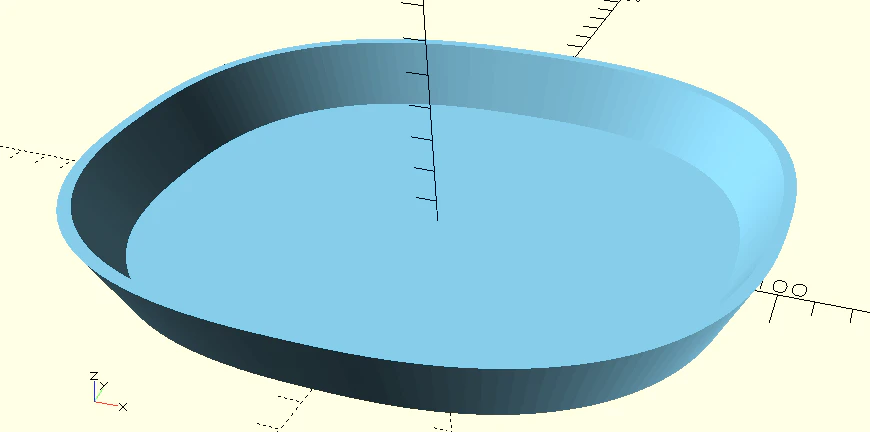
補足
この指定で、
scale=[outer_scale, outer_scale]
としているので、X方向もY方向も同じ比率で広がります。
つまり底面が、
180 × 150 mm
なら、上面は、
180 × 1.12 = 201.6 mm
150 × 1.12 = 168.0 mm
になります。
もし「完成品の最大外寸を 180×150mm にしたい」場合は、底面側を逆算して、
outer_width = 180.0 / outer_scale
outer_depth = 150.0 / outer_scale
にするとよいです。
02. パーリンノイズ
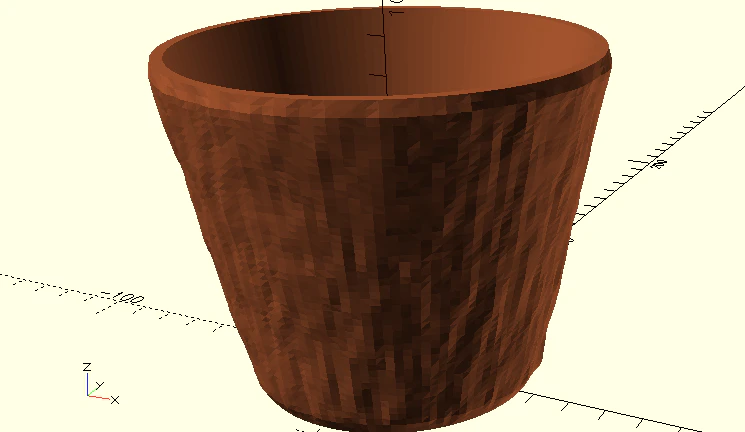
高さ88mm・底の直径72mm・口の直径110mmの植木鉢を作って。
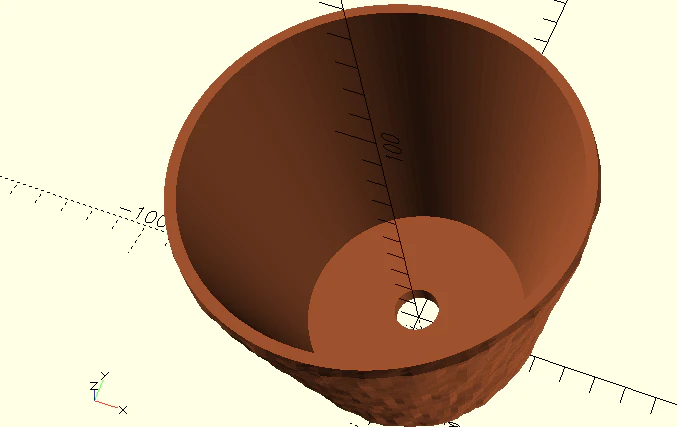
壁は3mm、底板は6mm、底の真ん中に直径14mmの水抜き穴。
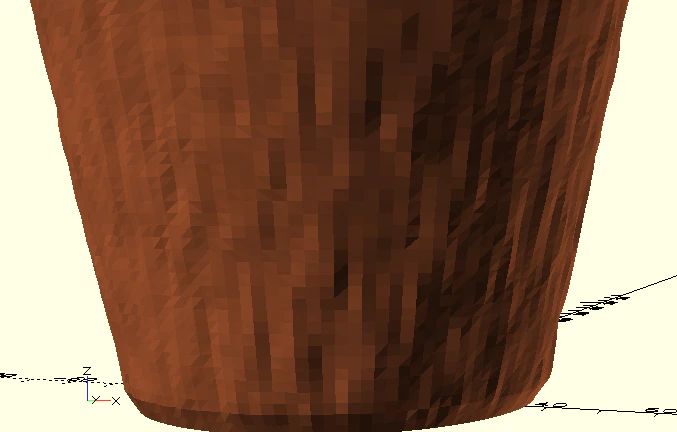
外側の表面だけ、パーリンノイズで最大3mm押し出して岩肌にする。
内側はまっすぐのままにして、壁が設計より薄くならないように。
ブーリアンは使わず、面を直接張って作って。
単位はmm、原点は底面の中心。ノイズの細かさは、
よこ方向とたて方向で別々に指定できるようにして
1. 完成コード(PythonSCAD)
# ==========================================
# 岩肌テクスチャ付き植木鉢(面張りメッシュ)
# 作成日: 2026/08/28
# 単位: mm
# 原点: 底面の中心 [0, 0, 0]
# ==========================================

from pythonscad import *
from math import pi, sin, cos, floor

# --- パラメータ設定 (単位: mm) ---

height              = 88.0     # 植木鉢の高さ Z方向
bottom_diameter     = 72.0     # 底の外径
mouth_diameter      = 110.0    # 口の外径
wall_thickness      = 3.0      # 壁厚
bottom_thickness    = 6.0      # 底板の厚み
drain_hole_diameter = 14.0     # 水抜き穴の直径

noise_max_push      = 3.0      # 外側だけに最大何mm押し出すか
noise_scale_u       = 10.0     # 横方向(円周方向)のノイズ細かさ:大きいほど細かい
noise_scale_z       = 5.0      # 縦方向(高さ方向)のノイズ細かさ:大きいほど細かい
noise_octaves       = 3        # ノイズの重ね回数
noise_persistence   = 0.5      # 細かいノイズの強さ

theta_segments      = 128      # 円周方向の分割数
z_segments          = 48       # 高さ方向の分割数
fn_val              = 64       # 参考用:円形の滑らかさ
eps                 = 0.01     # 微小値

pot_color           = "sienna"


# --- 基本計算 ---

bottom_radius       = bottom_diameter / 2.0
mouth_radius        = mouth_diameter / 2.0
drain_hole_radius   = drain_hole_diameter / 2.0


# --- ノイズ関数群 ---

def clamp(x, a, b):
    """値xをa〜bの範囲におさめる"""
    if x < a:
        return a
    if x > b:
        return b
    return x


def fade(t):
    """
    Perlin noise 用のなめらかな補間関数
    6t^5 - 15t^4 + 10t^3
    """
    return t * t * t * (t * (t * 6.0 - 15.0) + 10.0)


def lerp(a, b, t):
    """線形補間"""
    return a + (b - a) * t


def hash3(ix, iy, iz):
    """
    格子点ごとに擬似乱数を作るためのハッシュ関数
    Pythonだけで決定的に同じ模様を作る
    """
    h = ix * 374761393 + iy * 668265263 + iz * 2147483647
    h = (h ^ (h >> 13)) * 1274126177
    h = h ^ (h >> 16)
    return h & 0xffffffff


def grad_dot(h, x, y, z):
    """
    ハッシュ値から勾配ベクトルを選び、距離ベクトルとの内積を返す
    """
    g = h % 12

    if g == 0:
        return x + y
    if g == 1:
        return -x + y
    if g == 2:
        return x - y
    if g == 3:
        return -x - y
    if g == 4:
        return x + z
    if g == 5:
        return -x + z
    if g == 6:
        return x - z
    if g == 7:
        return -x - z
    if g == 8:
        return y + z
    if g == 9:
        return -y + z
    if g == 10:
        return y - z

    return -y - z


def perlin3(x, y, z):
    """
    3D Perlin noise
    戻り値はおよそ -1.0 〜 +1.0
    """
    x0 = int(floor(x))
    y0 = int(floor(y))
    z0 = int(floor(z))

    xf = x - x0
    yf = y - y0
    zf = z - z0

    u = fade(xf)
    v = fade(yf)
    w = fade(zf)

    n000 = grad_dot(hash3(x0,     y0,     z0),     xf,     yf,     zf)
    n100 = grad_dot(hash3(x0 + 1, y0,     z0),     xf - 1, yf,     zf)
    n010 = grad_dot(hash3(x0,     y0 + 1, z0),     xf,     yf - 1, zf)
    n110 = grad_dot(hash3(x0 + 1, y0 + 1, z0),     xf - 1, yf - 1, zf)

    n001 = grad_dot(hash3(x0,     y0,     z0 + 1), xf,     yf,     zf - 1)
    n101 = grad_dot(hash3(x0 + 1, y0,     z0 + 1), xf - 1, yf,     zf - 1)
    n011 = grad_dot(hash3(x0,     y0 + 1, z0 + 1), xf,     yf - 1, zf - 1)
    n111 = grad_dot(hash3(x0 + 1, y0 + 1, z0 + 1), xf - 1, yf - 1, zf - 1)

    x00 = lerp(n000, n100, u)
    x10 = lerp(n010, n110, u)
    x01 = lerp(n001, n101, u)
    x11 = lerp(n011, n111, u)

    y0v = lerp(x00, x10, v)
    y1v = lerp(x01, x11, v)

    return lerp(y0v, y1v, w)


def fractal_perlin3(x, y, z, octaves, persistence):
    """
    複数のPerlin noiseを重ねて岩肌らしくする
    """
    total = 0.0
    amplitude = 1.0
    frequency = 1.0
    max_total = 0.0

    for i in range(octaves):
        total = total + perlin3(x * frequency, y * frequency, z * frequency) * amplitude
        max_total = max_total + amplitude
        amplitude = amplitude * persistence
        frequency = frequency * 2.0

    return total / max_total


# --- 幾何計算関数 ---

def nominal_outer_radius_at_z(z):
    """
    高さzでの設計上の外半径。
    底から口に向かって直線的に広がる。
    """
    t = z / height
    return bottom_radius + (mouth_radius - bottom_radius) * t


def nominal_inner_radius_at_z(z):
    """
    内側はまっすぐな円すい台形状。
    外側の設計半径から壁厚を引く。
    ノイズは内側に入れないので、設計より薄くならない。
    """
    return nominal_outer_radius_at_z(z) - wall_thickness


def edge_fade(z):
    """
    底面と口の寸法をきれいに保つため、上下端ではノイズを0に近づける。
    これにより、底径72mm・口径110mmが崩れにくい。
    """
    fade_height = 4.0

    bottom_f = clamp(z / fade_height, 0.0, 1.0)
    top_f = clamp((height - z) / fade_height, 0.0, 1.0)

    return bottom_f * top_f


def outer_noise_push(theta, z):
    """
    外側表面だけに使う押し出し量。
    0〜noise_max_push の範囲にする。
    """
    z_rate = z / height

    # 円周方向のつなぎ目が出ないよう、cos/sinで円筒座標を3Dノイズ空間に入れる
    nx = cos(theta) * noise_scale_u
    ny = sin(theta) * noise_scale_u
    nz = z_rate * noise_scale_z

    n = fractal_perlin3(nx, ny, nz, noise_octaves, noise_persistence)

    # -1〜+1 を 0〜1 に変換
    n01 = clamp(n * 0.5 + 0.5, 0.0, 1.0)

    return noise_max_push * n01 * edge_fade(z)


def add_point(points, x, y, z):
    """
    polyhedron用の点を追加し、その点番号を返す
    """
    points.append([x, y, z])
    return len(points) - 1


# --- メッシュ生成 ---

def create_rock_pot_mesh():
    """
    ブーリアンを使わず、頂点と面を直接張って植木鉢を作る。
    外側だけノイズで外向きに押し出す。
    内側はノイズなしなので、壁厚3mmを下回らない。
    """
    points = []
    faces = []

    outer_idx = []
    inner_idx = []
    hole_top_idx = []
    hole_bottom_idx = []

    # ------------------------------
    # 1. 外側側面の頂点
    # ------------------------------
    for iz in range(z_segments + 1):
        z = height * iz / z_segments
        row = []

        for ia in range(theta_segments):
            theta = 2.0 * pi * ia / theta_segments

            r_nominal = nominal_outer_radius_at_z(z)
            r_noise = outer_noise_push(theta, z)
            r = r_nominal + r_noise

            x = r * cos(theta)
            y = r * sin(theta)

            row.append(add_point(points, x, y, z))

        outer_idx.append(row)

    # ------------------------------
    # 2. 内側側面の頂点
    #    内側は底板の上面 z=bottom_thickness から始める
    # ------------------------------
    for iz in range(z_segments + 1):
        z = bottom_thickness + (height - bottom_thickness) * iz / z_segments
        row = []

        for ia in range(theta_segments):
            theta = 2.0 * pi * ia / theta_segments

            r = nominal_inner_radius_at_z(z)

            x = r * cos(theta)
            y = r * sin(theta)

            row.append(add_point(points, x, y, z))

        inner_idx.append(row)

    # ------------------------------
    # 3. 水抜き穴の上下リング頂点
    # ------------------------------
    for ia in range(theta_segments):
        theta = 2.0 * pi * ia / theta_segments

        x = drain_hole_radius * cos(theta)
        y = drain_hole_radius * sin(theta)

        hole_bottom_idx.append(add_point(points, x, y, 0.0))
        hole_top_idx.append(add_point(points, x, y, bottom_thickness))

    # ------------------------------
    # 4. 外側側面の面
    # ------------------------------
    for iz in range(z_segments):
        for ia in range(theta_segments):
            nb = (ia + 1) % theta_segments

            faces.append([
                outer_idx[iz][ia],
                outer_idx[iz][nb],
                outer_idx[iz + 1][nb],
                outer_idx[iz + 1][ia]
            ])

    # ------------------------------
    # 5. 内側側面の面
    #    法線が内側空間を向くように、外側とは逆向きに張る
    # ------------------------------
    for iz in range(z_segments):
        for ia in range(theta_segments):
            nb = (ia + 1) % theta_segments

            faces.append([
                inner_idx[iz][ia],
                inner_idx[iz + 1][ia],
                inner_idx[iz + 1][nb],
                inner_idx[iz][nb]
            ])

    # ------------------------------
    # 6. 口のふち:外側上端と内側上端をつなぐ
    # ------------------------------
    top_outer = outer_idx[z_segments]
    top_inner = inner_idx[z_segments]

    for ia in range(theta_segments):
        nb = (ia + 1) % theta_segments

        faces.append([
            top_inner[ia],
            top_outer[ia],
            top_outer[nb],
            top_inner[nb]
        ])

    # ------------------------------
    # 7. 底板の上面:水抜き穴から内側壁までのリング
    # ------------------------------
    bottom_inner = inner_idx[0]

    for ia in range(theta_segments):
        nb = (ia + 1) % theta_segments

        faces.append([
            hole_top_idx[ia],
            bottom_inner[ia],
            bottom_inner[nb],
            hole_top_idx[nb]
        ])

    # ------------------------------
    # 8. 水抜き穴の内壁
    # ------------------------------
    for ia in range(theta_segments):
        nb = (ia + 1) % theta_segments

        faces.append([
            hole_bottom_idx[ia],
            hole_top_idx[ia],
            hole_top_idx[nb],
            hole_bottom_idx[nb]
        ])

    # ------------------------------
    # 9. 底面:水抜き穴から外側底面までのリング
    # ------------------------------
    bottom_outer = outer_idx[0]

    for ia in range(theta_segments):
        nb = (ia + 1) % theta_segments

        faces.append([
            hole_bottom_idx[ia],
            hole_bottom_idx[nb],
            bottom_outer[nb],
            bottom_outer[ia]
        ])

    return polyhedron(points=points, faces=faces)


# --- 安全チェック ---

if wall_thickness <= 0:
    raise ValueError("wall_thickness は 0 より大きくしてください。")

if bottom_thickness <= 0:
    raise ValueError("bottom_thickness は 0 より大きくしてください。")

if drain_hole_radius >= nominal_inner_radius_at_z(bottom_thickness):
    raise ValueError("水抜き穴が大きすぎます。底板上面の内径より小さくしてください。")


# --- メイン処理 ---

pot = create_rock_pot_mesh()

result = color(pot, pot_color)

show(result)
2. 設計ポイント
-
ブーリアン演算なし
-
cube - cylinderのような削り処理は使っていません。 -
polyhedron(points=..., faces=...)で頂点と面を直接作っています。
-
-
原点
- 原点
[0, 0, 0]は底面中心です。 - 植木鉢は
Z=0からZ=88まで立ち上がります。
- 原点
-
壁厚が薄くならない工夫
- 内側形状は完全にまっすぐな円すい台です。
- ノイズは外側へだけ押し出しています。
- そのため、壁厚は最低でも設計値の 3mm を保ちます。
-
岩肌ノイズ
-
noise_scale_uが横方向、つまり円周方向の細かさです。 -
noise_scale_zが縦方向、高さ方向の細かさです。 -
noise_max_push = 3.0なので、外側へ最大3mmまで押し出されます。
-
-
水抜き穴
- 底中央に直径14mmの穴を、面張りで直接作っています。
- ブーリアンで穴を開けているわけではありません。
3. 調整例
岩肌をもっと細かくしたい場合:
noise_scale_u = 18.0
noise_scale_z = 9.0
岩肌をもっとなだらかにしたい場合:
noise_scale_u = 6.0
noise_scale_z = 3.0
表面の凹凸を弱くしたい場合:
noise_max_push = 1.5
より滑らかにしたい場合:
theta_segments = 192
z_segments = 72
ただし、分割数を増やすと表示やSTL出力が重くなります。
03. 深型・円形トレイ(縁広がりタイプ)
トレイ
深型
断面

円

形
縁の広がり
0.35
scale=[1.35, 1.35] のように明示的に指定してください。

寸法
半径
60mm

縁の高さ
40mm

肉厚
2.6mm

幅
162mm
高さ
40mm
1. 完成コード(PythonSCAD)
# ==========================================
# 深型・円形トレイ(縁広がりタイプ)
# 作成日: 2026/08/29
# ==========================================

from pythonscad import *

# --- パラメータ設定 (単位: mm) ---
bottom_radius      = 60.0     # 底面側の半径
tray_height        = 40.0     # トレイの高さ
wall_thickness     = 2.6      # 肉厚
rim_spread         = 0.35     # 縁の広がり率
outer_scale        = [1.35, 1.35]  # 縁の広がりを明示指定
fn_val             = 120      # 円のなめらかさ
eps                = 0.1      # Zファイティング防止用

# --- 寸法計算 ---
top_radius         = bottom_radius * outer_scale[0]  # 60 * 1.35 = 81mm
top_width          = top_radius * 2                  # 162mm

inner_bottom_radius = bottom_radius - wall_thickness
inner_top_radius    = top_radius - wall_thickness

inner_height = tray_height - wall_thickness + 2 * eps
inner_scale_value = inner_top_radius / inner_bottom_radius
inner_scale = [inner_scale_value, inner_scale_value]

# --- 関数(モジュール)定義 ---

def create_outer_body():
    """外側の深型トレイ形状を作る"""
    base_circle = circle(r=bottom_radius, fn=fn_val)

    outer = linear_extrude(
        base_circle,
        height=tray_height,
        scale=outer_scale
    )

    return outer


def create_inner_cutter():
    """内側をくり抜くためのカッターを作る"""
    inner_circle = circle(r=inner_bottom_radius, fn=fn_val)

    cutter = linear_extrude(
        inner_circle,
        height=inner_height,
        scale=inner_scale
    )

    # 底の厚み wall_thickness を残し、上方向に少し突き抜けさせる
    cutter = translate(cutter, [0, 0, wall_thickness])

    return cutter


# --- メイン処理 ---

# 1. 外形とカッターを作成
outer_body = create_outer_body()
inner_cutter = create_inner_cutter()

# 2. 一括くり抜き
tray = outer_body - inner_cutter

# 3. 表示
show(tray)
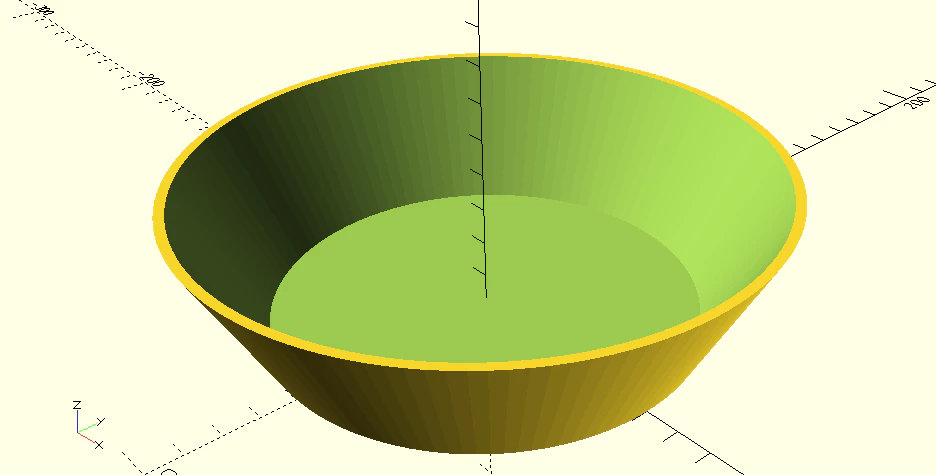
2. モデルの内容
- 底面半径:
60mm - 上端半径:
60 × 1.35 = 81mm - 上端の幅:
162mm - 高さ:
40mm - 肉厚:
2.6mm - 縁の広がり:
scale=[1.35, 1.35]として明示指定
このコードでは、まず円を高さ方向に押し出しながら広げて、深型の外形を作っています。
そのあと、少し小さい円を同じように押し出した「カッター」で中をくり抜き、底付きの円形トレイにしています。
参考資料
📄 ライセンスと「オープンソース」の文化について
本記事のソースコードは、すべて MIT ライセンス で公開しています。
- 高校生のみなさんへ 🚀
プログラミングの世界には、「自分が作った便利な仕組みをみんなに共有し、お互いに助け合って技術を発展させる(オープンソース)」という素晴らしい文化があります。このコードも、作者の名前(クレジット)さえ残してもらえれば、改造して学校の課題に使ったり、自分のアプリに組み込んだりして自由に無料で使ってOKです!
ぜひこのコードをベースに、自分だけの新しいプログラムを作って挑戦してみてください。 - 免責事項 ⚠️
本記事およびコードは個人の研究・検証に基づくものであり、所属する組織の公式見解ではありません。自由に使っていただけますが、利用に伴ういかなる損害についても執筆者は責任を負いかねますので、すべて「自己責任(無保証)」の範囲内で楽しく学んでくださいね。