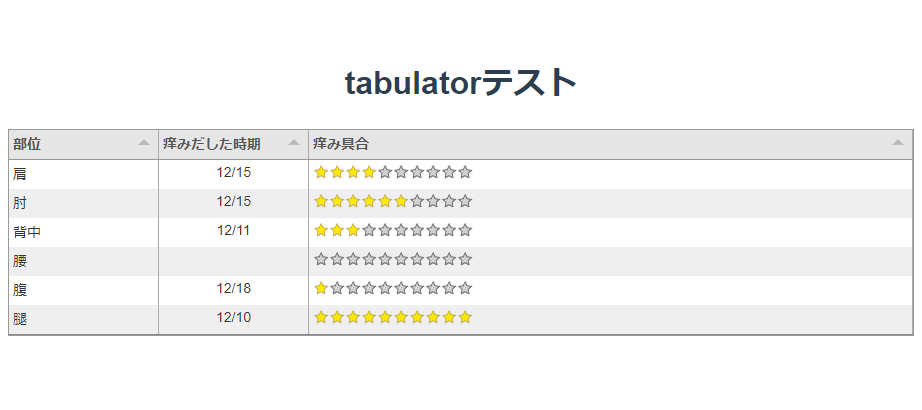
TabulatorはリッチなHTMLテーブルを実装できる素敵なJavascriptプラグインです。
React、Vue、Angularといった主要フレームワークがサポートされているのも嬉しいですね。
ライセンスはMITです。
Vueで使ってみたので実装方法を備忘録としてまとめておきます。
Tabulator
さっそく実装
環境作成
まずはvue-cli(3.2.1)でプロジェクト作成します。
適当なディレクトリでvue createします。
vue create tabulator-test
cd tabulator-test
普段templateはpugで書いているのでvue-cli-plugin-pugもインストールしておきます。
vue add pug
Tabulatorをインストールします。
npm install tabulator-tables --save
Tabulator.vueを新規作成してApp.vueに登録します。
<template lang="pug">
  .vm-tabulator
    h1 tabulatorテスト
</template>
<template>
  <div id="app">
    <Tabulator/>
  </div>
</template>

<script>
import Tabulator from './components/Tabulator.vue'

export default {
  name: 'app',
  components: {
    Tabulator
  }
}
</script>

<style>
# app {
  font-family: 'Avenir', Helvetica, Arial, sans-serif;
  -webkit-font-smoothing: antialiased;
  -moz-osx-font-smoothing: grayscale;
  text-align: center;
  color: #2c3e50;
  margin-top: 60px;
}
</style>
コンポーネントにTabulatorを実装
Tabulatorが表示されるdivを用意します。ref属性値は任意のものでOKです。
<template lang="pug">
  .vm-tabulator
    h1 tabulatorテスト
+   div(ref="table")
</template>
プラグインのcssをimportしておきます。
<style>
@import '~tabulator-tables/dist/css/tabulator.min.css'
</style>
scriptでTabulatorをrequireして、
<script>
const Tabulator = require("tabulator-tables");
dataに、テーブルに表示するデータを用意しておきます。
tableColumnに指定したfieldと、
tableDataのkeyが紐づくようです。
export default {
  data() {
    return {
      //mountedでインスタンスを格納するために用意しておく
      tabulator: null,
      //テーブル1行目の見出しにあたる部分
      tableColumn: [
        {title:"部位", field:"name", width:150},
        {title:"痒みだした時期", field:"from", align:"center", width:150},
        {title:"痒み具合", field:"kayumi", align:"left", formatter:"star", formatterParams:{
            stars: 10
        }},
      ],
      //テーブルデータ
      tableData: [
        {id:1, name:"肩", from:"12/15", kayumi:4},
        {id:2, name:"肘", from:"12/15", kayumi:6},
        {id:3, name:"背中", from:"12/11", kayumi:3},
        {id:4, name:"腰", from:"", kayumi:0},
        {id:5, name:"腹", from:"12/18", kayumi:1},
        {id:6, name:"腿", from:"12/10", kayumi:10},
      ]
    }
  },
mountedのタイミングでインスタンスを生成します。
this.$refs.tableの部分をtemplateで指定したref属性値にしてください。
  mounted(){
    //dataに用意したtabulaorにインスタンスを生成する
    this.tabulator = new Tabulator(this.$refs.table, {
      data: this.tableData,
      columns: this.tableColumn,
      // この辺はオプション
      height:205,
      layout:"fitColumns",
    });
  }
}
お肌が乾燥するこの時期に、自分が今どこが痒いか管理できる無意味なテーブルができました。
この時点で時期や痒み具合でソートができる代物となっています。
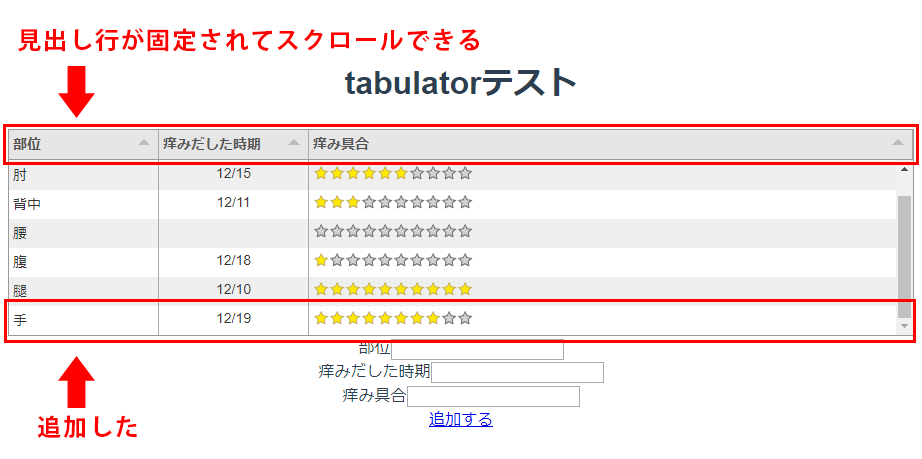
せっかくなのでVueらしく行を追加できるようにしてみます。
イメージ的には、
-
- 入力したデータをObjectとして保管
-
- 追加ボタンを押したら、
tableDataにpush
- 追加ボタンを押したら、
-
-
tableDataをwatchして変更があればtabulator.replaceDataメソッドで更新
-
もちろん、methods内でtabulator.replaceDataでもよいのですが、公式のドキュメントがwatch使ってたので合わせてみました。
こんな感じにしました。
<template lang="pug">
  .vm-tabulator
    h1 tabulatorテスト
    div(ref="table")
    .vm-tabulator__input
      label 部位
        input(type="text" v-model="addData.name")
    .vm-tabulator__input
      label 痒みだした時期
        input(type="text" v-model="addData.from")
    .vm-tabulator__input
      label 痒み具合
        input(type="text" v-model="addData.kayumi")
    .vm-tabulator__submit
      a(href="#", @click.prevent="addTabulator")
        |追加する
</template>

<script>
const Tabulator = require("tabulator-tables");
export default {
  data() {
    return {
      //mountedでインスタンスを作成する
      tabulator: null,
      //テーブル1行目の見出しにあたる部分
      tableColumn: [
        {title:"部位", field:"name", width:150},
        {title:"痒みだした時期", field:"from", align:"center", width:150},
        {title:"痒み具合", field:"kayumi", align:"left", formatter:"star", formatterParams:{
            stars: 10
        }},
      ],
      //テーブルデータ
      tableData: [
        {id:1, name:"肩", from:"12/15", kayumi:4},
        {id:2, name:"肘", from:"12/15", kayumi:6},
        {id:3, name:"背中", from:"12/11", kayumi:3},
        {id:4, name:"腰", from:"", kayumi:0},
        {id:5, name:"腹", from:"12/18", kayumi:1},
        {id:6, name:"腿", from:"12/10", kayumi:10},
      ],
      addData: {id:null,name:null,from:null,kayumi:null}
    }
  },
  mounted(){
    //dataに用意したtabulaorにインスタンスを生成する
    this.tabulator = new Tabulator(this.$refs.table, {
      data: this.tableData,
      columns: this.tableColumn,
      // この辺はオプション
      height:205,
      layout:"fitColumns",
    });
  },
  methods: {
    addTabulator(){
      const obj = Object.assign({},this.addData)
      obj.id = this.tableData.length + 1
      this.tableData.push(obj)
      Object.keys(this.addData).forEach(key => {
        this.addData[key] = null
      })
    }
  },
  watch: {
    //update table if data changes
    tableData:{
      handler: function (newData) {
        this.tabulator.replaceData(newData);
      },
      deep: true,
    }
  }
}
</script>

<style>
@import '~tabulator-tables/dist/css/tabulator.min.css'
</style>
watchの部分は公式のドキュメントから引用したのですが、
watch(){ => watch: { に修正しています。
これで今年の冬はいくらでも乾燥できますね。
感想
今回は実用性皆無なものを作りましたが、
他にも列と行を入れ替えたり、エディタブルなテーブルを作れたりするオプションもあるので、
色々と可能性は広がりますね。
なにかプロジェクトで使えたら便利なオプションとかカスタマイズとかもまとめてみようかと思います。


