はじめに
我が家は共働きで、家賃や光熱費・食費等の共通の出費はワリカンです。
共通の出費は一つの口座にまとめて紐づけており、その口座の残高のベース残高から減った分(=使った分)だけ割り勘してそれぞれが振り込む、といったルールとしています。
今回は口座残高の取得やワリカン計算を自動化し、Slackのチャンネルに投稿するような仕組みを作りました。
やったこと
- AWS Lambda上でHeadless Chrome + Seleniumを動作
- Web家計簿アプリに自動ログインして口座残高を取得
- ワリカンを計算しSlackの家計清算チャンネルにメッセージ送信
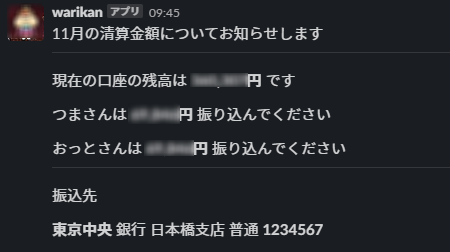
最終的にこんな感じのメッセージが投稿されるようになります。
システム概要は以下の図のようになります。
開発環境
- Windows10 Pro 64bit
- VisualStudio Code
- Python3.7
- AWS
- GitLab
1. Slack Incoming Webhookの準備
上記リンク参考にIncoming Webhookを有効にしたSlack appを作成します。
最終的にWebhook投稿用のURLが発行されますので、これを書き留めます。
2. zaimアカウントの作成
本当は銀行から直接API利用で残高など取得できればいいのですが現状個人では利用できないようです。
したがって今回は銀行サービスと連携し、残高を取得できる家計簿アプリを利用させていただきました。
zaimという家計簿アプリですがいろいろな銀行と連携可能で残高を取得できます。
このサービスを利用しWebスクレイピングすることで残高を取得します。
アカウント作成し、所望の銀行口座の連携登録を実施しておきます。
3. AWS Lambda上でHeadless Chrome + Selenium
参考にした記事は↓
https://qiita.com/nabehide/items/754eb7b7e9fff9a1047d
残念ながらPython3.8では動作しなかったので3.7で作成しています。
Headless Chromeのlayer作成
headless-chromiumとchromedriverの両方が必要です。
# headless-chromium
https://github.com/adieuadieu/serverless-chrome/releases/tag/v1.0.0-37
# chrome-driver
https://chromedriver.storage.googleapis.com/2.37/chromedriver_linux64.zip
必要なファイルをS3にアップロードしてからCloudformationでlayer作成します。
$ ls
chromedriver  headless-chromium
# このようなディレクトリで
$ chmod 755 chromedriver
$ chmod 755 headless-chromium
$ zip --quiet -r headless-chrome.zip ./
$ aws s3 cp headless-chrome.zip s3://${YOUR_BUCKET_NAME}/headless-chrome.zip
パラメータとしてアップロードしたバケット名を与えてください。
AWSTemplateFormatVersion: "2010-09-09"

Parameters:
  BucketName:
    Type: String
    Description: name of s3 bucket

Resources:
  LambdaLayer:
    Type: "AWS::Lambda::LayerVersion"
    Properties:
      CompatibleRuntimes:
        - python3.7
      Content:
        S3Bucket: !Ref BucketName
        S3Key: headless-chrome.zip
      Description: something
      LayerName: headless-chrome
Seleniumのlayer作成
GitLabランナーでamazonlinux:2イメージを利用し作成しました。
# .gitlab-ci.ymlのjob定義
Seleniumレイヤー作成job:
  image: amazonlinux:2
  script:
    # pythonをインストール
    - yum -y install gcc make tar openssl-devel bzip2-devel libffi-devel wget gzip zip --quiet
    - mkdir ./python-build
    - cd ./python-build
    - wget --quiet https://www.python.org/ftp/python/3.7.5/Python-3.7.5.tgz
    - tar xzf ./Python-3.7.5.tgz
    - cd Python-3.7.5
    - ./configure --enable-optimizations > /dev/null 2>&1
    - make install > /dev/null 2>&1
    - cd ${ROOT_DIR}
    - python3.7 --version
    # install pip
    - python3.7 -m pip install --quiet -U pip
    - pip install --quiet awscli selenium
    # deploy packageの作成
    - mkdir python
    - pip install --quiet -t ./python -r requirements.txt
    - zip --quiet -r selenium.zip ./python
    - aws s3 cp selenium.zip s3://${YOUR_BUCKET_NAME}/selenium.zip
こちらもCloudformationでlayer作成します。パラメータとしてアップロードしたバケット名を与えてください。
AWSTemplateFormatVersion: "2010-09-09"

Parameters:
  BucketName:
    Type: String
    Description: name of s3 bucket

Resources:
  LambdaLayer:
    Type: "AWS::Lambda::LayerVersion"
    Properties:
      CompatibleRuntimes:
        - python3.7
      Content:
        S3Bucket: !Ref BucketName
        S3Key: selenium.zip
      Description: something
      LayerName: selenium
Lambda Functionの作成
自分は以下の設定でLambdaFunctionを作成しました
- ランタイム: Python3.7
- タイムアウト:60秒(動作は30秒以上かかります)
- 割り当てメモリ: 384MB(メモリが少なすぎるとChromiumの動作に支障があるようです)
そのほか、上記作成したLayerの設定と各種環境変数の設定をしました。
参考ソースコード(長いので折り畳み)
本来はエラー処理など行っていますが処理の正常系の流れだけ追えるように1ファイルにまとめます。
import json
import os
from datetime import datetime

import requests
from selenium import webdriver
from selenium.webdriver.chrome.options import Options
from selenium.webdriver.common.by import By
from selenium.webdriver.support import expected_conditions as EC
from selenium.webdriver.support.ui import WebDriverWait

options = webdriver.ChromeOptions()
options.binary_location = "/opt/headless-chromium"
options.add_argument("--headless")
options.add_argument("--no-sandbox")
options.add_argument("--single-process")

# Webhook投稿時の本文に利用する要素、環境変数から読み込む
WIFE_NAME = os.environ.get("WIFE_NAME")
HASBAND_NAME = os.environ.get("HASBAND_NAME")
BASE_BALANCE = int(os.environ.get("BASE_BALANCE"))
BANK = os.environ.get("BANK")
BRANCH = os.environ.get("BRANCH")
ACCOUNT = os.environ.get("ACCOUNT")
SLACK_WEBHOOK_URL = os.environ.get("SLACK_WEBHOOK_URL")

def lambda_handler(event, context):
    # 1.----残高の確認----
    url = "https://auth.zaim.net/"
    # ログインの情報は環境変数から読み込む
    user_id = os.environ.get("ZAIM_USER_ID")
    user_pass = os.environ.get("ZAIM_PASS")
    driver = webdriver.Chrome("/opt/chromedriver", chrome_options=options)
    # ログインフォームの読み込み待ち
    WebDriverWait(driver, 10).until(
        EC.presence_of_element_located((By.ID, "UserEmail"))
    )
    user_id_input = driver.find_element_by_id("UserEmail")
    user_id_input.send_keys(user_id)

    user_pass_input = driver.find_element_by_id("UserPassword")
    user_pass_input.send_keys(user_pass)

    login_button = driver.find_element_by_xpath(
        '//*[@id="UserLoginForm"]/div[4]/input'
    )
    login_button.submit()
    # 残高の読み込み待ち
    WebDriverWait(driver, 10).until(
        EC.presence_of_element_located((By.ID, "total-balance"))
    )

    total_balance = driver.find_element_by_xpath(
        '//*[@id="total-balance"]/span'
    ).text
    total_balance = int(total_balance.strip().replace(",", "").lstrip("¥"))
    driver.close()
    driver.quit()

    # 2.----ワリカンの計算----
    # ベース残高からの差を計算
    total_charge = BASE_BALANCE - total_balance
    # total_chargeからそれぞれの補助分を引いて割り勘分を計算
    # ここは投稿上1/2のワリカンにしています
    # 本来はそれぞれの会社からの補助(家賃補助等)を考慮していますが割愛
    wife_charge = total_charge/2
    hasband_charge = total_charge/2

    # 3.----Webhook投稿----
    month = datetime.now().month
    json_payload = {
        "text": "清算金額のお知らせです",
        "blocks": [
            {
                "type": "section",
                "text": {
                    "type": "mrkdwn",
                    "text": "{month}月の清算金額についてお知らせします".format(month=month),
                },
            },
            {"type": "divider"},
            {
                "type": "section",
                "text": {
                    "type": "mrkdwn",
                    "text": "現在の口座の残高は *{:,}円* です".format(total_balance),
                },
            },
            {
                "type": "section",
                "text": {
                    "type": "mrkdwn",
                    "text": "{}さんは *{:,}円* 振り込んでください".format(WIFE_NAME, wife_charge),
                },
            },
            {
                "type": "section",
                "text": {
                    "type": "mrkdwn",
                    "text": "{}さんは *{:,}円* 振り込んでください".format(
                        HASBAND_NAME, hasband_charge
                    ),
                },
            },
            {"type": "divider"},
            {"type": "section", "text": {"type": "mrkdwn", "text": "振込先"}},
            {
                "type": "section",
                "text": {
                    "type": "mrkdwn",
                    "text": "*{bank}* 銀行 {branch}支店 普通 *{account}*".format(
                        bank=BANK, branch=BRANCH, account=ACCOUNT
                    ),
                },
            },
        ],
    }
    requests.post(SLACK_WEBHOOK_URL, data=json.dumps(json_payload))

    return {"statusCode": 200, "body": json.dumps({"message": "success"})}
結果(再掲)
これで夫婦円満!
あとはこの関数を月に1回動作するためにCloudwatch EventsのScheduledRuleを設定していますが、長くなってしまったので紹介は割愛します。
終わりに
初めてのQiita記事投稿でしたが結構な長さになってしまいました。
できるだけ再現性のあるように記載したかったのですがいかがでしたでしょうか?
今回は口座の残高を確認することが目的でしたが、日・週・月毎に一回程度、固定の要素をWebスクレイピングで情報収集したい時などにサーバレスで簡便な構成になったかと思います。

