Slack Appを使用し、さらにサーバレスで実装してみました!今回使用するのはPython、AWSのLambda、API Gatewayです。
API GatewayとLambdaの設定
AWSのLambda、API Gatewayについては過去のhttps://qiita.com/ymktmk_tt/items/7ad4e63e62795bb2418b に細かいことを書いてあるので同じように設定してみてください。
では、始めます !!
Slack Appを作成
https://api.slack.com/ にアクセスして「 Create a custom app 」 を押して、「 Create New App 」を押す。すると下の画像のような画面に遷移するかと思います。
そして、「 App Name 」と「 Development Slack Workspace 」を入力し、「 Create App 」をクリックするとアプリケーションが作成されます
Slack Appの設定 その① -- 「 Event Subscriptions 」
Lambda関数のlambda_fanction.pyに一旦下記のように記述してください。Slack Appとの連携確認が必要なためです。
import json

def lambda_handler(event, context):
    return json.loads(event['body'])['challenge']
そして、Slack API メニューから「 Event Subscriptions 」を選択

「 Request URL 」にAPI GatewayとLambdaを設定するで作成したAPI Gatewayのエンドポイントを入力します。しばらくして「Verified」になればOKです!
少し下にスクロールして「 Subscribe to Bot Events 」に「 channel_created 」のイベントを追加します
Slack Appの設定 その② -- 「 権限の付与 」
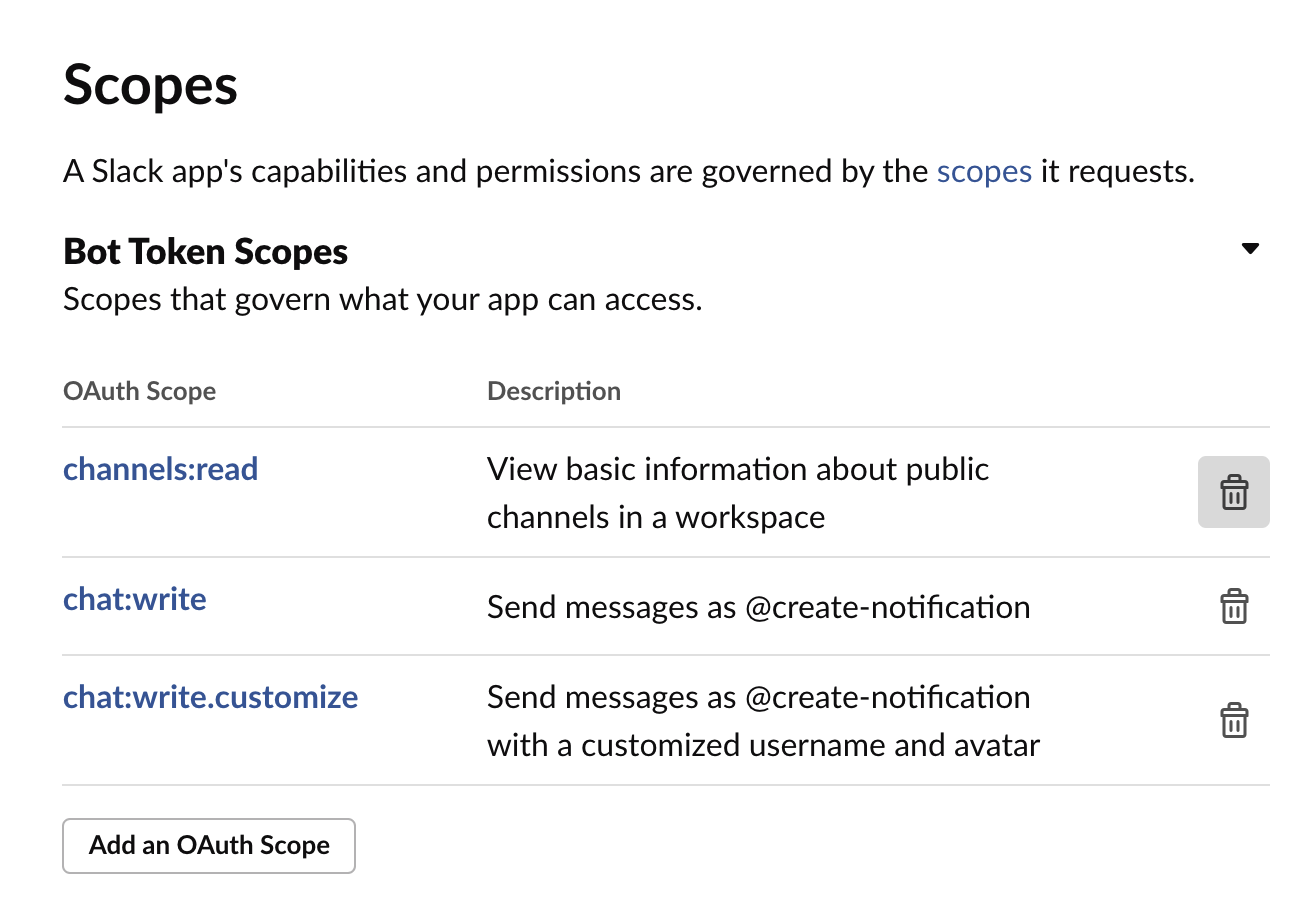
OAuth & Permissionsをクリックして、Scopesにてこの3つを追加しましょう。
Botのtokenが必要なのでそれをメモしておきます。Slack API メニューから「 OAuth & Permissions 」を選択して「 Bot User OAuth Access Token 」に書かれているtokenをコピーします。
Slack Appの設定 その③ -- 「 Install App 」
Slack API メニューから「 Install App 」を選択
「 Install to Workspace 」をクリック!
アプリケーションインストールの確認画面が表示されるので問題なければ「 Allow 」をクリックします。

インストールされるとSlackの画面でアプリケーションが起動しているのを確認できます。
さて、いよいよ Lambda関数にコードを書いていきましょう!
import logging

import os
import json
import urllib.request

logger = logging.getLogger()
logger.setLevel(logging.INFO)

def lambda_handler(event, context):

    logger.info(event)

    channelName = json.loads(event['body'])['event']['channel']['name']
    channelId = json.loads(event['body'])['event']['channel']['id']

    url = "https://slack.com/api/chat.postMessage"

    headers = {
        "Content-type" : "application/json",
        "Authorization" : "Bearer "+ os.environ['TOKEN']

    }

    data  = {
        'channel': '通知したいチャンネルID(このAppが存在する)',
        'text': '新しいチャンネル: ' + '#' + channelName,
        'link_names' : 1,
    }

    req = urllib.request.Request(url=url, data=json.dumps(data).encode('utf-8'), method='POST', headers=headers)

    with urllib.request.urlopen(req) as res:

        logger.info(res.read().decode("utf-8"))
試してみよう
通知したいチャンネルに作成したアプリケーションを追加しましょう。
できました! slack API ドキュメントを見るとさらに色々な機能をつけることができます。もしエラーが出てしまってもドキュメントに解決方法が載っていますよ!
参考記事


