著者 Adam Tworkiewicz
最終更新日 2022年3月23日
警告
本記事はTeradata CorporationのサイトGetting Startedに掲載された内容を抄訳したものです。掲載内容の正確性・完全性・信頼性・最新性を保証するものではございません。正確な内容については、原本をご参照下さい。
また、修正が必要な箇所や、ご要望についてはコメントをよろしくお願いします。
概要
このハウツーでは、AWS上でVantage Expressを実行する方法を説明します。
Vantage Expressは、完全な機能を持つTeradata SQL Engineを含むスモールフットプリント構成です。
クラウド料金について
Vantage Expressは、仮想マシンイメージとして配布されます。このハウツーでは、EC2のc5n.metalというインスタンスタイプを使用します。これはベアメタルインスタンスで、3ドル/時間以上のコストがかかります。
より安価なオプションをご希望の場合は、ネストされた仮想化をサポートし、安価なVMでVantage Expressを実行できるGoogle CloudやAzureを試してみてください。
クラウド利用料が必要のない方法としては、VMware、VirtualBox、UTMを使用してVantage Expressをローカルにインストールする方法があります。
必要なもの
① AWSのアカウント。新しいアカウントを作成する必要がある場合は、AWSの公式説明書に従ってください。
② awscliコマンドラインユーティリティがマシンにインストールされ、設定されていること。インストール方法はこちらをご覧ください。(https://docs.aws.amazon.com/cli/latest/userguide/getting-started-install.html
インストール方法
① インターネットに面したサブネットのあるVPCが必要です。もし利用可能なものがない場合は、以下の方法で作成します。
# Copied from https://cloudaffaire.com/how-to-create-a-custom-vpc-using-aws-cli/

# Create VPC
AWS_VPC_ID=$(aws ec2 create-vpc \
  --cidr-block 10.0.0.0/16 \
  --query 'Vpc.{VpcId:VpcId}' \
  --output text)

# Enable DNS hostname for your VPC
aws ec2 modify-vpc-attribute \
  --vpc-id $AWS_VPC_ID \
  --enable-dns-hostnames "{\"Value\":true}"

# Create a public subnet
AWS_SUBNET_PUBLIC_ID=$(aws ec2 create-subnet \
  --vpc-id $AWS_VPC_ID --cidr-block 10.0.1.0/24 \
  --query 'Subnet.{SubnetId:SubnetId}' \
  --output text)

# Enable Auto-assign Public IP on Public Subnet
aws ec2 modify-subnet-attribute \
  --subnet-id $AWS_SUBNET_PUBLIC_ID \
  --map-public-ip-on-launch

# Create an Internet Gateway
AWS_INTERNET_GATEWAY_ID=$(aws ec2 create-internet-gateway \
  --query 'InternetGateway.{InternetGatewayId:InternetGatewayId}' \
  --output text)

# Attach Internet gateway to your VPC
aws ec2 attach-internet-gateway \
  --vpc-id $AWS_VPC_ID \
  --internet-gateway-id $AWS_INTERNET_GATEWAY_ID

# Create a route table
AWS_CUSTOM_ROUTE_TABLE_ID=$(aws ec2 create-route-table \
  --vpc-id $AWS_VPC_ID \
  --query 'RouteTable.{RouteTableId:RouteTableId}' \
  --output text )

# Create route to Internet Gateway
aws ec2 create-route \
  --route-table-id $AWS_CUSTOM_ROUTE_TABLE_ID \
  --destination-cidr-block 0.0.0.0/0 \
  --gateway-id $AWS_INTERNET_GATEWAY_ID \
  --output text

# Associate the public subnet with route table
AWS_ROUTE_TABLE_ASSOID=$(aws ec2 associate-route-table  \
  --subnet-id $AWS_SUBNET_PUBLIC_ID \
  --route-table-id $AWS_CUSTOM_ROUTE_TABLE_ID \
  --output text | head -1)

# Create a security group
aws ec2 create-security-group \
  --vpc-id $AWS_VPC_ID \
  --group-name myvpc-security-group \
  --description 'My VPC non default security group'
  --output text

# Get security group ID's
AWS_DEFAULT_SECURITY_GROUP_ID=$(aws ec2 describe-security-groups \
  --filters "Name=vpc-id,Values=$AWS_VPC_ID" \
  --query 'SecurityGroups[?GroupName == `default`].GroupId' \
  --output text) &&
  AWS_CUSTOM_SECURITY_GROUP_ID=$(aws ec2 describe-security-groups \
  --filters "Name=vpc-id,Values=$AWS_VPC_ID" \
  --query 'SecurityGroups[?GroupName == `myvpc-security-group`].GroupId' \
  --output text)

# Create security group ingress rules
aws ec2 authorize-security-group-ingress \
  --group-id $AWS_CUSTOM_SECURITY_GROUP_ID \
  --ip-permissions '[{"IpProtocol": "tcp", "FromPort": 22, "ToPort": 22, "IpRanges": [{"CidrIp": "0.0.0.0/0", "Description": "Allow SSH"}]}]' \
  --output text

# Add a tag to the VPC
aws ec2 create-tags \
  --resources $AWS_VPC_ID \
  --tags "Key=Name,Value=vantage-express-vpc"

# Add a tag to public subnet
aws ec2 create-tags \
  --resources $AWS_SUBNET_PUBLIC_ID \
  --tags "Key=Name,Value=vantage-express-vpc-public-subnet"

# Add a tag to the Internet-Gateway
aws ec2 create-tags \
  --resources $AWS_INTERNET_GATEWAY_ID \
  --tags "Key=Name,Value=vantage-express-vpc-internet-gateway"

# Add a tag to the default route table
AWS_DEFAULT_ROUTE_TABLE_ID=$(aws ec2 describe-route-tables \
  --filters "Name=vpc-id,Values=$AWS_VPC_ID" \
  --query 'RouteTables[?Associations[0].Main != `false`].RouteTableId' \
  --output text) &&
  aws ec2 create-tags \
  --resources $AWS_DEFAULT_ROUTE_TABLE_ID \
  --tags "Key=Name,Value=vantage-express-vpc-default-route-table"

# Add a tag to the public route table
aws ec2 create-tags \
  --resources $AWS_CUSTOM_ROUTE_TABLE_ID \
  --tags "Key=Name,Value=vantage-express-vpc-public-route-table"

# Add a tags to security groups
aws ec2 create-tags \
  --resources $AWS_CUSTOM_SECURITY_GROUP_ID \
  --tags "Key=Name,Value=vantage-express-vpc-security-group" &&
  aws ec2 create-tags \
  --resources $AWS_DEFAULT_SECURITY_GROUP_ID \
  --tags "Key=Name,Value=vantage-express-vpc-default-security-group"
② VMを作成するには、sshキーペアが必要です。まだ持っていない場合は、作成してください。
aws ec2 create-key-pair --key-name vantage-key --query 'KeyMaterial' --output text > vantage-key.pem
③ プライベートキーへのアクセスを制限します。path_to_private_key_file を、前のコマンドで返されたプライベートキーのパスに置き換えてください。
chmod 600 path_to_private_key_file
④ 4CPU、8GBのRAM、70GBのディスクでUbuntu VMを作成します。
AWS_INSTANCE_ID=$(aws ec2 run-instances \
  --image-id ami-0f597975071f4c4ec \
  --count 1 \
  --instance-type c5n.metal \
  --key-name vantage-key \
  --security-group-ids $AWS_CUSTOM_SECURITY_GROUP_ID \
  --subnet-id $AWS_SUBNET_PUBLIC_ID \
  --query 'Instances[0].InstanceId' \
  --output text)
⑤ VMにsshします。
AWS_INSTANCE_PUBLIC_IP=$(aws ec2 describe-instances \
  --query "Reservations[*].Instances[*].PublicIpAddress" \
  --output=text --instance-ids $AWS_INSTANCE_ID)
ssh -i vantage-key.pem ubuntu@$AWS_INSTANCE_PUBLIC_IP
⑥ VMに入ったら、rootユーザーに切り替えます。
sudo -i
⑦ Vantage Expressのダウンロードディレクトリを準備します。
mkdir /opt/downloads
cd /opt/downloads
⑧ VirtualBoxと7zipをインストールします。
apt update && apt-get install p7zip-full p7zip-rar virtualbox -y
⑨ Vantage Expressをダウンロードするためのcurlコマンドを取得します。
a) Vantage Expessのダウンロードページにアクセスします(登録が必要です)。
b) 最新のダウンロードリンク(例:"Vantage Express 17.10")をクリックします。使用許諾契約のポップアップが表示されます。まだライセンスに同意しない。
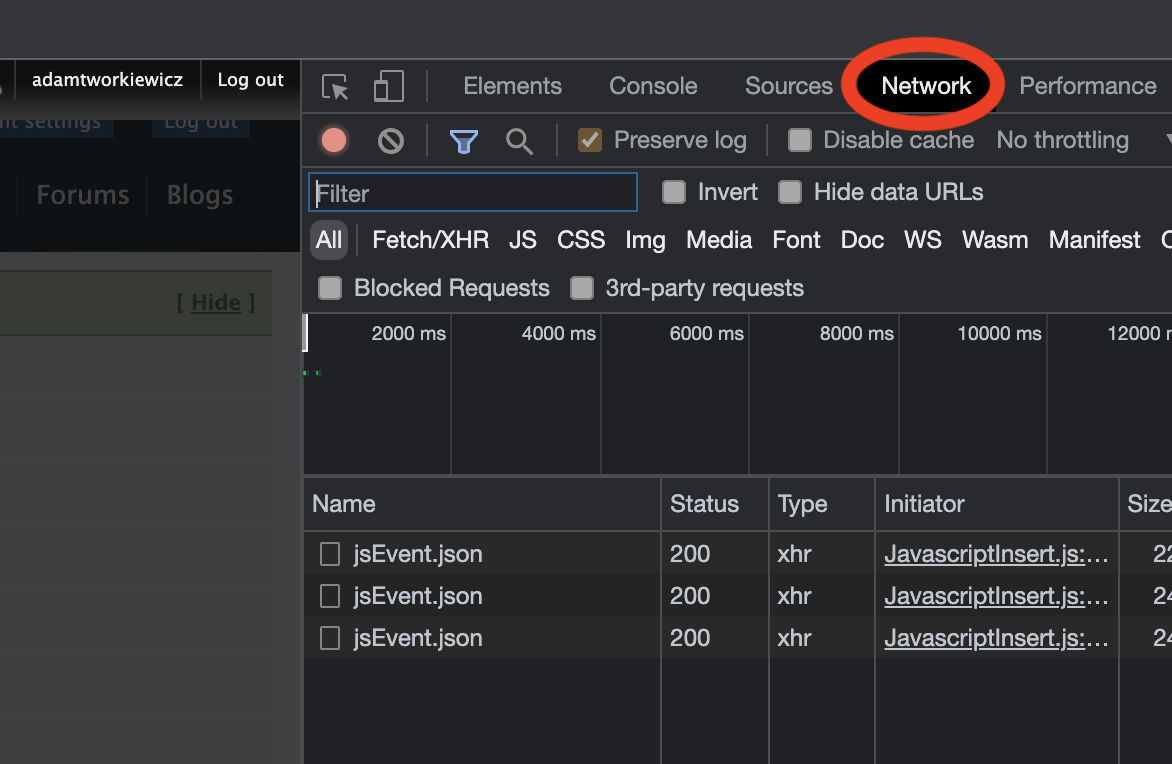
c) ブラウザでネットワークビューを開きます。例えば、Chromeの場合、F12キーを押して、「ネットワーク」タブに移動します。
d) 同意するボタンをクリックしてライセンスに同意し、ダウンロードをキャンセルします。
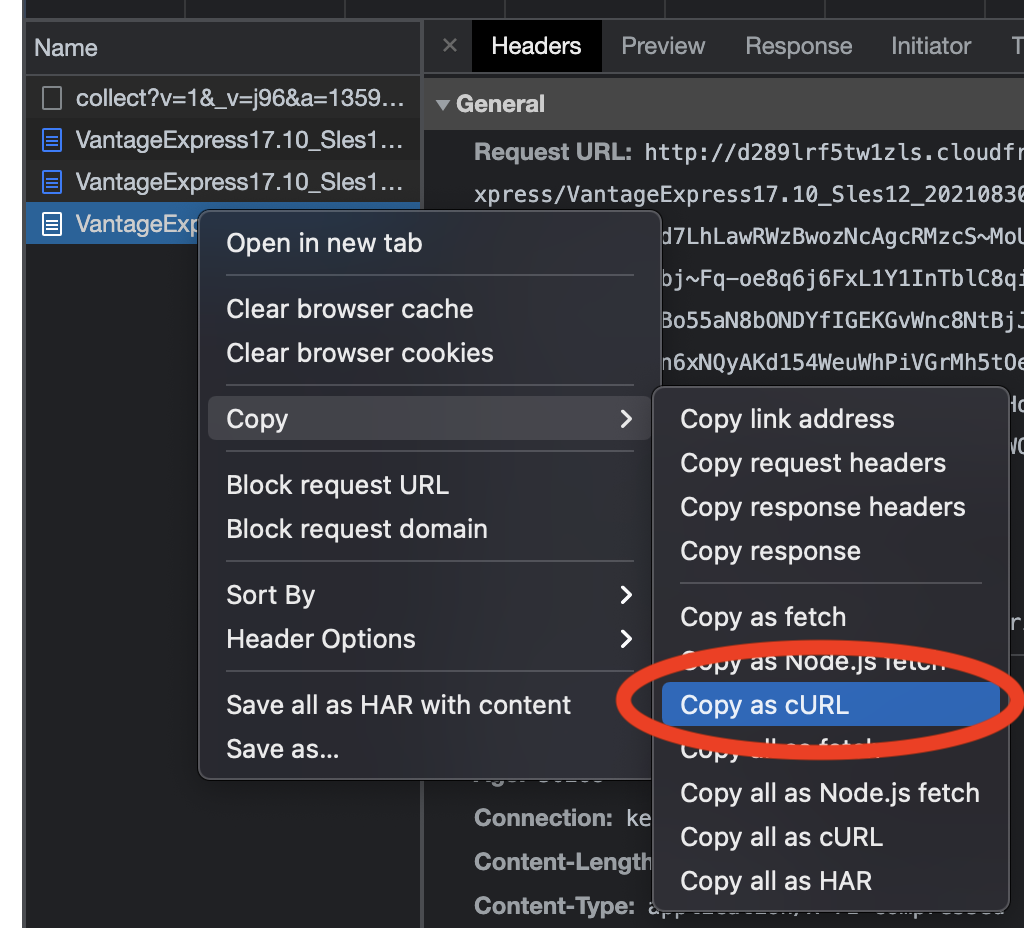
e) ネットワークビューで、VantageExpressで始まる最後のリクエストを見つけます。その上で右クリックし、コピー→cURLとしてコピーを選択します。
⑩ sshセッションに戻り、curlコマンドを貼り付けて、Vantage Expressをダウンロードします。コマンドに -o ve.7z を追加すると、ダウンロードしたファイルを ve.7z という名前のファイルに保存します。HTTPヘッダをすべて削除するなどします。
curl -o ve.7z 'http://d289lrf5tw1zls.cloudfront.net/database/teradata-express/VantageExpress17.10_Sles12_202108300444.7z?Expires=1638719978&Signature=GKBkNvery_long_signature__&Key-Pair-Id=********************'
⑪ ダウンロードしたファイルを解凍してください。数分かかります。
7z x ve.7z
⑫ VirtualBoxでVMを起動します。コマンドはすぐに返ってきますが、VMのinitプロセスには数分かかります。
export VM_IMAGE_DIR="/opt/downloads/VantageExpress17.10_Sles12"
DEFAULT_VM_NAME="vantage-express-17.10"
VM_NAME="${VM_NAME:-$DEFAULT_VM_NAME}"
vboxmanage createvm --name "$VM_NAME" --register --ostype openSUSE_64
vboxmanage modifyvm "$VM_NAME" --ioapic on --memory 6000 --vram 128 --nic1 nat --cpus 4
vboxmanage storagectl "$VM_NAME" --name "SATA Controller" --add sata --controller IntelAhci
vboxmanage storageattach "$VM_NAME" --storagectl "SATA Controller" --port 0 --device 0 --type hdd --medium  "$(find $VM_IMAGE_DIR -name '*disk1*')"
vboxmanage storageattach "$VM_NAME" --storagectl "SATA Controller" --port 1 --device 0 --type hdd --medium  "$(find $VM_IMAGE_DIR -name '*disk2*')"
vboxmanage storageattach "$VM_NAME" --storagectl "SATA Controller" --port 2 --device 0 --type hdd --medium  "$(find $VM_IMAGE_DIR -name '*disk3*')"
vboxmanage modifyvm "$VM_NAME" --natpf1 "tdssh,tcp,,4422,,22"
vboxmanage modifyvm "$VM_NAME" --natpf1 "tddb,tcp,,1025,,1025"
vboxmanage startvm "$VM_NAME" --type headless
vboxmanage controlvm "$VM_NAME" keyboardputscancode 1c 1c
⑬ Vantage Express VMにsshします。パスワードはrootを使用します。
ssh -p 4422 root@localhost
⑭ DBが稼働していることを確認する。
pdestate -a
コマンドが返された場合、PDE の状態は RUN/STARTED です。DBSの状態は、5:ログオンが有効 - システムが静止している、つまりVantage Expressが起動したことを意味します。状態が異なる場合は、正しい状態になるまで pdestate -a を繰り返してください。
⑮ Vantage Expressが起動したら、bteq clientコマンドラインクライアントを起動します。BTEQ (ビーテックと発音) は、Teradata データベースに SQL クエリーを送信するために使用される、コマンドベースの汎用クライアントツールです。
bteq
⑯ bteqを起動したら、Vantage Expressインスタンスに接続します。パスワードを要求されたら、dbc と入力します。
.logon localhost/dbc
サンプルクエリの実行
① dbcユーザーを使って、HRという新しいデータベースを作成します。このクエリをコピー・ペーストして、pressを実行します。
CREATE DATABASE HR
AS PERMANENT = 60e6, -- 60MB
    SPOOL = 120e6; -- 120MB
② サンプルテーブルを作成し、データを挿入してクエリを実行してみましょう。まず、社員情報を保持するテーブルを作成します。
CREATE SET TABLE HR.Employees (
   GlobalID INTEGER,
   FirstName VARCHAR(30),
   LastName VARCHAR(30),
   DateOfBirth DATE FORMAT 'YYYY-MM-DD',
   JoinedDate DATE FORMAT 'YYYY-MM-DD',
   DepartmentCode BYTEINT
)
UNIQUE PRIMARY INDEX ( GlobalID );
③ では、レコードを挿入してみましょう。
INSERT INTO HR.Employees (
   GlobalID,
   FirstName,
   LastName,
   DateOfBirth,
   JoinedDate,
   DepartmentCode
)
VALUES (
   101,
   'Adam',
   'Tworkowski',
   '1980-01-05',
   '2004-08-01',
   01
);
④ 最後に、データを取り出せるかどうか見てみましょう。
SELECT * FROM HR.Employees;
以下のような結果が得られるはずです。
| GlobalID | FirstName | LastName | DateOfBirth | JoinedDate | DepartmentCode |
|---|---|---|---|---|---|
| 101 | Adam | Tworkowski | 1980-01-05 | 2004-08-01 | 1 |
オプション設定
・VMの停止と起動を行う場合は、Vantage Expressを自動起動に追加するとよいでしょう。 VMにsshし、次のコマンドを実行します。
sudo -i

cat <<EOF >> /etc/default/virtualbox
VBOXAUTOSTART_DB=/etc/vbox
VBOXAUTOSTART_CONFIG=/etc/vbox/autostart.cfg
EOF

cat <<EOF > /etc/systemd/system/vantage-express-17.10.service
[Unit]
Description=vm1
After=network.target virtualbox.service
Before=runlevel2.target shutdown.target
[Service]
User=root
Group=root
Type=forking
Restart=no
TimeoutSec=5min
IgnoreSIGPIPE=no
KillMode=process
GuessMainPID=no
RemainAfterExit=yes
ExecStart=/usr/bin/VBoxManage startvm vantage-express-17.10 --type headless
ExecStop=/usr/bin/VBoxManage controlvm vantage-express-17.10 savestate
[Install]
WantedBy=multi-user.target
EOF

systemctl daemon-reload
systemctl enable vantage-express-17.10
systemctl start vantage-express-17.10
・インターネットから Vantage Express に接続する場合は、VM に対してファイアウォール・ホールを開く必要があります。また、デフォルトのパスワードをdbcユーザに変更する必要があります。
① dbcユーザのパスワードを変更するには、VMに移動してbteqを起動します。
bteq
② ユーザー名とパスワードをdbcにして、データベースにログインします。
.logon localhost/dbc
③ dbcユーザーのパスワードを変更する。
MODIFY USER dbc AS PASSWORD = new_password;
④ これで、1025番ポートをインターネットに開放することができます。
aws ec2 authorize-security-group-ingress \
  --group-id $AWS_CUSTOM_SECURITY_GROUP_ID \
  --ip-permissions '[{"IpProtocol": "tcp", "FromPort": 1025, "ToPort": 1025, "IpRanges": [{"CidrIp": "0.0.0.0/0", "Description": "Allow Teradata port"}]}]'
クリーンアップ
課金を停止するには、すべてのリソースを削除してください。
# Delete the VM
aws ec2 terminate-instances --instance-ids $AWS_INSTANCE_ID --output text

# Wait for the VM to terminate

# Delete custom security group
aws ec2 delete-security-group \
  --group-id $AWS_CUSTOM_SECURITY_GROUP_ID

# Delete internet gateway
aws ec2 detach-internet-gateway \
  --internet-gateway-id $AWS_INTERNET_GATEWAY_ID \
  --vpc-id $AWS_VPC_ID &&
  aws ec2 delete-internet-gateway \
  --internet-gateway-id $AWS_INTERNET_GATEWAY_ID

# Delete the custom route table
aws ec2 disassociate-route-table \
  --association-id $AWS_ROUTE_TABLE_ASSOID &&
  aws ec2 delete-route-table \
  --route-table-id $AWS_CUSTOM_ROUTE_TABLE_ID

# Delete the public subnet
aws ec2 delete-subnet \
  --subnet-id $AWS_SUBNET_PUBLIC_ID

# Delete the vpc
aws ec2 delete-vpc \
  --vpc-id $AWS_VPC_ID
次のステップ
・Query data stored in object storage
さらに詳しく
・Teradata® Studio™ and Studio™ Express Installation Guide