はじめに
以前からIoTブームが囁かれていたが、筆者は中々波に乗れていない感じだった。思い切ってRaspberry Piを購入してみてタイトルのようなものを作ってみた。作業記録を兼ねて投稿する。IFTTTとは、簡単に説明すると複数のアプリケーションを簡単に連携できるようにするサービスです。ラズベリーパイとは、ミニPCのようなイメージで良いと思います。通常のPCに比べてサイズが小さいのと安価で購入できるため、IoTを始め様々な用途で用いられています。Raspberry PiについてはWeb上に外部センサーの使い方とか豊富なのでこれから始める方にはおすすめです!詳細については別途ググっていただけたらと思います。
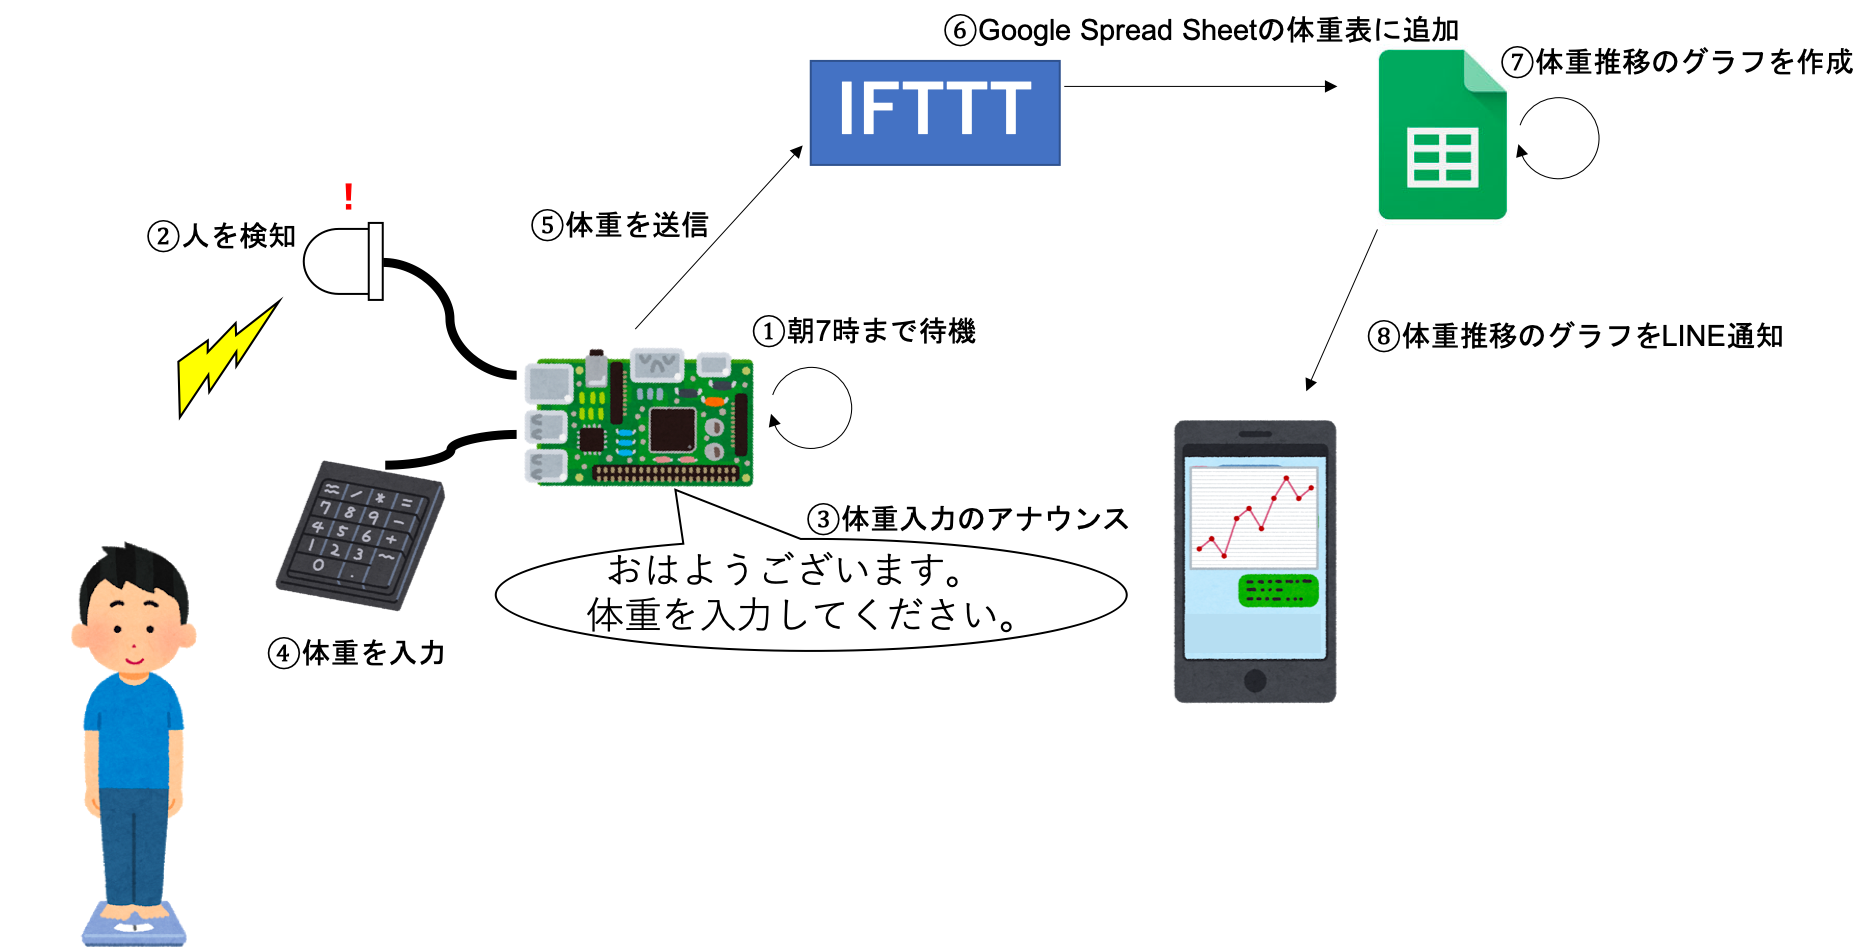
全体構成としては、下図のような感じである。
1. Raspberry Piが朝7時になるまで待機する
2. Raspberry Piが人感センサを起動し、人を検知する
3. Raspberry Piが人を検知すると「おはようございます。体重を入力してください。」とアナウンスする
4. Raspberry Piが体重の入力を受け付ける
5. Raspberry Piが体重値をIFTTTに通知する
6. IFTTTがGoogle Spread Sheetの体重表に体重値を追記する
7. Google Spread Sheetが体重表から体重推移グラフを作成する
8. Google Spread Sheetが体重推移グラフをLINEへ通知する
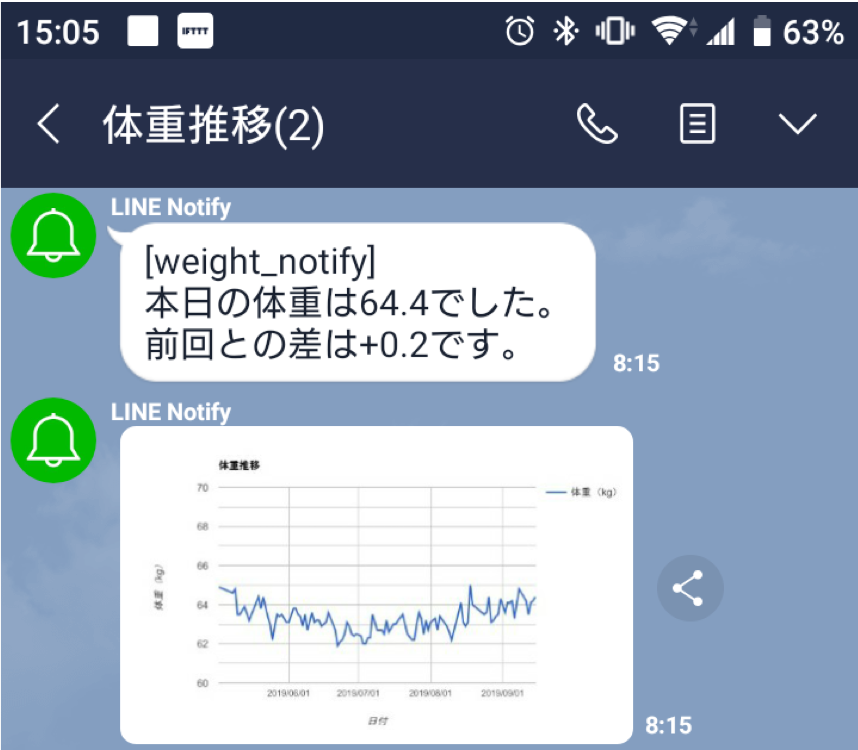
実際に通知されるLINEはこんな感じ。
実装については 「ひとまず動けば良いや」くらいの心持ちで作ったのでソースコードの綺麗さとかは度外視です...笑 また、標準入力を受け付ける必要があり、起動のためにはプロセスをwhile-loopで起動しっぱなしにする必要があります。そのため、cronとかは使えていないです。もっとスマートな方法があればコメント欄等で指摘いただければと思います。m(_ _)m
必要なもの
- Raspberry Pi
- テンキー
- 体重を入力するために用いる
- 人感センサ
- こちらで紹介されているSB412Aというものを用いました。
- USBスピーカー
- ユーザに体重入力を促すために使います
- 体重計
実装(ラズパイ側編)
実装にはpythonとGAS(Google App Script)を用いています。まずはRaspberry Pi側の実装について紹介します。全ソースコードは「さいごに」のところで記載します。
Raspberry Pi側
1. Raspberry Piが朝7時になるまで待機する
プロセスとして起動しっぱなしなので、まずは日をまたいでいるかを算出します。跨いでいなければ、while-loopで1分待機します。また、跨いでいれば7時になるまで待機します。7時になったら次の処理に進みます。
WAKE_UP_HOUR = 7                    # 起床時刻
...
current_date = datetime.datetime.now().day
before_date  = current_date

while True:
    current_date = datetime.datetime.now().day
    print("current date: " + str(current_date))
    print("before  date: " + str(before_date))

    # ①朝7時になるまで待機
    if current_date != before_date:
        while True:
            current_hour = datetime.datetime.now().hour
            print("cureent hour: " + str(current_hour))
            if current_hour == WAKE_UP_HOUR:
                break
            time.sleep(60.0)
    ...
    before_date = current_date
    time.sleep(60.0)
2. Raspberry Piが人感センサを起動し、人を検知する
人感センサを用いて人の検知を行います。基本的には、GPIOという外部の電圧の入出力を計測してくれる部分のコードを1秒単位で読み出します。このセンサの場合反応すると1が返ってくるので、返ってきたら次の「③体重入力を促すアナウンス」に進むという流れです。
# ②人の検知
# 起動してから3時間検出を試みて、一回でも入力が完了したら終了
for i in range(MEASURING_DURATION):
    time.sleep(1.0)
    current_pir_value = pi.read(PIR_GPIO_NUM)

    # 人感センサが0(反応なし)→1(反応あり)に変化した場合
    if (before_pir_value == False) and (current_pir_value == True):
         ...
         # ③体重入力を促すアナウンス出力
         ...
         before_pir_value = current_pir_value
3. Raspberry Piが人を検知すると「おはようございます。体重を入力してください。」とアナウンスする
pythonからlinuxのプロセスを呼び出してアナウンスします。
# ③体重入力を促すアナウンス出力
announce('input_require.mp3')
...
def announce(file_name):
    try:
         subprocess.call(['mpg321', './audio/' + file_name])
    except:
        print("command error...orz")
        sys.exit(1)
4. Raspberry Piが体重の入力を受け付ける
ユーザから体重の入力を受け付けます。入力は標準入力で受け付けます。一応、エラーチェックも入れています。エラーチェックOKであれば、OKとのアナウンス(③と同じロジック)、NGならNGとのアナウンスをしもう一度入力を受け付けます。
# ④体重入力受付
while True:
    user_input = input("please input your weight(50<x<100):")
    if is_correct_weight(user_input):
        announce('input_correct.mp3')
        weight = float(user_input)
        post_weight_ifttt(weight)
        break
    else:
        announce('input_not_correct.mp3')
        pass
...
def is_correct_weight(str):
    MIN_WEIGHT_VALUE = 50
    MAX_WEIGHT_VALUE = 100
    try:
        if MIN_WEIGHT_VALUE < float(str) < MAX_WEIGHT_VALUE:
            return True
        else:
            return False
    except ValueError:
        return False
5. Raspberry Piが体重値をIFTTTに通知する
IFTTTのWebhookを用いて通知します。Webhookの登録方法などについてはこちらを参考にしていただければと思います。
# ⑤体重をIFTTTに通知
post_weight_ifttt(weight)
...
def post_weight_ifttt(weight):
    URL = "https://maker.ifttt.com/trigger/weight_recode/with/key/dnWNxgJh1uE-JUEPaIIkCw"
    METHOD = "POST"
    HEADERS = {"Content-Type" : "application/json"}

    today = datetime.date.today().strftime('%Y/%m/%d')

    # PythonオブジェクトをJSONに変換する
    obj = {"value1" : today, "value2" : weight}
    json_data = json.dumps(obj).encode("utf-8")

    # httpリクエストを準備してPOST
    request = urllib.request.Request(URL, data=json_data, method=METHOD, headers=HEADERS)
    with urllib.request.urlopen(request) as response:
        response_body = response.read().decode("utf-8")
        print(response_body)
おわりに
Raspberry Pi側の処理としては以上です。最後に全コードを下記します。
# -*- coding: utf-8 -*-
import pigpio
import time
import subprocess
import datetime
import sys
import json
import urllib.request

def main():
    # 定数
    PIR_GPIO_NUM = 27                   # 人感センサのGPIO番号
    WAKE_UP_HOUR = 7                    # 起床時刻
    MEASURING_DURATION = 60 * 60 * 3    # 計測時間(秒)
    INVERVAL_BETWEEN_GET_DATE = 60.0    # 日付取得のインターバル(秒)

    # 人感センサーの準備
    pi = pigpio.pi()

    if not pi.connected:
        print("pigio is not connected...")
        exit(1)

    pi.set_mode(PIR_GPIO_NUM, pigpio.INPUT)
    pi.set_pull_up_down(PIR_GPIO_NUM, pigpio.PUD_UP)

    current_date = datetime.datetime.now().day
    before_date  = current_date

    while True:
        current_date = datetime.datetime.now().day
        print("current date: " + str(current_date))
        print("before  date: " + str(before_date))

        # ①朝7時になるまで待機
        if current_date != before_date:
            while True:
                current_hour = datetime.datetime.now().hour
                print("cureent hour: " + str(current_hour))
                if current_hour == WAKE_UP_HOUR:
                    break
                time.sleep(60.0)

            before_pir_value  = 0
            current_pir_value = 0

            # ②人の検出
            # 起動してから3時間検出を試みて、一回でも入力が完了したら終了
            for i in range(MEASURING_DURATION):
                time.sleep(1.0)
                current_pir_value = pi.read(PIR_GPIO_NUM)

                print("========================================================")
                print("before  pir: %d" % before_pir_value)
                print("current pir: %d" % current_pir_value)

                # 人感センサが0(反応なし)→1(反応あり)に変化した場合
                if (before_pir_value == False) and (current_pir_value == True):
                    print("human detected!")
                    # ③体重入力を促すアナウンス出力
                    announce('input_require.mp3')
                    # ④体重入力受付
                    while True:
                        user_input = input("please input your weight(50<x<100):")
                        if is_correct_weight(user_input):
                            print("input weight is correct! Thank you!")
                            announce('input_correct.mp3')
                            weight = float(user_input)
                            # ⑤体重をIFTTTに通知
                            post_weight_ifttt(weight)
                            break
                        else:
                            print("input weight is not correct please input again...")
                            announce('input_not_correct.mp3')
                            pass

                    print("your weight is: ", weight)
                    print("========================================================")
                    break
                else:
                    print("human not detected...orz")
                    print("========================================================")

                before_pir_value = current_pir_value

        before_date = current_date
        time.sleep(60.0)

    pi.stop()
    exit(0)


def is_correct_weight(str):
    MIN_WEIGHT_VALUE = 50
    MAX_WEIGHT_VALUE = 100
    try:
        if MIN_WEIGHT_VALUE < float(str) < MAX_WEIGHT_VALUE:
            return True
        else:
            return False
    except ValueError:
        return False

def announce(file_name):
    try:
        subprocess.call(['mpg321', './audio/' + file_name])
    except:
        print("command error...orz")
        sys.exit(1)


def post_weight_ifttt(weight):
    URL = "https://maker.ifttt.com/trigger/weight_recode/with/key/【Web hookAPIキー】"
    METHOD = "POST"
    HEADERS = {"Content-Type" : "application/json"}

    today = datetime.date.today().strftime('%Y/%m/%d')

    # PythonオブジェクトをJSONに変換する
    obj = {"value1" : today, "value2" : weight}
    json_data = json.dumps(obj).encode("utf-8")

    # httpリクエストを準備してPOST
    request = urllib.request.Request(URL, data=json_data, method=METHOD, headers=HEADERS)
    with urllib.request.urlopen(request) as response:
        response_body = response.read().decode("utf-8")
        print(response_body)

if __name__ == '__main__':
    main()
つづく
続きがかけたらこちらにリンクを貼ります!(9/27頃更新予定です。)
更新しました!こちらをどうぞ!