概要
本記事では、Windows環境でVirtualBoxを使ったubuntu仮想環境で、tensorflow(CPU版)をビルドして実行するまでを紹介します。
ホストOSにはwindows 10 Home、ゲストOSにはubuntu 16.04 (LTS)、CUDAのバージョンは8.0を使用しており、NVIDIAドライバをゲストOSにインストールしています。
hyper-Vが搭載されていないWindowsのバージョン(Home Editionとか)ではDockerが使えないため、VirtualBoxでubuntu環境を仮想化してtensorflow(CPU版)を導入するまでの記録です。
本記事を書くにあたり、GPU版を使えるように設定を行っていたのですが、結果的に上手くいかなかったという報告です…
同じような被害者を出さないために、メモがてら本記事に纏めました。
折角のAdvent Calenderなのに、しょうもない記事になってしまって大変申し訳ございませんm(_ _)m
※ 本記事の出来事は1年ぐらい前から報告されており、未だに更新されていない状態です。
VirtualBoxのインストール、Guest Additionsの有効化
以下の記事を参考に、VirtualBoxのインストール、拡張機能の導入、Guest Additonsのインストールを行います。
ゲストOSのubuntuのバージョンは16.04(LTS)を使用しました。
3Dアクセレーションを有効化
VirtualBoxの設定画面にて、3Dアクセレーションを有効化することで、ゲストOSでGPUを使用するようにします。
残念ながら、この設定はホストOSのグラフィック機能を活用した3DレンダリングのためにGPUを使用するための設定であり、tensorflowでのGPGPUプログラミングには機能しません。
PCI passthrough
エクステンションパックを導入することで、PCI passthrough(ホストOSのPCIデバイスをゲストOSへバインドする機能)が使用可能となり、ゲストOSでGPUデバイスを直接使用することができるようになります。
ですが、ホストOSへのシステム障害のリスクがあるため、本記事を書くにあたっては実施しませんでした。
それでもGPGPUに挑戦したい方には、以下の記事が参考になります。
※ 余談ですが、IOMMU(Intel系のマシンでは"Intel VT-d"、AMD系のマシンでは"AMD I/O Virtualization Technology")という機能は、最近のマザーボードとチップセットには大体搭載されていると思います。
Ubuntu 16.04 in VirtualBox
以下の記事を参考に、ubuntu仮想環境でのtensorflowのビルドを試みます。
参考記事では、caffeをインストールして、PyCaffeとexampleを実行するまでが紹介されています。
また、CUDAのバージョンは6.5ですが、本記事ではCUDA 8.0を使用します。
記事内の・Install build essentials: から・Update the library path までの流れは、以下の様に実行します。
build-essential、kernel-headers、VBoxLinuxAdditionsのインストール
# build-essentialのインストール
$ sudo apt-get install build-essential

# kernel-headersのインストール
$ sudo apt-get install linux-headers-`uname -r`

# VBoxLinuxAdditionsのインストール
$ cd /media/<USER>/VBOXADDITIONS_4.3.16_95972 (where <USER> is your user name)
$ sudo ./VBoxLinuxAdditions.run
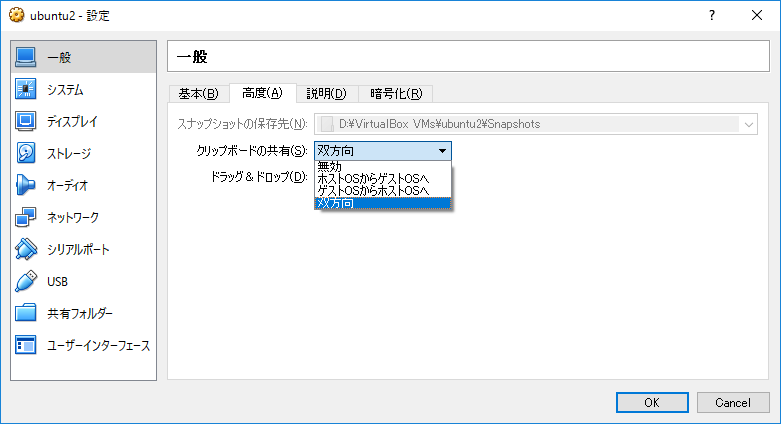
クリップボードを双方向に設定
VirtualBoxの設定画面にて、以下の設定を行います。
tensorflowのインストール
参考
※ 参考の手順は古いので、下記の様に実行します。
CUDA 8.0のインストール
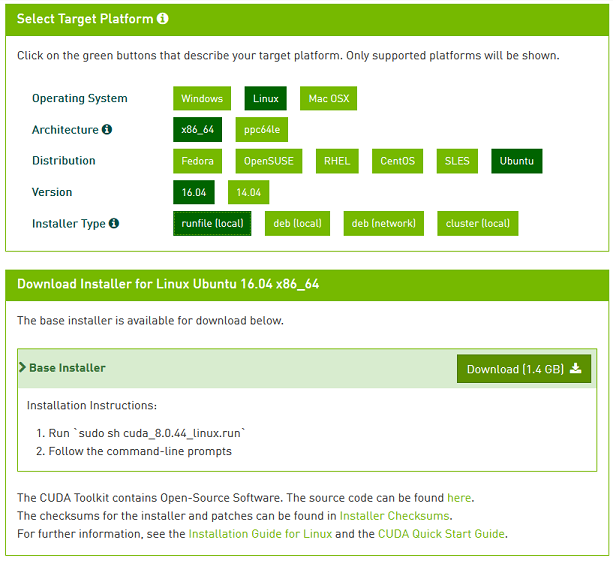
公式ページからローカルにrunfileをダウンロードします。
CUDNN 5.1のインストール
CUDNNも同様にダウンロードします(NVIDIAのメンバー登録が必要です)。
$ tar xvzf cudnn-8.0-linux-x64-v5.1.tgz
$ sudo cp cuda/include/cudnn.h /usr/local/cuda-8.0/include
$ sudo cp cuda/lib64/libcudnn* /usr/local/cuda-8.0/lib64
$ sudo chmod a+r /usr/local/cuda-8.0/include/cudnn.h  /usr/local/cuda-8.0/lib64/libcudnn*
CUDAのrunfile実行前に、関連ライブラリをインストールしておきます。
# CUDA関連ライブラリのインストール
$ sudo apt-get install libglu1-mesa libxi-dev libxmu-dev libglu1-mesa-dev
- http://stackoverflow.com/questions/22360771/missing-recommended-library-libglu-so
- http://www.insiderattack.net/2014/12/installing-cuda-toolkit-65-in-ubuntu.html
CUDA runfileの実行
$ sudo ./cuda_8.0.44_linux_64.run --kernel-source-path=/usr/src/linux-headers-`uname -r`/ --override compiler
実行中の設定は、上記の参考記事と同じで良いです。
Accept the EULA
Do NOT install the graphics card drivers (since we are in a virtual machine)
Install the toolkit (leave path at default)
Install symbolic link
Install samples (leave path at default)
ライブラリパスの更新
$ echo 'export PATH=/usr/local/cuda-8.0/bin:$PATH' >> ~/.bashrc
$ echo 'export LD_LIBRARY_PATH=$LD_LIBRARY_PATH:/usr/local/cuda-8.0/lib64:/usr/local/lib' >> ~/.bashrc
$ echo 'export CUDA_HOME=/usr/local/cuda-8.0' >> ~/.bashrc
$ source ~/.bashrc
bazelのインストール
公式ページを参考に、レポジトリから取得します。
$ sudo add-apt-repository ppa:webupd8team/java
$ sudo apt-get update
$ sudo apt-get install oracle-java8-installer
$ echo "deb [arch=amd64] ttp://storage.googleapis.com/bazel-apt stable jdk1.8" | sudo tee /etc/apt/sources.list.d/bazel.list
$ curl https://bazel.build/bazel-release.pub.gpg | sudo apt-key add -
$ sudo apt-get update && sudo apt-get install bazel
$ sudo apt-get upgrade bazel
tensorflowのビルド
# tensorflowソースコードのダウンロード
$ git clone https://github.com/tensorflow/tensorflow
$ cd tensorflow

# configureスクリプトの設定
$ ./configure
Please specify the location of python. [Default is /usr/bin/python]: [Enter]
Do you wish to build TensorFlow with Google Cloud Platform support? [y/N] N
No Google Cloud Platform support will be enabled for TensorFlow
Do you wish to build TensorFlow with Hadoop File System support? [y/N] N
No Hadoop File System support will be enabled for TensorFlow
Found possible Python library paths:
  /usr/local/lib/python2.7/dist-packages
  /usr/lib/python2.7/dist-packages
Please input the desired Python library path to use.  Default is [/usr/local/lib/python2.7/dist-packages] [Enter]

Using python library path: /usr/local/lib/python2.7/dist-packages
Do you wish to build TensorFlow with OpenCL support? [y/N] N
No OpenCL support will be enabled for TensorFlow
Do you wish to build TensorFlow with CUDA support? [y/N] y
CUDA support will be enabled for TensorFlow
Please specify which gcc should be used by nvcc as the host compiler. [Default is /usr/bin/gcc]: /usr/bin/gcc-4.9
Please specify the CUDA SDK version you want to use, e.g. 7.0. [Leave empty to use system default]: 8.0
Please specify the location where CUDA 8.0 toolkit is installed. Refer to README.md for more details. [Default is /usr/local/cuda]: /usr/local/cuda-8.0
Please specify the Cudnn version you want to use. [Leave empty to use system default]: 5
Please specify the location where cuDNN 5 library is installed. Refer to README.md for more details. [Default is /usr/local/cuda-8.0]: [Enter]
Please specify a list of comma-separated Cuda compute capabilities you want to build with.
You can find the compute capability of your device at: https://developer.nvidia.com/cuda-gpus.
Please note that each additional compute capability significantly increases your build time and binary size.
\[Default is: "3.5,5.2"]: [Enter]
INFO: Starting clean (this may take a while). Consider using --expunge_async if the clean takes more than several minutes.
........
INFO: All external dependencies fetched successfully.
Configuration finished

# bazelによるビルド
$ bazel build -c opt --config=cuda //tensorflow/tools/pip_package:build_pip_package
$ bazel-bin/tensorflow/tools/pip_package/build_pip_package /tmp/tensorflow_pkg
tensorflowのインストール
$ cd /tmp/tensorflow_pkg
$ pip install --upgrade tensorflow-0.12.0rc1-*.whl
tensorflowをインポートすると、デバイスがないエラーが出てしまいます。
>>> import tensorflow as tf
I tensorflow/stream_executor/dso_loader.cc:128] successfully opened CUDA library libcublas.so locally
I tensorflow/stream_executor/dso_loader.cc:128] successfully opened CUDA library libcudnn.so locally
I tensorflow/stream_executor/dso_loader.cc:128] successfully opened CUDA library libcufft.so locally
I tensorflow/stream_executor/dso_loader.cc:119] Couldn't open CUDA library libcuda.so.1. LD_LIBRARY_PATH: /usr/local/cuda-8.0/lib64:/usr/local/lib
I tensorflow/stream_executor/cuda/cuda_diagnostics.cc:165] hostname: localname-VirtualBox
I tensorflow/stream_executor/cuda/cuda_diagnostics.cc:189] libcuda reported version is: Not found: was unable to find libcuda.so DSO loaded into this program
I tensorflow/stream_executor/cuda/cuda_diagnostics.cc:193] kernel reported version is: Permission denied: could not open driver version path for reading: /proc/driver/nvidia/version
I tensorflow/stream_executor/cuda/cuda_gpu_executor.cc:1092] LD_LIBRARY_PATH: /usr/local/cuda-8.0/lib64:/usr/local/lib
I tensorflow/stream_executor/cuda/cuda_gpu_executor.cc:1093] failed to find libcuda.so on this system: Failed precondition: could not dlopen DSO: libcuda.so.1; dlerror: libcuda.so.1: cannot open shared object file: No such file or directory
I tensorflow/stream_executor/dso_loader.cc:128] successfully opened CUDA library libcurand.so locally
>>> sess=tf.Session()
E tensorflow/stream_executor/cuda/cuda_driver.cc:509] failed call to cuInit: CUDA_ERROR_NO_DEVICE
I tensorflow/stream_executor/cuda/cuda_diagnostics.cc:145] kernel driver does not appear to be running on this host (localname-VirtualBox): /proc/driver/nvidia/version does not exist
※ libcuda.so.1.がないエラーの解決策はこちらです(意味ないですが)。
tensorflow自体は問題なく動きます。
>>> a=tf.constant(1)
>>> b=tf.constant(2)
>>> sess.run(a+b)
3

