1. はじめに
みなさん、こんにちは。
本記事では、AMQP準拠のルータ(Qpid Dispatch Router)を用いて簡単にKubernetesのマルチクラスタのアプリケーション間通信を実現するオープンソースであるSkupperを紹介します。
また、IstioのサンプルアプリケーションであるBookinfoのPodをMAC PCとAWS上に配置し、Skupperを用いて接続する方法を記載します。
2. Skupperとは
Skupperは、KubernetesのマルチクラスタをInterconnectするソフトウェアです。
クラスタ間のネットワークを構成する方法として、SubmarinerなどのIPsecを用いる方法や、Istioを使用してmTLSでクラスタ跨ぎでアプリケーション間通信を制御する方法などがありますが、NATやファイアウォール越えの対応やテナント分離の課題(Cluster adminでないとdeployできない)や、取れるネットワークトポロジがフルメッシュのみであり、クラスタ数増に伴う管理の煩雑化、性能の懸念、などの課題が出てきます。
2022年2月17日 追記:
Multi-Cluster Networkingの考察記事を書いたので、詳しくはこちらをご参照下さい。
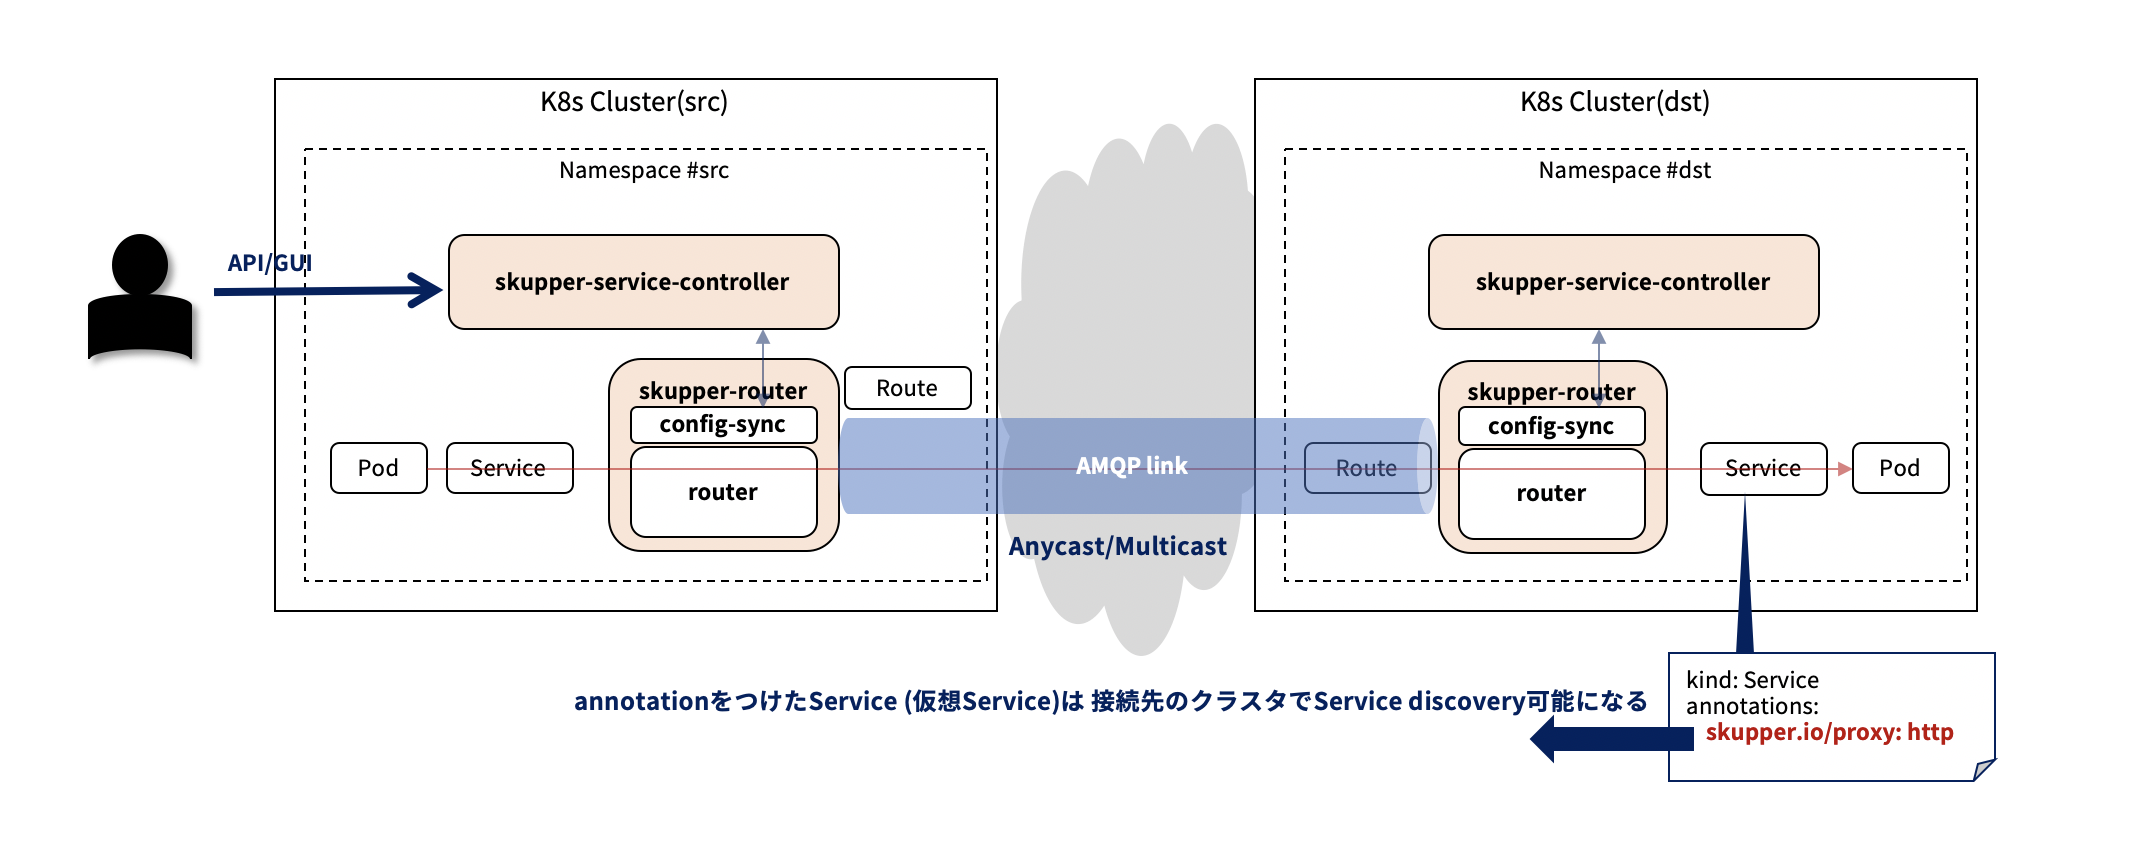
Skupperは、非特権でnamespace単位にdeployされたQpid Dispatch Router(以降、QDR)を介してPod間通信を可能にします。対象のServiceリソースのバックエンドがQDRとなり、QDRが宛先のクラスタへルーティングするイメージです。
ルータと言いながら外部公開はL5以上でアプリケーション間通信が伝搬する形になりますので、L4以下のネットワーク情報の公開が不要でセキュアに構成でき、また、ゼロトラストソリューションにも寄与できる期待があります。
尚、QDRはステートレスなアプリケーションですので、スケールアウトできます。
また、QDR間を接続して構成したネットワークは、OSPFとIS-ISに似たリンクステートルーティングプロトコルのアルゴリズムを使用して、送信元から宛先すべてにコストベースで最適なパスを計算してルーティング、障害時は迅速に復元するように動作します。
2-1. Skupperのユースケースイメージ
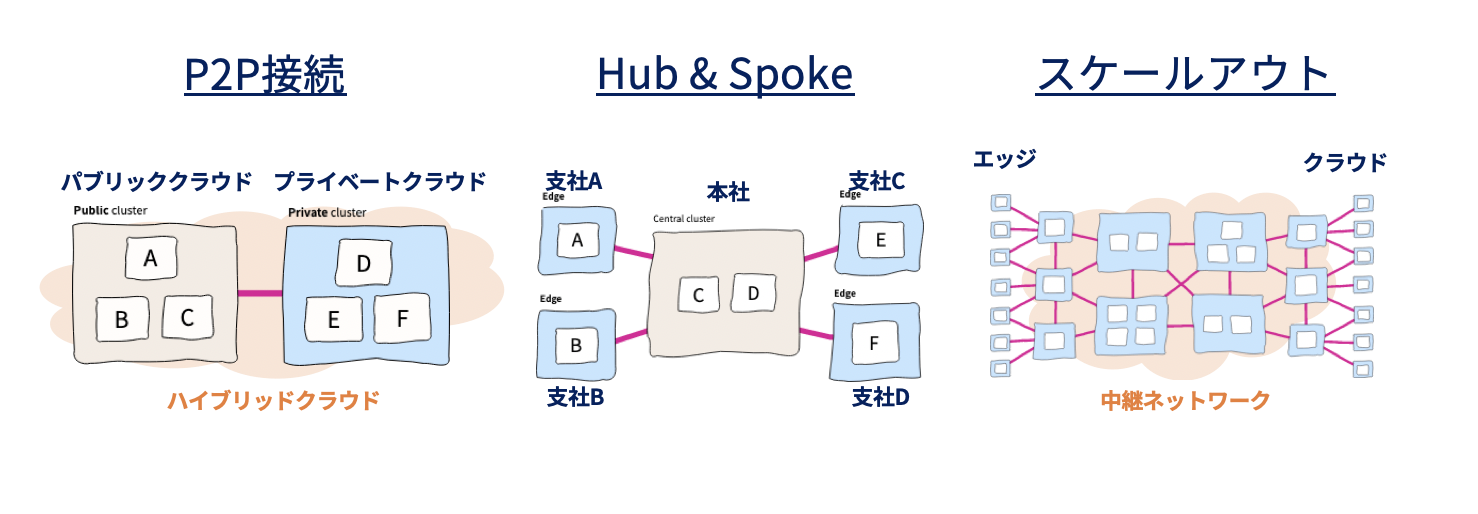
Skupperは、VPNやファイアウォールのルール、アクセスポリシーなどの複雑なL3処理を介さず、場所を問わずどこからどこへでもアプリケーション間通信を可能にするネットワークとして、Virtual Application Network(VAN)を構成できる、というコンセプトを掲げています。
VANのユースケースとして、例えば、下記が考えられるかと思いました。特にネットワークエッジに分散配置できたら、面白そうです。
- プライベートクラウド上のKubernetesクラスタとパブリッククラウド上のKubernetesクラスタをP2Pで接続し、ハイブリッドクラウドを構成する。
- 本社をHubとして、支社 to 支社の通信を本社経由で管理。支社からのデータは本社で一元化。また、本社にいるデータ分析者が、支社データを支社内に閉じた状態で活用する
- Hubとなるクラスタを通信キャリアのネットワーク上に分散配置して、エッジとクラウドを中継するネットワークを構成する、など
2-2. アプリケーション構成
Skupperのアプリケーション構成はシンプルで、Control Planeのskupper-service-controllerとData Planeのskupper-routerの2コンポーネントが提供されます。
-
skupper-service-controller Pod(Deployment)
- consolenやAPIを提供(APIへは
skupperCLIでアクセス) - skupper routerの設定(qdrのqdrouterd.jsonの一部箇所)をconfig-syncと連携して変更
- consolenやAPIを提供(APIへは
-
skupper-router Pod(Deployment)
- routerコンテナとconfig-syncコンテナが含まれる
- routerコンテナはQDR
- config-syncコンテナは、skupper-service-controllerと連携してAPIやGUI上で設定されたconfigをrouterと同期する
3. Skupperを触ってみる
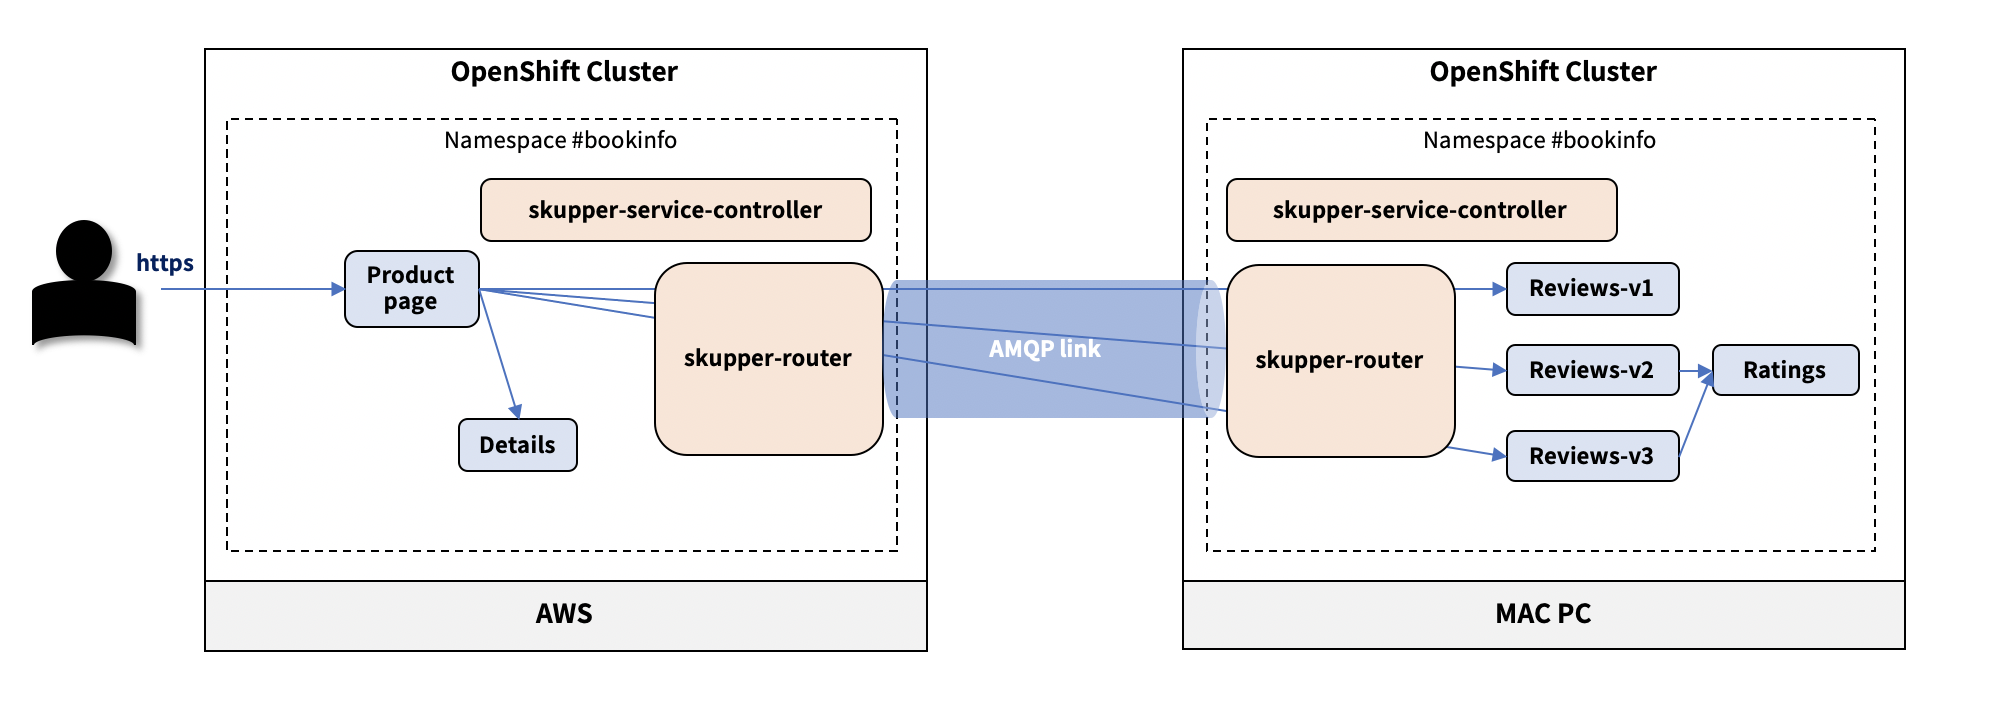
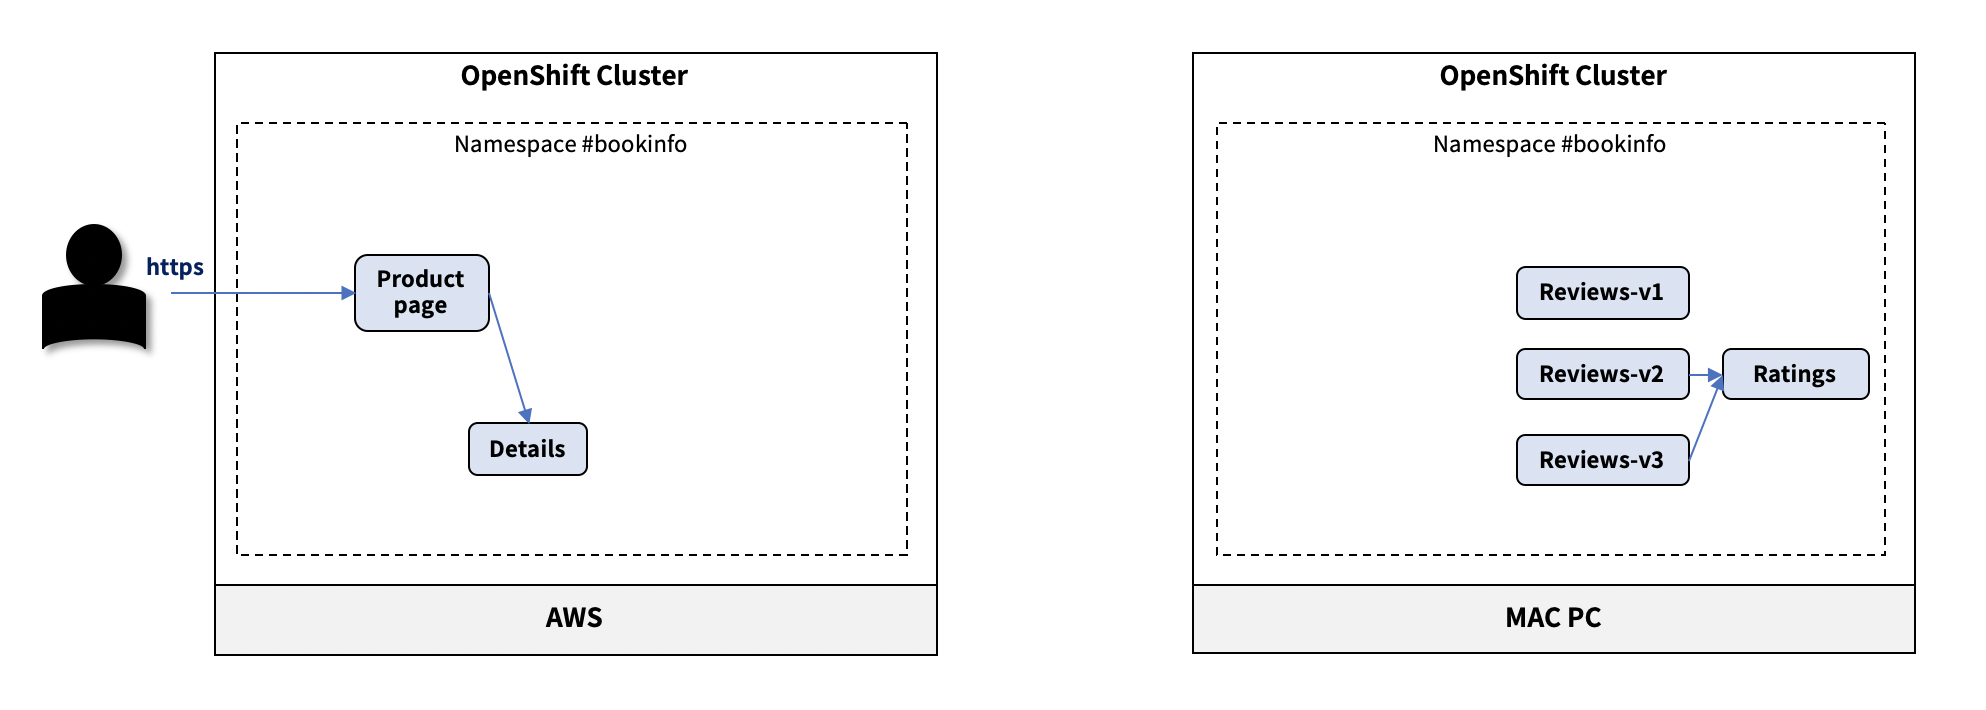
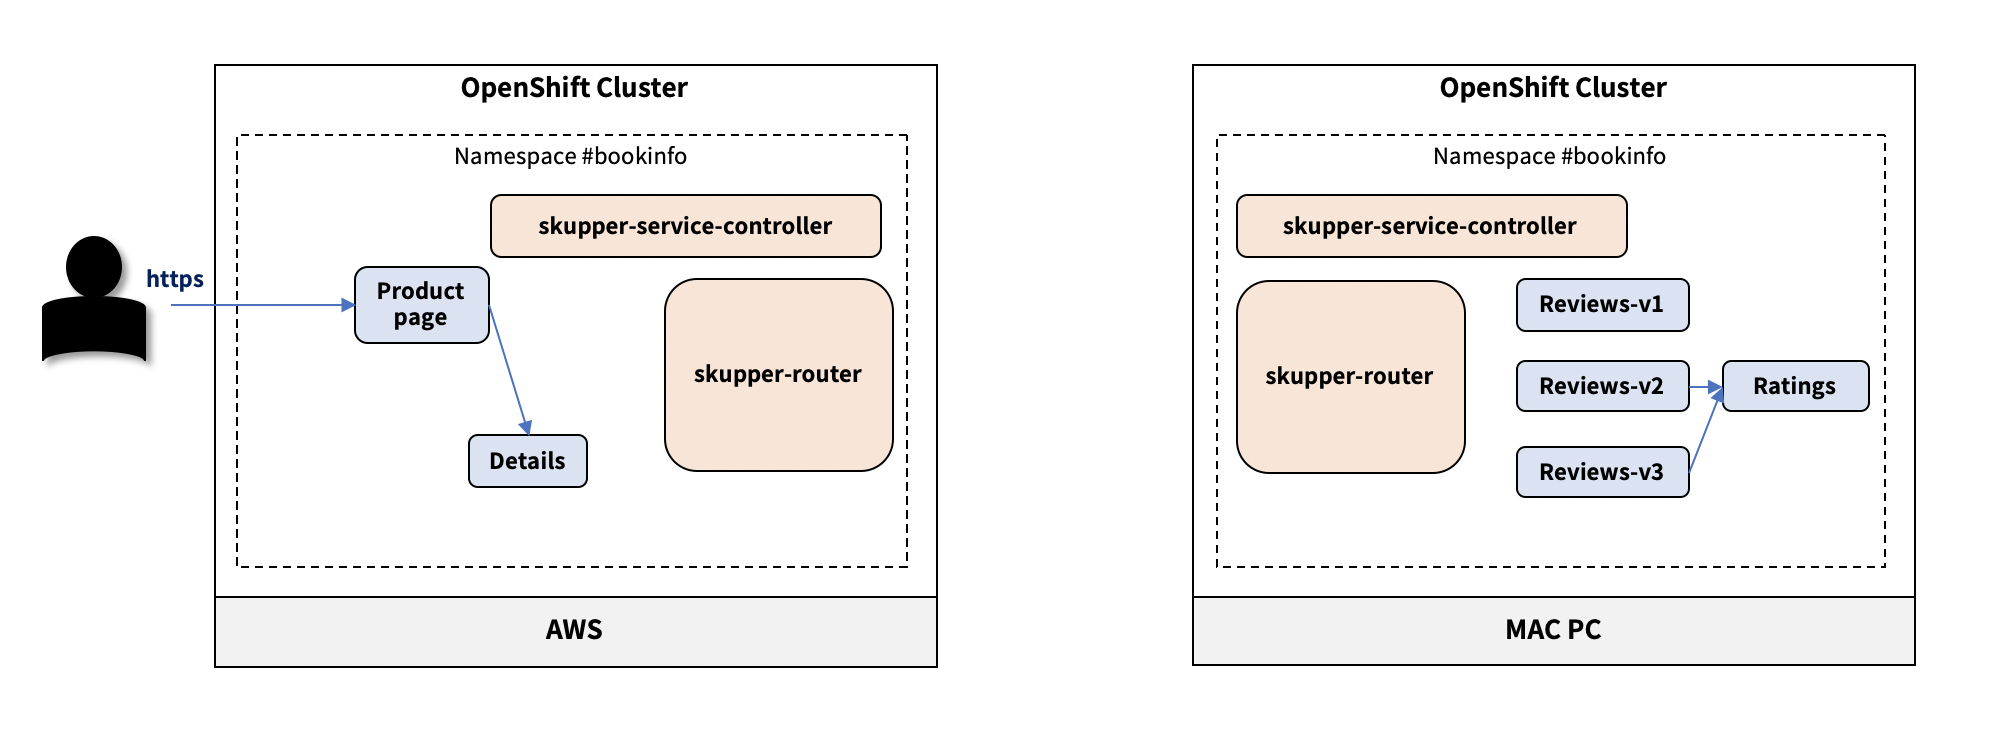
以下のサンプルを参考に、ローカルのMacPCとAWSのそれぞれにBookinfoの各Deploymentをdeployして、アクセスしてみます。
尚、簡単な構成は以下の通りです。
3-1. 前提条件
- MAC PCへVagrantがインストールされている(私の環境では Vagrant 2.2.19)
- MAC PCへ
ocコマンドがインストールされている - AWSへOpenShiftがインストールされている
参考記事:
3-2. MAC PCへSkupper CLIツールをインストール
便利ツールなのでインストールしておきます。
$ curl https://skupper.io/install.sh | sh
3-3. MAC PCへOpenShift環境を構築
今回は、MAC PCへMicroShiftをインストールしてOpenShift環境を構築し、SkupperとBookinfoアプリケーションを実行します。
尚、MicroShiftはOpenShiftの機能をできる限り落として、ラズパイなどのSmall Factorなデバイス環境でもOpenShiftを実行できる様にしたものです。似たようなものにK3sやK0sなどがあります。
MicroShift自体はまだ実験段階のプロジェクトでRed Hatのプロダクトではなく、正式なサポートを受けられないですが、簡単に手元の環境でOpenShiftを動かせてデモやPoCで使うのに便利です。
3-4. MicroShiftインストール
3-4-1. Vagrantfileを作成
$ vi Vagrantfile
Vagrant.configure("2") do |config|
  config.vm.box = "fedora/35-cloud-base"
  config.vm.provider "virtualbox" do |v|
    v.memory = 4096 # 4GB
    v.cpus = 2 # 2コア
  end

  # localhostからアクセスできる様にポートフォワードしておく
  config.vm.network :forwarded_port, guest: 6443, host: 6443, id: "console"
  config.vm.network :forwarded_port, guest: 22, host: 22, id: "ssh"

  # 任意のドメインを指定
  config.vm.hostname = 'microshift.local.com'
  config.vm.provision "shell", inline: <<-SHELL
dnf module list cri-o
dnf -y module enable cri-o:1.22
dnf -y install cri-o
curl https://copr.fedorainfracloud.org/coprs/g/redhat-et/microshift-nightly/repo/fedora-34/group_redhat-et-microshift-nightly-fedora-34.repo -o /etc/yum.repos.d/microshift-nightly-fedora34.repo 2>/dev/null
cat << EOF > /etc/cni/net.d/100-crio-bridge.conf
{
    "cniVersion": "0.4.0",
    "name": "crio",
    "type": "bridge",
    "bridge": "cni0",
    "isGateway": true,
    "ipMasq": true,
    "hairpinMode": true,
    "ipam": {
        "type": "host-local",
        "routes": [
            { "dst": "0.0.0.0/0" }
        ],
        "ranges": [
            [{ "subnet": "10.42.0.0/24" }]
        ]
    }
}
EOF
dnf install -y microshift
hostnamectl set-hostname microshift.local.com # the host needs a fqdn domain for microshift to work well
dnf -y install firewalld wget
systemctl enable firewalld --now
firewall-cmd --zone=public --permanent --add-port=6443/tcp
firewall-cmd --zone=public --permanent --add-port=30000-32767/tcp
firewall-cmd --zone=public --permanent --add-port=2379-2380/tcp
firewall-cmd --zone=public --add-masquerade --permanent
firewall-cmd --zone=public --add-port=80/tcp --permanent
firewall-cmd --zone=public --add-port=443/tcp --permanent
firewall-cmd --zone=public --add-port=10250/tcp --permanent
firewall-cmd --zone=public --add-port=10251/tcp --permanent
firewall-cmd --permanent --zone=trusted --add-source=10.42.0.0/16
firewall-cmd --reload
firewall-cmd --permanent --change-zone=eth0 --zone=public
systemctl enable crio
systemctl start crio
systemctl enable microshift
systemctl start microshift
# Install the oc client
ARCH=x86_64
wget -q https://mirror.openshift.com/pub/openshift-v4/$ARCH/clients/ocp/candidate/openshift-client-linux.tar.gz
mkdir tmp;cd tmp
tar -zxvf ../openshift-client-linux.tar.gz
mv -f oc /usr/local/bin
cd ..;rm -rf tmp
rm -f openshift-client-linux.tar.gz
echo "export KUBECONFIG=/var/lib/microshift/resources/kubeadmin/kubeconfig" >> /root/.bash_profile
  SHELL

end
3-4-2. MicroShiftをインストール
$ vagrant status
Current machine states:

default                   not created (virtualbox)

$ vagrant up

$ vagrant status
Current machine states:

default                   running (virtualbox)

### 3-4-3. KubeConfigをローカルへコピー
$ ssh vagrant@localhost sudo cat /var/lib/microshift/resources/kubeadmin/kubeconfig > ./kubeconfig-mac
3-5. Bookinfoアプリケーションのdeploy
MAC PCとAWSそれぞれにdeployされたOpenShiftのクラスタへBookinfoアプリケーションのPodを配置します。
3-5-1. 事前準備
MAC PC上でターミナルを2つ開き、MAC PC側のOpenShift操作用とAWS側のOpenShift操作用としてそれぞれ使います。
MAC PC、AWSそれぞれのKubeConfigのパスをKUBECONFIG環境変数へ設定しておきます。
$ export KUBECONFIG=./kubeconfig-mac
$ oc create ns bookinfo
$ oc project bookinfo
$ export KUBECONFIG=./kubeconfig-aws
$ oc create ns bookinfo
$ oc project bookinfo
3-5-2. Deployment起動
マニフェストは本稿のおまけ①にまとめてあります。
$ oc apply -f review.yaml
$ oc apply -f rating.yaml

$ oc get pods
NAME                          READY   STATUS    RESTARTS   AGE
ratings-v1-74f65555dc-fvxgh   1/1     Running   0          74s
reviews-v1-548769b868-q7t4x   1/1     Running   0          78s
reviews-v2-54f97b8f6-n9mgr    1/1     Running   0          78s
reviews-v3-7db558b8f6-zdsvc   1/1     Running   0          78s
$ oc apply -f productpage.yaml
$ oc apply -f detail.yaml

$ oc get pods
NAME                           READY   STATUS    RESTARTS   AGE
details-v1-866649cddc-clkfb    1/1     Running   0          34s
productpage-54b495bbb9-vvtv5   1/1     Running   0          47s
3-5-3. Routeの設定
AWS側のターミナルにて、productpage Serviceへ接続するRouteを作成します。
$ oc create route edge productpage --service=productpage

$ oc get route
NAME          HOST/PORT                                                      PATH   SERVICES      PORT   TERMINATION   WILDCARD
productpage   productpageのエンドポイント          productpage   http   edge          None
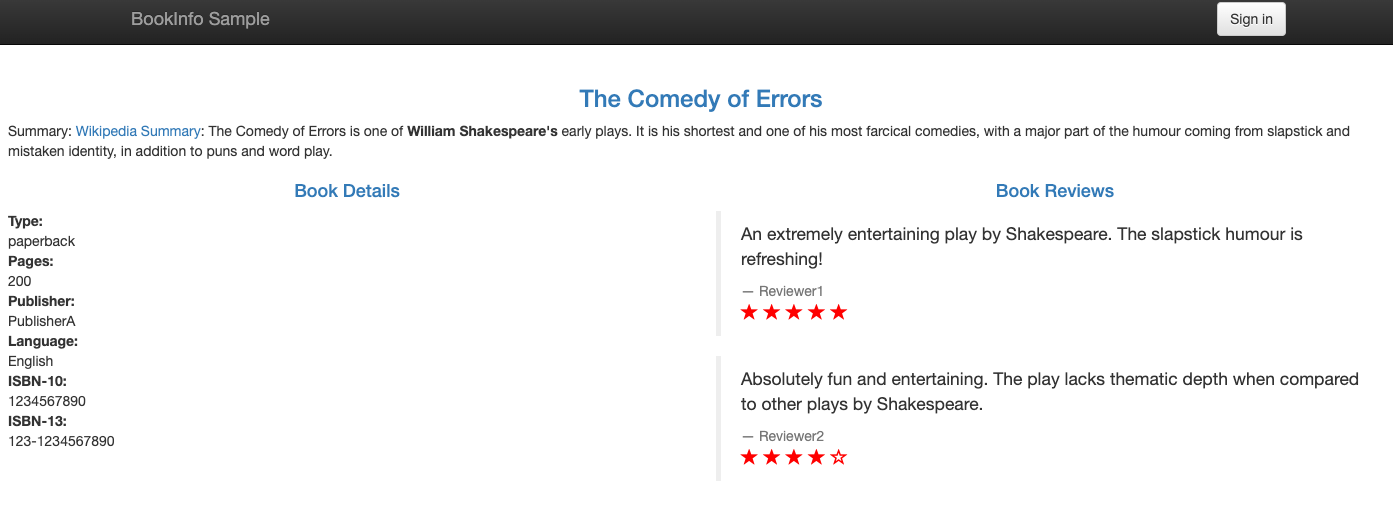
https://productpageのエンドポイント へアクセスします。
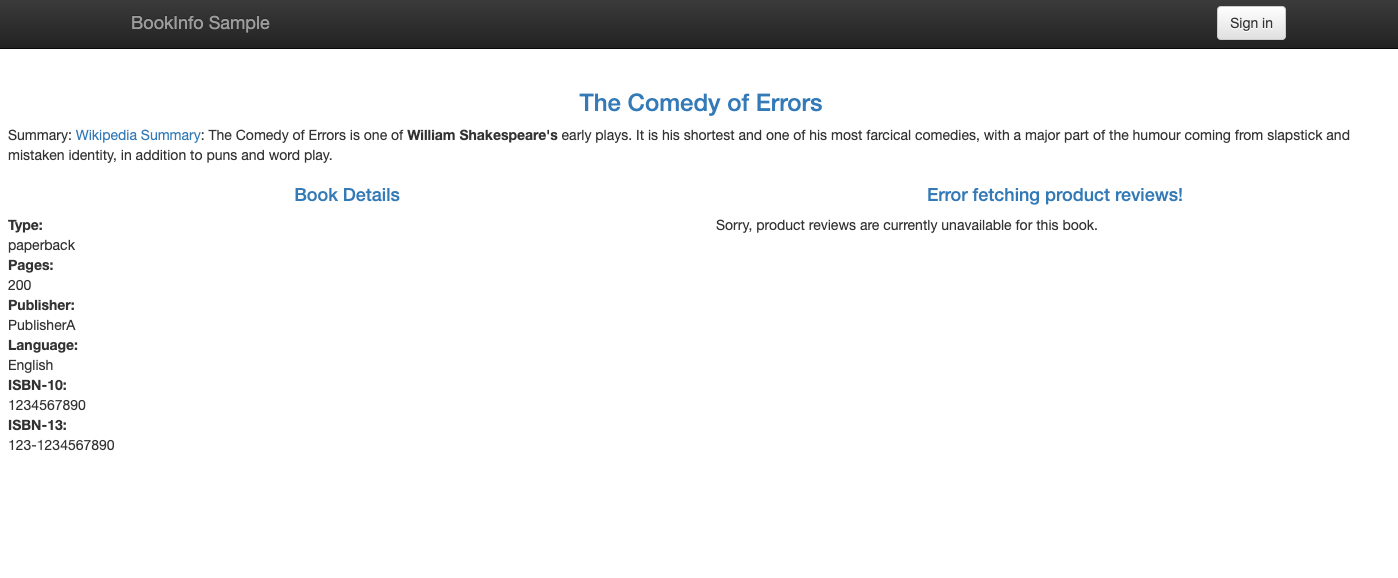
reviewsの箇所がエラーになっていることがわかります。
3-6. Skupperを使ってMAC PCとAWSのクラスタを接続
ここでは、3-2. MAC PCへSkupper CLIツールをインストールにてダウンロードした、skupperコマンドを使った方法を記載します。
尚、OpenShiftへSkupper Site Operatorがインストールされている場合は、以下のサイトに記載されているようなConfigMapを作成することで、自動的にdeployできます。
3-6-1. Skupperルータのdeploy
$ skupper init
Skupper is now installed in namespace 'bookinfo'.  Use 'skupper status' to get more information.

$ oc get pods
NAME                                          READY   STATUS    RESTARTS   AGE
ratings-v1-74f65555dc-fvxgh                   1/1     Running   0          12m
reviews-v1-548769b868-q7t4x                   1/1     Running   0          12m
reviews-v2-54f97b8f6-n9mgr                    1/1     Running   0          12m
reviews-v3-7db558b8f6-zdsvc                   1/1     Running   0          12m
skupper-router-7968576b67-ndnkh               2/2     Running   0          4m10s
skupper-service-controller-65dd76576c-wd8vv   1/1     Running   0          4m8s

$ skupper status
Skupper is enabled for namespace "bookinfo" in interior mode. It is not connected to any other sites. It has no exposed services.
The site console url is:  https://skupperコンソールのドメイン
The credentials for internal console-auth mode are held in secret: 'skupper-console-users'
$ skupper init
Skupper is now installed in namespace 'bookinfo'.  Use 'skupper status' to get more information.

$ oc get pods
NAME                                          READY   STATUS    RESTARTS   AGE
details-v1-866649cddc-clkfb                   1/1     Running   0          11m
productpage-54b495bbb9-vvtv5                  1/1     Running   0          11m
skupper-router-f7dbd86c4-zwrht                2/2     Running   0          4m8s
skupper-service-controller-67f884b954-wllcl   1/1     Running   0          4m6s

$ skupper status
Skupper is enabled for namespace "bookinfo" in interior mode. It is not connected to any other sites. It has no exposed services.
The site console url is:  https://skupperコンソールのドメイン
The credentials for internal console-auth mode are held in secret: 'skupper-console-users'
SkupperコンソールへアクセスするとデフォルトでBasic認証がかかっており、そのユーザ名とパスワードはskupper-console-users Secretに記載されています。デフォルトのユーザ名はadmin、パスワードは以下のコマンドで確認できます。
$ oc get secret skupper-console-users -o json | jq .data.admin -r | base64 -d
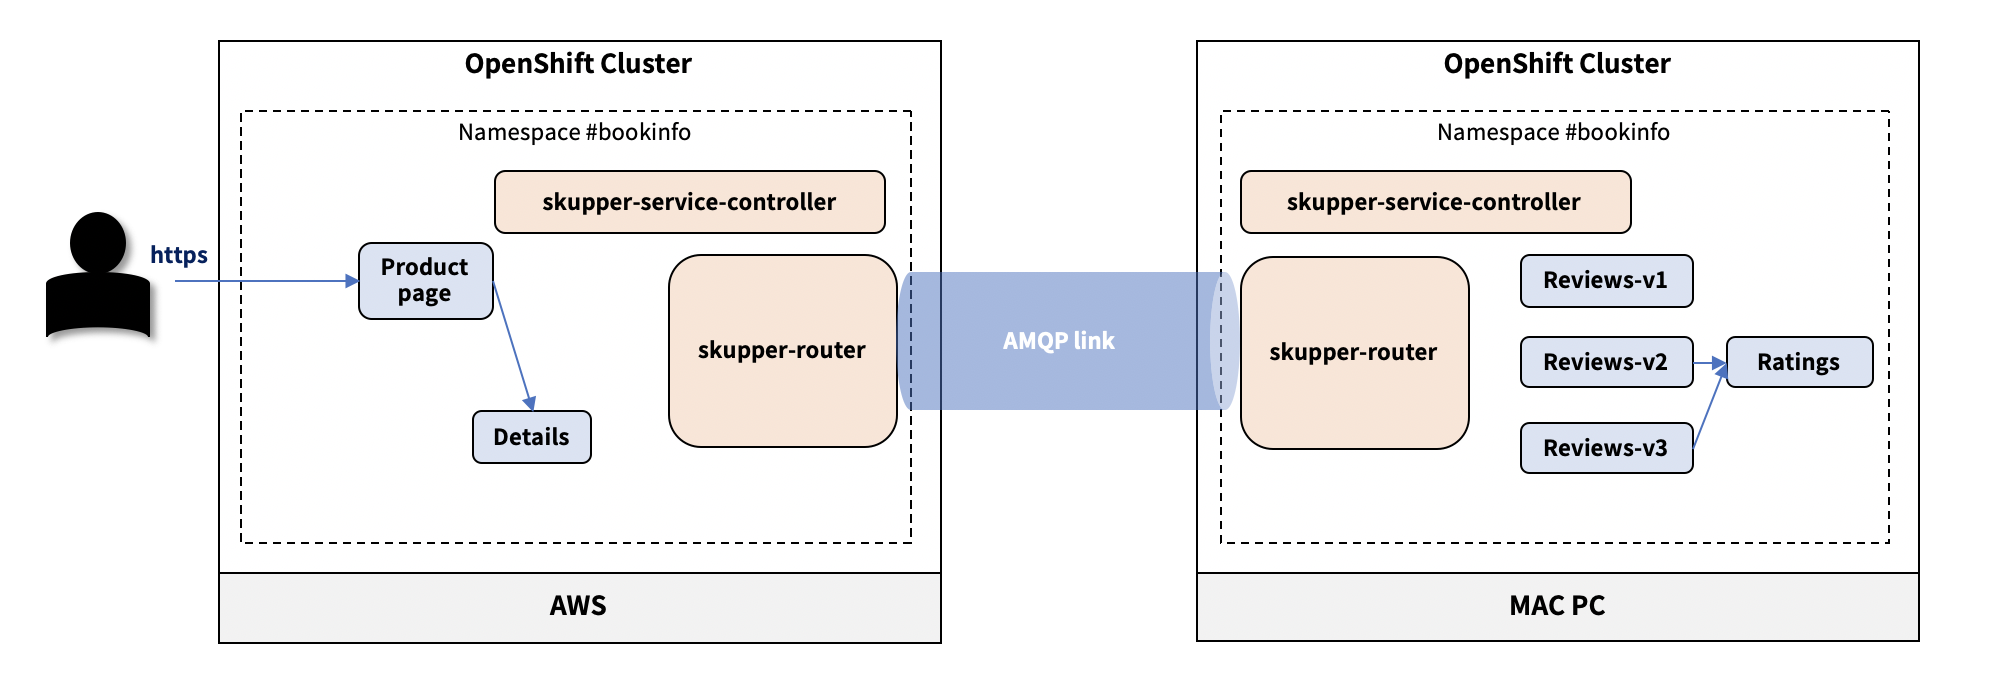
3-6-2. MAC PCとAWS上のSkupperルータを接続するLinkを生成する
deployしたMAC PCとAWS上のSkupperルータ間を接続するLinkを作成します。
Skupperでは、接続先のクラスタでskupper token createコマンドを実行し、他のクラスタにあるSkupperルータからの接続を許可するSecret Tokenを生成し、接続元のクラスタでskupper link create <生成したToken>コマンドを実行し、接続先のクラスタのSkupperルータへLinkを張るように指示します。
尚、Link作成時は必ず プライベートな環境からパブリックな環境へ接続するLinkを作成する ということを意識してください。
大まかに言うと、パブリック側でToken取得、プライベート側でLink作成という流れです。
今回は、AWS側でTokenを取得し、MAC PC側からLinkを作成します。
$ skupper token create mac2aws.yaml
Token written to mac2aws.yaml
$ skupper link create mac2aws.yaml

〜数分待ちます〜

$ skupper link status
Link link1 is active

$ skupper status
Skupper is enabled for namespace "bookinfo" in interior mode. It is connected to 1 other site. It has no exposed services.
The site console url is:  https://skupperコンソールのドメイン
The credentials for internal console-auth mode are held in secret: 'skupper-console-users'
skupper statusコマンドの実行結果に、It is connected to 1 other site.が出力されていれば正常にLinkを生成できています。
尚、Skupperコマンドを使用せず、Secretを作成することでLinkを生成することも可能です。
例えば、下記の様な流れになります。
$ vi token-request.yaml
apiVersion: v1
kind: Secret
metadata:
  labels:
    skupper.io/type: connection-token-request
  name: link1

$ oc apply -f token-request.yaml

$ oc get secret -o yaml link1 > ~/link1.yaml
$ oc apply -f link1.yaml
3-6-3. SkupperとServiceの関連付け(Serviceの仮想化)
skupper linkによって、マルチクラスターで通信可能なSkupperネットワークを構成できましたが、
まだ各ServiceはSkupperネットワークに組み込まれていることを認識しておらず、サービスディスカバリができません。
現状、AWS側のServiceは以下の状態となっており、reviewsとratingsを管理していません。
$ oc get svc
NAME                   TYPE           CLUSTER-IP       EXTERNAL-IP                                                                   PORT(S)               AGE
details                ClusterIP      172.30.170.94    <none>                                                                        9080/TCP              38m
productpage            LoadBalancer   172.30.91.218    ab978fa268317413a819a0415c527140-637765270.ap-northeast-1.elb.amazonaws.com   9080:32494/TCP        39m
skupper                ClusterIP      172.30.38.110    <none>                                                                        8080/TCP,8081/TCP     31m
skupper-router         ClusterIP      172.30.48.78     <none>                                                                        55671/TCP,45671/TCP   31m
skupper-router-local   ClusterIP      172.30.238.212   <none>                                                                        5671/TCP              31m
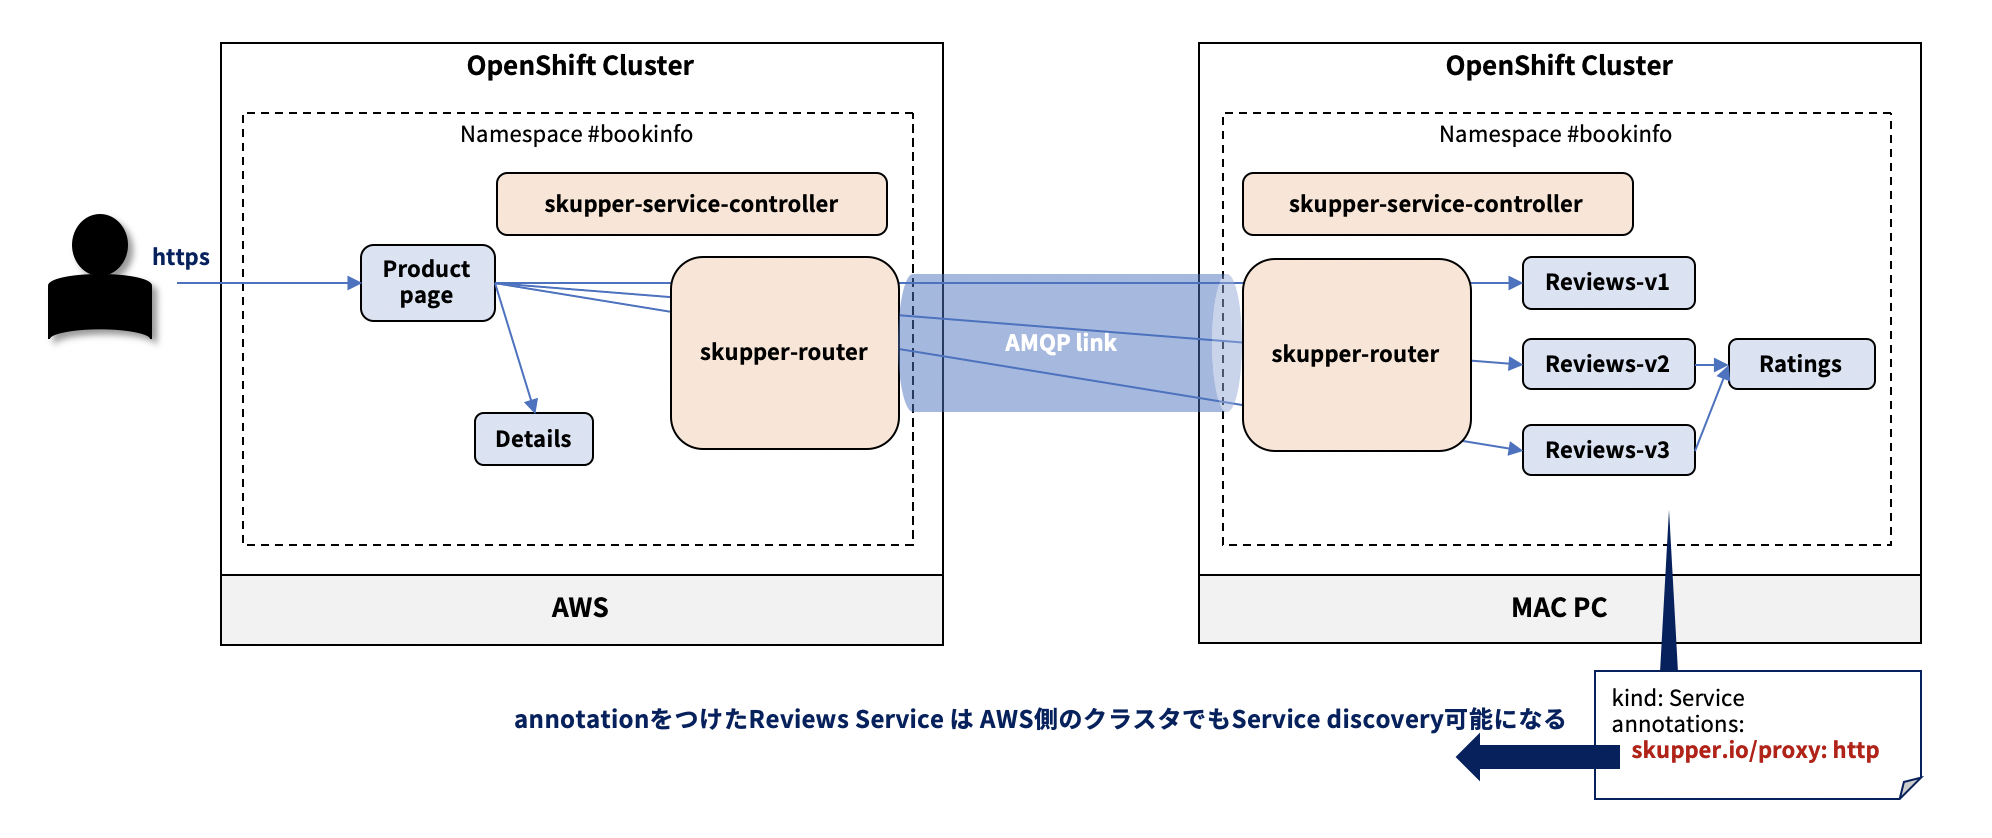
Skupperは、Serviceへ付与されたannotationを元に、Skupperネットワークと関連付けられたServiceを特定し、そのServiceを仮想的なServiceとして管理します。
今回は、AWS側で実行中のproductpageがMAC PC上で実行中のreviewsをサービスディスカバリできるように、MAC PC上のreviews Serviceへannotationを付与します。
すると、AWS側で、仮想的なServiceとしてreviews Serviceを認識できる様になります。
以下の様に、AWS側でディスカバリしたいMAC PC側のServiceへoc annotateコマンドを使用してannotationを付与し、ServiceがSkupperネットワークに含まれることをSkupperに通知します。
$ oc annotate service reviews skupper.io/proxy=http
AWS側で再度Serviceの状態を確認すると、reviewsが表示されます。
$ oc get svc
NAME                   TYPE           CLUSTER-IP       EXTERNAL-IP                                                                   PORT(S)               AGE
details                ClusterIP      172.30.170.94    <none>                                                                        9080/TCP              154m
productpage            LoadBalancer   172.30.91.218    ab978fa268317413a819a0415c527140-637765270.ap-northeast-1.elb.amazonaws.com   9080:32494/TCP        154m
reviews                ClusterIP      172.30.96.136    <none>                                                                        9080/TCP              111m
skupper                ClusterIP      172.30.38.110    <none>                                                                        8080/TCP,8081/TCP     147m
skupper-router         ClusterIP      172.30.48.78     <none>                                                                        55671/TCP,45671/TCP   147m
skupper-router-local   ClusterIP      172.30.238.212   <none>                                                                        5671/TCP              147m
ここで再度、https://productpageのエンドポイント へアクセスしてみると、
正常にreviewsとratingsが表示されます。
尚、annotationはskupper exposeコマンドを使っても付与できます。
$ skupper expose service reviews --address reviews --protocol http
3-7. 環境のクリーンアップ
$ oc delete ns bookinfo
4. まとめ
本稿では、Skupperの紹介と、Skupperを使ったマルチクラスタ環境でBookinfoアプリケーションを実行するデモを構築してみました。
テストした感じ、簡単にクラスタ間ネットワークを構成できるお手軽感があるものの、オブザーバビリティはこれからな印象でした。
また、2クラスタ程度の接続なら問題ないですが、複数のクラスタでネットワークを構成するとなると、お絵描きしながらでないと混乱する&クラスタ数が増えるとマニフェストの管理が煩雑になりそう、と言う所感でした。
ただ、QDR自体はマチュアな技術ですので、不足している部分は代替手段があるかなと思いますし、IPsecを使う方法と比較すると非常に軽量に動きますので、オススメです。特にエッジコンピューティングでハイブリッドクラウドを構成するのに使えそうだなと思いました。
みなさんも是非お試しください!
5. 参考リンク
- https://skupper.io/index.html
- https://github.com/skupperproject/skupper-example-bookinfo
- https://itnext.io/virtual-application-networks-van-for-multi-cloud-multi-cluster-and-cloud-edge-interconnect-1f63a8081f41
- https://access.redhat.com/documentation/ja-jp/red_hat_amq/2021.q2/html/creating_amq_interconnect_sites_using_the_operator/using-skupper-operator-skupper-rhel
- https://access.redhat.com/documentation/ja-jp/red_hat_amq/2021.q4/html/using_the_amq_interconnect_router/index
おまけ① Bookinfoアプリケーションのマニフェスト
productpage.yaml
##################################################################################################
# Productpage services
##################################################################################################
apiVersion: v1
kind: Service
metadata:
  name: productpage
  labels:
    app: productpage
    service: productpage
spec:
  ports:
  - port: 9080
    name: http
  selector:
    app: productpage
  type: LoadBalancer
---
apiVersion: apps/v1
kind: Deployment
metadata:
  name: productpage
  labels:
    app: productpage
    version: v1
spec:
  replicas: 1
  selector:
    matchLabels:
      app: productpage
  template:
    metadata:
      labels:
        app: productpage
        version: v1
    spec:
      containers:
      - name: productpage
        image: docker.io/maistra/examples-bookinfo-productpage-v1:0.12.0
        imagePullPolicy: IfNotPresent
        ports:
        - containerPort: 9080
details.yaml
##################################################################################################
# Details service
##################################################################################################
apiVersion: v1
kind: Service
metadata:
  name: details
  labels:
    app: details
    service: details
spec:
  ports:
  - port: 9080
    name: http
  selector:
    app: details
---
apiVersion: apps/v1
kind: Deployment
metadata:
  name: details-v1
  labels:
    app: details
    version: v1
spec:
  replicas: 1
  selector:
    matchLabels:
      app: details
  template:
    metadata:
      annotations:
        sidecar.istio.io/inject: "true"
      labels:
        app: details
        version: v1
    spec:
      containers:
      - name: details
        image: docker.io/maistra/examples-bookinfo-details-v1:0.12.0
        imagePullPolicy: IfNotPresent
        ports:
        - containerPort: 9080
ratings.yaml
##################################################################################################
# Ratings service
##################################################################################################
apiVersion: v1
kind: Service
metadata:
  name: ratings
  labels:
    app: ratings
    service: ratings
spec:
  ports:
  - port: 9080
    name: http
  selector:
    app: ratings
---
apiVersion: apps/v1
kind: Deployment
metadata:
  name: ratings-v1
  labels:
    app: ratings
    version: v1
spec:
  replicas: 1
  selector:
    matchLabels:
      app: ratings
  template:
    metadata:
      labels:
        app: ratings
        version: v1
    spec:
      containers:
      - name: ratings
        image: docker.io/maistra/examples-bookinfo-ratings-v1:0.12.0
        imagePullPolicy: IfNotPresent
        ports:
        - containerPort: 9080
reviews.yaml
##################################################################################################
# Reviews service
##################################################################################################
apiVersion: v1
kind: Service
metadata:
  name: reviews
  labels:
    app: reviews
    service: reviews
spec:
  ports:
  - port: 9080
    name: http
  selector:
    app: reviews
---
apiVersion: apps/v1
kind: Deployment
metadata:
  name: reviews-v1
  labels:
    app: reviews
    version: v1
spec:
  replicas: 1
  selector:
    matchLabels:
      app: reviews
      version: v1
  template:
    metadata:
      labels:
        app: reviews
        version: v1
    spec:
      containers:
      - name: reviews
        image: docker.io/maistra/examples-bookinfo-reviews-v1:0.12.0
        imagePullPolicy: IfNotPresent
        ports:
        - containerPort: 9080
---
apiVersion: apps/v1
kind: Deployment
metadata:
  name: reviews-v2
  labels:
    app: reviews
    version: v2
spec:
  replicas: 1
  selector:
    matchLabels:
      app: reviews
      version: v2
  template:
    metadata:
      labels:
        app: reviews
        version: v2
    spec:
      containers:
      - name: reviews
        image: docker.io/maistra/examples-bookinfo-reviews-v2:0.12.0
        imagePullPolicy: IfNotPresent
        ports:
        - containerPort: 9080
---
apiVersion: apps/v1
kind: Deployment
metadata:
  name: reviews-v3
  labels:
    app: reviews
    version: v3
spec:
  replicas: 1
  selector:
    matchLabels:
      app: reviews
      version: v3
  template:
    metadata:
      labels:
        app: reviews
        version: v3
    spec:
      containers:
      - name: reviews
        image: docker.io/maistra/examples-bookinfo-reviews-v3:0.12.0
        imagePullPolicy: IfNotPresent
        ports:
        - containerPort: 9080
おまけ② Skupperルータの状態確認コマンド
$ oc exec -it skupper-router-xxxxxxxxx-yyyyy -c router -- qdstat --all-entities
ルータの詳細については以下のサイトが参考になります。

