はじめに
昨日は@unsoluble_sugarさんのFlutterでFirebase Authenticationを使ったGoogleアカウントログインを実装してみたという記事でした。
同じgoogle系のサービスだけあって、設定などが簡単で使いやすい印象をうけました。
はじめまして。
flutterはほぼ初心者ですが、アドベントカレンダーはいい機会だと思い書いてみることにしました。
テーマは、タイトルの通り『イケてるFlutterのUIからいい感じの実装を紹介する』です。
イカしたUIはあるものの、それの実装を探す作業が割と面倒臭い経験があったため、少しでも同じような方の参考となれば幸いです。
参考にしたページ
Flutter-UI-Kit - github
flutter-ui-nice - github
イケてるカード
まずは、以下のような画面の中の1つのカードから。
元コードリンク
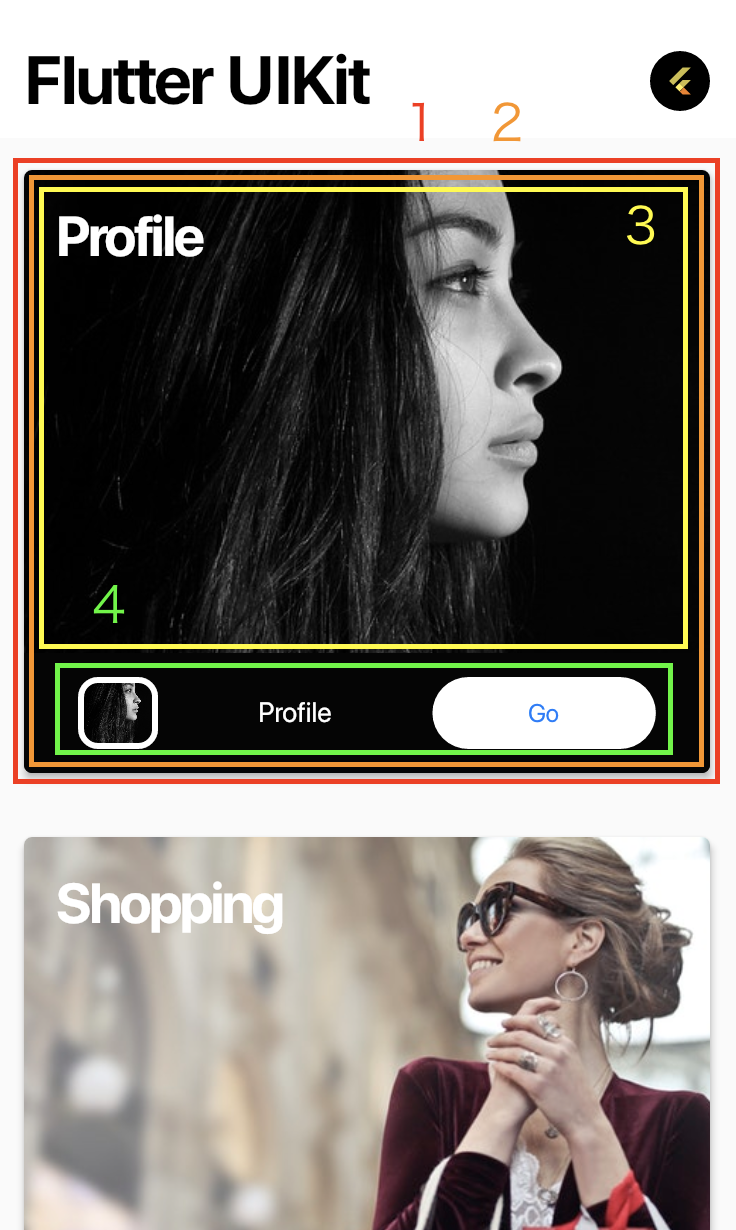
ポイントとしては、
-
Stackを使ってWidgetの上下関係を構築している -
Paddingを使って画像の上に文字を出している -
PositionedWidgetの使い方
あたりが参考になりました。
// 3
  Widget menuImage(Menu menu) => Image.asset(
        menu.image,
        fit: BoxFit.cover,
      );
  Widget menuIOS(Menu menu, BuildContext context) {
    return Container(
      height: deviceSize.height / 2,
      decoration: ShapeDecoration(
        shape:
            RoundedRectangleBorder(borderRadius: BorderRadius.circular(20.0)),
      ),
// 1
      child: Card(
        clipBehavior: Clip.antiAlias,
        elevation: 3.0,
        margin: EdgeInsets.all(16.0),
        child: Stack(
          fit: StackFit.expand,
          children: <Widget>[
// 3
            menuImage(menu),
// 2
            Padding(
              padding: const EdgeInsets.all(16.0),
              child: Text(
                menu.title,
                style: TextStyle(
                  color: Colors.white,
                  fontSize: 28.0,
                  fontWeight: FontWeight.bold,
                ),
              ),
            ),
// 4
            Positioned(
              bottom: 0.0,
              left: 0.0,
              right: 0.0,
              height: 60.0,
              child: Container(
                width: double.infinity,
                color: menu.menuColor,
                child: iosCardBottom(menu, context),
              ),
            )
          ],
        ),
      ),
    );
  }
// 4
  Widget iosCardBottom(Menu menu, BuildContext context) => Padding(
        padding: const EdgeInsets.all(12.0),
        child: Row(
          mainAxisAlignment: MainAxisAlignment.spaceEvenly,
          children: <Widget>[
            Container(
              width: 40.0,
              decoration: BoxDecoration(
                  color: Colors.white,
                  borderRadius: BorderRadius.circular(10.0),
                  border: Border.all(width: 3.0, color: Colors.white),
                  image: DecorationImage(
                      fit: BoxFit.cover,
                      image: AssetImage(
                        menu.image,
                      ))),
            ),
            SizedBox(
              width: 20.0,
            ),
            Text(
              menu.title,
              textAlign: TextAlign.start,
              style: TextStyle(color: Colors.white),
            ),
            SizedBox(
              width: 20.0,
            ),
            FittedBox(
              child: CupertinoButton(
                onPressed: () => _showModalBottomSheet(context, menu),
                borderRadius: BorderRadius.circular(50.0),
                child: Text(
                  "Go",
                  textAlign: TextAlign.left,
                  style: TextStyle(color: CupertinoColors.activeBlue),
                ),
                color: Colors.white,
              ),
            )
          ],
        ),
      );
イカしたボトムメニュー
次は以下の画像の、ボトムのメニューです。
元コードリンク

参考になったポイントは以下です
-
FloatingActionButtonがめり込むボトムメニューの実装方法 -
LinearGradientを使った、グラデーションのイケてる表示 -
SizedBoxWidgetの効果的な使い方
// 1
  Widget myBottomBar() => BottomAppBar(
        clipBehavior: Clip.antiAlias,
        shape: CircularNotchedRectangle(),
        child: Ink(
          height: 50.0,
          decoration: new BoxDecoration(
              gradient: new LinearGradient(colors: UIData.kitGradients)),
// 3
          child: new Row(
            mainAxisAlignment: MainAxisAlignment.spaceAround,
            crossAxisAlignment: CrossAxisAlignment.center,
            children: <Widget>[
              SizedBox(
                height: double.infinity,
                child: new InkWell(
                  radius: 10.0,
                  splashColor: Colors.yellow,
                  onTap: () {},
                  child: Center(
                    child: new Text(
                      "ADD TO WISHLIST",
                      style: new TextStyle(
                          fontSize: 12.0,
                          fontWeight: FontWeight.bold,
                          color: Colors.white),
                    ),
                  ),
                ),
              ),
              new SizedBox(
                width: 20.0,
              ),
              SizedBox(
                height: double.infinity,
                child: new InkWell(
                  onTap: () {},
                  radius: 10.0,
                  splashColor: Colors.yellow,
                  child: Center(
                    child: new Text(
                      "ORDER PAGE",
                      style: new TextStyle(
                          fontSize: 12.0,
                          fontWeight: FontWeight.bold,
                          color: Colors.white),
                    ),
                  ),
                ),
              ),
            ],
          ),
        ),
      );
呼び出し部分
  @override
  Widget build(BuildContext context) {
    return Scaffold(
      // (中略)
      body: bodyData,
// 2
      floatingActionButton: showFAB
          ? CustomFloat(
              builder: centerDocked
                  ? Text("5", style: TextStyle(color: Colors.white, fontSize: 10.0))
                  : null,
              icon: floatingIcon,  // Icons.add_shopping_cart を引数に渡されている
              qrCallback: () {},
            )
          : null,
      floatingActionButtonLocation: centerDocked
          ? FloatingActionButtonLocation.centerDocked
          : FloatingActionButtonLocation.endFloat,
      bottomNavigationBar: showBottomNav ? myBottomBar() : null,
    );
  }
イカしたTweetコンポーネント
いつかTwitterを作る時のために。
元コードリンク
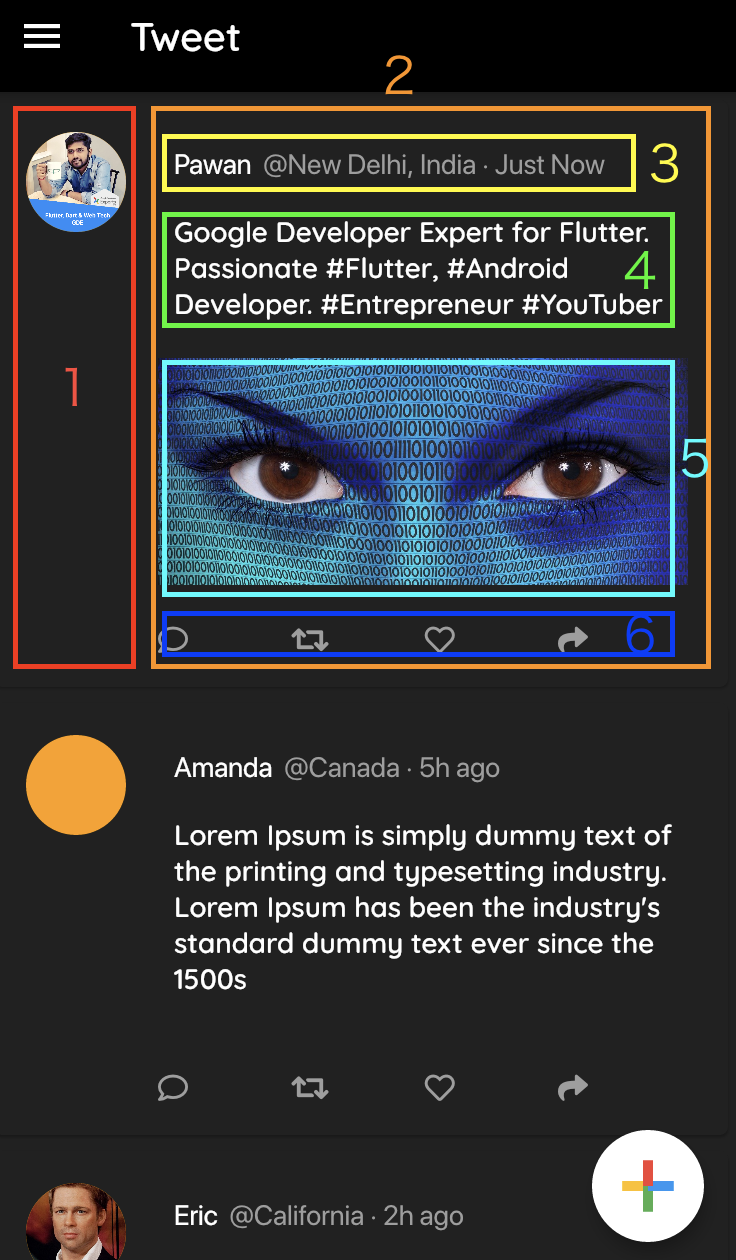
(見にくいですが、コメント、RTなどの欄が6です)
参考になったポイントは以下です
-
ColumnとRowの入れ子構造の実装 -
Columnへの配置の大きさの目安
  Widget bodyList(List<Post> posts) => ListView.builder(
        controller: scrollController,
        itemCount: posts.length,
        itemBuilder: (context, i) {
          Post post = posts[i];
          return Card(
            color: Colors.grey.shade900,
            child: Padding(
              padding: const EdgeInsets.all(16.0),
              child: Row(
                mainAxisAlignment: MainAxisAlignment.start,
                crossAxisAlignment: CrossAxisAlignment.start,
                children: <Widget>[
// 1
                  CircleAvatar(
                      radius: 25.0,
                      backgroundImage: NetworkImage(
                        post.personImage,
                      )),
// 2
                  rightColumn(post),
                ],
              ),
            ),
          );
        },
      );
  Widget rightColumn(Post post) => Expanded(
        child: Padding(
          padding: const EdgeInsets.only(left: 16.0, right: 4.0),
          child: Column(
            mainAxisAlignment: MainAxisAlignment.start,
            crossAxisAlignment: CrossAxisAlignment.start,
            children: <Widget>[
// 3
              Padding(
                padding: const EdgeInsets.all(8.0),
                child: RichText(
                  maxLines: 1,
                  text: TextSpan(children: [
                    TextSpan(
                      text: "${post.personName}  ",
                    ),
                    TextSpan(
                        text: "@${post.address} · ",
                        style: TextStyle(color: Colors.grey)),
                    TextSpan(
                        text: "${post.postTime}",
                        style: TextStyle(color: Colors.grey))
                  ]),
                ),
              ),
// 4
              Padding(
                padding: const EdgeInsets.all(8.0),
                child: Text(
                  post.message,
                  style: TextStyle(
                      color: Colors.white,
                      fontWeight: FontWeight.normal,
                      fontFamily: UIData.quickFont),
                ),
              ),
// 4,5間の空白
              SizedBox(
                height: 10.0,
              ),
// 5
              post.messageImage != null
                  ? Material(
                      borderRadius: BorderRadius.circular(8.0),
                      child: Image.network(
                        post.messageImage,
                        gaplessPlayback: true,
                        fit: BoxFit.cover,
                      ),
                    )
                  : Container(),
              SizedBox(
                height: 20.0,
              ),
// 6
              actionRow(post),
            ],
          ),
        ),
      );
// 6
  Widget actionRow(Post post) => Padding(
        padding: const EdgeInsets.only(right: 50.0),
        child: Row(
          mainAxisAlignment: MainAxisAlignment.spaceBetween,
          children: <Widget>[
            Icon(
              FontAwesomeIcons.comment,
              size: 15.0,
              color: Colors.grey,
            ),
            Icon(
              FontAwesomeIcons.retweet,
              size: 15.0,
              color: Colors.grey,
            ),
            Icon(
              FontAwesomeIcons.heart,
              size: 15.0,
              color: Colors.grey,
            ),
            Icon(
              FontAwesomeIcons.share,
              size: 15.0,
              color: Colors.grey,
            )
          ],
        ),
      );
イカしたStack
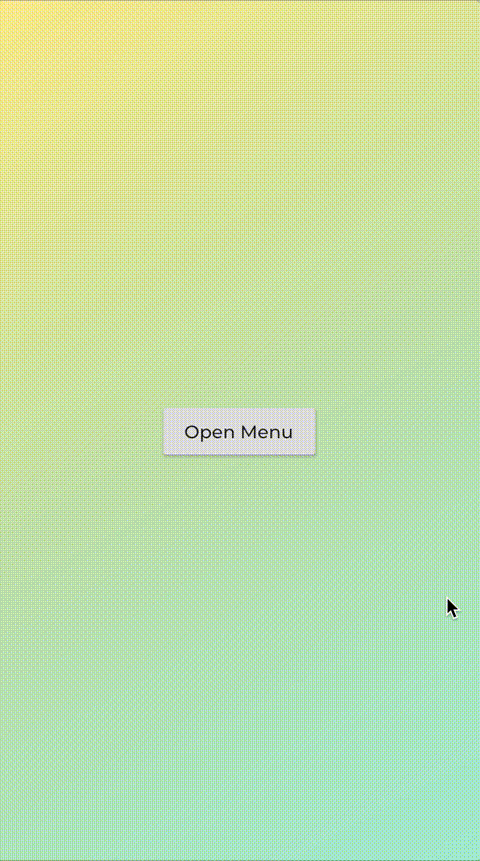
参考になったのは以下です
-
Stackを使って複数のWidgetを同時に出す方法
  @override
  Widget build(BuildContext context) => Material(
		child: BackgroundCommon(
			child: Stack(
				children: <Widget>[
					Positioned(
						bottom: 100.0,
						right: 50.0,
						child: MenuButtons(
							onChatPressed: _onChatPressed,
							onFeedPressed: _onFeedPressed,
							onHomePressed: _onHomePressed,
							onProfilePressed: _onProfilePressed,
							onSettingsPressed: _onSettingsPressed,
						),
					),

					AnimatedBuilder(
							animation: _controller,
							builder: (context, widget) => Transform(
								alignment: Alignment.centerLeft,
								transform: Matrix4
										.translationValues(_animator.translateLeft.value, 0.0, 0.0)
										..scale(_animator.scaleDown.value),
								child: HomePage(() => _openMenu()),
							),
					),
				],
			),
		),
	);

	Future _openMenu() async {
		try {
			await _controller.forward().orCancel;
		} on TickerCanceled {
			print("Animation Failed");
		}
	}
class HomePage extends StatelessWidget {
	HomePage(this.onMenuPressed);
	final VoidCallback onMenuPressed;

	@override
  Widget build(BuildContext context) {
    return Container(
			decoration: BoxDecoration(
				borderRadius: BorderRadius.circular(10.0),
				gradient: LinearGradient(
					begin: Alignment.topLeft,
					end: Alignment.bottomRight,
					colors: [YELLOW, GREEN, BLUE],
				),
				boxShadow: <BoxShadow>[
					BoxShadow(
						color: Colors.black26,
						offset: Offset(2.0, 1.0),
						blurRadius: 10.0,
					)
				],
			),
			child: Center(
				child: RaisedButton(onPressed: onMenuPressed, child: Text("Open Menu"),),
			),
		);
  }
}
さいごに
flutter/sampleもそうですが、UIだけならばサンプルの実装のWidgetの組み合わせだけで綺麗な画面を作ることができそうです。
(2019-12-10) P.S. 必要ない供養ネタは別で投稿し直しました。