以下の記事で実現されているものをVue.jsでkonvaを使って実装してみたので、その内容をまとめます。
元記事様は実装については最低限しか触れられていなかったので、この記事では、ここのコードをまるっと使えば動くものを提供したいなと思います。
その他、canvasについてはズブのド素人だったので、以下の一連の記事を参考にさせていただきました。ありがとうございます!
台形補正
最初に出来上がったものをお見せします。
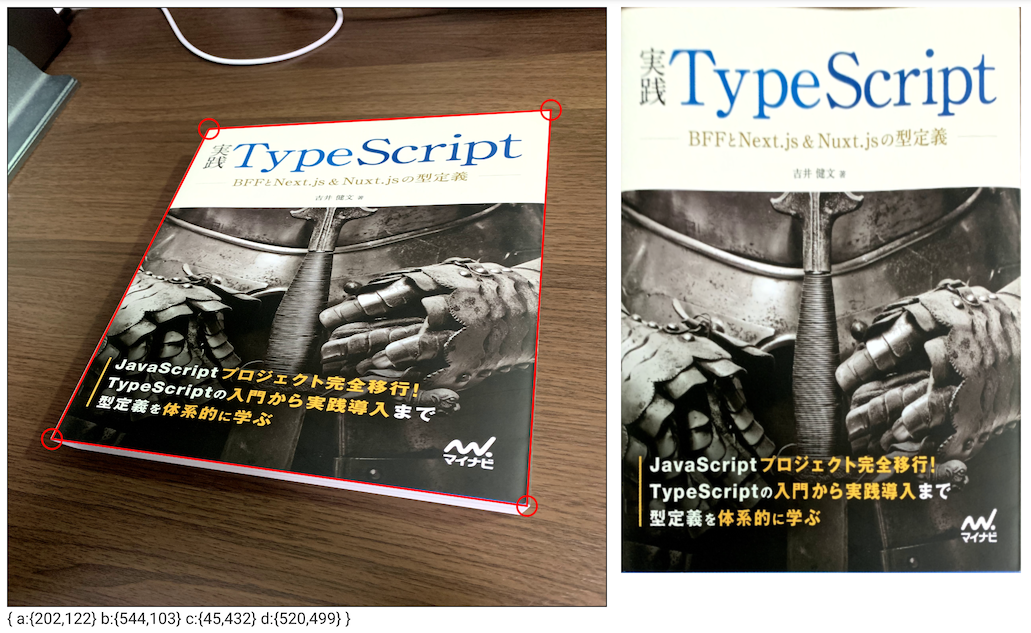
左図の赤枠で囲われた部分を補正した結果を右図に出力しています。
参考元と同じく、リアルタイムで補正が行われるようにしており、なかなかよいパフォーマンスです。
環境
- Nuxt.js 2.14.6
- Konva 7.1.8
- glfx 0.0.4
- canvasでの画像処理用ライブラリ
glfxは参考にさせていただいた記事にもありましたが、5年ほど更新がありません。そのため、TypeScriptには非対応です。TypeScriptで利用したいという方は、適宜、元記事様を参考にwrapperを定義してあげてください。
準備
konvaとglfxをインストールします。
npm install konva
npm install glfx
template, style
早速実装内容を紹介します。まずは<template>と<style>ですが、ここは最低限。
<template>
  <div>
    <div>
      <div ref="container" class="canvas_inline">
        <canvas id="baseImg" width="600" height="600" ref="canvas" />
      </div>
      <div class="canvas_inline canvas_margin">
        <canvas ref="result" width="400" height="566" />
      </div>
    </div>
    <div>
      <span>{{ nowCorner }}</span>
    </div>
  </div>
</template>

<style scoped>
.canvas_inline {
  display: inline-block;
  vertical-align: top;
}

.canvas_margin {
  margin-left: 10px;
}
</style>
script
処理の流れはざっくりと以下のような感じです。
- 起動時
- canvasに画像を表示
-
draggableな4頂点を定義し、dragmove処理を追加 - 4頂点と4辺を描画
- 頂点の座標情報を取得し、補正を実施
- 補正画像を出力先
canvasに描画
- 頂点操作時(
dragmove)
- 座標の更新
- 座標情報を取得し、補正を実施
- 補正画像を更新
宣言
class APIを使います。
<script>
import { Component, Vue, Watch } from 'nuxt-property-decorator';
import Konva from 'konva';

import * as fx from 'glfx';

@Component
export default class KonvaTop extends Vue {
  ...
}
</script>
mounted
まずは、mountedにてcanvasの初期設定を行い、補正に利用する画像を取得します。
// data
width = 600;
height = 600;
stage = null;
canvas = null;
drawingLayer = null;
drawingScope = null;
imageObj = null;
backgroundLayer = null;
backgroundImageScope = null;

// 座標情報格納配列
coords = [
 [202, 123],
 [544, 103],
 [45, 432],
 [520, 498]
];

// 4辺に関係する関数
line = null;
corners = [];

// 現在の座標を表示する
nowCorner = '';

// perspective
perspectiveNubs = [];
baseCanvas = null;
image = null;
texture = null;
resCanvas = null;

mounted() {
  var container = this.$refs.container;
  this.stage = new Konva.Stage({
    container,
    width: this.width,
    height: this.height
  });
  this.drawingLayer = new Konva.Layer();
  this.stage.add(this.drawingLayer);

  this.canvas = this.$refs.canvas;
  this.drawingScope = new Konva.Image({
    image: this.canvas,
    stroke: 'black'
  });
  this.drawingLayer.add(this.drawingScope);
  this.stage.draw();

  // 画像読み込み
  this.imageObj = new Image();
  this.imageObj.addEventListener('load', this.imageOnload);
  this.imageObj.src = require('../../static/IMAGE.JPG');
}
画像読み込み完了
画像読み込みが完了するとimageOnload関数が呼び出されます。
4辺の描画と補正画像の出力は、最初に定義したオブジェクトを更新していくため、初期起動時とその後のdragmoveで処理が変わります
imageOnload() {
  // 背景レイヤ
  this.backgroundLayer = new Konva.Layer()

  // 取得された画像データをImageオブジェクトに登録
  this.backgroundImageScope = new Konva.Image({
    image: this.imageObj,
    width: this.canvas.width,
    height: this.canvas.height
  })

  // 背景レイヤに背景イメージを追加
  this.backgroundLayer.add(this.backgroundImageScope)
  this.stage.add(this.backgroundLayer)

  // 背景イメージを最背面に移動。
  this.backgroundLayer.moveToBottom();

  // 頂点の描画
  this.drawCircle();

  // 4辺の初期描画
  this.initDrawLine();

  // 補正画像の初期表示
  this.initPerspectiveImage();
}
頂点の処理
初期起動時にdraggableな4頂点のオブジェクトを生成し、dragmoveのイベントを登録します。
こうすることで、頂点をドラッグで動かしてイベントを発火させることができます。
drawCircle() {
  // 4つの頂点を1つずつ登録する
  for (let i = 0; i < 4; i++){
    this.corners[i] = new Konva.Circle({
      radius: 10,
      x: this.coords[i][0],
      y: this.coords[i][1],
      stroke: 'red',
      strokeWidth: 2,
      // こいつをtrueにすることでcanvas上で動かすことができる
      draggable: true
    });

    // 4つの頂点ごとにイベントを分ける。
    // もっとよい書き方があったら教えて下さい!
    switch(i) {
      case 0:
        this.corners[i].on('dragmove', this.moveCircle1);
        break;
      case 1:
        this.corners[i].on('dragmove', this.moveCircle2);
        break;
      case 2:
        this.corners[i].on('dragmove', this.moveCircle3);
        break;
      case 3:
        this.corners[i].on('dragmove', this.moveCircle4);
        break;
      default: break;
    }

    // 描画レイヤーに追加
    this.drawingLayer.add(this.corners[i]);
  }

  // canvasを更新
  this.stage.add(this.drawingLayer);

  // 座標情報を表示させる処理
  this.getNowCorner();
}
実際に頂点を動かすと、以下の処理が発火します。
座標情報を更新し、更新された座標情報をもとに、4辺を再描画し、補正画像を更新します。
// それぞれどの頂点が動かされたかを識別するだけ
moveCircle1(node) {
  this.moveCircleBase(node, 0);
};

moveCircle2(node) {
  this.moveCircleBase(node, 1);
}

moveCircle3(node) {
  this.moveCircleBase(node, 2);
}

moveCircle4(node) {
  this.moveCircleBase(node, 3);
}

moveCircleBase(node, i) {
  // 座標情報を更新
  this.coords[i][0] = node.target.attrs.x;
  this.coords[i][1] = node.target.attrs.y;

  // 座標情報の表示を更新
  this.getNowCorner();

  // 4辺を再描画
  this.drawLine();

  // 補正画像を更新
  this.updatePerspectiveImage();
}
辺の処理
4辺は、補正エリアを定義する頂点を結んでいます。頂点をドラッグするときに同時に動かしたかったので、頂点のドラッグイベント時に表示を更新し、頂点の動きに追従できるようにしました。
もしもっとスマートなやり方があるようでしたら、ぜひ教えて下さい!
// 初期化処理
initDrawLine() {
  this.line = new Konva.Line({
    // 左上→右上→右下→左下→左上の順番に線をつなぐ
    points: [
      this.coords[0][0], this.coords[0][1],
      this.coords[1][0], this.coords[1][1],
      this.coords[3][0], this.coords[3][1],
      this.coords[2][0], this.coords[2][1],
      this.coords[0][0], this.coords[0][1],
    ],
    stroke: 'red'
  });

  this.drawingLayer.add(this.line);
  this.stage.add(this.drawingLayer);
}

drawLine() {
  // すでに定義したLineオブジェクトの座標情報を更新
  this.line.attrs.points = [
    this.coords[0][0], this.coords[0][1],
    this.coords[1][0], this.coords[1][1],
    this.coords[3][0], this.coords[3][1],
    this.coords[2][0], this.coords[2][1],
    this.coords[0][0], this.coords[0][1],
  ];

  this.drawingLayer.add(this.line);
  this.stage.add(this.drawingLayer);
}
台形補正
ここが今回のキモです。
glfxライブラリは、Image要素からtextureを取得し、そのtexture情報に画像処理をかけることができます。
台形補正を行うにはperspective(before, after)というAPIを利用します。
beforeは補正前の4頂点の情報を[ax, ay, bx, by, cx, cy, dx, dy]と8つの要素の行列として格納し、
afterには補正後の4頂点の情報を同じ形式でセットします。
今回は、afterとして400:566というA版、B版の割合に調整した画像を出力したかったので、
const after = [ 0, 0, 400, 0, 0, 566, 400, 566];
こんな感じでafterをセットしています。
また、別canvasに補正結果を出力するため、補正後のcanvasオブジェクトからgetPixelArray()でUint8Arrayを取り出しています。
この取り出した値でImageDataを作り、出力先canvas要素に埋め込んでいます。
// canvas,texture,出力先canvasを定義しておく
initPerspectiveImage() {
  try {
    this.baseCanvas = fx.canvas();
  } catch (e) {
    alert(e);
    return;
  }

  this.image = this.backgroundLayer.canvas._canvas;
  this.texture = this.baseCanvas.texture(this.image);
  this.resCanvas = this.$refs.result.getContext('2d');

  // 最初の補正情報
  this.updatePerspectiveImage();

}

updatePerspectiveImage() {
  // beforeの座標情報を設定
  this.setPerspectiveNubs();
  const before = this.perspectiveNubs;

  const after = [ 0, 0, 400, 0, 0, 566, 400, 566];
  this.baseCanvas
    .draw(this.texture)
    .perspective(before, after)
    .update()

  // ImageDataを取得して、別canvasに描画
  const data = this.baseCanvas.getPixelArray();
  const img = new ImageData(new Uint8ClampedArray(data), this.width*2, this.height*2);
  this.resCanvas.putImageData(img, 0, 0);
}

setPerspectiveNubs() {
  this.perspectiveNubs = [
    this.coords[0][0] * 2, this.coords[0][1] * 2,
    this.coords[1][0] * 2, this.coords[1][1] * 2,
    this.coords[2][0] * 2, this.coords[2][1] * 2,
    this.coords[3][0] * 2, this.coords[3][1] * 2,
  ];
}
最後に
- リポジトリはこちら
- 四隅を検出するデータセットがあれば、画像読み込み時に頂点推定とかできそうですよね...
- TypeScriptでリファクタリングもしたいなあ