はじめに
趣味のランニングで使用する GPS ウォッチを探していたところ、Polar というメーカーのものが見つかり、API でデータも自分好みで取得できそうということもあり早速いじってみた。
本記事では、Polar Pacer Pro の活動データの取得のために必要な設定やコマンドをやったことベースで紹介する。
本記事は、生成 AI を利用して執筆しました。
目次
認証情報の取得
Polar Access Link への登録
- Polar Access Link Admin にアクセス
- CREATE A CLIENT をクリック
- 必要な情報を入力:
- 住所や諸々の情報(適当でも可)
-
Authorization Redirect URL:
http://127.0.0.1:8000/oauth2/callback
- Client ID と Client Secret が即時発行される
OAuth 2.0 認証フロー
Step 1: Authorization Code の取得
ブラウザで以下の URL にアクセス:
https://flow.polar.com/oauth2/authorization?response_type=code&client_id={client-id}
認証後、リダイレクト URL のクエリパラメータに code が含まれる。
Step 2: Access Token の発行
Base64 エンコード
# {client_id}:{client_secret} を base64 エンコード
# '-n' は改行なしオプション
echo -n {client_id}:{client_secret} | base64
# 出力例: xxxxxxx==
Token API の呼び出し
curl -X POST https://polarremote.com/v2/oauth2/token \
  -H "Content-Type: application/x-www-form-urlencoded" \
  -H "Authorization: Basic {上でエンコードしたもの}" \
  -d "grant_type=authorization_code&code={上で取得した code}"
レスポンス例:
{
  "access_token": "xxxxxx",
  "token_type": "bearer",
  "expires_in": 315359999,
  "x_user_id": xxxxx
}
注意: 有効期限はデフォルトで 1 年
ユーザー登録
重要: API を使用する前に、ユーザー登録が必要(ドキュメントからは分かりづらい!)
curl -X POST https://www.polaraccesslink.com/v3/users \
  -H "Content-Type: application/json" \
  -H "Authorization: Bearer {access_token}" \
  -d '{"member-id": "fancy-partner-id"}'
-
member-id: 任意の文字列 - 成功時のステータスコード:
201
API の利用
ユーザー情報の取得
curl -X GET https://www.polaraccesslink.com/v3/users/{user-id} \
  -H "Content-Type: application/json" \
  -H "Authorization: Bearer {access_token}"
レスポンス例:
{
  "polar-user-id": xxxxxx,
  "member-id": "fancy-partner-id",
  "registration-date": "2025-12-05T02:10:17.000Z",
  "first-name": "John",
  "last-name": "Smith",
  "birthdate": "2000-01-23",
  "gender": "MALE",
  "weight": 62.0,
  "height": 171.0,
  "extra-info": []
}
user-id の確認方法:
- Polar Flow のプロフィールページから確認可能
- URL 形式:
https://flow.polar.com/training/profiles/{user_id}
過去 28 日間のアクティビティ取得
List activities for past 28 days API
curl -X GET https://www.polaraccesslink.com/v3/users/activities \
  -H "Content-Type: application/json" \
  -H "Authorization: Bearer {access_token}"
レスポンス例(一部抜粋):
[
  {
    "start_time": "2025-11-07T00:00",
    "end_time": "2025-11-07T23:59:59",
    "active_duration": "PT4H54M",
    "inactive_duration": "PT8H46M",
    "daily_activity": 97.42,
    "calories": 2376,
    "active_calories": 1013,
    "steps": 14308,
    "inactivity_alert_count": 0,
    "distance_from_steps": 13055.36
  }
]
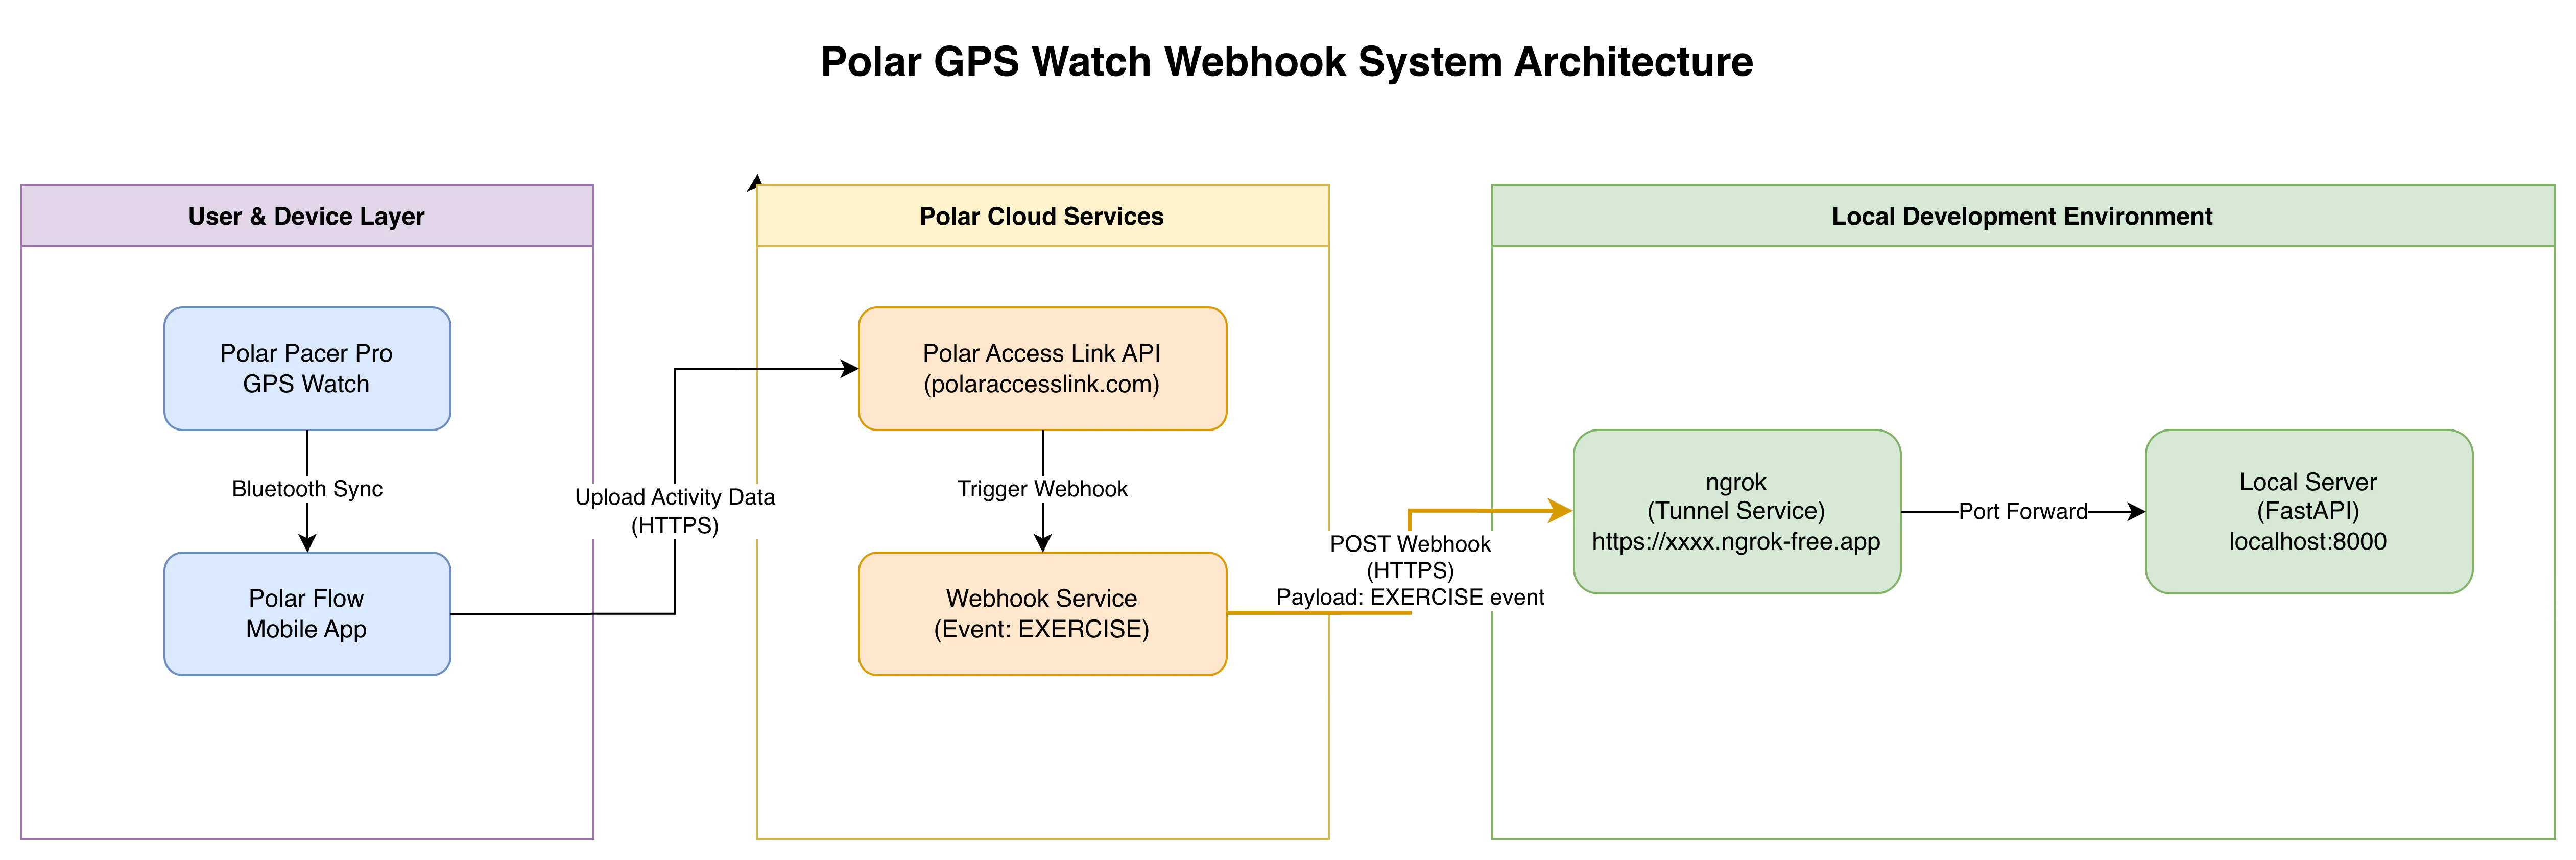
Webhook の設定
エクササイズ後にデータを自動で取り込むための Webhook 設定方法。
システム構成
重要な注意事項
⚠️ 認証方式: Webhook の作成には、OAuth 2.0 Bearer Token 認証ではなく、Basic 認証が必要
To perform this operation, you must be authenticated by means of one of the following methods: Basic
⚠️ レスポンス要件: Webhook(呼ばれる)側は、200 OK を返す必要がある
The ping message must be answered with 200 OK or otherwise the webhook is not created.
webhook 先のサーバーを用意
こんな感じのエンドポイント (webhook 先サーバー) を建てておく。
from fastapi import FastAPI, Request
from pydantic import BaseModel
from typing import Union, Literal
from config import settings
from datetime import datetime
import requests

app = FastAPI(
    title=settings.app_name,
    version=settings.app_version,
    debug=settings.debug,
)

class PingEvent(BaseModel):
    event: Literal["PING"]

class PaymentSucceeded(BaseModel):
    event: Literal["EXERCISE", "SLEEP", "CONTINUOUS_HEART_RATE", "SLEEP_WISE_CIRCADIAN_BEDTIME", "SLEEP_WISE_ALERTNESS", "ACTIVITY_SUMMARY"]
    user_id: int
    entity_id: str
    timestamp: datetime
    url: str


WebhookPayload = Union[PingEvent, PaymentSucceeded]

@app.post(f"{settings.api_prefix}/webhook", status_code=200)
async def create_item(payload: WebhookPayload, req: Request):
    headers = req.headers
    print(f"headers:{headers}")
    print(f"payload:{payload}")

    if payload.event == "PING":
        return "webhook is successully created."

    # retreive runnning detailed information
    response = requests.get(url=payload.url, headers={
        "Authorization": f"Bearer {settings.bearer_token}"
    })
    data = response.json()
    print(f"data:{data}")
    # data.duration 時間(in seconds)
    # data.distance 距離(in meter)
    # data.calories 消費カロリー(in kcal)

    return "payload delivered."
Webhook の作成
curl -X POST https://www.polaraccesslink.com/v3/webhooks \
  -H "Content-Type: application/json" \
  -H "Accept: application/json" \
  -H "Authorization: Basic $(echo -n '<Client ID>:<Client Secret>' | base64)" \
  -d '{
    "events": ["EXERCISE"],
    "url": "<my-fancy-webhook-url>"
  }'
パラメータ説明
-
events: データを受信したいイベントを配列形式で指定
- 選択可能なイベント:
-
EXERCISE: エクササイズ完了時 -
SLEEP: 睡眠データ -
CONTINUOUS_HEART_RATE: 継続的な心拍数 -
SLEEP_WISE_CIRCADIAN_BEDTIME: 就寝時刻 -
SLEEP_WISE_ALERTNESS: 覚醒度 -
ACTIVITY_SUMMARY: アクティビティサマリー
-
- 選択可能なイベント:
-
url: 自分で建てたサーバーのエンドポイント
- 開発時は localhost + ngrok で代用可能1
レスポンス例
{
  "id": "xxxxxxxx",
  "events": ["EXERCISE"],
  "url": "<my-fancy-webhook-url>",
  "signature_secret_key": "xxxxxxxx-xxxx-xxxx-xxxx-xxxxxxxxxxxx",
  "active": true
}
重要:
signature_secret_keyは Payload の検証に使用するため保存しておく
Webhook の確認
curl -X GET https://www.polaraccesslink.com/v3/webhooks \
  -H "Content-Type: application/json" \
  -H "Accept: application/json" \
  -H "Authorization: Basic $(echo -n '<Client ID>:<Client Secret>' | base64)"
Webhook Payload の受信
Payload の構造
{
  "event": "EXERCISE",
  "user_id": xxxx,
  "entity_id": "<ENTITY_ID>",
  "timestamp": "yyyy-mm-ddThh:MM:ssZ",
  "url": "https://www.polaraccesslink.com/v3/exercises/<ENTITY_ID>"
}
デリバリータイミング
ℹ️ Webhook のデリバリータイミングは、ウォッチ端末で活動を完了し、ウォッチとスマホを同期した時である。
Payload の検証
⚠️ Webhook 作成時に取得した signature_secret_key により、verify する必要あり(推奨)
参考: Verifying Payload Signature
詳細データの取得
Payload 中の URL から詳細なエクササイズデータを取得:
curl -X GET https://polaraccesslink.com/v3/exercises/<ENTITY_ID> \
  -H 'Content-Type: application/json' \
  -H 'Accept: application/json' \
  -H 'Authorization: Bearer <access_token>' | jq
レスポンス例
{
  "id": "0rvW7qxQ",
  "upload_time": "2026-02-26T15:43:34Z",
  "polar_user": "https://polaraccesslink.com/v3/users/xxxxxx",
  "device": "Polar Pacer Pro",
  "device_id": "003CA834",
  "start_time": "2026-02-27T00:42:39",
  "start_time_utc_offset": 540,
  "duration": "PT5.664S",
  "heart_rate": {
    "average": 71,
    "maximum": 71
  },
  "sport": "RUNNING",
  "has_route": false,
  "detailed_sport_info": "RUNNING",
  "calories": 0,
  "fat_percentage": 0,
  "carbohydrate_percentage": 100,
  "protein_percentage": 0,
  "training_load_pro": {
    "cardio-load": 0.0,
    "cardio-load-interpretation": "NOT_AVAILABLE",
    "muscle-load": 0.0,
    "muscle-load-interpretation": "NOT_AVAILABLE",
    "perceived-load": 0.0,
    "perceived-load-interpretation": "NOT_AVAILABLE",
    "user-rpe": "UNKNOWN"
  }
}
アーキテクチャ上の考察
イベント駆動型データ取得の重要性
データさえ取得できる仕組みが確立されれば、あとは如何様にでもできる。
活用例:
- Notion の Habit Tracker に書き込む
- LINE メッセージで結果をお褒めの言葉と共に通知
- データベースへの自動保存
- 分析ダッシュボードへのリアルタイム反映
Webhook vs バッチ処理
今回の試行において重要なポイントは、活動データの取得方法である。
Webhook(イベント駆動型)の利点
- リアルタイム性: 「ウォッチにて活動を完了させる」というイベントを起点としてデータが即座に送信される
- 効率性: 必要な時にのみデータが送信されるため、無駄なリクエストが発生しない
- 鮮度: データの鮮度が高く、即座に処理・活用できる
従来のバッチ処理との比較
私が以前 Google Pixel Watch で行った健康管理では、毎日決まった時間に能動的にサーバーへデータを取得しにいく、いわばバッチ処理であった。
現代のデータ処理における意義
今世の中ではかつてないほどの量のデータが生成・消費され、生成 AI の隆盛とともに増加の一途を辿っている。
AI エージェントがエンタープライズにおいて業務利用されるとき、如何にデータを鮮度の高い状態で効率よく処理できるかが肝となる。
従来のバッチ的なデータの処理方法のみでは到底追いつかなくなり、複雑に絡み合うシステムからリアルタイムでデータを取得・処理する仕組みの確立はこれまでになく重要性を増している。2
まとめ
Polar GPS ウォッチのデータ取得は、以下の手順で実現できる:
- Polar Access Link でクライアント登録
- OAuth 2.0 フローで認証
- ユーザー登録
- Webhook の設定
- イベント駆動型のデータ受信
この仕組みにより、リアルタイムで活動データを取得し、様々なサービスと連携させることが可能になる。