はじめに
背景と目的
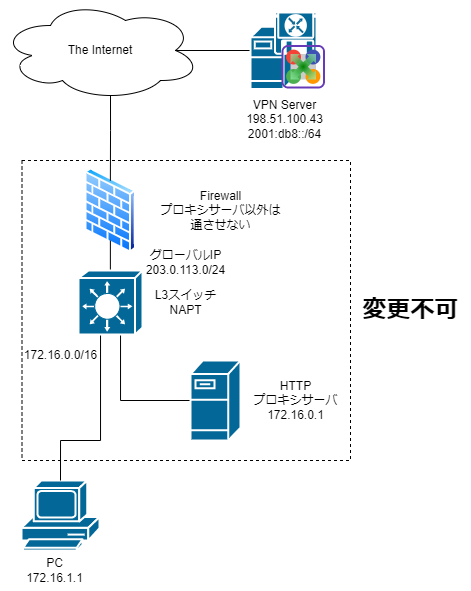
極端に厳しいファイアウォールによって一切の TCP/IP, UDP/IP 通信,及び HTTP プロキシサーバを通過しないと HTTP(S) 通信ができない場合があります.
そのような環境では,例えば SINET のように高品質・低遅延なによる高速ネットワークがあるにもかかわらず,インターネットを利用した実験ができません.
そこで,SoftEther VPN Server を用いて Ethernet over HTTPS カプセル方式の VPN サーバを構築し,自由なインターネットを手にすることが目的です.レイテンシを極力抑えるため,VPN サーバには東京リージョンの VPS を使用します.
今回のネットワーク図を示します.
先行例
VPS やクラウドサーバ上に SoftEther VPN Server をインストールしている例はいくつも存在しますが,これらは上位ネットワークに DHCP サーバなどを持たないため,単純にローカルブリッジを構築しても動作しません.これの解決策として,Secure NAT 機能を用いていました.
しかし,SecureNAT 機能は仕組み上スループットの低下の原因となる場合があったり,IPv6 に非対応であることから,今回はSecureNAT を用いずに構築を行いました.
SecureNAT について SoftEther VPN プロジェクトは以下のように述べています.
SecureNAT 機能は内部で仮想の TCP/IP スタックを持つことによって、一度 TCP/IP スタックによってパケット化した TCP/IP ストリームを再度組み立て、さらにそれをオペレーティングシステムを通じて、TCP/IP パケット化するというような大変高度な処理を行っています。したがって、これらの処理にかかわるオーバーヘッドは大きく、十分高速なコンピュータを用いる場合でも 、仮想 NAT 機能を経由したスループットは物理的な最大スループットと比較して大きく低下してしまいます。そのため、仮想 NAT 機能はパフォーマンスが重視されるような用途には使用しないでください。前述のとおり、仮想 NAT 機能はあくまでも技術的またはセキュリティ上の理由があるため、ローカルブリッジ機能などを使用することができない場合に、「代用」として使用できる機能です。ローカルブリッジなどの高速な手段が利用可能な場合は、そちらを使用してください。
(3.7 仮想 NAT および仮想 DHCP サーバー - SoftEther VPN プロジェクト)
また,SecureNAT 機能にはユーザモード,カーネルモード,Raw IP モードと3種類のモードがあり,カーネルモードと Raw IP モードは今回の手法と遜色ない程度高速に動作することが予想されますが,今回は IPv6 対応のため使用しません.今後可能であれば SoftEther VPN Server の SecureNAT 機能自体を IPv6 対応できるようにしたいと考えています.
システム概要
SecureNAT を用いずに VPN Server を構築している先行例は IPv4 での構築のみを行っていたので,今回は IPv6 にも対応させました.
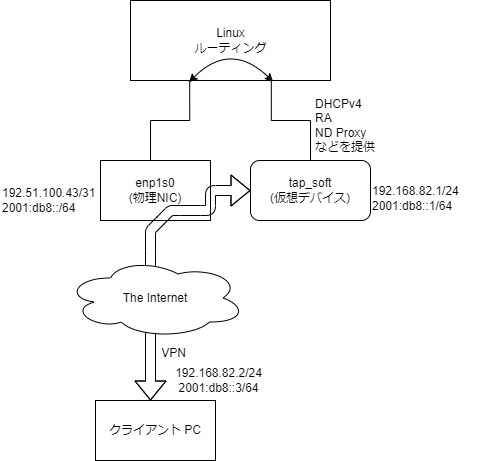
具体的な構成としては,ローカルブリッジ で TAP デバイスを作成し,その TAP デバイスに対し DHCP,RA,ND プロキシなどといったルータに相当する機能を提供することで VPN クライアントをインターネット接続を実現しています.
イメージ図を示します.
実験環境
サーバ側
インスタンス: Vultr AMD High Performance 1 vCPU, RAM 2GB, Bandwidth 3TB/month $12.00/month
IP アドレス: 192.51.100.43/31, 2001:db8::/64 (固定IP)
OS: Arch Linux
月の使用可能転送量が明記されている点,100Mbps 以上の回線速度があるなどの理由から Vultr を採用しました.
参考までに speedtest-cli の結果を示しておきます.計測日時は 2/5 3:30 頃です.
Retrieving speedtest.net configuration...
Testing from (Hidden)...
Retrieving speedtest.net server list...
Selecting best server based on ping...
Hosted by Enzu.com (Tokyo) [13.54 km]: 2.373 ms
Testing download speed................................................................................
Download: 3184.83 Mbit/s
Testing upload speed......................................................................................................
Upload: 356.20 Mbit/s
下りで 3Gbps 以上出てますね…ww
上りでも 300 Mbps 以上出ていてかなり優秀です.
なお,提示した IP アドレスは例示用 IP アドレスとして定められらているものです.
クライント側
クライアントは 172.16.0.0/16 のプライベート IPv4 アドレスだけが付与され,インターネットにアクセスするには HTTP プロキシサーバを通過する必要があります.
TCP や UDP,ICMP のパケットは一切通過できません.
VPN Server の構築
SoftEther VPN Server のインストール
ArchLinux の場合,AUR からインストールできます.
yay -S softethervpn
ソースからビルドするので若干時間がかかります.忙しい人は SoftEther VPN プロジェクトからバイナリがダウンロードできますが,配布されているバイナリでは固有証明書認証などさまざまな機能が使えないことにご注意ください.
SoftEther VPN Server のセットアップ
vpncmd を用いた設定
今回は vpncmd を用いて設定を行います.
まずは sudo systemctl start softethervpn-server.service と入力しを起動させて,それから vpncmd を実行してください.
${}で囲まれた内容は適切な内容に変更し,以下の設定を投入してください.
ServerPasswordSet ${SVPASSWD}
HubCreate VPNHUB1 /PASSWORD:${HUBPASSWD}
HubDelete DEFAULT
BridgeCreate VPNHUB1 /DEVICE:soft /TAP:yes
Hub VPNHUB1
UserCreate ${USRNAME} /NOTE:none /REALNAME:none
UserPasswordSet ${USERNAME} /password:${USERPASSWD}
exit
systemd Unit ファイルの編集
AUR で配布されている SoftEther VPN Server はあらかじめ Unit ファイルが用意されていますが,追加でスクリプトを走らせるために編集を行います.
sudo systemctl edit softethervpn-server.service と入力し以下の内容を追記してください.
### Editing /etc/systemd/system/softethervpn-server.service.d/override.conf
### Anything between here and the comment below will become the new contents of the file

[Unit]
After=network-online.target
Before=dnsmasq.service radvd.service ndppd.service

[Service]
ExecStartPost=/root/softether-start.sh
ExecStop=/root/softether-stop.sh
ExecStop=/root/softether-stop.sh

ProtectHome=no

### Lines below this comment will be discarded

### /usr/lib/systemd/system/softethervpn-server.service
# [Unit]
# Description=SoftEther VPN Server
(後略)
ファイアウォールの設定
Vultr では標準で ufw によるファイアウォールが設定されているので,今回は ufw でファイアウォールを設定します.
なお,今回はセキュリティ向上のため TCP 443 は対向拠点のグローバル IP アドレスからのみアクセスできるようにした.
ufw allow from any to any port 22 proto tcp
ufw allow from 203.0.113.0/24 to any port 443 proto tcp
ufw allow from 0.0.0.0 to 255.255.255.255 port 66:67 proto udp
ufw allow from any to any port 5555 proto tcp
ufw allow from any to any port 8888 proto udp
ufw allow from any to any port 40000:44999 proto udp
3行目では DHCP リクエストの許可,4~6行目では UDP 高速化機能の際に使用するポートを開放している.
NAT設定
以下のスクリプトを作成します.変数は各自の環境に合うように変更してください.
nmcli の行では metric の調整を行っています.デフォルトだと物理 NIC の metric が 100,TAP デバイス側が 255 で物理 NIC の方が優先されてしまい,IPv6 パケットが通らなかったためこのようにしています.
また,Cloud init のような環境では NetworkManager で管理している NIC の名前が ip コマンドで取得できるものと違う (cloud-init\ enp1s0 のようになっている) 場合があるので注意しましょう.
#!/bin/bash
TAP_ADDR=192.168.82.1
TAP_INTERFACE=tap_soft
VPN_SUBNET=192.168.82.0/24
NET_INTERFACE=enp1s0
VPNEXTERNALIP=192.51.100.43

sleep 1

nmcli connection modify $NET_INTERFACE ipv6.route-metric 300
nmcli connection down $NET_INTERFACE && nmcli connection up $NET_INTERFACE

/sbin/ifconfig $TAP_INTERFACE $TAP_ADDR

iptables -t nat -A POSTROUTING -s $VPN_SUBNET -j SNAT --to-source $VPNEXTERNALIP

iptables -A ufw-before-input -s $VPN_SUBNET -m state --state NEW -j ACCEPT
iptables -A ufw-before-output -s $VPN_SUBNET -m state --state NEW -j ACCEPT
iptables -A ufw-before-forward -s $VPN_SUBNET -m state --state NEW -j ACCEPT
#!/bin/bash
TAP_ADDR=192.168.82.1
TAP_INTERFACE=tap_soft
VPN_SUBNET=192.168.82.0/24
NET_INTERFACE=enp1s0
VPNEXTERNALIP=192.51.100.43

iptables -t nat -D POSTROUTING -s $VPN_SUBNET -j SNAT --to-source $VPNEXTERNALIP

iptables -D ufw-before-input -s $VPN_SUBNET -m state --state NEW -j ACCEPT
iptables -D ufw-before-output -s $VPN_SUBNET -m state --state NEW -j ACCEPT
iptables -D ufw-before-forward -s $VPN_SUBNET -m state --state NEW -j ACCEPT
保存後はスクリプトに chmod +x softether-* で実行権限を付与してください.
dnsmasq の設定
DNS, DHCP サーバとして dnsmasq を使用します.
まずは dnsmasq をインストールします.
yay -S dnsmasq
except-interfaceは自分の物理 NIC を指定してください.
その他,必要に応じてパラメータを変更してください.
interface=tap_soft
except-interface=enp1s0
listen-address=192.168.82.1
bind-interfaces
dhcp-range=tap_soft,192.168.82.10,192.168.82.200,720h
dhcp-option=tap_soft,3,192.168.82.1
dhcp-authoritative
enable-ra
expand-hosts
strict-order
dhcp-no-override
domain-needed
bogus-priv
stop-dns-rebind
rebind-localhost-ok
dns-forward-max=300
no-resolv
no-poll
# Prevent Windows 7 DHCPDISCOVER floods
dhcp-option=252,"\n"
server=1.1.1.1
server=1.0.0.1
server=2606:4700:4700::1111
server=2001:4860:4860::8844
dhcp-option=option:dns-server,192.168.82.1,1.1.1.1
dhcp-option=option6:dns-server,[2606:4700:4700::1111],[2606:4700:4700::1001]

cache-size=10000
neg-ttl=80000
local-ttl=3600
dhcp-option=23,64

dhcp-option=vendor:MSFT,2,1i
dhcp-option=44,192.168.82.1 # set netbios-over-TCP/IP nameserver(s) aka WINS server(s)
dhcp-option=45,192.168.82.1 # netbios datagram distribution server
dhcp-option=46,8         # netbios node type
dhcp-option=47
read-ethers
log-facility=/var/log/dnsmasq.log
log-async=5
log-dhcp
quiet-dhcp6

dhcp-option=3,192.168.82.1
次に systemd Unit ファイルの編集を行います.これだけ編集箇所が多いので --full オプションを用いて編集しています.
Unit セクションでは依存関係の調整を行っています.
sleep 1 を挿入しているのは,SoftEther VPN Server が TAP デバイスを作成するのを待つためです.systemd の制約上 SoftEther VPN Server のプロセスが生成された時点で起動完了と判断するため少し時間が必要です.
あまりスマートな書き方では無いので,イイ感じの書き方を知っていたらぜひとも教えていただきたいです.
systemctl edit --full dnsmasq.service
[Unit]
Description=dnsmasq - A lightweight DHCP and caching DNS server
Documentation=man:dnsmasq(8)
After=softethervpn-server.service
Before=nss-lookup.target
Wants=nss-lookup.target

[Service]
Type=dbus
BusName=uk.org.thekelleys.dnsmasq
ExecStartPre=/usr/sbin/sleep 1
ExecStartPre=/usr/bin/dnsmasq --test
ExecStart=/usr/bin/dnsmasq -k --enable-dbus --user=dnsmasq --pid-file
ExecReload=/bin/kill -HUP $MAINPID
Restart=on-failure
PrivateDevices=true
ProtectSystem=full

[Install]
WantedBy=multi-user.target
radvd の設定
ルータ広告に radvd を使用します.
まずは radvd をインストールします.
yay -S radvd
次に radvd のコンフィグを書きます.プレフィックスの部分は各自で変更してください.
interface tap_soft
{
        AdvSendAdvert on;
        prefix 2001:db8::/64
        {
                AdvOnLink on;
                AdvAutonomous on;
        };
};
最後に systemd Unit ファイルの編集を行います.
sudo systemctl edit radvd.service
### Editing /etc/systemd/system/radvd.service.d/override.conf
### Anything between here and the comment below will become the new contents of the file
[Unit]
Requires=softethervpn-server.service

[Service]
ExecStartPre=/usr/sbin/sleep 1
### Lines below this comment will be discarded

### /usr/lib/systemd/system/radvd.service
# [Unit]
(後略)
ndppd の設定
ND Proxy を行うために ndppd を使用します.
/64 で配布されている IPv6 アドレスをそのまま LAN 側にも適用させる,かつ ip6tables でフィルタをするためには ND Proxy が必要です.
まずは ndppd をインストールします.こちらは AUR 上にあるのでパッケージのビルドが必要です.
yay -S ndppd
次にコンフィグを書きます.NIC名,プレフィックスの部分は各自で変更してください.
proxy enp1s0 {
        router no
        timeout 500
        autowire yes
        keepalive yes
        retries 3
        ttl 30000
        rule 2001:db8::/64 {
                iface tap_soft
        }
}
同様に systemd Unit ファイルの編集を行います.
sudo systemctl edit ndppd.service
### Editing /etc/systemd/system/ndppd.service.d/override.conf
### Anything between here and the comment below will become the new contents of the file

[Unit]
Requires=softethervpn-server.service

[Service]
ExecStartPre=/usr/sbin/sleep 1

### Lines below this comment will be discarded

### /usr/lib/systemd/system/ndppd.service
# [Unit]
(後略)
カーネルコンフィグの編集
IP転送などを有効にします. /etc/sysctl.conf が正常に読み込まれなかったので sysctl.d 配下に作成します.
net.core.somaxconn=4096
net.ipv4.ip_forward=1
net.ipv4.conf.all.send_redirects = 0
net.ipv4.conf.all.accept_redirects = 1
net.ipv4.conf.all.rp_filter = 1
net.ipv4.conf.default.send_redirects = 1
net.ipv4.conf.default.proxy_arp = 0


net.ipv6.conf.all.forwarding = 1
net.ipv6.conf.all.proxy_ndp = 1
net.ipv6.conf.all.accept_ra = 1
net.ipv6.conf.tap_soft.accept_ra = 2
sudo sysctl -p /etc/sysctl.d/10-router.conf で変更を適用させます.
サービスの有効化
サービスの起動と有効化をします.
systemctl enable --now softethervpn-server.service
systemctl enable --now dnsmasq.service
systemctl enable --now radvd.service
systemctl enable --now ndppd.service
クライアントの接続
SoftEther VPN ダウンロードセンターから SoftEther VPN Client をダウンロードします.
https://www.softether-download.com/ja.aspx
ダウンロードしたら画面の指示に従ってインストールをしてください.
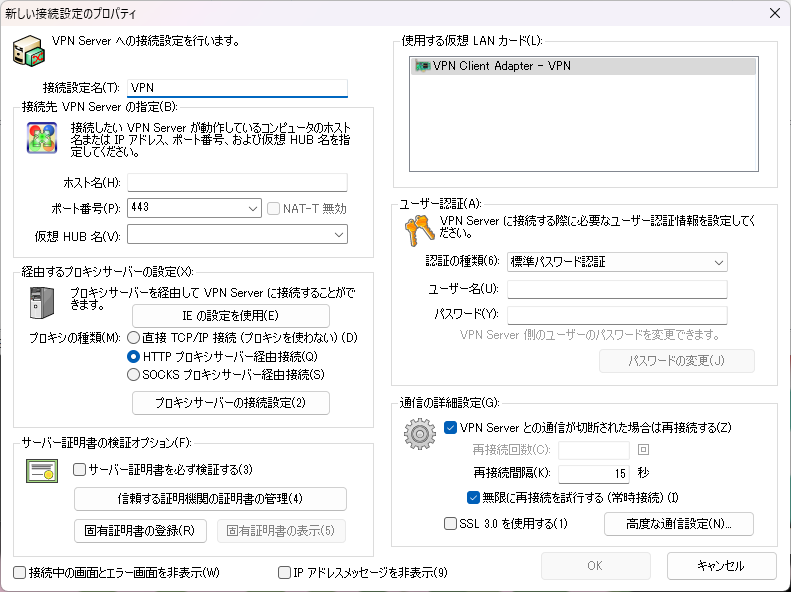
「新しい接続設定の作成」からホスト名,仮想 HUB 名,自分のユーザ名・パスワードを入力します.
経由するプロキシサーバの設定では HTTP プロキシサーバ経由接続を選択してください.
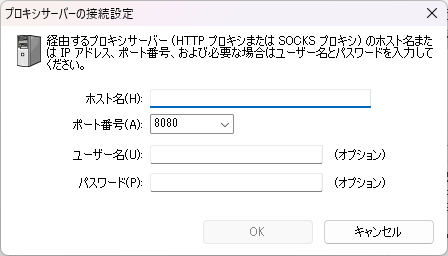
プロキシサーバの接続設定では,ホスト名にプロキシサーバのホスト名,または IP アドレスを (今回は 172.16.0.1),ポート番号を適切に設定し,認証付きプロキシの場合はプロキシサーバの認証に使用しているユーザ名とパスワードを入力してください.
上手くいっていれば VPN コネクションが確立され,IPv4, v6 双方のアドレスが付与されているはずです.お疲れ様でした!
不明な点,修正依頼などありましたらコメントまでお願いします.
今後の展望
SoftEther VPN Server の Secure NAT 機能の一部として移植することを目指しています.また,RA 以外での動作 (ひかり電話ありの構成で直収を行ってる場合など) も確認したいです.おそらく DHCPv6-PD ではユーザ側で自由にプレフィックスを切ることができるので幾分かは単純になると思います.
参考文献
先行例で挙げさせてもらった記事はこちらです.
先行例の参考文献にあったものです./root/softether-start.sh はこちらを参考にいたしました.ありがとうございます.
こちらには IPv6 NAT を用いて IPv6 インターネットに接続する方法も記載されていましたが,自分の環境ではうまく行きませんでした.
SecureNAT の動作モードについてです.
radvd,ndppd などのコンフィグはこちらを参考にいたしました.ありがとうございます.
例示アドレスについてです.