本書の目的
DS18B20の設定方法はGoogle検索でいくらでも情報が見つかるのだが、少し戸惑ったので、2020年6月時点における動作確認結果のメモとして投稿する。
構成
ハード構成
- Raspberry Pi Zero WH
- センサ DS18B20
AliExpressで購入。(https://www.aliexpress.com/item/32676135779.html)
ソフト構成:
sudo lsb_release -a
No LSB modules are available.
Distributor ID: Raspbian
Description:    Raspbian GNU/Linux 10 (buster)
Release:        10
Codename:       buster

uname -a
Linux dishproto01 4.19.97+ #1294 Thu Jan 30 13:10:54 GMT 2020 armv6l GNU/Linux
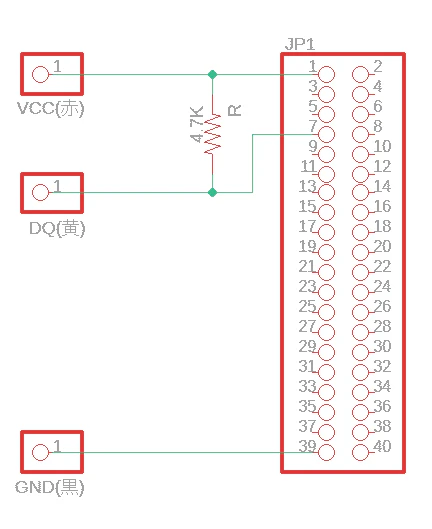
接続方法
4.7KΩの抵抗をVCCとDQの間に接続(プルアップ)する。(ここに10KΩの抵抗を使用したらデバイスがLinux上で見つからず戸惑った)
JP1の各ピン番号がRaspberry Piのピン番号に対応している。
1=3.3V
7=GPIO4(Raspberry Piにおける、1-Wire用のデフォルトピン)
39=GND
設定方法
/boot/config.txtの末尾に以下の行を追加する。
(raspi-configを使ってもよいが、やることは同じ)
/boot/config.txt
dtoverlay=w1-gpio
再起動する
sudo reboot
再起動後、以下のように、28-で始まるディレクトリが出現する。
ls /sys/bus/w1/devices/
28-3c01a81689e9  w1_bus_master1
ちなみに28-の部分は、デバイスの種類によって変わる模様。
https://github.com/owfs/owfs-doc/wiki/1Wire-Device-List
28-~のディレクトリ内のw1_slaveファイルの内容を表示すると、t=・・・で温度が表示される。(watchコマンドにより、0.5秒ごとに更新)
ash
watch -n 0.5 cat /sys/bus/w1/devices/28-3c01a81689e9/w1_slave
表示内容
Every 0.5s: cat /sys/bus/w1/devices/28-3c01a81689e9/w1_slave

c8 01 55 05 7f a5 a5 66 83 : crc=83 YES
c8 01 55 05 7f a5 a5 66 83 t=28500