目的
私が以前所属していたチームでは
- 単体試験表を作成(EXCELなどのドキュメント)
- ユニットテストの作成
- 実装
- テスト実施
という流れで開発を行っていましたが、単体試験の試験表を作成と保守していくコストが掛かるようになり
- ユニットコードの作成
- 試験項目表の自動生成
- 実装
- テスト実施
とすることはできないか検討してみました。
手順
phpunit.xmlで試験の結果をjunit形式で出力する
phpunitのマニュアルによるとphpunit.xmlにtype="junit"を指定するとテスト実行時に自動でログを出力してくれるので追記します。
今回はtests配下にlogというフォルダを設けてそちらに出力します。
    <logging>
        <log type="junit" target="./tests/log/logfile.xml"/>
    </logging>
試しに実行してみます
vendor/bin/phpunit
PHPUnit 7.5.13 by Sebastian Bergmann and contributors.

...                                                                 3 / 3 (100%)

Time: 1.33 seconds, Memory: 14.00 MB
<testsuites>
<testsuite name="" tests="3" assertions="3" errors="0" failures="0" skipped="0" time="1.102644">
<testsuite name="Unit" tests="2" assertions="2" errors="0" failures="0" skipped="0" time="0.806409">
<testsuite name="Tests\Unit\Auth\RegisterControllerTest" file="/var/www/html/tests/Unit/Auth/RegisterControllerTest.php" tests="1" assertions="1" errors="0" failures="0" skipped="0" time="0.768928">
<testcase name="testExample" class="Tests\Unit\Auth\RegisterControllerTest" classname="Tests.Unit.Auth.RegisterControllerTest" file="/var/www/html/tests/Unit/Auth/RegisterControllerTest.php" line="16" assertions="1" time="0.768928"/>
</testsuite>
<testsuite name="Tests\Unit\ExampleTest" file="/var/www/html/tests/Unit/ExampleTest.php" tests="1" assertions="1" errors="0" failures="0" skipped="0" time="0.037481">
<testcase name="testBasicTest" class="Tests\Unit\ExampleTest" classname="Tests.Unit.ExampleTest" file="/var/www/html/tests/Unit/ExampleTest.php" line="15" assertions="1" time="0.037481"/>
</testsuite>
</testsuite>
<testsuite name="Feature" tests="1" assertions="1" errors="0" failures="0" skipped="0" time="0.296235">
<testsuite name="Tests\Feature\ExampleTest" file="/var/www/html/tests/Feature/ExampleTest.php" tests="1" assertions="1" errors="0" failures="0" skipped="0" time="0.296235">
<testcase name="testBasicTest" class="Tests\Feature\ExampleTest" classname="Tests.Feature.ExampleTest" file="/var/www/html/tests/Feature/ExampleTest.php" line="15" assertions="1" time="0.296235"/>
</testsuite>
</testsuite>
</testsuite>
</testsuites>
...かなりわかりにくいですがひとまず試験の内容を出力することができました。
見やすい形式に変換する
こちらのXMLTテンプレートをもとにXMLをHTMLに変換するとかなり見やすくなるようですので、変換してみます。
※xsltprocが入っていない場合は以下のコマンドでインストールしてください。
sudo apt-get install xsltproc
こちらがHTML変換用のコマンドです。
xsltproc phpunit.xslt tests/log/logfile.xml > output.html
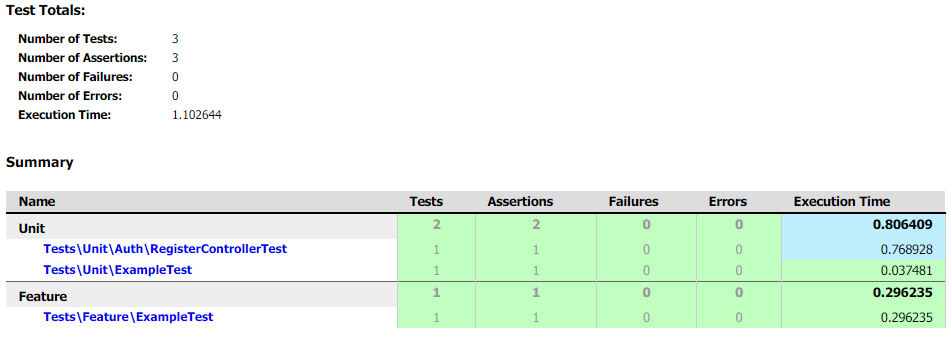
こちらが出力されたHTMLです、かなり見やすくなったのではないでしょうか。

ただ、そのまま使うだけだとテストケースが出力されないため試験の内容がわかりにくく感じたのでテンプレートの内容を少し修正しました。

修正したphpunit.xsltはこちらにも配置してあるので好きに使ってください。
https://gist.github.com/yamamoto-taku/aa3cf2fe6d498a5a855c0f948a29cecd
実例
sampleとしてlaravelの会員登録フォームのバリデーションについてユニットテストを作成し、どのような感じになるか試してみます。
まず以下のコマンドでlaravelの会員機能一式を作成します。
php artisan make:auth
上記のコマンドで作成された以下の関数を試験するテストコードを作成しようと思います。
    /**
     * Get a validator for an incoming registration request.
     *
     * @param  array  $data
     * @return \Illuminate\Contracts\Validation\Validator
     */
    protected function validator(array $data)
    {
        return Validator::make($data, [
            //デフォルトのバリデーションだとひらがなでも登録できるので末尾の正規表現は追記しています。
            'name' => ['required', 'string', 'max:255', 'regex:/^[a-zA-Z0-9-_]+$/'],
            'email' => ['required', 'string', 'email', 'max:255', 'unique:users'],
            'password' => ['required', 'string', 'min:8', 'confirmed'],
        ]);
    }
<?php

namespace Tests\Unit\Auth;

use App\Http\Controllers\Auth\RegisterController;
use Tests\TestCase;

class RegisterControllerTest extends TestCase
{
    protected $target;

    /**
     * @return void
     */
    public function setUp(): void
    {
        parent::setUp();
        $this->target = new RegisterController();
    }

    /**
     * @test
     * @throws \ReflectionException
     */
    public function 正常系()
    {
        $method = $this->changeAccessible('validator');

        $input = [
            'name' => 'yamamoto-taku',
            'email' => 'hoge@example.com',
            'password' => 'password',
            'password_confirmation' => 'password',
        ];
        $validator = $method->invoke($this->target, $input);
        $this->assertTrue($validator->passes());
    }

    /**
     * @param array $input
     * @dataProvider validatorProviderForFailure
     * @test
     * @throws \ReflectionException
     */
    public function 異常系(array $input)
    {
        $method = $this->changeAccessible('validator');
        $validator = $method->invoke($this->target, $input);
        $this->assertFalse($validator->passes());
    }

    /**
     * @return array
     */
    public function validatorProviderForFailure()
    {
        $input = [
            'name' => 'あいうえお',
            'email' => 'hoge@example.com',
            'password' => 'password',
            'password_confirmation' => 'password',
        ];
        $null = [
            'name' => null,
            'email' => null,
            'password' => null,
            'password_confirmation' => null,
        ];

        return [
            '必須入力チェック' => [$null],
            '日本語入力ひらがな' => [$input],
        ];
    }


    /**
     * @param $object
     * @return mixed
     * @throws \ReflectionException
     */
    public function changeAccessible($methodName)
    {
        $reflection = new \ReflectionClass($this->target);
        $method = $reflection->getMethod($methodName);
        $method->setAccessible(true);
        return $method;
    }
}
phpunitを実行してHTMLへの変換処理をかけます。
vendor/bin/phpunit tests/Unit/Auth/RegisterControllerTest.php
xsltproc phpunit.xslt tests/log/logfile.xml > output.html
生成された結果がこちらです。
データセットを持つ試験項目はデータラベルで、単一の試験項目については関数名でレビュアーにどのような試験を実施する想定かを伝えることができそうです!

終わりに
上記のような自動レポートの機能を使って単体試験表を別途書かなくてもOKとなればいいなーと思います。あと変換の処理も合わせて自動でできそうな気もするのでそちらも別途検討してみようと思います。
→PHPUnitのテストランナーを拡張して自動化できましたのでつづきを書きました