こんにちは、やまだゆうです。
前回投稿したソケットサーバー構築の続きです。その記事で作成したプログラムをベースにしているので、まだ読んでいない方はそちらも参考にしてください。
【Node.js】Socket.IO / Express / TypeScriptでリアルタイム通信を実現するソケットサーバー構築
概要
今回のゴール
以下のようにターミナル上のインターフェースから特定のRoomに接続し、そのRoomにメッセージを投稿できることをゴールとします。
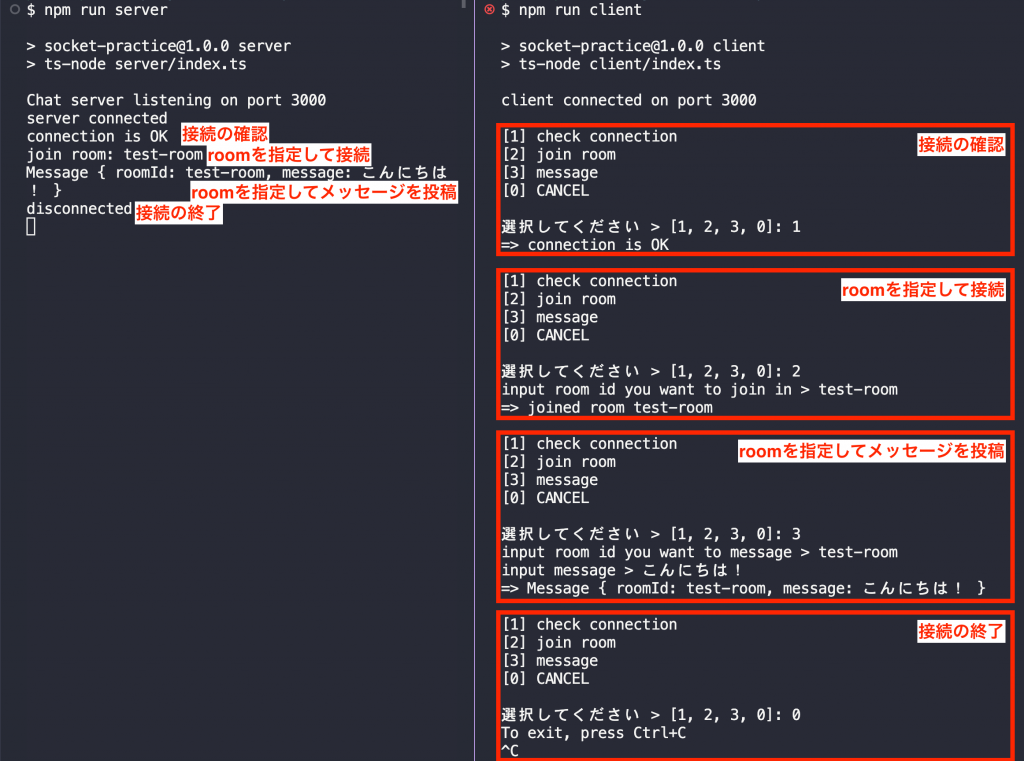
左: サーバーログ / 右: インターフェース(クライアント)
実行環境
- 開発マシン:MacBook Air (Retina, 13-inch, 2020)
- OS:Monterey バージョン12.6.2(21G320)
- npm:8.11.0
- node:v16.16.0
プロジェクトの全体図
ゴール到達時のプロジェクトの構成は以下のようになります。
.
├── client
│   ├── index.ts
│   └── interface.ts
├── server
│   ├── index.ts
│   ├── event.ts
│   └── events
│       └── room.ts
├── environment
│   └── config.ts
├── node_modules
├── package-lock.json
└── package.json
ここで紹介するプロジェクトはぼくのGithubリポジトリに公開しています。良かったらご覧ください。(随時更新しているのでこの記事の内容とは変わっている可能性があります。)
ファイルを役割で分割する
これは個人的な好みですが、役割ごとに細かくファイルを分割して管理しやすくしておきます。
役割ごとに細かくファイルを分割することで、何を書くべきファイルか明確になるので、ファイル内のコード量が少なくなります。
具体的には次の2つのファイルを用意します。
- config.ts
- event.ts
config.tsは設定に関する情報を集約して保持するファイルです。
export const config = {
  port: process.env.PORT || 3000
}
event.tsはソケットのイベントを振り分ける機能を持つファイルとします。
import socketIo from "socket.io";
import { join, message } from "./events/room";

export const event = function(io: socketIo.Server) {
  io.on("connect", (socket: socketIo.Socket) => {
    console.log("server connected");
  });
}
サーバーから参照する
分割したファイルをserver/index.tsから参照します。
import express from "express";
import { createServer } from "http";
import { Server } from "socket.io";
// config.tsを参照
const config = require("./../environment/config.ts").config;

const app = express();
const httpServer = createServer(app);
const io = new Server(httpServer, { path: "/socket/" });

app.get("/", (req: express.Request, res: express.Response) => {
  res.json({
    message: "root path"
  });
});

// event.tsを参照
require("./event.ts").event(io);

// config.tsからportを参照
const port = config.port;
httpServer.listen(port, () => {
  console.log(`Chat server listening on port ${port}`);
});
クライアントから参照する
クライアントではconfig.tsのみ参照します。
import { io } from "socket.io-client";
//  config.tsを参照
const config = require("./../environment/config.ts").config;

const port = config.port;
// config.tsからportを参照
const socket = io(`http://localhost:${port}`, { path: "/socket/" });

socket.on("connect", () => {
  if (socket.connected) {
    // config.tsからportを参照
    console.log(`client connected on port ${port}`);
  }
});
【サーバー】イベントの作成
サーバーにソケットのイベントと、それぞれのイベントが呼ばれたときの処理を実装します。
今回はSocket.IOのRoom機能を使うので、Roomに関する機能に特化したroom.tsを作成します。
Room機能を利用することで、チャットアプリを開発する際に特定のトークルームに所属する人に対してメッセージが届けることを実現できます。
import socketIo from "socket.io";

// 特定のroomを指定して参加
export const join = function(io: socketIo.Server, socket: socketIo.Socket, roomId: string) {
  socket.join(roomId);
  console.log(`join room: ${roomId}`);
  io.to(roomId).emit("receive", `joined room ${roomId}`);
}

// 特定のroomに対してメッセージを送信
export const message = function(io: socketIo.Server, data: {roomId: string, message: string}) {
  const message = `Message { roomId: ${data.roomId}, message: ${data.message} }`;
  console.log(message);
  io.to(data.roomId).emit("receive", message);
}
このroom.tsを参照しつつ、イベントの処理のプログラムをevent.tsに実装します。
import socketIo from "socket.io";
// room.tsを参照
import { join, message } from "./events/room";

export const event = function(io: socketIo.Server) {
  io.on("connect", (socket: socketIo.Socket) => {
    console.log("server connected");
// 以下、追加
    socket.on("check", () => {
      const checkMessage: string = "connection is OK";
      console.log(checkMessage)
      io.emit("receive", "connection is OK");
    });

    socket.on("join", (roomId: string) => {
      join(io, socket, roomId);
    });

    socket.on("message", (data: {roomId: string, message: string}) => {
      message(io, data);
    })

    socket.on("disconnect", () => {
      socket.disconnect;
      console.log("disconnected");
    })
  });
}
これで次の4つのイベントを処理できるようになりました。
- check
- join
- message
- disconnect
【クライアント】インターフェースの作成
次に、クライアント側にインターフェースを実装します。
config.tsを更新する
export const config = {
  port: process.env.PORT || 3000
}

// 以下、追加
export const CHECK_CONNECTION = "check connection";
export const JOIN_ROOM = "join room";
export const MESSAGE = "message";
export const socketActions = [CHECK_CONNECTION, JOIN_ROOM, MESSAGE];
interface.tsを追加する
ターミナル上に表示するインターフェースを実装していきます。
先にインターフェースに使用するパッケージをインストールします。
npm install readline-sync
interface.tsを作成します。
const readlineSync = require("readline-sync");
import { socketActions, CHECK_CONNECTION, JOIN_ROOM, MESSAGE } from "./../environment/config"

export const startCommunication = function(socket: any) {
  const action = selectAction();
  switch (action) {
    case CHECK_CONNECTION:
      checkConnection(socket);
      break;

    case JOIN_ROOM:
      joinRoom(socket);
      break;

    case MESSAGE:
      message(socket);
      break;

    default:
      console.log("To exit, press Ctrl+C");
      break;
  }
}

const selectAction = function() {
  const index =  readlineSync.keyInSelect(socketActions, "選択してください > ");
  return socketActions[index];
}

const checkConnection = function(socket: any) {
  socket.emit("check");
}

const joinRoom = function (socket: any) {
  const roomId = readlineSync.question("input room id you want to join in > ");
  socket.emit("join", roomId);
}

const message = function(socket: any) {
  const roomId = readlineSync.question("input room id you want to message > ");
  const message = readlineSync.question("input message > ");
  socket.emit("message", {roomId, message });
}
インターフェースを使用する流れは以下のようになります。
- 実行したい動作を選択
- check connectionのとき => checkイベントをサーバーに送信
join roomのとき => 参加したいroomを入力させてjoinイベントをサーバーに送信
messageのとき => 任意のroomに対して送るメッセージを入力させてmessageイベントをサーバーに送信
index.tsからinterface.tsを参照
import { io } from "socket.io-client";
 // interface.tsを参照
import { startCommunication } from "./interface";
const config = require("./../environment/config.ts").config;

const port = config.port;
const socket = io(`http://localhost:${port}`, { path: "/socket/" });

socket.on("connect", () => {
  if (socket.connected) {
    console.log(`client connected on port ${port}`);
    startCommunication(socket); // interface.tsに定義した関数を実行
  }
});

socket.on("receive", (message: string) => {
  console.log(`=> ${message}`);
  startCommunication(socket); // interface.tsに定義した関数を実行
});
これで一通りの実装が完了しました。
ターミナルでサーバーとクライアントの両方のプログラムを実行して、動作確認してみましょう!
npm run server
npm run client
これで「今回のゴール」で示したような動作をする、簡易的なチャットアプリができました!