ConstraintLayoutを使用するための設定については、ConstraintLayout入門その1をご覧ください。
ConstraintLayout2.0安定版ようやく登場
alphaもbetaもつかないConstraintLayout2.0安定版がようやくリリースされました。本記事執筆時点の最新安定版は2.0.1です。
今後、筆者の書くConstraintLayout入門の記事は、バージョン2.0準拠といたします。
補助線
ConstraintLayoutでは、子Viewそのものの配置のほか、「補助線」となる表示対象外のオブジェクトを設置し、これを子Viewに参照させることで子Viewの位置を規定することができます。Guidelineは親View、すなわちConstraintLayoutを基準とした位置を指定します。対するBarrierは、子Viewの配置から位置が決まります。
Guideline
ConstraintLayoutの上下左右端からの距離、もしくは相対位置を指定することで「補助線」を設置します。
なお、Guidelineが意味を持つ情報は位置情報のみであり、Guideline自体には「大きさ」がないため、Guidelineの android:layout_width と android:layout_height の値には意味がありません。しかし他のViewと同様 android:layout_width と android:layout_height はいずれも省略すると実行時エラーになります(Lintエラーも出ますがビルドは可能)。「無意味な値」であることを明示する意味で、筆者としては両方とも "0dp" を指定することを推奨します。
<androidx.constraintlayout.widget.ConstraintLayout xmlns:android="http://schemas.android.com/apk/res/android"

    ...

    >

    <androidx.constraintlayout.widget.Guideline
        android:id="@+id/guidelinePercent"
        android:layout_width="0dp"
        android:layout_height="0dp"
        app:layout_constraintGuide_percent="0.25"
        android:orientation="vertical" />

    <androidx.constraintlayout.widget.Guideline
        android:id="@+id/guidelineDpEnd"
        android:layout_width="0dp"
        android:layout_height="0dp"
        app:layout_constraintGuide_end="120dp"
        android:orientation="vertical" />

    <androidx.constraintlayout.widget.Guideline
        android:id="@+id/guidelineDpTop"
        android:layout_width="0dp"
        android:layout_height="0dp"
        app:layout_constraintGuide_begin="100dp"
        android:orientation="horizontal" />

    ...

</androidx.constraintlayout.widget.ConstraintLayout>
android:orientation でガイドラインの向きを水平または垂直のいずれかに指定します。 android:orientation に "horizontal" を指定した場合は水平のガイドラインとなり、親Viewの上端または下端からの距離もしくは相対位置の指定により配置が決まります。 android:orientation に "vertical" を指定した場合は垂直のガイドラインとなり、親Viewの左端または右端からの距離もしくは相対位置の指定により配置が決まります。
位置指定は app:layout_constraintGuide_begin、app:layout_constraintGuide_end、app:layout_constraintGuide_percent のいずれか1つを設定して行います。
水平のガイドラインでは app:layout_constraintGuide_begin で上端からの距離、 app:layout_constraintGuide_end で下端からの距離を設定します。app:layout_constraintGuide_percent を使う場合は0と1の間の小数を指定し、0に近いほど上端近く、1に近いほど下端近く、0.5なら中段に設定されます。
垂直のガイドラインでは app:layout_constraintGuide_begin で左端からの距離、 app:layout_constraintGuide_end で右端からの距離、app:layout_constraintGuide_percent を使う場合は0と1の間の小数を指定し、0に近いほど左端近く、1に近いほど右端近くに設定することになりますが、親Viewに android:layoutDirection="rtl" が設定されている場合は(明示的設定、もしくは親の親から継承されている場合ともに)左右がこれと逆になります。
Guidelineの位置指定は距離または比率の値を1つだけ用いた単純なものであり、子Viewを用いた位置指定でも代替できます。たとえば以下のXMLのように記述して、Spaceの上下左右端を参照することでSpaceをガイドラインとして使うこともできます。 android:layoutDirection="rtl" の場合にも左右の入れ替えを生じさせたくない場合は、以下のようにLeftとRightで位置を指定したSpaceを使うとよいでしょう。
<androidx.constraintlayout.widget.ConstraintLayout xmlns:android="http://schemas.android.com/apk/res/android"

    ...

    >

    <Space
        android:id="@+id/guideSpacePercent"
        android:layout_width="0dp"
        android:layout_height="0dp"
        app:layout_constraintLeft_toLeftOf="parent"
        app:layout_constraintWidth_default="percent"
        app:layout_constraintWidth_percent="0.25"
        app:layout_constraintTop_toTopOf="parent" />

    <Space
        android:id="@+id/guideSpaceDpEnd"
        android:layout_width="120dp"
        android:layout_height="0dp"
        app:layout_constraintRight_toRightOf="parent"
        app:layout_constraintTop_toTopOf="parent" />

    ...

</androidx.constraintlayout.widget.ConstraintLayout>
Barrier
以下の2つの画面例をご覧ください。
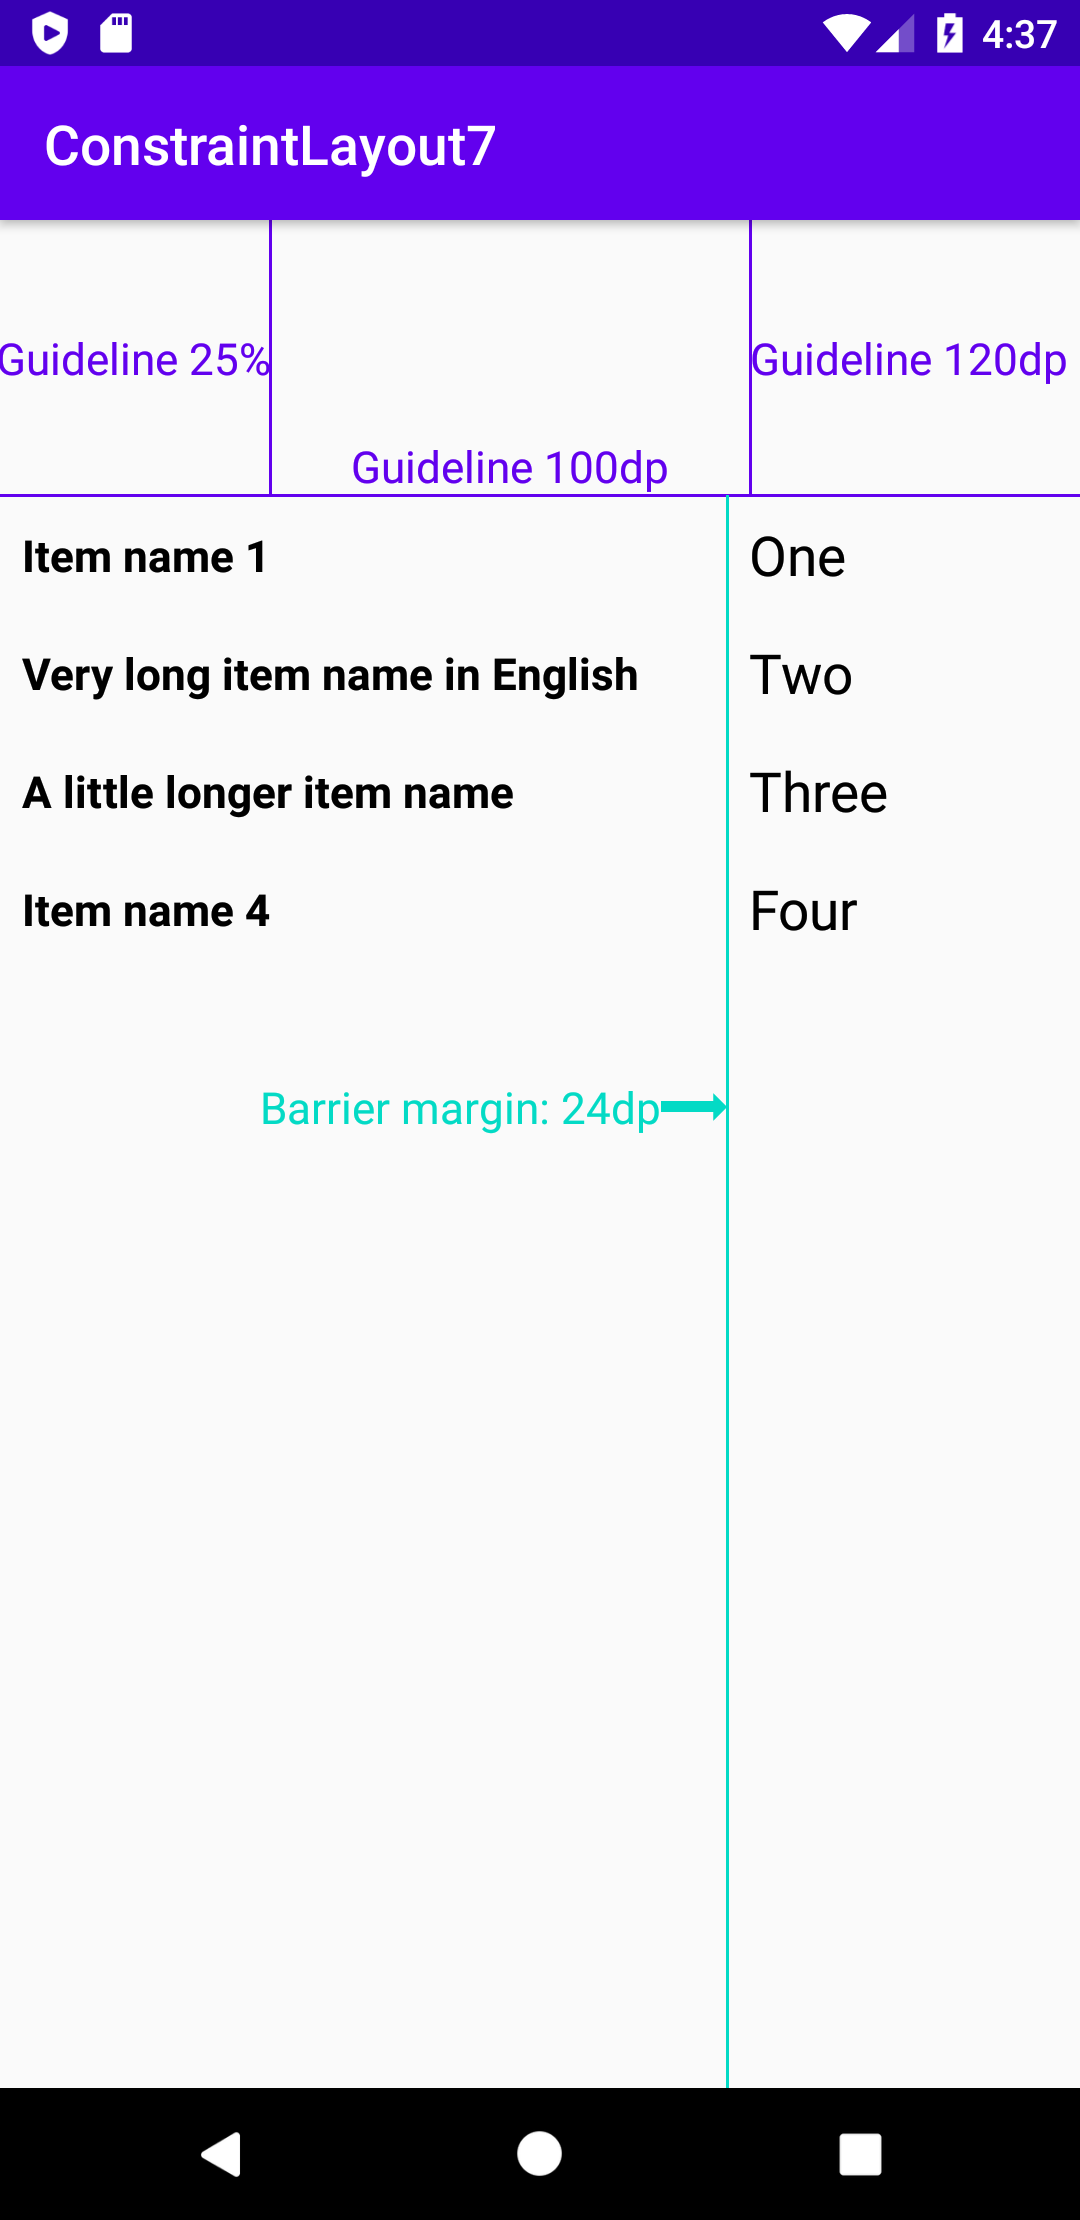

上記2つの画面例中、黒い文字で表示された部分のように「項目名-項目の値」という配列のリストを表示させる場合、左側の文字列のうち一番長い文字列の右端を基準に右側の文字列を揃えたい、という場合があります。この例では、言語が英語のとき上から2番目の文字列が最長、日本語のとき一番下の文字列が最長、と状況によって最長となるViewが変わっています。
このような場合、「子Viewのうちもっともせり出しているViewに合わせた補助線」としてBarrierが使えます。
<androidx.constraintlayout.widget.ConstraintLayout xmlns:android="http://schemas.android.com/apk/res/android"

    ...

    >

    <androidx.constraintlayout.widget.Barrier
        android:id="@+id/barrier"
        android:layout_width="0dp"
        android:layout_height="0dp"
        app:barrierDirection="end"
        app:barrierMargin="24dp"
        app:constraint_referenced_ids="itemName1, itemName2, itemName3, itemName4" />

    ...

</androidx.constraintlayout.widget.ConstraintLayout>
上記XMLにて app:constraint_referenced_ids で列挙したIDで表されたView(ここで、View IDには先頭の @id/ を付与する必要はありません)のうち、 app:barrierDirection で指定した方向にもっともせり出したViewの端に設置される「補助線」がBarrierとなります。他のViewがこのBarrierを参照することにより、画面例のような表示が可能になります。
BarrierもGuidelineと同じく大きさを持たず、Barrier自体はマージンの役割を果たすことができません。しかし、ConstraintLayoutバージョン2からは app:barrierMargin に長さを指定することでBarrierの位置を app:barrierDirection で指定した方向に動かすことが可能になったようです。これで「もっともせり出しているView」と、Barrierを基準に配置したViewとの間にマージンを設定できるようになりました。
Guidelineと同じく android:layout_width と android:layout_height の値は省略不可のため、ここでも無意味な値 "0dp" を指定しています。 android:layout_width と android:layout_height に長さを指定しても app:barrierMargin と同じような効果を持たせることはできません。
Barrierは他の方法での代替が困難な「補助線」です。たとえば、BarrierをFrameLayoutに置き換えて app:constraint_referenced_ids で指定していた子ViewをこのFrameLayoutの中に入れ、FrameLayoutのlayout_widthとlayout_heightに "wrap_content" を指定すれば、FrameLayoutの大きさを「もっともせり出しているView」に合わせることは可能です。しかし、このようにConstraintLayoutの内部にネストを作ってしまうと、ネストの中のViewとネストの外のViewとを相互に参照させることができなくなり不自由です。Barrierは、このような「ネストの壁」を避けて子View同士の参照を妨げずに制約を設ける効果があります。
サンプルコード
今回のサンプルコードは以下のリポジトリにあります。
https://github.com/csayamada/ConstraintLayout7
Guidelineは他の方法でも代替できるものの、親Viewの水平方向もしくは垂直方向の特定の位置を簡潔に表すのに便利です。
Barrierを使いたくなるケースはあまり多くないかもしれませんが、動的に長さが変わる複数の子Viewの位置を揃えるレイアウトが突然必要になったとき、きっとあなたを救ってくれると思います。
参考文献
ConstraintLayout でレスポンシブ UI を作成する | Android デベロッパー
ConstraintLayout | Android Developers
Guideline | Android Developers
Barrier | Android Developers
Barrierのバグ?
ConstraintLayoutバージョン2.0.1にて、ConstraintLayoutに android:layoutDirection="rtl" を指定、Barrierに app:barrierDirection="end" を指定して app:barrierMargin に正の長さを指定したとき、左側にマージンをとることが期待されるのに実際には右側にマージンがとられるようです。これ、IssueとしてGoogleに報告した方がいいでしょうかね…?