IBM の developerWorks サイトの記事 Watson×Unity!初心者でもできる、VR 空間で Unity ちゃんとおしゃべりアプリ! を現時点(2018年4月15日)の最新環境(バージョン)で試してみました。
前回 に引き続き、残りの API 用サンプルコードも修正したので、一応公開します。
Text to Speech を試してみよう
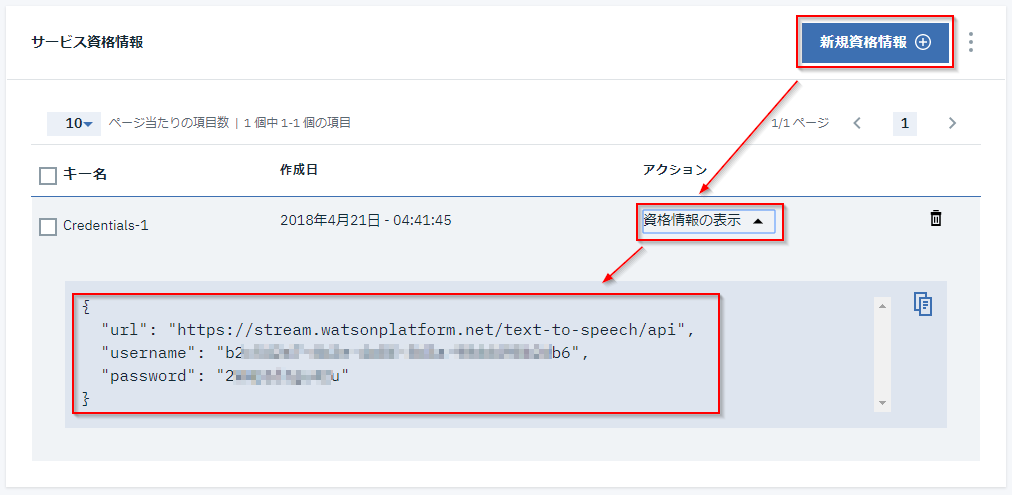
IBM Cloud (Bluemix) のダッシュボードからText to Speechのサービスを作成して、"TTS_unity-chan_test" など適当な名前に変更し、以下のように「資格情報」を作成して表示しておきます。
参照: Text To Speech APIの日本語説明ページ
そして Unity に戻って2つめのサンプルコード SampleTextToSpeech.cs をコピペするのですが、やはり今回も「資格情報」を設定するコードを追加します。肝心の ToSpeech 関数も引数が変更されているようなので、これも前回と同様に修正 (OnFail関数の定義と指定) してあげます。
結果として、修正済みのコードは以下になりました。
//SampleTextToSpeech.cs

using System.Collections;
using System.Collections.Generic;
using UnityEngine;
using IBM.Watson.DeveloperCloud.Services.TextToSpeech.v1;
using IBM.Watson.DeveloperCloud.Connection;
using IBM.Watson.DeveloperCloud.Utilities;

public class SampleTextToSpeech : MonoBehaviour
{

    //TextToSpeech m_TextToSpeech = new TextToSpeech();
    TextToSpeech m_TextToSpeech;
    string m_TestString = "おはようございます。漢字も読めます。";

    // Use this for initialization
    void Start()
    {
        string cre_id = "b2xxxxxx-xxxx-xxxx-xxxx-xxxxxxxxxxb6";                  // 資格情報より
        string cre_pw = "2xxxxxxxxxxu";                                          // 資格情報より
        string cre_url = "https://stream.watsonplatform.net/text-to-speech/api"; // 資格情報より
        Credentials credentials = new Credentials(cre_id, cre_pw, cre_url);
        m_TextToSpeech = new TextToSpeech(credentials);
        m_TextToSpeech.Voice = VoiceType.ja_JP_Emi;
        //m_TextToSpeech.ToSpeech(m_TestString, HandleToSpeechCallback);
        m_TextToSpeech.ToSpeech(HandleToSpeechCallback, OnFail, m_TestString);
    }

    //void HandleToSpeechCallback(AudioClip clip)
    void HandleToSpeechCallback(AudioClip clip, Dictionary<string, object> customData)
    {
        PlayClip(clip);
    }

    private void PlayClip(AudioClip clip)
    {
        if (Application.isPlaying && clip != null)
        {
            GameObject audioObject = new GameObject("AudioObject");
            AudioSource source = audioObject.AddComponent<AudioSource>();
            source.spatialBlend = 0.0f;
            source.loop = false;
            source.clip = clip;
            source.Play();

            GameObject.Destroy(audioObject, clip.length);
        }
    }
    private void OnFail(RESTConnector.Error error, Dictionary<string, object> customData)
    {
        Debug.Log("SampleTextToSpeech.OnFail() Error received: " + error.ToString());
    }

    // Update is called once per frame
    void Update()
    {
    }

}
これで Unity ちゃんがちゃんと喋ってくれましたが、思ってたよりも落ち着いた女性の声で違和感がw
さて、次に進みましょう。
Conversation Service を試してみよう
えーと、実は私は Conversation (Watson Assistant) は以前から使用していますので、手抜きして、過去に作成した会話データを流用しちゃいますね。皆さんは元ページをみて会話データを作成してみてください。
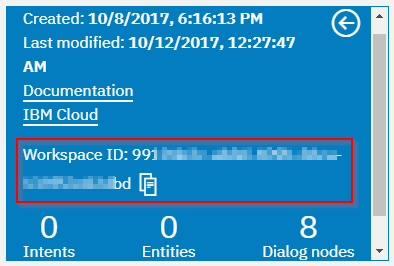
作成した会話データの Workspace ID を表示しておきます。
また Speech To Text などと同様に、「資格情報」を表示しておきます。
そして Unity に戻り、3つめのサンプルコード SampleConversation.cs を修正していきましょう。実は今回の3つのAPIの中で、これが一番大変でした…
やはり今回も「資格情報」を設定するコードを追加します。肝心の ToSpeech 関数も引数が変更されているようなので、これも前回と同様に修正してあげます。
で、Conversation なのですが、名称が変わったことで
- IBM.Watson.DeveloperCloud.Services.Conversation.v1
- IBM.Watson.DeveloperCloud.Services.Assistant.v1
の2種類のAPIがあるようなんですよ。たぶん後者に移行中?困ったことにSDKドキュメントですら更新途中で整合性が無いように見受けられ… サンプルに従ってもうまく動作せず困惑。
一番面倒だったのが Message に渡す Delegation 関数である OnMessage 関数のところ。関数の定義は新しくなっているんですが、現在のバージョンで実行してみると、過渡期だからなのか渡される値が違う。MessageResponse の代わりに Dictionary オブジェクトが第一引数に渡され、あれ君は customData では?と混乱する謎動作。
仕方ないので今回は動作にあわせ、元ページと同じ処理するコードを書いてみました。ダーティハックって感じで、これいつまで通用するんでしょうね… 近い将来、移行が落ち着いたころにもう一回フォローできると良いのですが。
というわけで、以下がとりあえず動作する、修正後のコードになります。
//SampleConversation.cs

using System.Collections;
using System.Collections.Generic;
using UnityEngine;
using IBM.Watson.DeveloperCloud.Services.Conversation.v1;
using IBM.Watson.DeveloperCloud.Connection;
using IBM.Watson.DeveloperCloud.Utilities;

public class SampleConversation : MonoBehaviour
{

    //private Conversation m_Conversation = new Conversation();
    private Conversation m_Conversation;
    private string m_WorkspaceID = "8cxxxxxx-xxxx-xxxx-xxxx-xxxxxxxxxx79"; //各自変更してください
    private string m_Input = "おはよう";

    // Use this for initialization
    void Start()
    {
        string cre_id = "50xxxxxx-xxxx-xxxx-xxxx-xxxxxxxxxx22";                  // 資格情報より
        string cre_pw = "pxxxxxxxxxxx";                                          // 資格情報より
        string cre_url = "https://gateway.watsonplatform.net/conversation/api";  // 資格情報より
        Credentials credentials = new Credentials(cre_id, cre_pw, cre_url);
        m_Conversation = new Conversation(credentials);
        Debug.Log("User: " + m_Input);
        //m_Conversation.Message(OnMessage, m_WorkspaceID, m_Input);
        m_Conversation.VersionDate = "2017-05-26";
        m_Conversation.Message(OnMessage, OnFail, m_WorkspaceID, m_Input);
    }

    //void OnMessage(MessageResponse resp, string customData)
    void OnMessage(object resp, Dictionary<string, object> customData)
    {
        /*
        foreach (Intent mi in resp.intents)
            Debug.Log("intent: " + mi.intent + ", confidence: " + mi.confidence);

        Debug.Log("response: " + resp.output.text.[0]);
        */
        if (resp is Dictionary<string, object>)
        {
            Dictionary<string, object> dic_resp = (Dictionary<string, object>)resp;

            foreach (object o in (List<object>)dic_resp["intents"])
            {
                Dictionary<string, object> dic_intent = (Dictionary<string, object>)o;
                Debug.Log("intent: " + dic_intent["intent"] + ", confidence: " + dic_intent["confidence"]);
            }

            Dictionary<string, object> dic_output = (Dictionary<string, object>)dic_resp["output"];
            string res = "";
            foreach (object o in (List<object>)dic_output["text"])
            {
                res += o.ToString();
            }
            Debug.Log("response: " + res);
        }

    }
    private void OnFail(RESTConnector.Error error, Dictionary<string, object> customData)
    {
        Debug.Log("SampleConversation.OnFail() Error received: " + error.ToString());
    }

    // Update is called once per frame
    void Update()
    {
    }
}
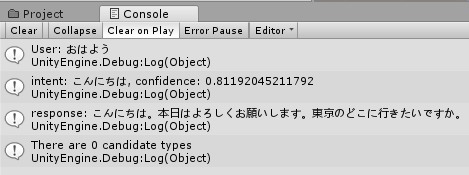
実行してみて、やりとりが Unity のコンソールに表示されることを確認します。
あ、忘れてました。いざ実行したら「VersionDate が null なので "2017-05-26" を設定せよ」とエラー表示されたので、生成した m_Conversation インスタンスに素直に代入したらエラー消えました。ここの詳細は追っていませんが、ちょっと不思議な感じですね。
というわけで
前回 は Speech To Text だけでしたが、今回は Text To Speech と Conversation のサンプルも修正してみました。全ての API のコード修正部分をまとめたので、後は 元の解説ページ に従って進めていただければ良いとおもいます。
単なるバージョン違いかと思ったら
- 認証情報の簡易ツールが無いのでコードで設定してあげないと駄目
- 処理関数の順番が変わっており、エラー時に呼ばれる OnFail 関数を追加してあげないと駄目
- Conversation はライブラリ移行中のためか違う形式の値を渡してきて、変換が必要
などなど、わりと苦労がありました。
ま、でも楽しかったのでモーマンタイですw
なお私が修正で加えたコードの著作権は放棄しますので、サンプルコードの扱いは元の developerWorks 記事 と同じでかまいません。
ではでは。


