この記事はニフティグループ Advent Calendar 2020 の17日目の記事です。
昨日は @kasayu さんで 一般化線形モデルの概要とPythonでの実装でした。
前提が詳しく書いてあってわかりやすかったです。GLMの使い所、参考にさせてもらいます。
はじめに
GUIからAnsibleを触れるAWXはかなり便利です。
しかし、GUIからしか触ることを想定されているために千台単位の大量の設定変更対象を登録するのはかなりの手間がかかります。というのもインベントリースクリプトを使えば一度に複数台のホストを登録できますが、複数のインベントリーを用意するためにはインベントリーの数だけインベントリースクリプトを登録して、同期して、としなければなりません。
AWXの1つの利点として多彩なAPIが提供されていることがあります。そこで、今回はAPI経由でインベントリーを登録することで上記のような手間を削減していきます。
環境
AWXの環境
 ______________
<  AWX 10.0.0  >
 --------------
        \   ^__^
         \  (oo)\_______
            (__)      A )\/\
                ||----w |
                ||     ||

Ansible 2.9.5
今回はpythonを用いてAPIを叩いていきます。
pythonの環境
$ python -V
Python 3.8.5

$ pip freeze
requests-html==0.10.0
AWXのAPIについて
提供されているAPIのリストは http(s)://<your awx ip>/api/v2/から確認することができます。
さらに、レスポンスや、必須のフィールドが知りたい場合は/api/v2/の各リソースをクリックすることで確認できます。
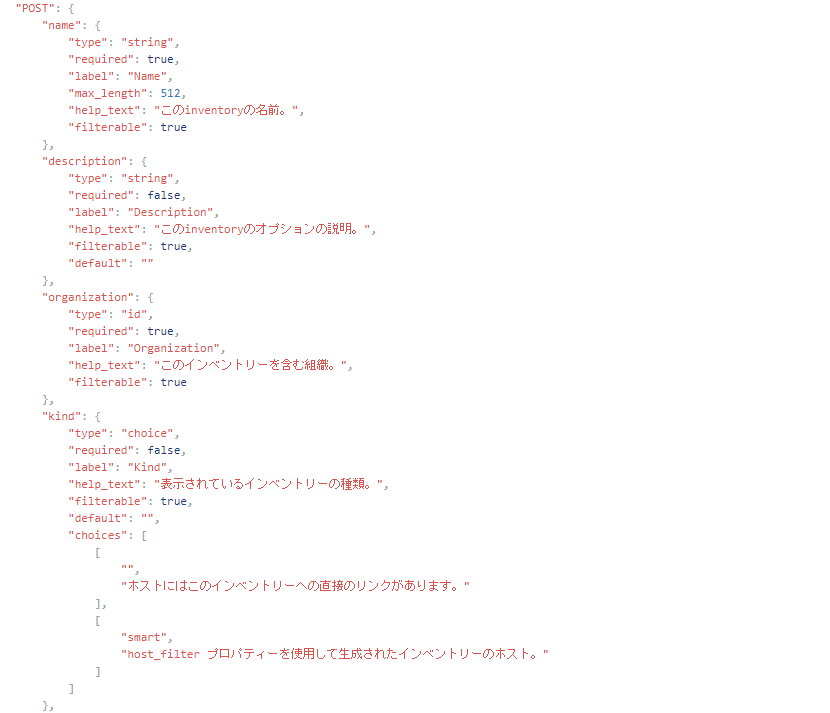
例として/inventoriesの必須フィールドを確認する場合は、以下の画像のようにOPTIONSから参照できます。

↓
インベントリーの作成
今回はインベントリースクリプト経由でインベントリーを作成していきます。
順序としては インベントリーの作成 > インベントリースクリプトの作成 > インベントリーソースへの登録 > 同期の実行でホストを登録していきます。
下準備としてインベントリーを所属させたい組織のIDを調べておきます。
組織を選択したときのこちらの数字がIDとなります。画像での 608がそれにあたります。

また、インベントリーの作成以下のプログラムは次のライブラリを使用しています。
from requests_html import HTMLSession
# awxの認証情報を保存している
import env
import json
インベントリーの作成
/api/v2/inventoriesに対して インベントリー名nameと所属させる組織organizationをdataとしてpostします。
def create_inventory(name):
  awx_url = 'http://<your awx ip>/api/v2/inventories/'
  headers = {'Content-Type': 'application/json'}

  # 608 => default
  data = {
    'name': name,
    'organization': 608
  }
  awx_session = HTMLSession()
  resp = awx_session.post(
      url=awx_url,
      headers=headers,
      auth=(env.awx['login_id'], env.awx['login_pass']),
      data=json.dumps(data),
      verify=False
  )

  return resp.json()['id']
authについて
auth=(env.awx['login_id'], env.awx['login_pass'])
予めenv.pyにAWXのAPI実行権限を持ったユーザーのidとパスワードを記述しています。
ベタ書きなり環境変数に入れるなりしてauthに入れてあげてください。
インベントリースクリプトの作成以下もauthについては同様に処理してください。
インベントリースクリプトの作成
/api/v2/inventory_scriptsに対してscriptをpostします。
def upload_inventory_script(name, script):
  awx_url = 'http://<your awx ip>/api/v2/inventory_scripts/'
  headers = {'Content-Type': 'application/json'}

  # 608 => default
  data = {
    'name': f'get_{name}',
    'script': script,
    'organization': 608
  }
  awx_session = HTMLSession()
  resp = awx_session.post(
      url=awx_url,
      headers=headers,
      auth=(env.awx['login_id'], env.awx['login_pass']),
      data=json.dumps(data),
      verify=False
  )

  return resp.json()['id']
インベントリースクリプトの登録
インベントリーとインベントリースクリプトを紐付けます。
def update_inventory_source(name, script_id, inventory_id):
  awx_url = 'http://<your awx ip>/api/v2/inventory_sources/'
  headers = {'Content-Type': 'application/json'}

  data = {
    'name': name,
    'source': 'custom',
    'inventory': inventory_id,
    'source_script': script_id,
  }
  awx_session = HTMLSession()
  resp = awx_session.post(
      url=awx_url,
      headers=headers,
      auth=(env.awx['login_id'], env.awx['login_pass']),
      data=json.dumps(data),
      verify=False
  )

  return resp.json()['id']
インベントリースクリプトの実行
インベントリーの同期を実行します。
/api/v2/inventory_sources/<id>/updateに対してpostすることで同期ジョブが走ります。
def update_hosts(source_id):
  awx_url = f'http://<your awx ip>/api/v2/inventory_sources/{source_id}/update/'
  headers = {'Content-Type': 'application/json'}

  awx_session = HTMLSession()
  resp = awx_session.post(
      url=awx_url,
      headers=headers,
      auth=(env.awx['login_id'], env.awx['login_pass']),
      data=json.dumps({}),
      verify=False
  )

  return resp.status_code
実行
投げるスクリプトはjinja2のテンプレートで作成しています。
# !/usr/bin/env python
# coding: utf-8
import json

dict = {
    {{Account}}: {
        'hosts': {{Hosts}},

        'vars': {
            'ansible_port': '22',
            {% raw %}
            'ansible_user': '{{ username }}',
            'ansible_password': '{{ password }}',
            'ansible_become_pass': '{{ password }}'
            {% endraw %}
        }
    }
}

print(json.dumps(dict))
from jinja2 import Environment, FileSystemLoader
# inventory scriptを作成
template = Environment(loader=FileSystemLoader('.', 'utf-8')).get_template('template.txt')

# インベントリースクリプトの登録
name = 'test'
hosts = ['192.168.0.0', '192.168.0.1', '192.168.0.2']
script_id = upload_inventory_script(name, template.render({'Account': f'"{name}"', 'Hosts': hosts}))
inventory_id = create_inventory(name)
source_id = update_inventory_source(name, script_id, inventory_id)
update_hosts(source_id)
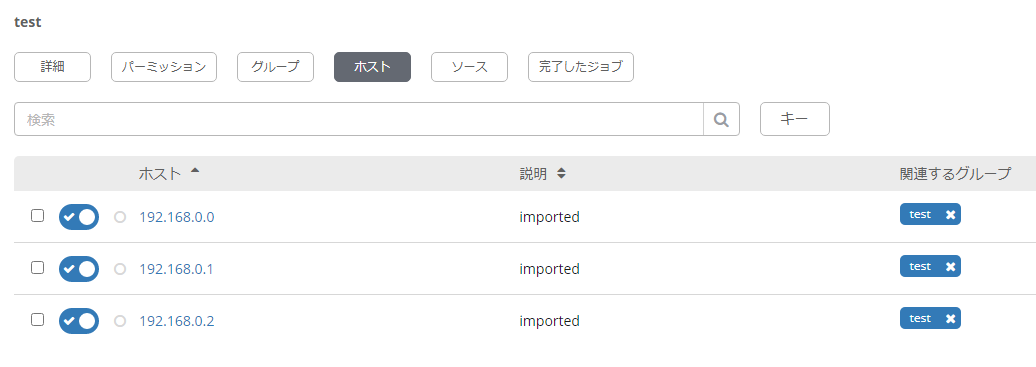
generate_template.pyを実行することで以下のようなインベントリーが作成されます。
おわりに
ポチポチするのが大変な朝にもAPI経由で処理するプログラムを書いておけばボタン一つでサーバーの状態を保つことができます。皆様も良きAWXライフを送ってください。
明日は@shin27さんです。お楽しみに!