はじめに
今回は前回記事にした自作アプリケーションについて詳細を紹介していきたいと思います。
前回の記事⇨https://qiita.com/y_13/items/9d8c614f0fe318d32e92
アプリの使い方の流れは主に下記3ステップです。
- twitterでログイン
- レコメンド画面で同窓会メンバーを選択
- twitterで呼びかけ
今回はログインから同窓会メンバーを選択するまでの2ステップを実際にコードを追っていきながら紹介していきます。
まだまだ初心者で分からないことばかりなので間違っていることやよくないコードの書き方などあれば教えていただきたいです!
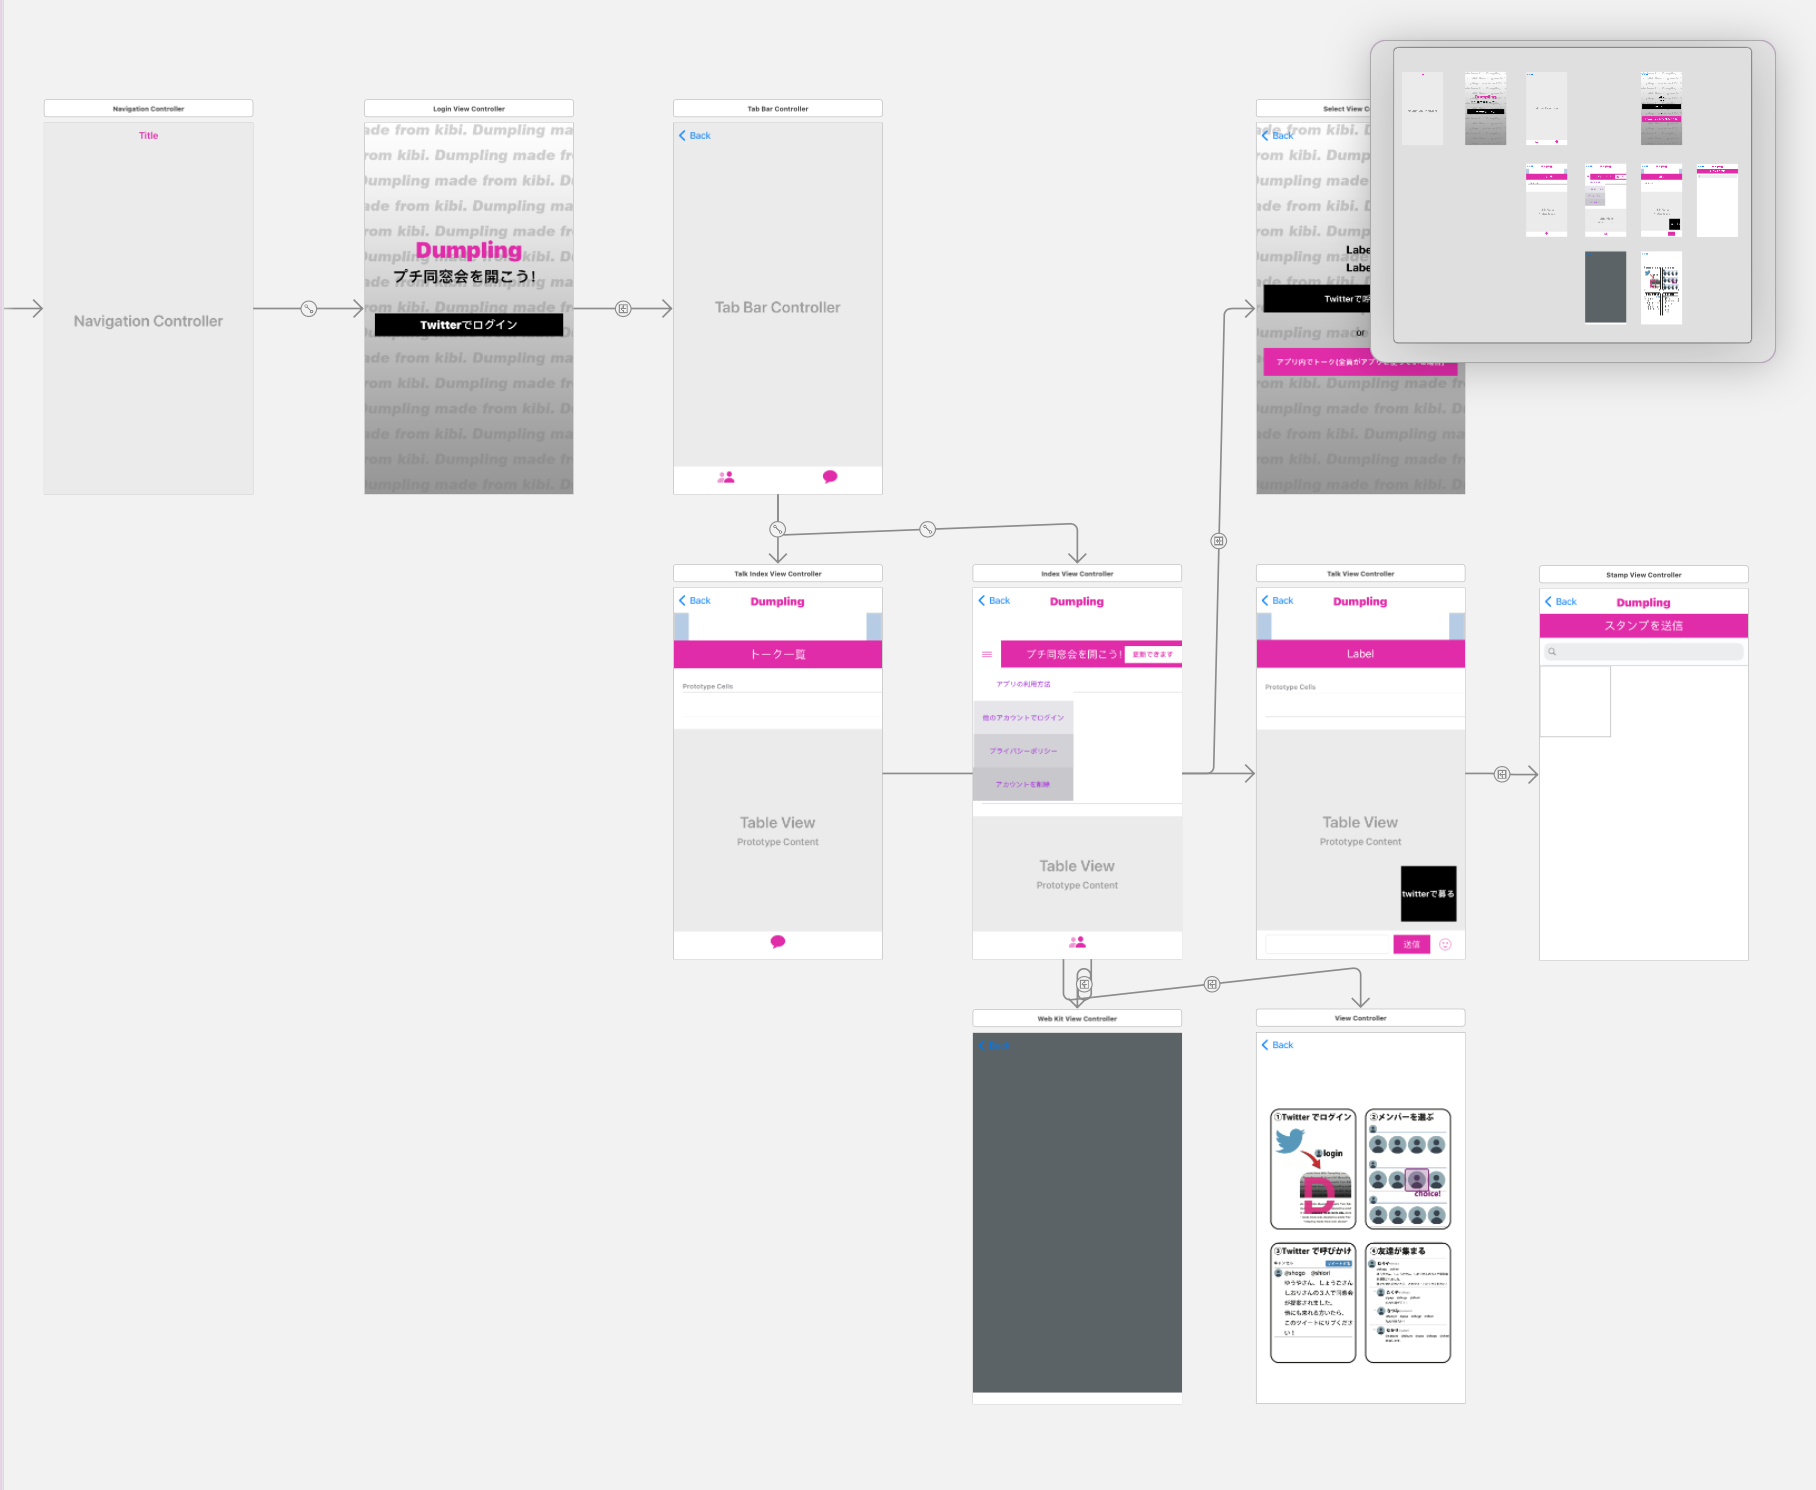
ストーリーボード
twitterでログイン
まずログイン機能ですがこちらはFirebaseのFirebaseAuthを用いて実装しています。
viewDidLoadに下記を記載して既にユーザーのtwitterIDがUserDefaultsに保存されている場合はログイン画面はスルーしてレコメンド画面に遷移させます。
if UserDefaults.standard.object(forKey: "likertwID") != nil{
    let tabBC = self.storyboard?.instantiateViewController(identifier: "tabBC") as! TabBarController
    self.navigationController?.pushViewController(tabBC, animated: true)
}
その後下記のコードでログインしたユーザーのtwitterのユーザーID、ユーザー名、スクリーンネーム、プロフィール画像のURL、アクセストークン、アクセストークンシークレットをUserDefaultsに保存します。
@IBAction func twitterLogin(_ sender: Any) {
        self.provider = OAuthProvider(providerID: TwitterAuthProviderID)
        provider?.customParameters = ["force_login":"true"]
        provider?.getCredentialWith(nil, completion: { (credential, error) in

            //ActivityIndicatorView
            let activityView = NVActivityIndicatorView(frame: self.view.bounds, type: .circleStrokeSpin, color: .black, padding: 400)
            self.view.addSubview(activityView)
            activityView.startAnimating()

            //ログイン処理
            Auth.auth().signIn(with: credential!) { [self] (result, error) in
                if error != nil{ return }

                activityView.stopAnimating()

                let credential = result?.credential as? OAuthCredential
                let accessToken = credential?.accessToken
                let secret = credential?.secret
                let userID = result?.additionalUserInfo?.profile!["id"] as! Int
                let userName = result?.additionalUserInfo?.profile!["name"] as! String
                let screenName = result?.additionalUserInfo?.profile!["screen_name"] as! String
                let userProfileURL = result?.user.photoURL!.absoluteString
                UserDefaults.standard.set(String(userID), forKey: "likertwID")
                UserDefaults.standard.set(String(userName), forKey: "likerName")
                UserDefaults.standard.set(userProfileURL, forKey: "likerProfileURL")
                UserDefaults.standard.set(String(screenName), forKey: "screenName")
                UserDefaults.standard.set(String(accessToken!), forKey: "accessToken")
                UserDefaults.standard.set(String(secret!), forKey: "accessTokenSecret")
                let tabBC = self.storyboard?.instantiateViewController(identifier: "tabBC") as! TabBarController
                self.navigationController?.pushViewController(tabBC, animated: true)
            }
        })
    }
上記2パターンUserDefaultsに必要な情報を保存してログイン画面からレコメンド画面に遷移させます。
レコメンド画面を生成
xmlパースを実行
レコメンド画面ではxmlパースを用いて必要な情報をtwitterAPIから取得して表示させています。
下記がviewDidLoadにてxmlパースを実行しているコードです。
let activityView = NVActivityIndicatorView(frame: self.view.bounds, type: .circleStrokeSpin, color: .black, padding: 400)
        self.view.addSubview(activityView)
        activityView.startAnimating()
        let url = "https://dumpling-dousoukai.herokuapp.com/" + self.likertwID + "/" + self.accessToken + "/" + self.accessTokenSecret + "/"
        print(url)
        let urlToSend = URL(string: url)
        parser = XMLParser(contentsOf: urlToSend!)!
        parser.delegate = self
        parser.parse()
ここではxmlパースを実行する際のURLにtwitterのユーザーID、アクセストークン、アクセストークンシークレットを持たせてwebアプリにパラメーターとして渡しています。
webアプリも自作したものでURLにパラメーターを持たせてアクセスすると
- ユーザーが相互フォローしているユーザーの情報
- ユーザーの相互フォローユーザー、一人一人の相互フォローユーザーの情報
を10人分*10人分ランダムで返してくれるというものをherokuでデプロイしています。
これについても後々詳しく紹介できたらと思います。
帰ってきた情報を元にセルを生成
下記コードが帰ってきたレスポンスを元にtableViewを構成するためのものです。
func tableView(_ tableView: UITableView, numberOfRowsInSection section: Int) -> Int {
    return self.thenScreenNames.count
}

func numberOfSections(in tableView: UITableView) -> Int {
    return 1
}

func tableView(_ tableView: UITableView, cellForRowAt indexPath: IndexPath) -> UITableViewCell {
    let cell = tableView.dequeueReusableCell(withIdentifier: "FriendCell", for: indexPath) as! FriendCell
    cell.nameLabel.text = self.thenUserNames[indexPath.row] + "さんとのメンバー"
    cell.profileImage.sd_setImage(with: URL(string: (self.thenProfileImageURLs[indexPath.row]), relativeTo: nil))
    cell.thenUserName = thenUserNames[indexPath.row]
    cell.thenProfileImageUrl = thenProfileImageURLs[indexPath.row]
    cell.thenScreenName = thenScreenNames[indexPath.row]
}
ここでは各セルにそれぞれ配列を渡していてセルの中でそれぞれコレクションビューが生成されています。セル一つのイメージ↓
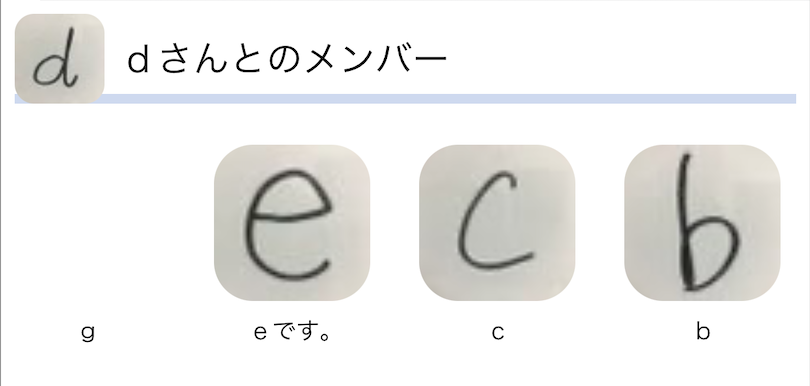
渡された情報を用いてそれぞれにセルにコレクションビューを生成
下記コードがセル一つひとつにコレクションビューを生成しているコードです。
(セルのswiftファイルに記載しています)
func collectionView(_ collectionView: UICollectionView, numberOfItemsInSection section: Int) -> Int {
    return self.userNames.count
}
func collectionView(_ collectionView: UICollectionView, cellForItemAt indexPath: IndexPath) -> UICollectionViewCell {
    let cell = collectionview.dequeueReusableCell(withReuseIdentifier: "FriendGroupCell", for: indexPath) as! FriendGroupCell
    cell.thirdPersonNameLabel.text = userNames[indexPath.item]
    cell.thirdPersonProfileImage.sd_setImage(with: URL(string: profileImageURLs[element: indexPath.item]!), completed: nil)
    return cell
}
func collectionView(_ collectionView: UICollectionView, didSelectItemAt indexPath: IndexPath) {
    var storyboard = UIStoryboard()
    let height = UIScreen.main.bounds.size.height
    if height == 667 {
        storyboard = UIStoryboard(name: "iPhone8", bundle: nil)
        //iPhone7,8
    }else if height == 736 {
        storyboard = UIStoryboard(name: "iPhone8Plus", bundle: nil)
        //iPhone8Plus
    }else if height == 896{
        storyboard = UIStoryboard(name: "Main", bundle: nil)
         //iPhoneXR,XSMAX,iPhone11
    }else if height == 844{
        storyboard = UIStoryboard(name: "iPhone12", bundle: nil)
    }else if height == 812{
        storyboard = UIStoryboard(name: "iPhone12Mini", bundle: nil)
    }else if height == 926{
        storyboard = UIStoryboard(name: "iPhone12ProMax", bundle: nil)
    }
    let selectVC = storyboard.instantiateViewController(identifier: "selectVC") as! SelectViewController
    selectVC.thenScreenName = thenScreenName
    selectVC.screenName = screenNames[indexPath.item]
    selectVC.thenUserName = thenUserName
    selectVC.userName = userNames[indexPath.item]
    selectVC.thenProfileImageUrl = thenProfileImageUrl
    selectVC.profileImageUrl = profileImageURLs[indexPath.item]
    let indexViewController = ((self.superview as! UITableView).delegate as! IndexViewController)
    indexViewController.navigationController?.pushViewController(selectVC, animated: true)
}
ここまでがセルを選択までのコードの紹介です。
途中、パースした値をFirebaseに保存するコードやそれをまた取ってくるコードの説明などは省きましたが大まかな流れはこんな感じです。
xmlパースの際の値を受けとる型に関してはコードがやばいのでとてもお見せできるものではありませんでした。修正してから紹介しようと思います。
一応こんな感じで自作アプリの紹介2を終わろうと思います。
さいごに
前回の大まかなアプリの説明に加えて今回は実際のコードを追ってみました。
このアプリの制作に1年半ほどかけたのですが、やっている時は何が何だかよく分からない暗号を書いているような気分でした。
今の会社に入社して非常にいい教育を受けさせてもらっているので後から自分のコードが読めるようになっていて面白かったです。
また機会があれば書こうと思います!