State Restorationとは
iOS の State Restoration という機能は、アプリを元の状態に復元するための仕組みを提供します。メモリが不足してバックグラウンドのアプリが終了した後、次に起動したときに、アプリを元の状態に戻すことができます。地図で見つけた道順や、検討中の商品、または入力中のメッセージや、さっき見ていた web ページなど、そういったものをそのまま残しておくことができます。もしこのような復元が行われなければ、ユーザーはそれまでのコンテキストを失い、せっかく見つけたものを見失ったり、大切な言葉を忘れてしまったり、とてもがっかりしてしまうに違いありません。
上記の通り、バックグラウンドに入っていつの間にかkillされてしまったアプリをUINavigationのツリーも含めて復元します。
細かい検索条件を指定して一覧画面に遷移するようなアプリだと実装されていると嬉しい、かも。
例)せっかく指定した検索条件をまた入力…などのストレスを無くす。
サンプル実装
State Restorationを実装する必要の無い構造ですが、簡単な実装方法サンプルということで載せておきます。
画面構成
今回は以下のような画面構成でState Restorationを実装します。
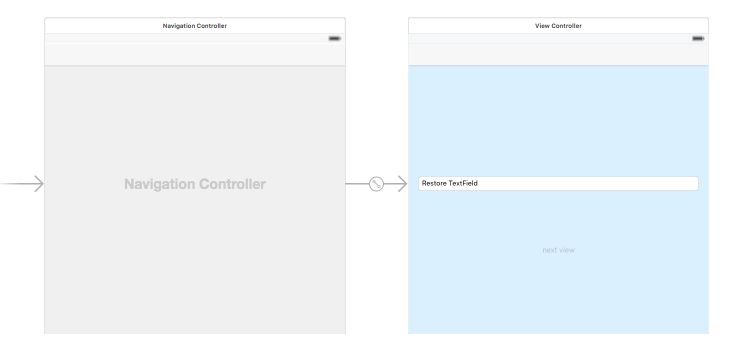
Main.storyboard
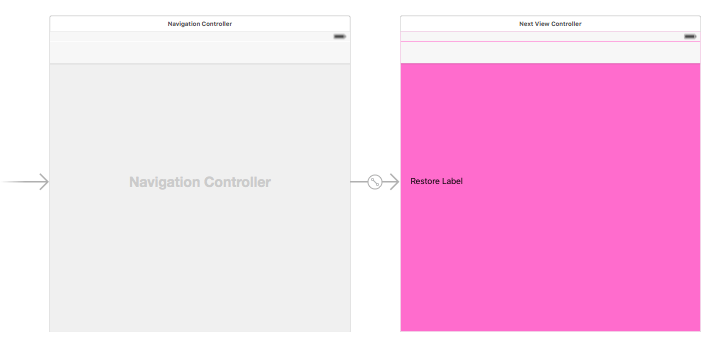
Next.storyboard
MainのViewControllerで入力した文字と、NextViewボタンのenabledを保存・復元します。
NextのNextViewControllerでは、ViewControllerから渡されたパラメータ(入力文字)を表示します。
また、NextViewControllerでも表示文字の保存・復元を行います。
実行イメージ
一度終了したアプリの画面を復元します。

保存と復元の許可設定
下記の2つのメソッドを実装し、保存と復元の許可を行います。
optional func application(_ application: UIApplication, shouldSaveApplicationState coder: NSCoder) -> Bool
optional func application(_ application: UIApplication, shouldRestoreApplicationState coder: NSCoder) -> Bool
実装
保存された時と復元される時でアプリケーションのバージョンが異なるような場合はここで制御を行うらしいですが、今回は実装しません。
import UIKit

@UIApplicationMain
class AppDelegate: UIResponder, UIApplicationDelegate {

    var window: UIWindow?

    func application(application: UIApplication, willFinishLaunchingWithOptions launchOptions: [NSObject : AnyObject]?) -> Bool {
        // このメソッドの後、shouldRestoreApplicationState →viewDidLoad() →decodeRestorableStateWithCoder →init(coder:) →didFinishLaunchingWithOptions の流れで実行される
        // そのため、復元の際にはここが初期化メソッドとなる
        // didFinishLaunchingWithOptionsと同様の処理を実行する(dispatch_once_tなどを使用?)
        print(String(AppDelegate) + ":" + #function)
        return true
    }

    func application(application: UIApplication, didFinishLaunchingWithOptions launchOptions: [NSObject: AnyObject]?) -> Bool {
        print(String(AppDelegate) + ":" + #function)
        return true
    }

    // MARK: Restore
    func application(application: UIApplication, shouldSaveApplicationState coder: NSCoder) -> Bool {
        print(String(AppDelegate) + ":" + #function)

        // 保存許可
        return true
    }

    func application(application: UIApplication, shouldRestoreApplicationState coder: NSCoder) -> Bool {
        print(String(AppDelegate) + ":" + #function)

        // 復元許可
        return true
    }
}
保存と復元の対象を設定
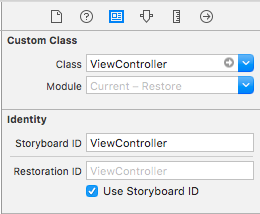
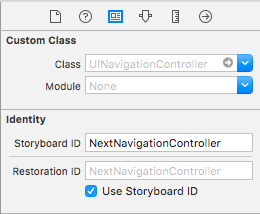
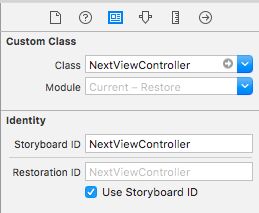
StoryboardでRestoration IDを設定します。(コードでも出来ますが省略します)
入れ子の場合、親となるUIViewController全てにこの設定が必要になります。
例えば、親のUINavigationControllerに設定し忘れると子が保存されなくなります。
子の場合は、実装必須ではないので、欲しければ実装ということになります。(今回で言えばNextViewController)
実装

保存と復元の実装(UIViewController)
下記の二つのメソッドを実装し、保存と復元を行います。
引数を見ればわかる通り、保存と復元の対象となるのはNSCodingプロトコルに適合したオブジェクトやプリミティブな値ということになります。
func encodeRestorableStateWithCoder(_ coder: NSCoder)
func decodeRestorableStateWithCoder(_ coder: NSCoder)
実装
ViewController
ここではNSCodingプロトコルに適合した独自クラスRestoreModelとnextViewButtonのenabledを保存・復元しています。
RestoreModelの詳細は次の項目で説明します。
import UIKit

class ViewController: UIViewController {
    @IBOutlet weak var restoreTextField: UITextField!
    @IBOutlet weak var nextViewButton: UIButton!

    var restoreModel = RestoreModel()

    override func viewDidLoad() {
        super.viewDidLoad()
        print(String(ViewController) + ":" + #function)
        restoreTextField.addTarget(self, action: #selector(ViewController.restoreTextFieldDidChange(_:)), forControlEvents: UIControlEvents.EditingChanged)

        // viewDidLoadより後に復元が行われるため、ここでviewに値を設定すると上手くいかない
    }

    override func viewWillAppear(animated: Bool) {
        super.viewWillAppear(animated)
        print(String(ViewController) + ":" + #function)

        restoreTextField.text = restoreModel.text
    }

    override func didReceiveMemoryWarning() {
        super.didReceiveMemoryWarning()
    }

    // MARK: - Restore
    override func encodeRestorableStateWithCoder(coder: NSCoder) {
        super.encodeRestorableStateWithCoder(coder)
        print(String(ViewController) + ":" + #function)
        print("保存")

        // keyを指定して保存
        // restoreModelのencodeWithCoderが実行される
        coder.encodeObject(restoreModel, forKey:"restoreModel")
        coder.encodeBool(nextViewButton.enabled, forKey:"nextViewButton.enabled")
    }

    override func decodeRestorableStateWithCoder(coder: NSCoder) {
        super.decodeRestorableStateWithCoder(coder)
        print(String(ViewController) + ":" + #function)
        print("復元")

        // 復元
        // restoreModelのinit(coder:)が実行される
        if let restore = coder.decodeObjectForKey("restoreModel") as? RestoreModel {
            restoreModel = restore
        }
        if coder.containsValueForKey("nextViewButton.enabled") {
            nextViewButton.enabled = coder.decodeBoolForKey("nextViewButton.enabled")
        }
    }

    // MARK: - Action
    @IBAction func onTouchedNextViewButton(sender: UIButton) {
        let viewContrller = UIStoryboard(name: "Next", bundle: nil).instantiateViewControllerWithIdentifier("NextViewController") as! NextViewController
        viewContrller.restoreModel = restoreModel
        self.navigationController?.pushViewController(viewContrller, animated: true)
    }

    func restoreTextFieldDidChange(textField:UITextField){
        restoreModel.text = textField.text!
        nextViewButton.enabled = textField.text?.characters.count > 0
    }
}

// MARK: - UITextFieldDelegate
extension ViewController: UITextFieldDelegate {
    func textFieldShouldReturn(textField: UITextField) -> Bool {
        textField.resignFirstResponder()
        return true
    }
}
NextViewController
ViewControllerからの遷移先の画面でも保存と復元を行います。
import UIKit

class NextViewController: UIViewController {
    @IBOutlet weak var restoreLabel: UILabel!
    var restoreModel = RestoreModel()

    override func viewDidLoad() {
        super.viewDidLoad()
        print(String(NextViewController) + ":" + #function)
    }

    override func didReceiveMemoryWarning() {
        super.didReceiveMemoryWarning()
    }

    override func viewWillAppear(animated: Bool) {
        super.viewWillAppear(animated)
        print(String(NextViewController) + ":" + #function)

        restoreLabel.text = restoreModel.text
    }

    // MARK: - Restore
    override func encodeRestorableStateWithCoder(coder: NSCoder) {
        super.encodeRestorableStateWithCoder(coder)
        print(String(NextViewController) + ":" + #function)
        print("保存")

        // keyを指定して保存
        // restoreModelのencodeWithCoderが実行される
        coder.encodeObject(restoreModel, forKey:"restoreModel")
    }

    override func decodeRestorableStateWithCoder(coder: NSCoder) {
        super.decodeRestorableStateWithCoder(coder)
        print(String(NextViewController) + ":" + #function)
        print("復元")

        // 復元
        // restoreModelのinit(coder:)が実行される
        if let restore = coder.decodeObjectForKey("restoreModel") as? RestoreModel {
            restoreModel = restore
        }
    }
}
保存と復元の実装(NSCoder)
独自クラスを保存・復元させるにはNSCodingプロトコルで定義されている、以下の二つのメソッドを実装する必要があります。
func encodeWithCoder(aCoder: NSCoder)
init?(coder aDecoder: NSCoder)
実装
encodeWithCoder:aCoderでシリアライズして、init?:aDecoderでデシリアライズします。
import UIKit

// NSCodingを継承する
class RestoreModel: NSObject, NSCoding {
    var text = ""

    override init() {
        super.init()
    }

    // MARK: - NSCoding
    func encodeWithCoder(aCoder: NSCoder) {
        print(String(RestoreModel) + ":" + #function)

        // keyを指定して保存
        aCoder.encodeObject(text, forKey: "text")
    }

    required init(coder aDecoder: NSCoder) {
        print(String(RestoreModel) + ":" + #function)

        // 復元
        text = aDecoder.decodeObjectForKey("text") as! String
    }
}
デバッグ手順
色々やり方はあるのかもしれませんが、今回はシミュレータのDebugを再実行させる方法で確認しました。
- シミュレータを起動
- シミュレータをHome画面へ(Hardware>Home)
- シミュレータを停止
- シミュレータを起動
2.を実施するとデータ保存のメソッドencodeRestorableStateWithCoder:coderが実行されます。
4.を実施するとデータ復元のメソッドdecodeRestorableStateWithCoder:coderが実行されます。
参考
http://cockscomb.hatenablog.com/entry/state-restoration
http://ninjinkun.hatenablog.com/entry/2012/10/20/122257
http://troutdev.blogspot.jp/2014/12/uistaterestoring-in-swift.html
最後に
なんとなく実装してみましたが、処理が煩雑になりそうなので注意が必要です。