フロントエンドにvue.jsを利用し、バックエンドにexpress.jsを利用しました。
prerequisite
私の環境ではそれぞれのバージョンは以下のようになっています。
一応OSはmacOS mojave バージョン10.14です。
$ node -v
v10.1.0
$ npm -v
5.6.0
$ vue -V
2.9.3
sequence of explanations
大まかにここでの解説を順序立てします。
- フロント側の作業ディレクトリの作成
- サーバー側の作業ディレクトリを作成
- フロント側からサーバー側へリクエストを送りレスポンスを受け取る
まず、フロント側とサーバー側でディレクトリを分けます。
フロント側でvue initし、サーバー側ではnpm initでサーバー処理を書いていきます。
つまり、フロント側で作成したページからサーバー側へ通信するようにするわけです。
ですが、この作業を何も考えずに行うと、CORSポリシーに抵触することになり、ブラウザでエラーが発生します。
そのため、サーバー側のjsファイルでcorsというモジュールを利用します。
https://www.npmjs.com/package/cors
implementation
フロント側の作業ディレクトリの作成
フロント側とサーバー側でディレクトリを作成し、それぞれが互いにやり取りを行うようにします。
そのため、それらをまとめるディレクトリを作成すると、整理されて作業がしやすいと思います。
$ mkdir vue_application
次に、vueプロジェクトを作成します。
Install vue-router?はyesにします。ESlintやtest等はここではnoにしました。
$ cd vue_application
$ vue init webpack frontend
$ npm run dev
サーバー側の作業ディレクトリの作成
expressを利用しますが、express-generator(下記リンク参照)でプロジェクトを作成すると、ごちゃごちゃしてしまうのでここでは簡便に行います。
https://expressjs.com/ja/starter/generator.html
$ cd vue_application
$ mkdir backend
$ cd backend
$ npm init
$ npm install --save nodemon express body-parser cors
npm init時に作成されたpackage.jsonのscriptsの部分を編集します。
nodemonを利用することで、変更が加えられたファイルが検知されると自動的にプロセスを再起動させることができるようになります。
https://qiita.com/twipg/items/cb969b335d66c4aee690
{
  "name": "server",
  "version": "1.0.0",
  "description": "",
  "main": "index.js",
  "scripts": {
    "start": "./node_modules/nodemon/bin/nodemon.js index.js"
  },
  "author": "",
  "license": "ISC",
  "dependencies": {
    "body-parser": "^1.18.3",
    "cors": "^2.8.5",
    "express": "^4.16.4",
    "nodemon": "^1.18.9"
  }
}
index.jsを作成してここに処理を書いていきます。
package.jsonのmainのファイル名と同じファイルを作成していますが、異なる名前のファイルを作成しても良い様子です。
package.jsonについては以下を参考にしてみてください。
https://qiita.com/dondoko-susumu/items/cf252bd6494412ed7847
$ touch index.js
const express = require('express')
const bodyParser = require('body-parser')
// corsポリシーに抵触するため、その対策としてcorsを利用する
const cors = require('cors')

const app = express()
app.use(bodyParser.json())
app.use(cors())

app.get('/test', function(req, res) {
  res.send({
    message: 'Hello world!'
  })
})

app.listen(process.env.PORT || 3000)
この時点でnpm startを行い、http://localhost:3000/test にアクセスすると、以下の画面が表示されると思います。

サーバー側でのapiの準備は基本的に上記のように行います。
フロント側からサーバー側へリクエストを送りレスポンスを受け取る
$ cd vue_application/frontend
$ npm install --save axios
axiosはnode.jsのHTTPクライアントです。
https://github.com/axios/axios
これを用いてapi通信を行います。
次に、frontendの同じレベルにあるsrcディレクトリ内にapi通信を行うためのファイルを作成します(わかりやすくapiフォルダ内に作成します)。
$ cd src
$ mkdir api
$ touch api/index.js
まず、index.jsでapi通信を行うためのaxiosの設定をインスタンス化します。
import axios from 'axios'

export default () => {
  return axios.create({
    baseURL: `http://localhost:3000/`
  })
}
そして、index.jsで作成したインスタンスを利用してpostを行うメソッドを作成します。
ここではテストとして定数itemにハッシュでtextを与えます。
import Api from './index'

export default {
  testPosting () {
    const item = { text: 'Success!' }
    return Api().post('/test', item)
  }
  // 他の処理も追加可能
}
これでhttp://localhost:3000/test にpostを行うための準備が整いました。
次はmethods.jsで定義したpostメソッドをUIのボタンと連動させ、ボタンが押されるとhttp://localhost:3000 にtextの値が送信されるようにします。
既存のHelloWorld.vueを以下のように書き換えます。
<template>
  <div class="hello">
    <h1>{{ msg }}</h1>
    <!-- ごちゃごちゃしていたのを全て消して、ボタンを配置 -->
    <button @click='post'>click me</button>
  </div>
</template>

<script>
import Methods from '@/api/methods'

export default {
  name: 'HelloWorld',
  data () {
    return {
      msg: 'Welcome to Your Vue.js App'
    }
  },
  methods: {
    // サーバーから返ってくる値をログに出力したいのでasyncとawaitを行う
    async post() {
      let response = await Methods.testPosting()
      console.log(response)
    }
  }
}
</script>

<!-- Add "scoped" attribute to limit CSS to this component only -->
<style scoped>
h1, h2 {
  font-weight: normal;
}
ul {
  list-style-type: none;
  padding: 0;
}
li {
  display: inline-block;
  margin: 0 10px;
}
a {
  color: #42b983;
}
</style>
また、backend/index.jsに作成したapiはgetとなっていたので、これをpostに書き換える必要があります。
送られてきたtextはreq.body.textで取得できます。
app.get('/test', function(req, res) {
  res.send({
    message: 'Hello world!'
  })
})

// 以下に書き換え

app.post('/test', function(req, res) {
  res.send({
    message: req.body.text
  })
})
これでようやくフロント側とサーバー側の通信を行うことができます。
フロント側でnpm run dev、サーバー側でnpm startを行い、http://localhost:8080 (vue側のポート)へアクセスしましょう。
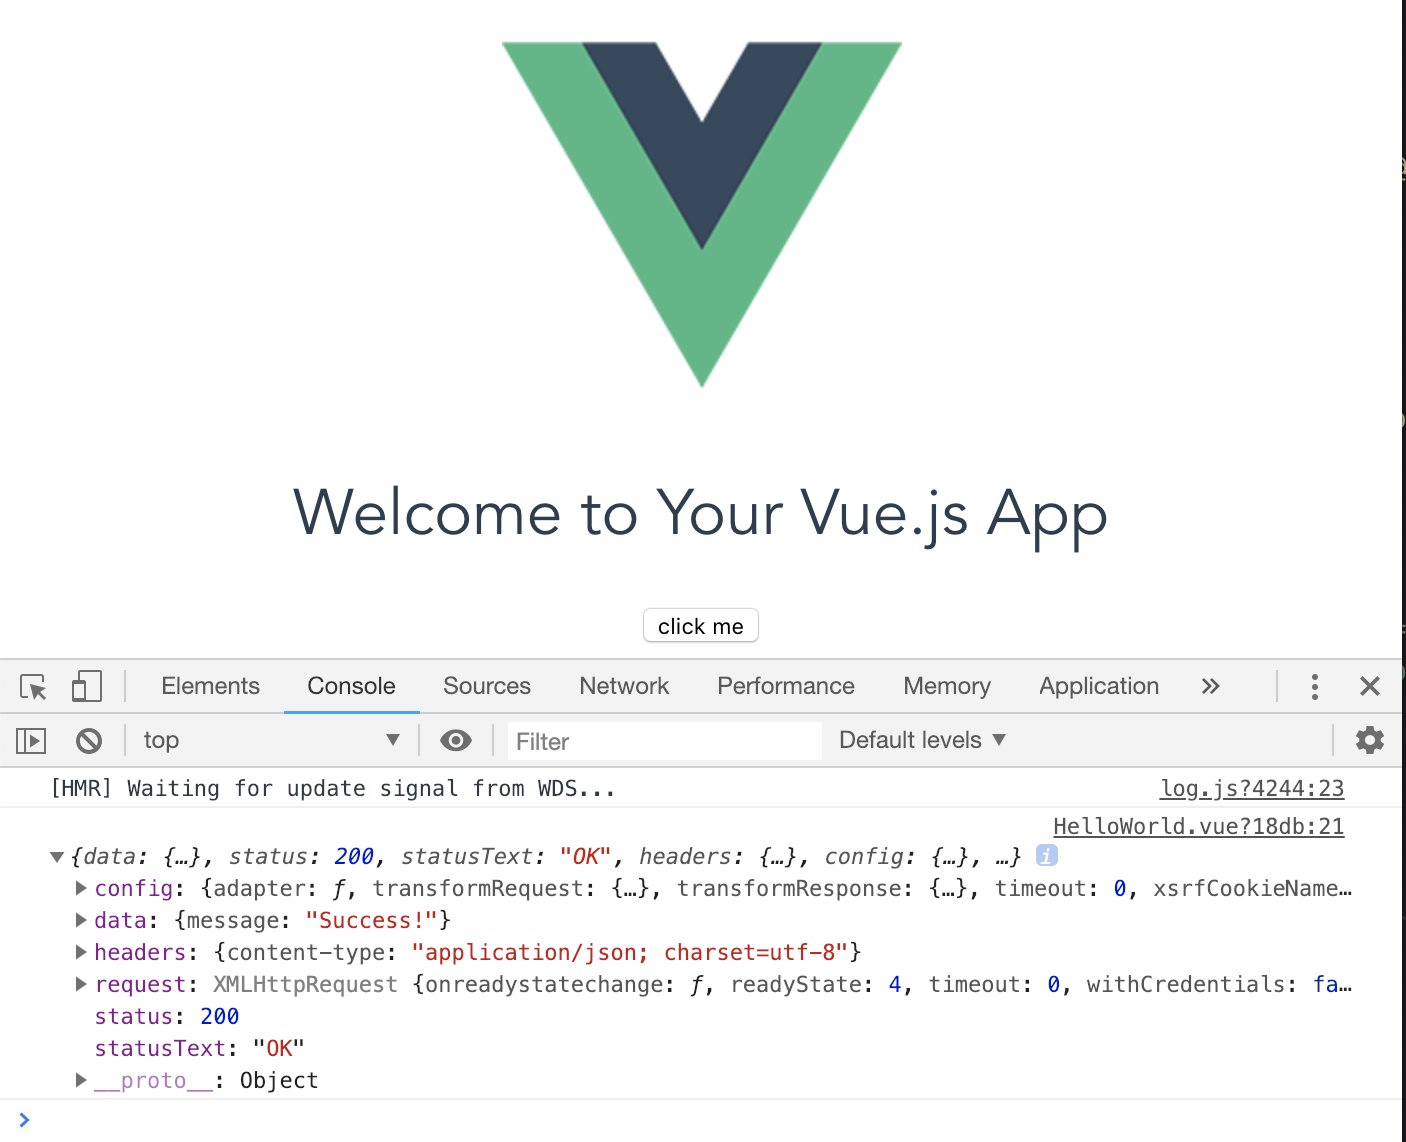
以下のような画面が表示されるので、ボタンを押します。
すると、consoleに事前にセットしておいた、'Success!'の文字がdata.messageとして表示されるはずです。

今回はボタンを押すことでpostを行うように実装しましたが、基本的にボタンでpostを行うなどということは普通しないと思います。
vueファイルにinputタグを設置し、その配下に@click='submit'のような要素を持つbuttonタグを配置することで、UI上で入力した任意の値を渡すこともできますので試してみてください。
簡単に書くと以下のような感じになると思いますが。
<template>
  <div class="hello">
    <h1>{{ msg }}</h1>
    <input type='text' name='text' v-model='text'>
    <br>
    <button @click='post'>post</button>
  </div>
</template>

<script>
import Methods from '@/api/methods'

export default {
  name: 'HelloWorld',
  data () {
    return {
      msg: 'Welcome to Your Vue.js App',
      text: ''
    }
  },
  methods: {
    async post() {
      let element = { text: this.text }
      let response = await Methods.testPosting(element)
      console.log(response.data.message)
    }
  }
}
</script>
import Api from './index'

export default {
  testPosting(item) {
    return Api().post('/test', item)
  }
}
ここで作ったものをgithubにもあげましたのでご参考までに。
https://github.com/yutaro1204/vue_client_and_express_server
以下の動画も参考になります。
https://www.youtube.com/watch?v=Fa4cRMaTDUI