はじめに
この記事はand factory.inc Advent Calendar 2022 17日目の記事です。
昨日は @MatsuNaoPen さんの Androidのプロジェクトで横断的にビルド速度を集計できるようにした話 でした。
and factory iOSエンジニアのy-okuderaです!
Flutterでタロットカードのシャッフルアニメーションを実装しましたので紹介します。
今回実装したアニメーション

※ gifに変換した関係で実際より動きが遅く見えています。また、ループ再生していますが、実際は、シャッフル後3箇所に集約されたら停止します。
アニメーションを分解する
今回のアニメーションを実装するにあたり、デザイナーから「こちらと同様のアニメーションをできるようにしたい」というオーダーで参考動画をいただきました。
いきなり実装するには、難しそうなので、アニメーションを分解して整理をします。
- 初期状態から縮小するスケールアニメーション
- ランダムに発散する移動アニメーション
- 3箇所に収束する移動アニメーション
初期状態から縮小するスケールアニメーションの実装
まずは、スケールアニメーションを実装します。
使用するAPI
AnimationControllerはアニメーションの再生や停止を制御をします。デフォルトでは、AnimationControllerは与えられた持続時間の間、0.0から1.0の範囲の値を線形に生成します。
AnimationStatusはアニメーションの状態を表すenumです。
Transform.scale constructorは、2次元平面に沿って子widgetを拡大縮小するwidgetを作成します。
Tweenは、開始値と終了値の間の線形補間をするクラスです。
実装
StatefulWidgetのStateクラスのinitStateでAnimationController, Animationを生成します。
// 開始時、終了時のスケールとアニメーション時間を指定
final _scaleTween = Tween<double>(begin: 1.0, end: 0.56);
final _scaleDuration = 500;

@override
void initState() {
  super.initState();

  _scaleAnimationController = AnimationController(
    duration: Duration(milliseconds: _scaleDuration),
    vsync: this,
  );

  _scaleAnimation = _scaleTween.animate(_scaleAnimationController)
    ..addListener(() {
      setState(() {});
    });
}
Widgetのdispose時にAnimationControllerもdisposeします。
@override
void dispose() {
  _scaleAnimationController.dispose();
  super.dispose();
}
Transform widgetのscale constructorを使用して、カードが縮小するスケールアニメーションを実装します。
@override
Widget build(BuildContext context) {
  return Transform.scale(
    scale: _scaleAnimation.value,
    child: GestureDetector(
      onTap: () async {
        // タップ時にアニメーション可能な場合、アニメーションを開始する
        if (_isReadyAnimation()) {
          await startAnimation();
        }
      },
      child: child,
    ),
  );
}

// アニメーションを実行するメソッド
Future<void> startAnimation() async {
  await _scaleAnimationController.forward();
}

// アニメーション開始可能か判定するメソッド
bool _isReadyAnimation() {
  // 初期状態で停止している場合、アニメーション開始可能
  return _scaleAnimationController.status == AnimationStatus.dismissed;
}
AnimationControllerクラスのメソッドで、アニメーションの前方への実行を開始します。
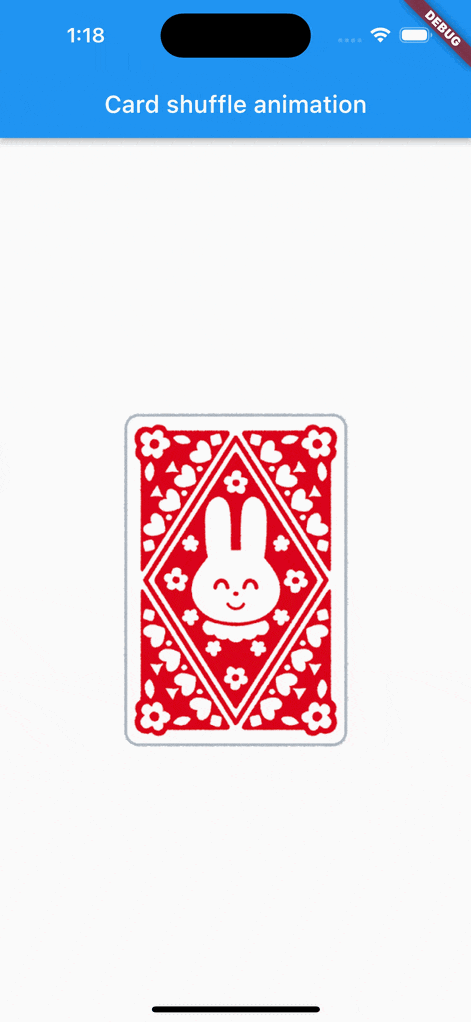
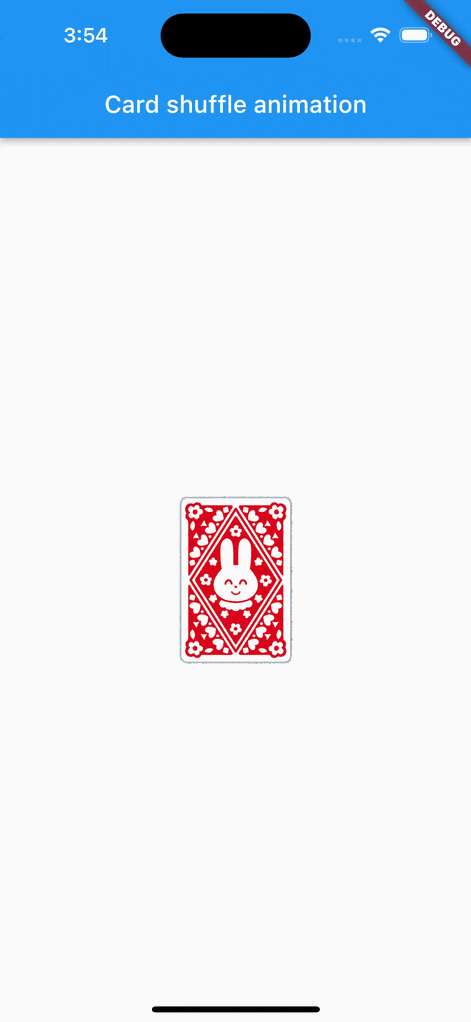
画面に出力してみると、以下のようにカードを縮小するアニメーションができました。
ランダムに発散する移動アニメーション
続いて、ランダムに発散する移動アニメーションを実装します。
使用するAPI
スケールアニメーションで使用したAPIに加えて、Transform.translateとTransform.rotateを使用します。
Transform.translate constructorは、offsetを指定して座標を移動させるwidgetを作成します。
Transform.rotate constructorは、angleに時計回りのラジアン単位を指定してWidgetを回転させるwidgetを作成します。
実装
シャッフルしているように見せるため、複数枚のカードをStackで重ねて、それぞれのカードに対して移動アニメーションも複数回実行します。
今回は、枚数は12枚で、移動アニメーションは5回実行します。
それ以外は、先ほどのスケールアニメーションと大きく変わりません。
StatefulWidgetのStateクラスのinitStateでAnimationController, Animationを生成します。
final Widget child;
  final double cardWidth;

  late final _cardWidth = cardWidth / 2;
  final _cardsCount = 12;

  late final List<int> _indexList =
      List.generate(_cardsCount, (index) => index);

  late Animation<double> _angleAnimation;
  late AnimationController _angleAnimationController;
  final _angleTween = Tween<double>(begin: 0.0, end: 1.0);
  final _angleDuration = 500;

  late Animation<double> _translateAnimation;
  late AnimationController _translateAnimationController;
  final _translateTween = Tween<double>(begin: 0.0, end: 1.0);
  final _translateDuration = 500;

  var _dAngle = List<double>.empty(growable: true);
  var _dx = List<double>.empty(growable: true);
  var _dy = List<double>.empty(growable: true);

  @override
  void initState() {
    super.initState();

    _translateAnimationController = AnimationController(
      duration: Duration(milliseconds: _translateDuration),
      vsync: this,
    );

    _translateAnimation = _translateTween
        .chain(CurveTween(curve: Curves.decelerate))
        .animate(_translateAnimationController)
      ..addListener(() {
        setState(() {});
      });

    _angleAnimationController = AnimationController(
      duration: Duration(milliseconds: _angleDuration),
      vsync: this,
    );

    _angleAnimation = _angleTween
        .chain(CurveTween(curve: Curves.decelerate))
        .animate(_angleAnimationController)
      ..addListener(() {
        setState(() {});
      });

    _generateRandomData(0); // 後述
}
Widgetのdispose時にAnimationControllerもdisposeします。
@override
void dispose() {
    _angleAnimationController.dispose();
    _translateAnimationController.dispose();
    super.dispose();
}
各カードのアニメーションの移動先のoffset、回転量は乱数で生成します。
それらの値は、indexを指定して値を取得できるようにします。
void _generateRandomData(int index) {
    _dAngle =
        List.generate(_cardsCount, (index) => _randomDoubleWithRange(0, 5));
    final xSet = [
      List.generate(_cardsCount, (index) => _randomDoubleWithRange(-90, 180)),
      List.generate(_cardsCount, (index) => _randomDoubleWithRange(-45, 180)),
      List.generate(_cardsCount, (index) => _randomDoubleWithRange(-90, 180)),
      List.generate(_cardsCount, (index) => _randomDoubleWithRange(-45, 180)),
      List.generate(_cardsCount, (index) => _randomDoubleWithRange(-90, 180)),
    ];

    final ySet = [
      List.generate(_cardsCount, (index) => _randomDoubleWithRange(-180, 270)),
      List.generate(_cardsCount, (index) => _randomDoubleWithRange(-270, 270)),
      List.generate(_cardsCount, (index) => _randomDoubleWithRange(-90, 270)),
      List.generate(_cardsCount, (index) => _randomDoubleWithRange(-180, 270)),
      List.generate(_cardsCount, (index) => _randomDoubleWithRange(-180, 270)),
    ];

    _dx = xSet[index];
    _dy = ySet[index];
}

double _randomDoubleWithRange(int min, int max) {
    final value = Random().nextDouble() * max;
    return value + min.toDouble();
}

double _getAngle(int index) {
    if (_dAngle.isNotEmpty) {
      return _dAngle[index] * _angleAnimation.value;
    }
    return 0;
}

  double _getOffsetX(int index) {
    if (_dx.isNotEmpty) {
      return _dx[index] * _translateAnimation.value;
    }
    return 0;
}

  double _getOffsetY(int index) {
    if (_dy.isNotEmpty) {
      return _dy[index] * _translateAnimation.value;
    }
    return 0;
}
Transform.translateとTransform.rotateを使用して、ランダムに発散する移動アニメーションを実装します。
  @override
  Widget build(BuildContext context) {
    final offsets = _indexList
        .map((index) => Offset(_getOffsetX(index), _getOffsetY(index)))
        .toList();

    final cardWidget = SizedBox(
      width: _cardWidth,
      child: child,
    );

    return Stack(
      children: [
        ..._indexList.map(
          (index) => Align(
            alignment: Alignment.topCenter,
            child: Transform.translate(
              offset: offsets[index],
              child: Transform.rotate(
                angle: _getAngle(index),
                child: index == _indexList.length - 1
                    // 最前面のカードのみTap gesture有り
                    ? GestureDetector(
                        onTap: () async {
                          if (_isReadyAnimation()) {
                            await startAnimation();
                          }
                        },
                        child: cardWidget,
                      )
                    : cardWidget,
              ),
            ),
          ),
        ),
      ],
    );
  }

  // アニメーションを実行するメソッド
  Future<void> startAnimation() async {
    // 5回発散
    const animCount = 5;
    for (var i = 0; i < animCount; i++) {
      _generateRandomData(i);
      _translateAnimationController.forward();
      await _angleAnimationController.forward();

      await Future.delayed(Duration(milliseconds: _translateDuration));

      if (i == animCount - 1) _angleAnimationController.reverse(); // 最後の発散の場合は収束する前に回転を戻しはじめる
      await _translateAnimationController.reverse();
      if (i != animCount - 1) _angleAnimationController.reverse();
    }
  }

  // アニメーション開始可能か判定するメソッド
  bool _isReadyAnimation() {
    // 初期状態で停止している場合、アニメーション開始可能
    return _angleAnimationController.status == AnimationStatus.dismissed &&
        _translateAnimationController.status == AnimationStatus.dismissed;
  }
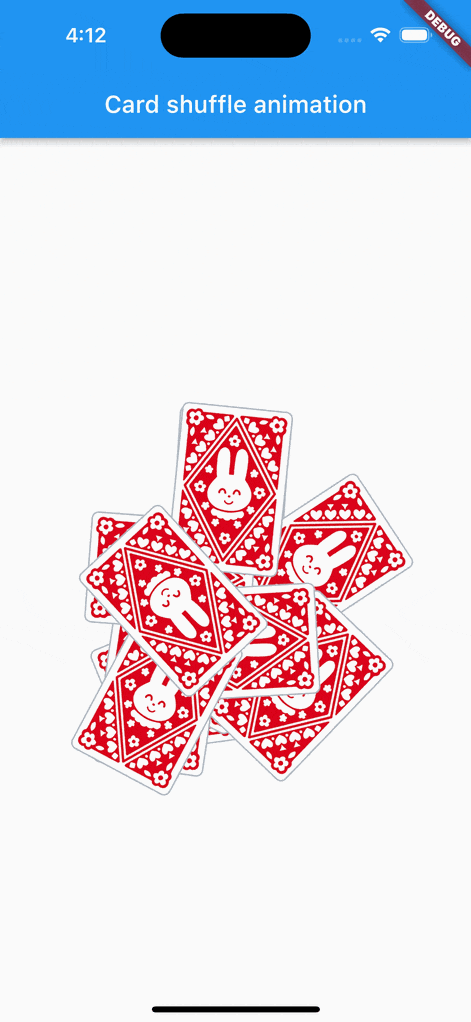
画面に出力してみると、以下のようにカードがランダムに発散する移動アニメーションができました。
3箇所に収束する移動アニメーション
シャッフルされた後、3箇所に収束するアニメーションは、先ほどのランダムに発散する移動アニメーションの座標指定をしただけなので、詳細は割愛します![]()
y座標と回転量を0にして、x座標を「-カード幅-マージン」・「0」・「「+カード幅+マージン」と3つに分けて、そこに向けて移動アニメーションをします。
Future<void> startAnimation() async {

    // ...省略

    // 最後、3箇所に収束
    _dx = List.generate(_cardsCount, (index) {
      final mod = index % 3;
      switch (mod) {
        case 0:
          return -_cardWidth - 8;
        case 1:
          return 0;
        case 2:
          return _cardWidth + 8;
      }
      return 0;
    });
    _dy = List.generate(_cardsCount, (index) => 0);
    _dAngle = List.generate(_cardsCount, (index) => 0);

    _translateAnimationController.forward();
    await _angleAnimationController.forward();
}
画面に出力してみると、以下のように3箇所に収束する移動アニメーションができました。
おわりに
最後まで見ていただいてありがとうございました。
前半に紹介したスケールアニメーションと後半に紹介したランダムに発散・3箇所に収束するアニメーションを合わせた最終的なサンプルコードはGitHubにPushしています。
乱数をそのまま使うと見栄えの調整が難しいところもあり、最終的には静的な値を入れて動作を確認しながら値を調整しました![]()
明日のAdvent Calendarの記事もお楽しみに![]()