はじめに
この記事はand factory.inc Advent Calendar 2021 7日目の記事です。
昨日は @nabetaro_jpさんの「Flutterエンジニア採用面談で聞きそうなこと」でした。
and factory iOSエンジニアのy-okuderaです!
今回は、AirDropでiOSアプリのデータを共有してみようと思います。
AirDrop
Apple製品のユーザーであれば説明するまでも無いかもしれませんが、念のためm(_ _)m
AirDrop を使うと、近くにあるほかの Apple 製デバイスと写真や書類などのコンテンツを共有し、相手からも受け取ることができます。
写真やメモなどを共有するのに便利です!
アプリ開発をするときにも、iPhoneからMacに画像や動画を送るのに多用してます![]()
今回は、自分で開発したアプリにAirDropでデータを共有してみようと思います。
作るもの
今回実装する機能は、シンプルに選択したカードをAirDropでシェアできるだけです!
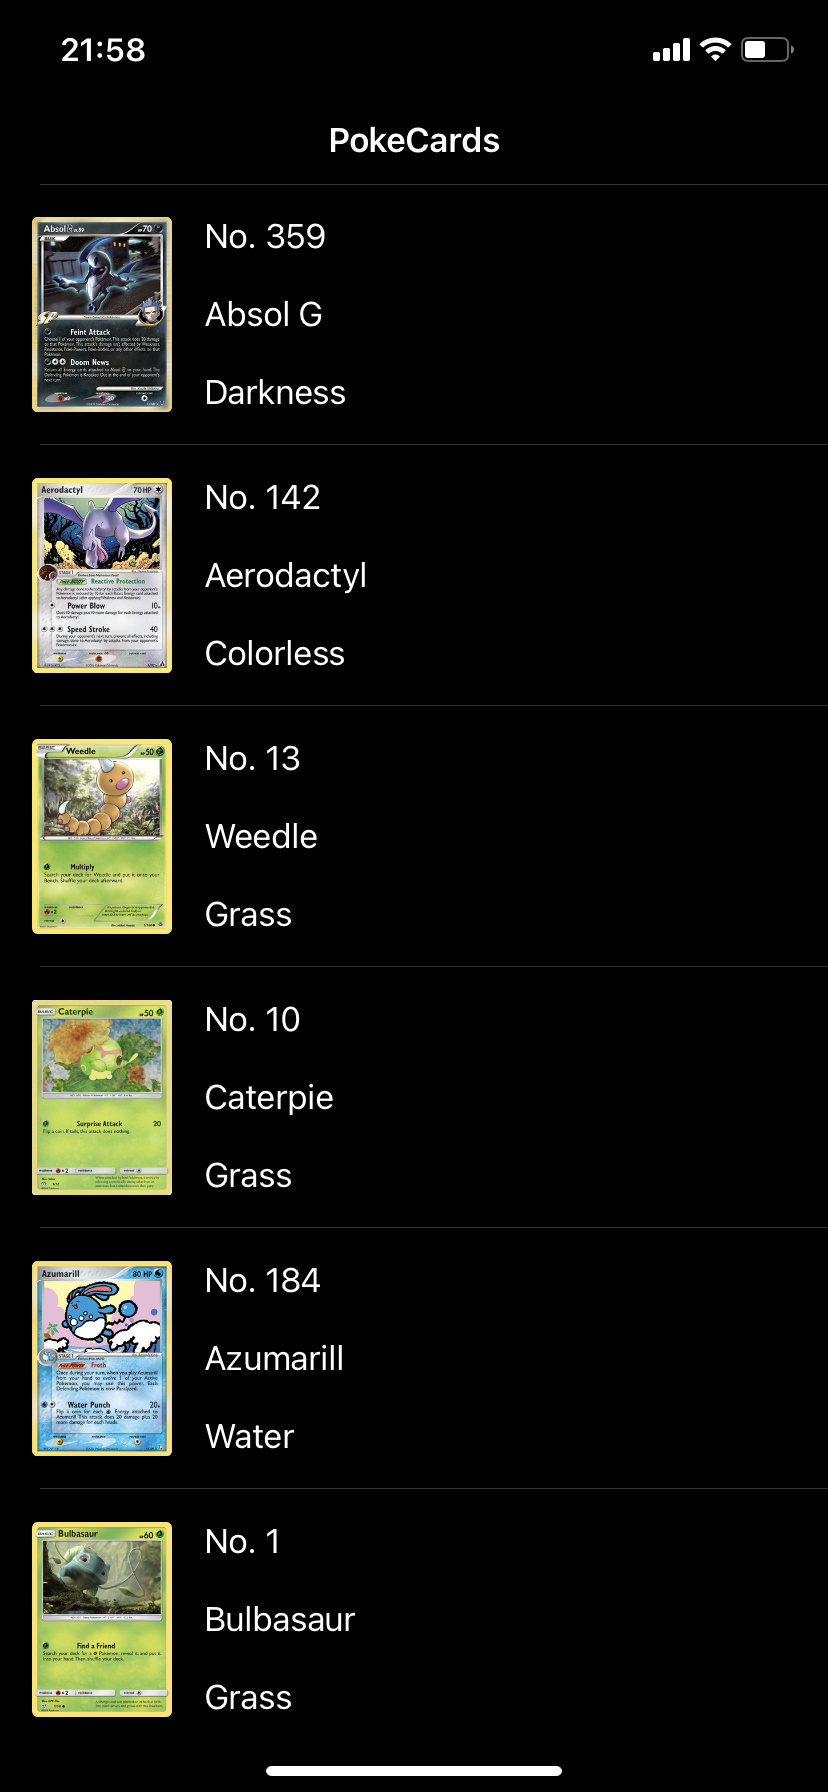
まず、ポケモンカードの一覧画面があって
| dark | light |
|---|---|
 |
 |
一覧からカードを選択すると、選択したカードの詳細画面をモーダル表示して
| dark | light |
|---|---|
 |
 |
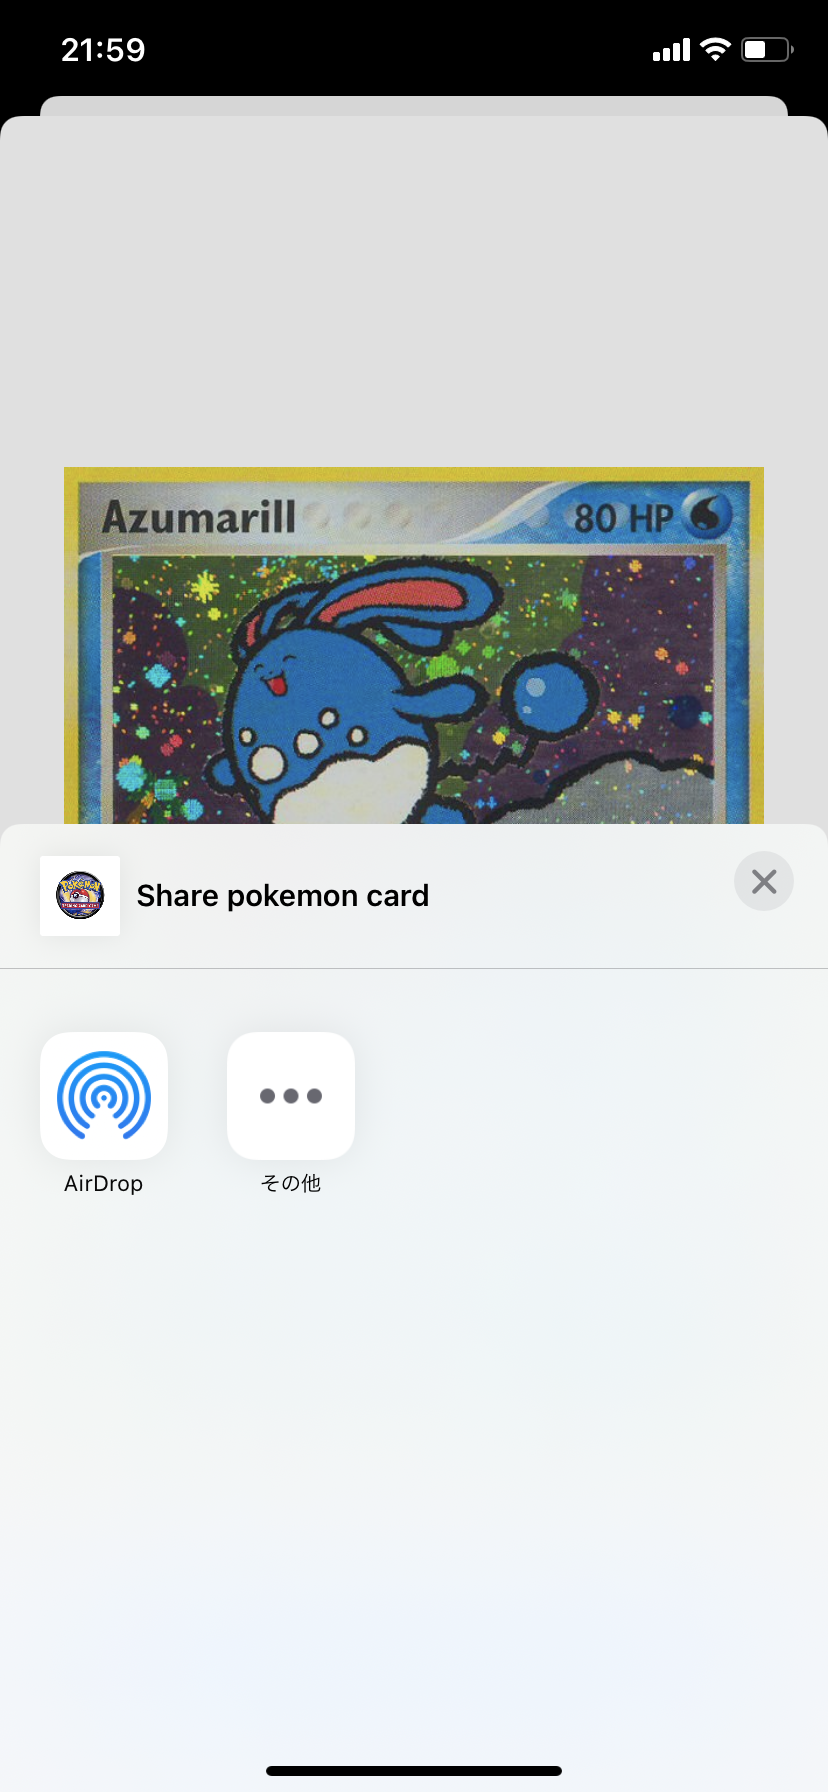
詳細画面のShareボタンをタップすると、AirDropのみのシェアシートが表示されます。
「AirDrop」のほかに「その他」も表示されていますが、「その他」の中も、AirDropのみになります。
| dark | light |
|---|---|
 |
 |
あとはAirDropで共有ができるという感じです![]()
実際に送受信する挙動は最後に載せます![]()
開発環境
今回は、以下の環境で開発を進めていきます。
| name | version |
|---|---|
| Xcode | 13.0 |
| Deployment Target | iOS 14.4 ~ |
動作確認に利用したiPhoneのOSが15と14.4だったので、Deployment Targetも合わせましたが、もっと古いバージョンが含まれていても実装はできると思います![]()
実装
具体的な実装について見ていきましょう!
ポケモンカード一覧画面はTableViewを使用しているくらいで、ポケモンカード詳細画面もImageView使用しているくらいなので、UI実装については詳細は割愛させていただきます![]()
最後にGitHub Repositoryのリンクを載せるので、UIはそちらをご確認いただければと思います。
データ取得と、今回の本題であるAirDropの送受信まわりを具体的に見ていきたいと思います。
ポケモンカードデータの取得
ポケモンカード一覧画面のデータは、Pokémon TCG APIを利用させていただいています。
ただ、APIリクエストに関しても、今回の本題ではないので、いろいろ省くためにAPIのレスポンスをJSONファイルに書き込んで、それをAssetsに入れるようにしました!
(いろいろサボりすぎて、ごめんなさいです![]() )
)
AssetsからJSONデータをとってきて、それをDecodableなEntityにDecodeしていきます!
Entity
APIのドキュメントに載っている仕様を確認して、今回使いそうなプロパティを並べてEntityを作成していきます。
- PokeImages
- ポケモンカードの画像URLを持つEntity
- smallとlargeの2種類のURLを持つ
コード
import Foundation

struct PokeImages: Codable, Equatable {
    let small: String
    let large: String

    init(small: String, large: String) {
        self.small = small
        self.large = large
    }

    var smallImageUrl: URL? {
        return URL(string: small)
    }

    var largeImageUrl: URL? {
        return URL(string: large)
    }
}
- PokeCard
- ポケモンカード1枚の情報を持つEntity
- idやname, typesなどの情報とPokeImagesを持つ
コード
import Foundation

struct PokeCard: Codable, Equatable {
    let id: String
    let name: String
    let supertype: String
    let subtypes: [String]
    let types: [String]
    let level: String?
    let hp: String?
    let nationalPokedexNumbers: [Int]
    let images: PokeImages

    init(
        id: String,
        name: String,
        supertype: String,
        subtypes: [String],
        types: [String],
        level: String?,
        hp: String?,
        nationalPokedexNumbers: [Int],
        images: PokeImages
    ) {
        self.id = id
        self.name = name
        self.supertype = supertype
        self.subtypes = subtypes
        self.types = types
        self.level = level
        self.hp = hp
        self.nationalPokedexNumbers = nationalPokedexNumbers
        self.images = images
    }
}
- PokeCards
- ポケモンカード複数枚の情報を持つEntity
- PokeCardのArrayを持つ
- ポケモンカード取得APIのレスポンスJSONのデコード先の型になる
コード
import Foundation

struct PokeCards: Decodable {
    let data: [PokeCard]
}
PokeImagesとPokeCardsは、Decodableに準拠していますが、PokeCardは、Decodable & EncodableなCodableに準拠しています。これは、後ほど説明しますが、AirDropで送信するときにData型にする必要があるので、PokeCardのみEncodableにも準拠させています。
AssetLoader
Entityはできたので、AssetsからJSONデータをとってきて、それをDecodeしていきます!
今回は、Data.xcassetsというAssetsファイルにcards.jsonというJSONファイルを入れています。
このAssetsから、NSDataAssetクラスを使用してデータを取り出します。
Data型で取り出せるので、それをJSONDecoderでdecodeするだけで、APIのGETリクエストの代用品が完成します![]()
ちなみに、NSDataAssetクラスは名前からは連想しにくいですが、UIKitのクラスなので、import Foundation ではなく、import UIKitしてあげる必要があるので注意が必要です![]()
Imageを取ってくるからUIKitなのかなとか勝手に思っていたのですが、NSDataAssetでは画像のデータは取れないらしいです![]()
/// NSDataAsset represents the contents of data entries in your asset catalog.
/// Data assets are not in the same class of stored content as images, so you cannot use a data asset to get image data for an image.
UIKIT_EXTERN API_AVAILABLE(ios(9.0), macos(10.11), tvos(9.0), watchos(2.0)) @interface NSDataAsset : NSObject<NSCopying>
/// NSDataAsset represents the contents of data entries in your asset catalog.
/// Data assets are not in the same class of stored content as images, so you cannot use a data asset to get image data for an image.
実装したAssetLoader.swift
import UIKit

final class AssetLoader {
    static func loadWithDecode<T: Decodable>(
        name: String,
        decoder: () -> JSONDecoder = {
            let decoder = JSONDecoder()
            decoder.keyDecodingStrategy = .convertFromSnakeCase
            return decoder
        }
    ) -> T {
        guard let dataAsset = NSDataAsset(name: name, bundle: .init(for: self)) else {
            // サンプルではfatalErrorで落としてしまっていますが、throwしてあげた方が優しいかもです
            fatalError("Asset data loading failure.")
        }
        do {
            return try decoder().decode(T.self, from: dataAsset.data)
        } catch {
            // サンプルではfatalErrorで落としてしまっていますが、throwしてあげた方が優しいかもです
            fatalError("Decoding failure. error: \(error)")
        }
    }
}
これで、以下のような形でPokeCardsをJSONから取得できるようになりました!
let pokeCards: PokeCards = AssetLoader.loadWithDecode(name: "cards")
データを取得できるようになったので、AirDropの処理を見ていきましょう!
Info.plistにカスタムUTIを追加する
AirDropで送受信するデータの種類を識別するために、カスタムUTI(Uniform Type Identifiers)を定義します。
Exported Type Identifiers
Exported Type Identifiersで、アプリが送信するファイルの形式を定義します。
Exported Type Identifiersに、Description, Identifier, Conforms Toを入力します。
それぞれ、UTIの説明、UTIの識別子、どのUTIを継承するかを指定します。
Identifierは、重複しないようにBundle identifierを含めたものが良さそうです![]()
Document Types
Document Typesで、アプリが受け取るファイルの形式を定義します。
Document Typesに、Name, Typesを入力して、Handler Rankを指定します。
Typesは、Exported Type IdentifiersのIdentifierと同じ値にしておきます。
Handler Rankは、受信した情報を開ければいいので、Defaultにしています。
参考
Defining File and Data Types for Your App
Setting Up a Document Browser App
AirDrop用のActivityItemSourceを実装する
UIActivityItemSourceは、共有するデータを表すためのプロトコルです。
今回は、シェアシートにAirDropのみを表示させるようにしてみます![]()
UIActivityItemSource Protocolに準拠したAirDropOnlyActivityItemSourceクラスを実装します。
func activityViewControllerPlaceholderItem(_ activityViewController: UIActivityViewController) -> Anyで、空のURLを指定することで、AirDrop以外の項目を表示させないようにするのですが、
URL(string: "")!にすると、クラッシュしてしまうので、NSURL(string: "")!にして回避しています。
import UIKit
import LinkPresentation

final class AirDropOnlyActivityItemSource: NSObject {
    /// AirDropで送信するアイテム
    let item: Any

    init(item: Any) {
        self.item = item
    }

    /// 送信するポケモンカードを指定してイニシャライズ
    convenience init(pokeCard: PokeCard) {
        let data = Encoder.jsonData(from: pokeCard)
        self.init(item: data)
    }
}

extension AirDropOnlyActivityItemSource: UIActivityItemSource {
    func activityViewControllerPlaceholderItem(_ activityViewController: UIActivityViewController) -> Any {
        //using NSURL here, since URL with an empty string would crash
        return NSURL(string: "")!
    }

    func activityViewController(
        _ activityViewController: UIActivityViewController,
        itemForActivityType activityType: UIActivity.ActivityType?
    ) -> Any? {
        return item
    }

    func activityViewController(
        _ activityViewController: UIActivityViewController,
        dataTypeIdentifierForActivityType activityType: UIActivity.ActivityType?
    ) -> String {
        // Info.plistで定義したUTIのIdentifierを指定
        return "jp.yuoku.PokeCardDropUTI.pokecard"
    }

    func activityViewControllerLinkMetadata(_ activityViewController: UIActivityViewController) -> LPLinkMetadata? {
        let linkMetadata = LPLinkMetadata()
        linkMetadata.title = "Share pokemon card"

        let fileUrl = AssetExtractor.createLocalUrl(forImageNamed: "pokemon_tcg")
        linkMetadata.iconProvider = NSItemProvider(contentsOf: fileUrl)

        return linkMetadata
    }
}
EncodableなPokeCard EntityをJSON dataにEncodeする処理も必要なので、実装しています。
import Foundation

enum Encoder {

    /// Json encoding
    static func jsonData<T: Encodable>(from encodableData: T) -> Data {
        let encoder = JSONEncoder()
        do {
            let data = try encoder.encode(encodableData)
# if DEBUG
            if let jsonString = String(data: data, encoding: .utf8) {
                print(jsonString)
            }
# endif
            return data
        } catch {
            // サンプルではfatalErrorで落としてしまっていますが、throwしてあげた方が優しいかもです
            fatalError("Encoding failure. error: \(error)")
        }
    }
}
参考
AirDropを受け取ったときの処理を実装する
AirDropを受け取ったときの処理は、アプリ起動済みかどうかでSceneDelegate.swiftのどの処理が呼ばれるか異なります。
アプリ起動済みの場合
アプリが起動済みの状態でAirDropを受け取ったら、func scene(_ scene: UIScene, openURLContexts URLContexts: Set<UIOpenURLContext>)が呼び出されます。
通常、URLContexts.firstに受信した情報が格納されているので、そこからDataを取り出して使用します。
ちなみに今回は、受け取ったポケモンカードの詳細画面をモーダル表示して、Toastでメッセージを表示しています。
Toastの実装には、Toast-Swiftを使用してみました!
class SceneDelegate: UIResponder, UIWindowSceneDelegate {
...

    func scene(_ scene: UIScene, openURLContexts URLContexts: Set<UIOpenURLContext>) {
        open(urlContexts: URLContexts)
    }

    private func open(urlContexts: Set<UIOpenURLContext>) {
        guard let urlContext = urlContexts.first else {
            return
        }
        do {
            let receivedData = try Data(contentsOf: urlContext.url)
            // PokeCardにデコード
            let receivedPokeCard: PokeCard = Decoder.jsonDecode(from: receivedData)

            // 最前面のViewControllerを取得して、そこから受信したポケモンカードの詳細画面をモーダル表示する
            if let frontVC = UIViewController.getFrontViewController() {
                let vc = PokeCardDetailViewController.build(pokeCard: receivedPokeCard)
                frontVC.present(vc, animated: true, completion: {
                    // 遷移後に、Toastでメッセージを表示する
                    vc.view.makeToast("Received \(receivedPokeCard.name) via AirDrop.", position: .top)
                })
            }
        } catch {
            print("data is nil. fromUrl: \(urlContext.url.path)")
            return
        }
    }
}
アプリ未起動の場合
アプリ未起動の状態でAirDropを受け取ったら、func scene(_ scene: UIScene, openURLContexts URLContexts: Set<UIOpenURLContext>)は呼び出されません。
通常のアプリ起動と同様に、func scene(_ scene: UIScene, willConnectTo session: UISceneSession, options connectionOptions: UIScene.ConnectionOptions)が呼び出されます。
そして、connectionOptions.urlContextsに受信した情報が格納されているので、そこからDataを取り出して使用します。
class SceneDelegate: UIResponder, UIWindowSceneDelegate {

    var window: UIWindow?

    func scene(_ scene: UIScene, willConnectTo session: UISceneSession, options connectionOptions: UIScene.ConnectionOptions) {
        // アプリ未起動時にAirDrop受け取りから起動した場合
        if let urlContext = connectionOptions.urlContexts.first {
            do {
                let receivedData = try Data(contentsOf: urlContext.url)
                // PokeCardにデコード
                let receivedPokeCard: PokeCard = Decoder.jsonDecode(from: receivedData)
                // シングルトンに値を保持しておいて、最初のViewControllerのviewDidAppearで使用する
                let receivedPokeCardRepository = ReceivedPokeCardRepositoryProvider.provide()
                receivedPokeCardRepository.write(receivedPokeCard: receivedPokeCard)
            } catch {
                print("data is nil. fromUrl: \(urlContext.url.path)")
                return
            }
        }

        setupWindow(windowScene: (scene as? UIWindowScene))
    }

    private func setupWindow(windowScene: UIWindowScene?) {
        guard let windowScene = windowScene else {
            return
        }
        let window = UIWindow(windowScene: windowScene)
        self.window = window
        window.makeKeyAndVisible()

        let pokeCardsRepository = PokeCardsRepositoryProvider.provide()
        let vc = PokeCardListViewController.build(pokeCards: pokeCardsRepository.pokeCards())
        let navigation = UINavigationController(rootViewController: vc)

        window.rootViewController = navigation
    }
...
}
実装したアプリの動作
AirDrop送信側
AirDrop受信側
その他参考情報
さいごに
今回実装してみたソースコードは、GitHub y-okudera/PokeCardDropにPushしてあります![]()
詳細説明できていないところなどはそちらもあわせて見ていただけると幸いです![]()
Advent Calendar まだまだ続きますので、次の記事もお楽しみに!


