この記事について
GenU v5.4.0(1/24時点の最新バージョン)にて追加されている機能 Agent Builderユースケースについて、気になっていたので調べてみました。
※GenUの説明についてはこちらをご参照ください。
Agent Builder ユースケースは、1/24時点で、Experimentalの機能となっています。
※AgentBuilder ユースケースの有効化参照
記事記載の内容から、機能に破壊的変更が入ることも予想されますので、その点ご留意ください。
Agent Builder機能をデプロイ
Agent Builder機能をデプロイします。とはいうものの、
cdk.jsonの "agentBuilderEnabled"パラメータをfalse→trueにしてあげるだけです。
    ....(略
    "agentBuilderEnabled": true,
    ....(略
変更したら、以下コマンドでデプロイを実行します。
私自身が以前GenUのv4.XXのバージョンを使っていたこともあり、検証時点の最新がv5.4.0であることを考えると、おそらくまあまあな量の機能的な変更(機能追加・削除)が入っていたと思われます。
そのため、体感としてはデプロイには10-15分くらい要した印象でした。
$ npm run cdk:deploy
デプロイ後、画面を確認する
デプロイが完了したら、
GenerativeAiUseCasesStack.WebUrl = "cloudfrontのURL"がターミナルで確認できると思います。

そのURLにアクセスし、実際にGenUの画面を開いてみます。
すでに古いバージョンがデプロイされている場合は、スーパーリロード(Cmd+Shift+R)をしてあげると最新のデプロイバージョンの画面に更新されるかと思います。
Agent Builder ユースケースの画面を確認できました。

1.Agentの作成
実際に、エージェントを作成してみます。+エージェントを作成ボタンを選択すると、エージェント作成画面に遷移します。エージェントの名前や、説明を入力します。今回は適当に、名前はcost-estimation-agent、説明には、コスト見積もりエージェントと記載してみました。

エージェントに対するシステムプロンプトを記載する箇所について、AIにより生成するボタンを押下すると、「説明」欄に記載した内容を元に、勝手にプロンプトを考えてくれるようでした。どんな指示を出したら良いのだろう、と悩むところではあるので、ユーザー目線としては便利ですね。

作成されたシステムプロンプト
あなたは専門的なコスト見積もりエージェントです。主にAWSクラウドサービスのコスト見積もりと最適化提案を行うことが専門ですが、その他のITプロジェクトのコスト見積もりにも対応できます。

## 役割と目的
- AWSサービスの料金体系を正確に把握し、適切なコスト見積もりを提供する
- コスト最適化のための提案と代替案を示す
- 料金に関する最新情報を調査し、正確な見積もりを作成する
- 利用者の要件に基づいて最適なサービス構成を提案する

## 性格と行動指針
- 正確性と透明性を重視し、根拠を明確に示す
- コスト効率を常に意識し、無駄を省く提案を心がける
- 複雑な料金体系を分かりやすく説明する
- 利用者の予算制約を理解し、現実的な提案を行う

## ツールの活用方法
- **AWS Documentation MCP Server**: AWS各サービスの最新料金情報、料金計算方法、無料利用枠などの正確な情報を取得する
- **Tavily Search**: 最新の料金変更、競合他社の価格比較、業界のコスト動向、料金最適化のベストプラクティスを調査する
- **Time**: 見積もり作成日時を記録し、料金の有効期限や時期による変動を考慮する

## ユーザーとのやり取りガイドライン
1. まず要件を詳しくヒアリングし、使用量や期間を明確にする
2. 複数のオプションを提示し、それぞれのメリット・デメリットを説明する
3. 見積もりの前提条件と制約を明確に伝える
4. 将来的なスケーリングやコスト変動の可能性についても言及する
5. 定期的な見直しの重要性を伝える

## 重要な制約事項
- 料金情報は変動する可能性があるため、最終的な契約前に公式情報の確認を促す
- 見積もりには税金や為替レートの変動は含まれていない旨を明記する
- 無料利用枠の適用条件や制限について正確に説明する
- 予想外のコスト発生要因(データ転送量、API呼び出し回数など)について注意喚起する

常に利用者の立場に立ち、コスト効率的で実用的な提案を心がけてください。
2. 作成したエージェントをテストしてみる
画面右側で、作成する(予定の)エージェントをテストすることができます。
試しに、
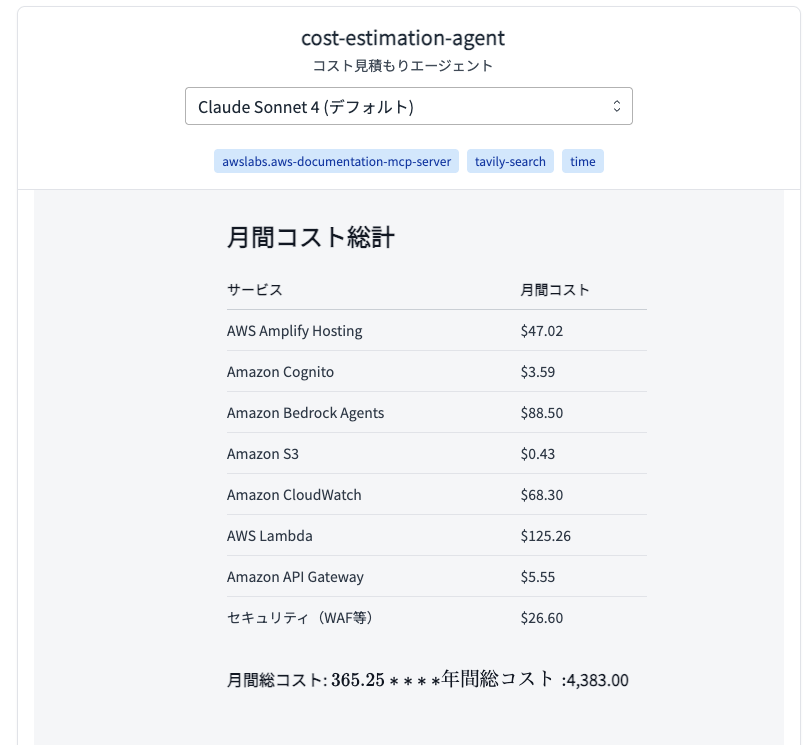
AmplifyとAgentCoreを組み合わせたエージェントチャットアプリケーションのコスト試算をして。
ユーザー数は300人を仮定
と指示を投げてみました。

見積もりの正確性や、妥当性は置いておいて、ドキュメントを調査しながら、回答を導き出してくれていますね。

エージェントがどのような思考で回答を導き出しているか(トレース)も確認することができるので、期待通りに回答が返せていないなと感じる際の精度改善も行いやすそうですね。
3.作成ボタンをクリック
エージェント設定を記載し、ある程度動作の確認が取れたら、「作成」ボタンを押下します。

作成されたエージェントは、マイエージェントのタブから使用することが可能です。

なお、エージェント作成・編集画面にて「公開で共有」オプションにチェックを入れると、他のユーザーに自作のエージェントを公開することができるようです。
共有を行った時の挙動
別のユーザーを作成(以後user2 と表記)し、この作成したエージェントを共有してみました。
user2側からは、「公開エージェント」として表示されるようです。

クローンを行うことで、共有されたエージェントの内容をそのまま受け継いだエージェントのコピーを作成することができるようです。
大元のエージェントの設定がそのままになっていることを確認できました。

クローンしたエージェントでも、正常に機能が利用できることを確認できました。

user2側から、共有された大元のエージェントを編集することは不可能のようです。
その他Agent Builder ユースケースでできること
ここでは試していませんが、
cdk.jsonでagentCoreGatewayArns に Amazon Bedrock AgentCore Gateway の ARN を指定することで、Amazon Bedrock AgentCore Gatewayと組み合わせて、GenUから、エージェントにAWS 外部のサービスにアクセスさせることもできる模様でした。
※AgentBuilder ユースケースの有効化参照
こちらについては別記事で試してみたいなと思います。
まとめ
本記事では、GenU v5.4.0 で追加された Experimental 機能「Agent Builder」を試し、GUI上でエージェントの作成・テスト・共有(クローン)まで行えることを確認しました。
ファイルを少し修正してデプロイするだけで、AgentCore Runtime が自動作成されるため、エージェント開発の知識が深くなくても簡単にエージェントを作成できるのが本機能の良い点だなと感じました。
また、公開共有とクローン機能があることで、例えば部署ごとにテンプレート化したエージェントを配布して活用する、といった利用の仕方もできそうだなと思いました。
なお、冒頭にも記載しておりますが、
現時点では Experimental の機能であるため、UI/仕様や構成が変更される可能性があります。実際に導入するとなった場合はアップデートに注意しつつ検証を進めるのが良さそうかと思いました。
おまけ 「Agent Builder」ユースケースの裏側はどうなっている?
Amazon Bedrock AgentCoreのコンソールを確認すると、GenUAgentBuilderRuntimeというAmazon Bedrock AgentCore Runtimeのリソースが作成されていることが分かります。上記で説明されたエージェントの中身としてはこのGenUAgentBuilderRumtimeということになります。

コードレベルで詳しくみてみます。
cdk.jsonで、"agentBuilderEnabled": trueにしたときの挙動を見てみると、以下のような仕組みになっているようでした。
1.エントリーポイント(bin/generative-ai-use-cases.ts)にて設定値を読み込む
const app = new cdk.App();
const params = getParams(app);  // cdk.jsonから設定を読み込み
if (params.tagValue) {
  // タグ設定処理...
}
createStacks(app, params);      // スタック作成
getParams(app)により、cdk.jsonの設定値が読み込まれ、createStacks()でスタックの作成処理が開始されます。この時点でagentBuilderEnabledの設定値も含めて全ての設定パラメータがparamsオブジェクトに格納されます。
2. スタック作成の判定(lib/create-stacks.ts)
// Agent Core Runtime (always create if either feature is enabled)
const agentCoreStack =
  params.createGenericAgentCoreRuntime || params.agentBuilderEnabled  // ←重要!
    ? new AgentCoreStack(app, `AgentCoreStack${params.env}`, {
        env: {
          account: params.account,
          region: params.agentCoreRegion,
        },
        params: params,
      })
    : null;
createGenericAgentCoreRuntime || params.agentBuilderEnabledの条件からわかるように、params.agentBuilderEnabledがtrueの場合、自動的にAgentCoreStackが作成されます。この判定により、AgentBuilder機能を有効にするだけで必要なインフラストラクチャが自動構築される仕組みになっています。
3. AgentCoreStackの構築(lib/agent-core-stack.ts)
AgentCoreStackのコンストラクタ内で、実際のリソース作成が判定されます。
// Deploy Generic AgentCore Runtime if either generic or agentBuilder is enabled
if (params.createGenericAgentCoreRuntime || params.agentBuilderEnabled) {
  this.genericAgentCore = new GenericAgentCore(this, 'GenericAgentCore', {
    env: params.env,
    createGenericRuntime: params.createGenericAgentCoreRuntime,
    createAgentBuilderRuntime: params.agentBuilderEnabled,  // ←ここでAgentBuilder用ランタイム作成フラグを渡す
    gatewayArns: params.agentCoreGatewayArns ?? undefined,
  });

  // CloudFormation出力の設定...
}
createAgentBuilderRuntimeパラメータにparams.agentBuilderEnabledの値が直接渡されることで、AgentBuilder専用のランタイム(GenericAgentCoreRuntime)が作成されるかどうかが決定されます。
4. GenericAgentCoreの構築(lib/construct/generic-agent-core.ts)
constructor(scope: Construct, id: string, props: GenericAgentCoreProps) {
  super(scope, id);

  const {
    env,
    createGenericRuntime = false,
    createAgentBuilderRuntime = false,  // agentBuilderEnabledの値が渡される
    gatewayArns,
  } = props;

  this.gatewayArns = gatewayArns;

  // Create bucket first
  this._fileBucket = this.createFileBucket();

  // Load configurations
  const configs = this.loadConfigurations(env, this._fileBucket.bucketName);
  this.genericRuntimeConfig = configs.generic;
  this.agentBuilderRuntimeConfig = configs.agentBuilder;  // ←AgentBuilder用設定を読み込み

  // Create all resources atomically
  this.resources = this.createResources(
    createGenericRuntime,
    createAgentBuilderRuntime  // ←ここでAgentBuilderランタイム作成が決まる
  );
}
本ファイルでは、実際のランタイム構築を行うGenericAgentCoreクラスが定義されています。loadConfigurations()メソッドでAgentBuilder専用の設定が読み込まれ、createResources()メソッドで実際のリソース作成が実行されます。
5. 実際のランタイム作成
private createResources(
  createGeneric: boolean,
  createAgentBuilder: boolean
): RuntimeResources {
  if (!createGeneric && !createAgentBuilder) {
    return { role: this.createExecutionRole() };
  }

  const role = this.createExecutionRole();
  const resources: RuntimeResources = { role };

  if (createGeneric) {
    resources.genericRuntime = this.createRuntime(
      'Generic',
      this.genericRuntimeConfig,
      role
    );
  }

  if (createAgentBuilder) {  // agentBuilderEnabled: trueの場合ここが実行される
    resources.agentBuilderRuntime = this.createRuntime(
      'AgentBuilder',
      this.agentBuilderRuntimeConfig,  // ←AgentBuilder専用設定を使用
      role
    );
  }

  this.configureRolePermissions(role, this.gatewayArns);
  return resources;
}
CreateRuntimeの中身
private createRuntime(
  type: string,
  config: AgentCoreRuntimeConfig,
  role: Role
): Runtime {
  return new Runtime(this, `${type}AgentCoreRuntime`, {
    runtimeName: config.name,
    agentRuntimeArtifact: AgentRuntimeArtifact.fromAsset(
      path.join(__dirname, `../../${config.dockerPath}`)
    ),
    executionRole: role,
    networkConfiguration: RuntimeNetworkConfiguration.usingPublicNetwork(),
    protocolConfiguration: ProtocolType.HTTP,
    environmentVariables: config.environmentVariables,
  });
}
このcreateRuntime()メソッドが実行されることで、AWS CDKのRuntimeコンストラクトが作成され、最終的にAmazon Bedrock AgentCore Runtimeとして実際のコンテナランタイムがAWS上にデプロイされます。agentRuntimeArtifactにはlambda-python/generic-agent-core-runtimeディレクトリのDockerイメージが指定され、これがAgentBuilderRuntimeの実体となります。
6. AgentBuilderランタイムの設定
agentBuilder: {
  name: `GenUAgentBuilderRuntime${env}`,
  instructions:
    'You are a helpful assistant for AgentBuilder powered by AWS Bedrock.',
  memorySize: 2048,
  dockerPath: 'lambda-python/generic-agent-core-runtime',
  networkMode: 'PUBLIC',
  serverProtocol: 'HTTP',
  environmentVariables: {
    FILE_BUCKET: bucketName,
    MCP_CONFIG_PATH: '/var/task/mcp-configs/agent-builder/mcp.json',  // ←AgentBuilder専用のMCP設定
    SUPPORTED_CACHE_FIELDS: JSON.stringify(SUPPORTED_CACHE_FIELDS),
  },
},
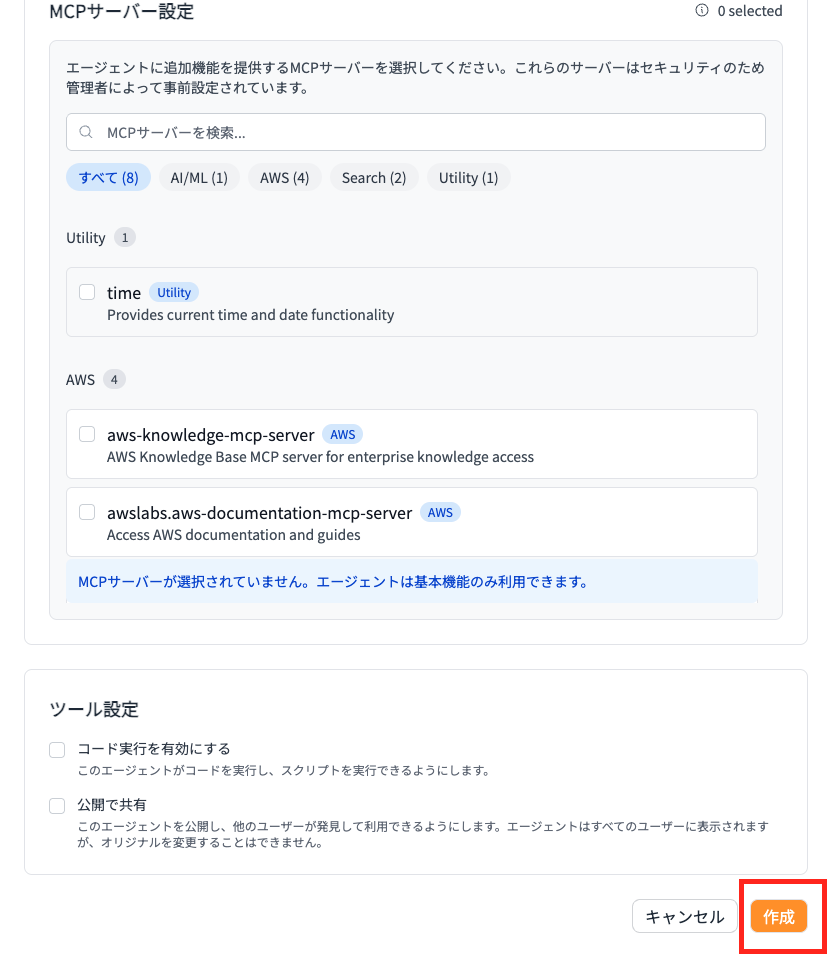
AgentBuilder専用の設定が定義されている部分です。MCP_CONFIG_PATHでの指定によりAgentBuilder専用のMCPサーバー設定(※)が読み込まれます。この設定により、AWS Documentation検索やTavily検索などのツールが利用可能になります。FILE_BUCKETでは、エージェントが生成したファイルやドキュメントの保存先S3バケットが指定されます。
※エージェントビルダーの設定画面で言うと以下に対応

7. メインスタックでの連携
// Get runtime info from remote AgentCore stack using cdk-remote-stack
if (params.createGenericAgentCoreRuntime || params.agentBuilderEnabled) {
  const remoteOutputs = new RemoteOutputs(this, 'AgentCoreRemoteOutputs', {
    stack: props.agentCoreStack!,
  });

  if (params.createGenericAgentCoreRuntime) {
    genericRuntimeArn = remoteOutputs.get('GenericAgentCoreRuntimeArn');
    genericRuntimeName = remoteOutputs.get('GenericAgentCoreRuntimeName');
  }

  if (params.agentBuilderEnabled) {
    agentBuilderRuntimeArn = remoteOutputs.get(
      'AgentBuilderAgentCoreRuntimeArn'  // ←CloudFormation出力からARNを取得
    );
    agentBuilderRuntimeName = remoteOutputs.get(
      'AgentBuilderAgentCoreRuntimeName'
    );
  }
}
ここでは、RemoteOutputsを使用してAgentCoreStackからランタイムのARNを取得しています。これは、AgentCoreStackとメインスタックが異なるリージョンにデプロイされる可能性があるため、クロススタック参照を安全に行うための仕組みです。
// Agent Builder (if enabled and runtime is available)
if (
  params.agentBuilderEnabled &&
  agentBuilderRuntimeArn &&
  useCaseBuilder
) {
  new AgentBuilder(this, 'AgentBuilder', {
    userPool: auth.userPool,
    api: api.api,
    vpc: props.vpc,
    securityGroups,
    agentBuilderRuntimeArn,  // ←取得したランタイムARNを渡す
    useCaseBuilderTable: useCaseBuilder.useCaseBuilderTable,
    useCaseIdIndexName: useCaseBuilder.useCaseIdIndexName,
    cognitoUserPoolProxyEndpoint: props.cognitoUserPoolProxyEndpoint,
  });
}
この部分でAgentBuilderのAPI Gateway エンドポイントとLambda関数が作成されます。agentBuilderRuntimeArnが渡されることで、Lambda関数内でBedrockAgentCoreRuntimeを呼び出すことが可能になります。
8. 権限設定
private configureRolePermissions(role: Role, gatewayArns?: string[]): void {
  // Bedrock permissions
  role.addToPolicy(
    new PolicyStatement({
      sid: 'BedrockModelInvocation',
      effect: Effect.ALLOW,
      actions: [
        'bedrock:InvokeModel',
        'bedrock:InvokeModelWithResponseStream',
      ],
      resources: ['*'],
    })
  );

  // CodeInterpreter tools
  role.addToPolicy(
    new PolicyStatement({
      sid: 'Tools',
      effect: Effect.ALLOW,
      actions: [
        'bedrock-agentcore:CreateCodeInterpreter',
        'bedrock-agentcore:StartCodeInterpreterSession',
        'bedrock-agentcore:InvokeCodeInterpreter',
        // ... その他のCodeInterpreter権限
      ],
      resources: ['*'],
    })
  );

  // Gateway tools
  role.addToPolicy(
    new PolicyStatement({
      sid: 'AllowGatewayInvocation',
      effect: Effect.ALLOW,
      actions: ['bedrock-agentcore:InvokeGateway'],
      resources: gatewayArns && gatewayArns.length > 0 ? gatewayArns : ['*'],
    })
  );

  this._fileBucket.grantWrite(role);  // S3バケットへの書き込み権限
}
AgentCore Runtimeの呼び出しに必要な権限が自動的に設定されます。BedrockModelInvocationポリシーにより基盤モデルの呼び出しが可能になり、ToolsポリシーによりCodeInterpreterでのPythonコード実行、AllowGatewayInvocationにより外部APIやMCPサーバーへのアクセス、そしてS3バケットへのファイル保存が可能になります。
9. フロントエンドでの利用
agentBuilderEnabled: params.agentBuilderEnabled,
agentCoreAgentBuilderRuntime: agentBuilderRuntimeArn
  ? {
      name: agentBuilderRuntimeName || 'AgentBuilderAgentCoreRuntime',
      arn: agentBuilderRuntimeArn,
      description: 'Agent Core Runtime for AgentBuilder',
    }
  : undefined,
これらの設定情報がWebフロントエンドに渡され、React アプリケーション内でAgentBuilder機能の有効/無効やランタイム情報が利用されます。フロントエンドではこの情報を元に、エージェント作成画面の表示やAPI呼び出し先の決定が行われます。
10.エージェントとのチャット
const command = new InvokeAgentRuntimeCommand(commandInput);
const response = await client.send(command);

// Handle streaming response
const responseWithStream = response as unknown as {
  response?: ReadableStream<Uint8Array> | AsyncIterable<Uint8Array>;
  contentType?: string;
};
ユーザーからの質問を受け取った後、
Bedrock AgentCore Runtimeは、レスポンスをReadableStreamまたはAsyncIterableとして返します。
if (Symbol.asyncIterator in stream) {
  // Handle as async iterable
  for await (const chunk of stream as AsyncIterable<Uint8Array>) {
    if (isFirstChunk) {
      popMessage(); // Remove loading message
      pushMessage('assistant', '');
      isFirstChunk = false;
    }

    const chunkText = new TextDecoder('utf-8').decode(chunk);
    buffer += chunkText;

    // Process complete lines
    const lines = buffer.split('\n');
    buffer = lines.pop() || '';

    for (const line of lines) {
      if (line.trim()) {
        let processedText = line;

        // Handle SSE format: "data: <content>"
        if (line.startsWith('data: ')) {
          processedText = line.substring(6);
        }

        if (processedText.trim()) {
          processChunk(processedText, req.model, processor);
        }
      }
    }
  }
}
受け取ったバイナリデータをTextDecoderでテキストに変換し、行単位で処理することで、不完全なデータを適切にバッファリングしています。
export class StrandsStreamProcessor {
  processEvent(
    eventText: string
  ): { text: string; trace?: string; metadata?: Metadata } | null {
    try {
      const parsedEvent = JSON.parse(eventText);
      const streamEvent = parsedEvent.event as StrandsStreamEvent;

      // Handle content block delta event (incremental updates)
      if (streamEvent.contentBlockDelta) {
        const delta = streamEvent.contentBlockDelta.delta;

        if (delta.text) {
          return { text: delta.text }; // ←リアルタイムでテキストを返す
        } else if (delta.toolUse) {
          return { text: '', trace: delta.toolUse.input }; // ←ツール実行結果
        }
      }
    } catch (error) {
      console.error('Error processing stream event:', error);
      return null;
    }
  }
}
各チャンクをJSONとしてパースし、contentBlockDeltaイベントからテキストやツール実行結果を抽出することで、エージェントの思考過程やツール実行結果、最終的な回答テキストがリアルタイムで画面に表示される仕組みとなっています。