はじめに
Tailwind CSS v3からv4への変更により、セットアップ方法が大幅に簡略化されました。本記事では、ViteプロジェクトでTailwind CSS v4を導入する手順と、v3からの主な変更点について記録として残したいと思います。
v3からの主な変更点
Tailwind CSS v4では以下の点が大きく変わりました。
-
tailwind.config.jsファイルが不要になった -
@tailwindcss/viteプラグインを使用するようになった - CSSでの
@import "tailwindcss"のみでスタイルが適用される
これにより、設定ファイルの管理が不要になり、セットアップがより簡単になりました。
セットアップ手順
前提条件
- Node.js がインストールされている。
- npm が使用可能な環境
Viteの環境構築を行う
1. コマンドプロンプト(またはターミナル)を起動し、プロジェクトを作成したいフォルダに移動する。
2. 以下のコマンドを実行する。
npm create vite@latest
3. プロジェクト名とフレームワークと使用する言語を選択する。
以下は私が行ったプロジェクト作成になります。
heyou@heiyunoMacBook-Pro 00.workspace % npm create vite@latest
Need to install the following packages:
create-vite@7.1.1
Ok to proceed? (y) y


> npx
> "create-vite"

│
◇  Project name:
│  substitute-search
│
◇  Select a framework:
│  React
│
◇  Select a variant:
│  TypeScript
│
◇  Scaffolding project in /Users/heyou/01.Programming/00.workspace/substitute-search...
│
└  Done. Now run:

  cd substitute-search
  npm install
  npm run dev

npm notice
npm notice New patch version of npm available! 11.5.1 -> 11.5.2
npm notice Changelog: https://github.com/npm/cli/releases/tag/v11.5.2
npm notice To update run: npm install -g npm@11.5.2
npm notice
4. 作成したプロジェクトのフォルダに移動し、以下のコマンドを実行する。
npm install
5. 以下のコマンドを実行し、表示されるURLにアクセスしてViteの画面が表示できたら環境作成完了!
npm run dev
6. 確認できたら開発環境を終了させる。
Tailwind CSS v4のインストールと設定
1. 以下のコマンドを実行する。
npm install tailwindcss @tailwindcss/vite
2. vite.config.tsを編集する。
vite.config.ts
import { defineConfig } from 'vite';
import react from "@vitejs/plugin-react";
+ import tailwindcss from '@tailwindcss/vite';

export default defineConfig({
  plugins: [
    react(),
+    tailwindcss(),
  ],
})
3. index.cssにTailwind CSSをインポートし、App.cssの内容は全て削除する。
index.css
@import "tailwindcss";
4. App.tsxでcssが適用されるか確認する。
App.tsx
import './App.css'
function App() {
return (
<>
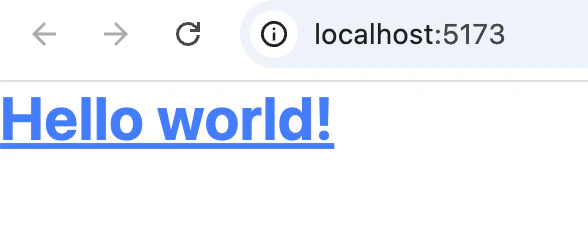
<h1 className="text-3xl font-bold underline text-blue-500">
Hello world!
</h1>
</>
)
}
export default App
5. 開発環境を起動し、CSSが適用されていたらセットアップ完了!!
npm run dev
終わりに
Tailwind CSS v4では設定ファイルが不要になるなど、大幅にセットアップが簡略化されました。バージョンアップによって手順が変わることがあるため、今後は公式ドキュメントを確認する習慣を身につけていきたいと思います。
参考