"PeopleNet"の出力テンソルを読む
人物検出のできる "PeopleNet" をNGC Model Catalogから入手し、推論を実施してみたところ、画像である入力テンソル (1, 544, 960, 3) から、出力テンソル (1, 34, 60, 3) と (1, 34, 60, 12) が生成されました。"34"や"60"や"12"などの意味をはじめとして、 この2種類の出力テンソルをどうやって扱えばいいのかがわからなかったため、 ゼロから調査し、出力テンソルからバウンディングボックスを生成するプログラムを実装してみました。

本記事内で扱う"PeopleNet"のTensorFlow Lite形式のモデルを入手・生成する方法については以下の記事をご参照ください
出力テンソルを読み解くためのヒントとなる情報
PeopleNetの配布ページに出力テンソルに関するヒントがいくつか隠されています。
This model is based on NVIDIA DetectNet_v2 detector with ResNet34 as feature extractor. This architecture, also known as GridBox object detection, uses bounding-box regression on a uniform grid on the input image. Gridbox system divides an input image into a grid which predicts four normalized bounding-box parameters (xc, yc, w, h) and confidence value per output class.
Output Type(s): Label(s), Bounding-Box(es), Confidence Scores
Output Format: Label: Text String(s); Bounding Box: (x-coordinate, y-coordinate, width, height), Confidence Scores: Floating Point
Other Properties Related to Output: Category Label(s): Bag, Face, Person, Bounding Box Coordinates, Confidence Scores
PeopleNetに対する海外のフォーラムの反応
ただ、この説明文だけでは出力テンソルを実際どのようなプログラムで加工すれば良いのか悩んでしまいます。こうしたPeopleNetの出力テンソルを描画したい、デコードしたいといったリクエストは、NGCのフォーラムでも度々挙げられているようです。なので、今回はNGCのフォーラムを起点に調査を行いました。 基本は "ソースコード見てね" という回答を辿って、関連する実装を探す流れです。
今回実装するにあたって参照した情報
結果、以下のソースコードに辿り着き、これらを参考に "PeopleNet" の出力テンソルをBoundingBoxへと変換するデコーダーを実装することができました。
"PeopleNet"の出力をBoundingBoxへと変換する
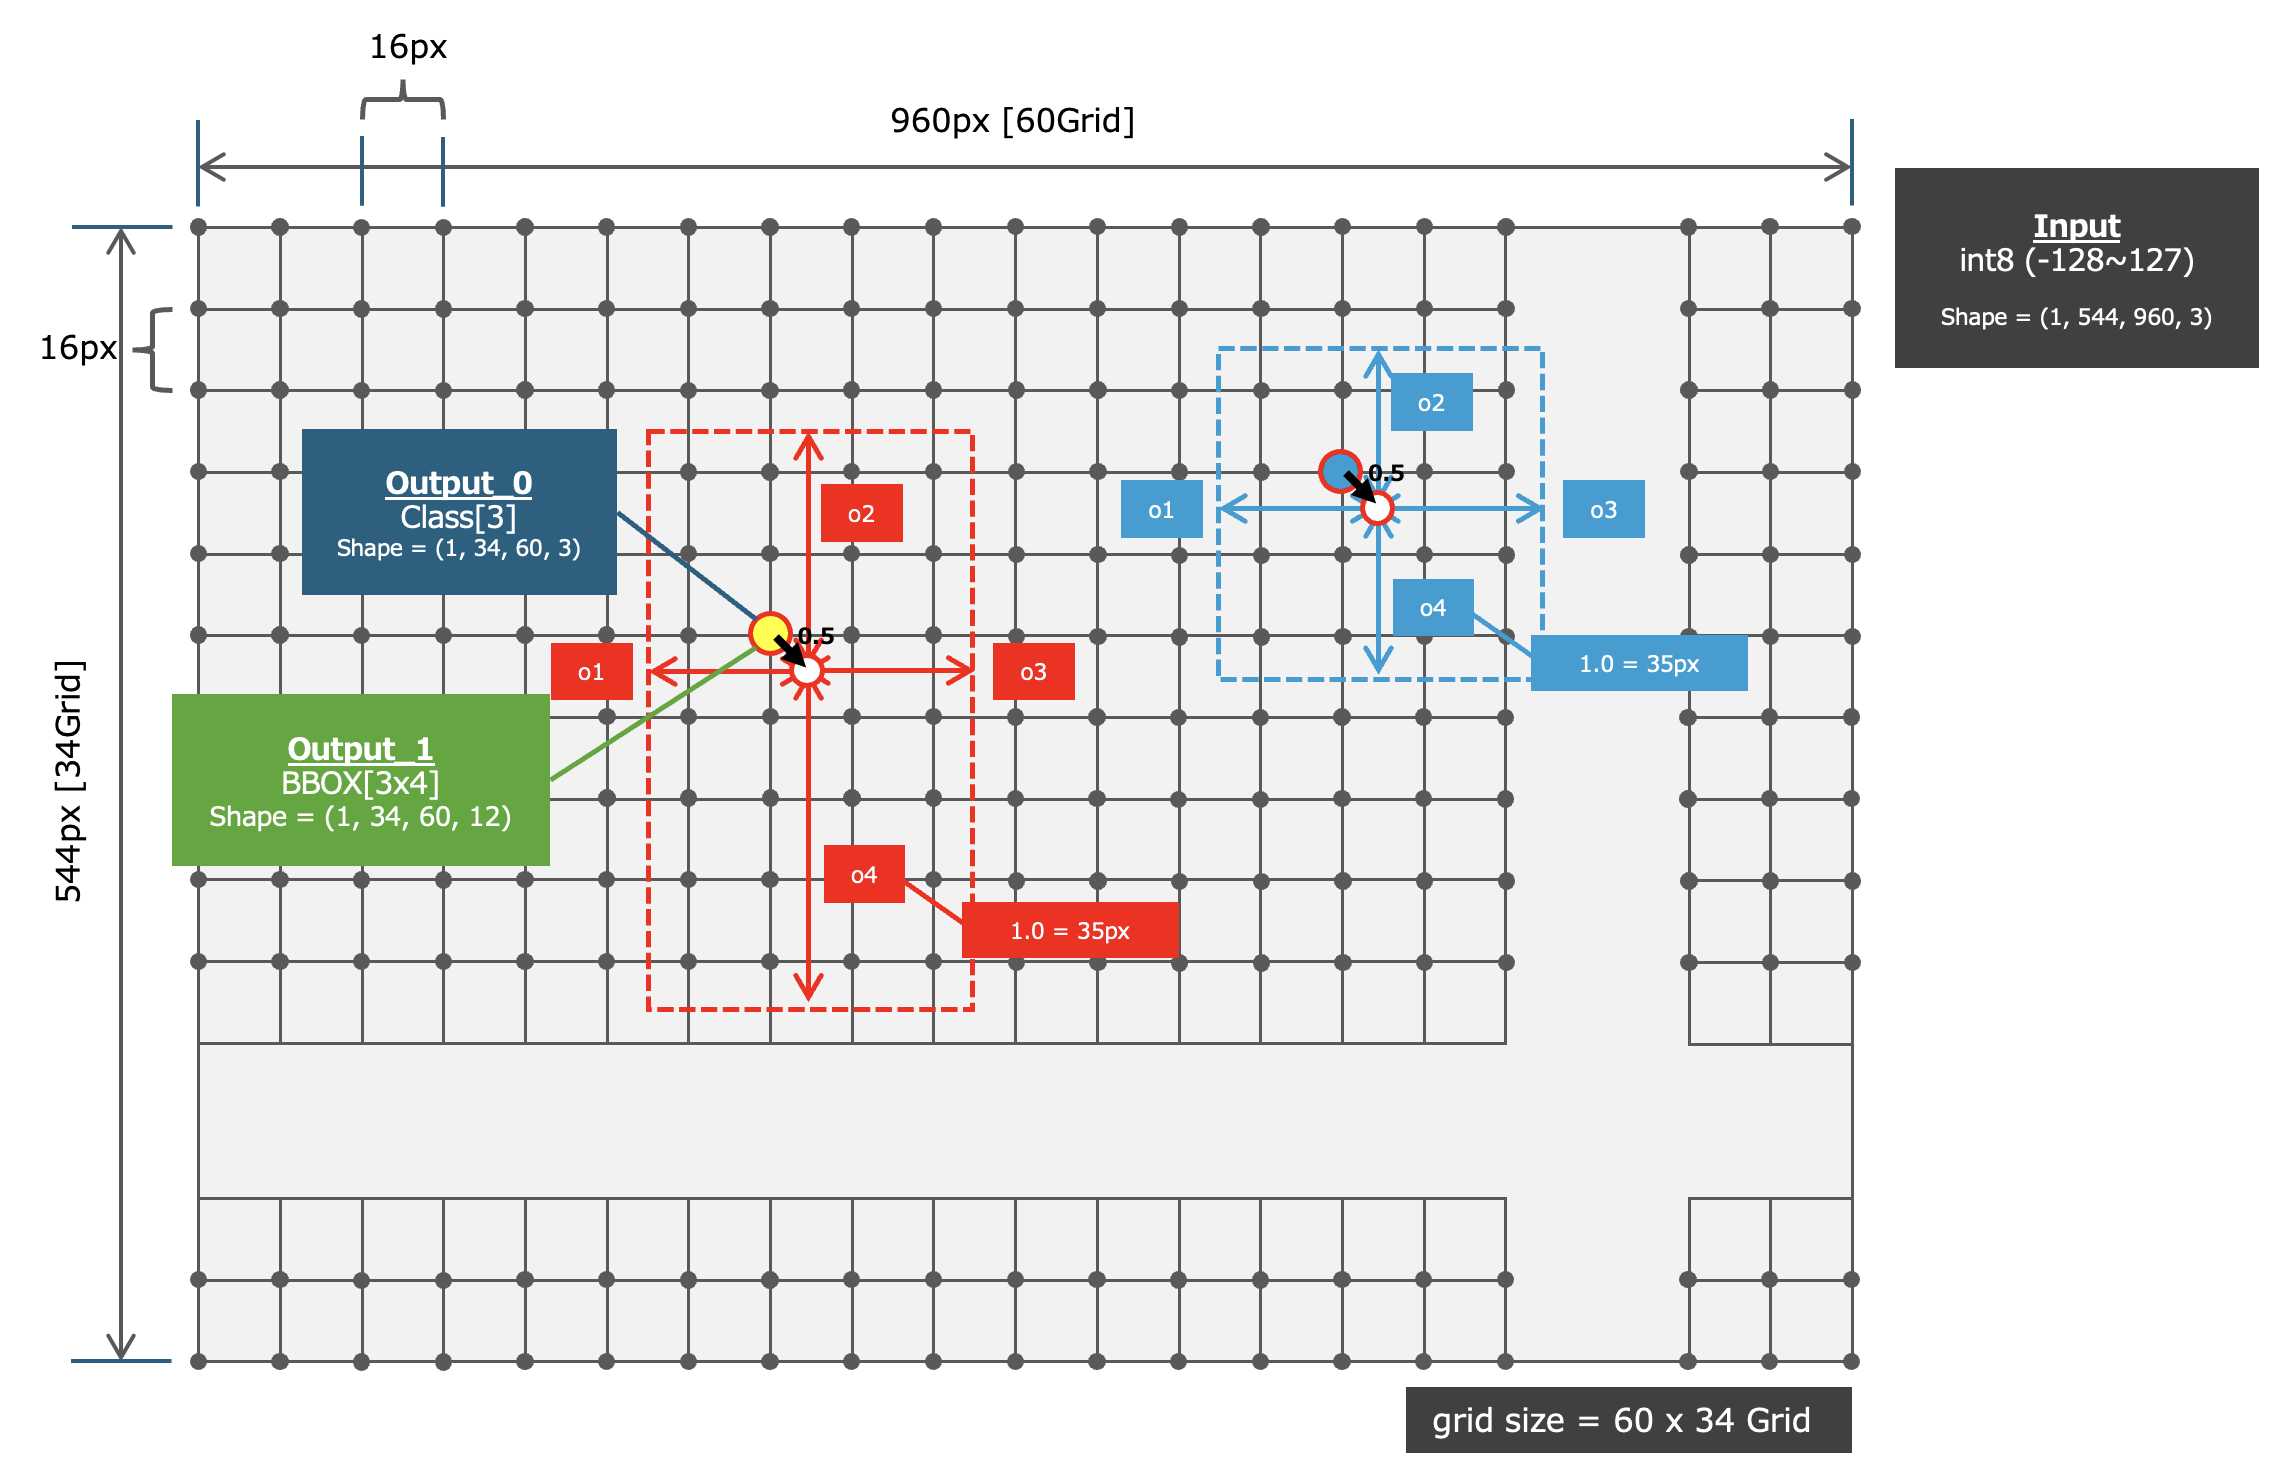
調べた結果、NVIDIA NGC Model Catalogで配布されている "PeopleNet" は画像内から「人物」「顔」「バッグ」の 合計3クラス の物体を検索し、検出できた物体の場所を表す情報を 「特定のグリッドを中心としたBoundingBox (LEFT, TOP, RIGHT, BOTTOM)」 として出力するニューラルネットワークモデルであることがわかりました。 さらに、検出された物体が複数重なっている場合でも"同一グリッド"上に複数のBoundingBoxの情報としてOne-Hot Encodingにて管理されるようです。つまり1個の座標に3クラス分の(LEFT, TOP, RIGHT, BOTTOM)の値、合計12個の数値が保持される可能性があるということです。 なお、ここで扱う 「グリッド」 とは画像を16px x 16pxで分割した際の交点です。グリッドで入力テンソル(画像)のサイズ960px x 544pxを分割すると "60Grid x 34Grid" として出力テンソルのShapeとなります。なお、BoundingBoxの大きさは "35px = 1.0" としてNormalizeされた長さで出力テンソル内に保持されるようです(参考としたソースコードより)。
GridとBoundingBoxの関係
上記を図で表すと以下のようになります。60Grid x 34Grid に対して、まず、 (1, 34, 60, 3) のOne-Hot Encodingによるクラス確率を保持した出力テンソルから確率を参照し、クラス確率が一定以上となっている物体を検出できたGridを特定します。そして特定したGridに対して 確率の高いクラスについてのBoundingBox情報を (1, 34, 60, 12) の出力テンソルの ,12) より1クラス分 ,4) を切り抜きます。
抽出したBoundingBox情報は、そのGridの中心座標に対する、4要素 ,4) (LEFT, TOP, RIGHT, BOTTOM)のオフセット値です。そのため、 Gridの中心(正確には0.5ズレた座標) に対して (LEFT, TOP)なら減算 、(RIGHT, BOTTOM)なら加算 することにより、Normalizedされた座標系におけるBoundingBoxを入手できます。 最後にこれらの値に対して 1.0 = 35px というNormalizationに使用されている係数を掛け合わせることで、ピクセル単位のBoundingBox(int型)を算出することができます。
入力テンソルと出力テンソルの仕様
出力テンソルは2系統あり、それぞれがクラス確率とBoundingBoxの座標を保持しています。
Netronでテンソルを確認してみよう
ニューラルネットワークモデルをNetronで可視化することにより、これらの 入力/出力テンソルのShapeを確認 することができます。上記で述べた通りに (1, 544, 960, 3) から (1, 34, 60, 3) と (1, 34, 60, 12) が出力されていることがわかります。
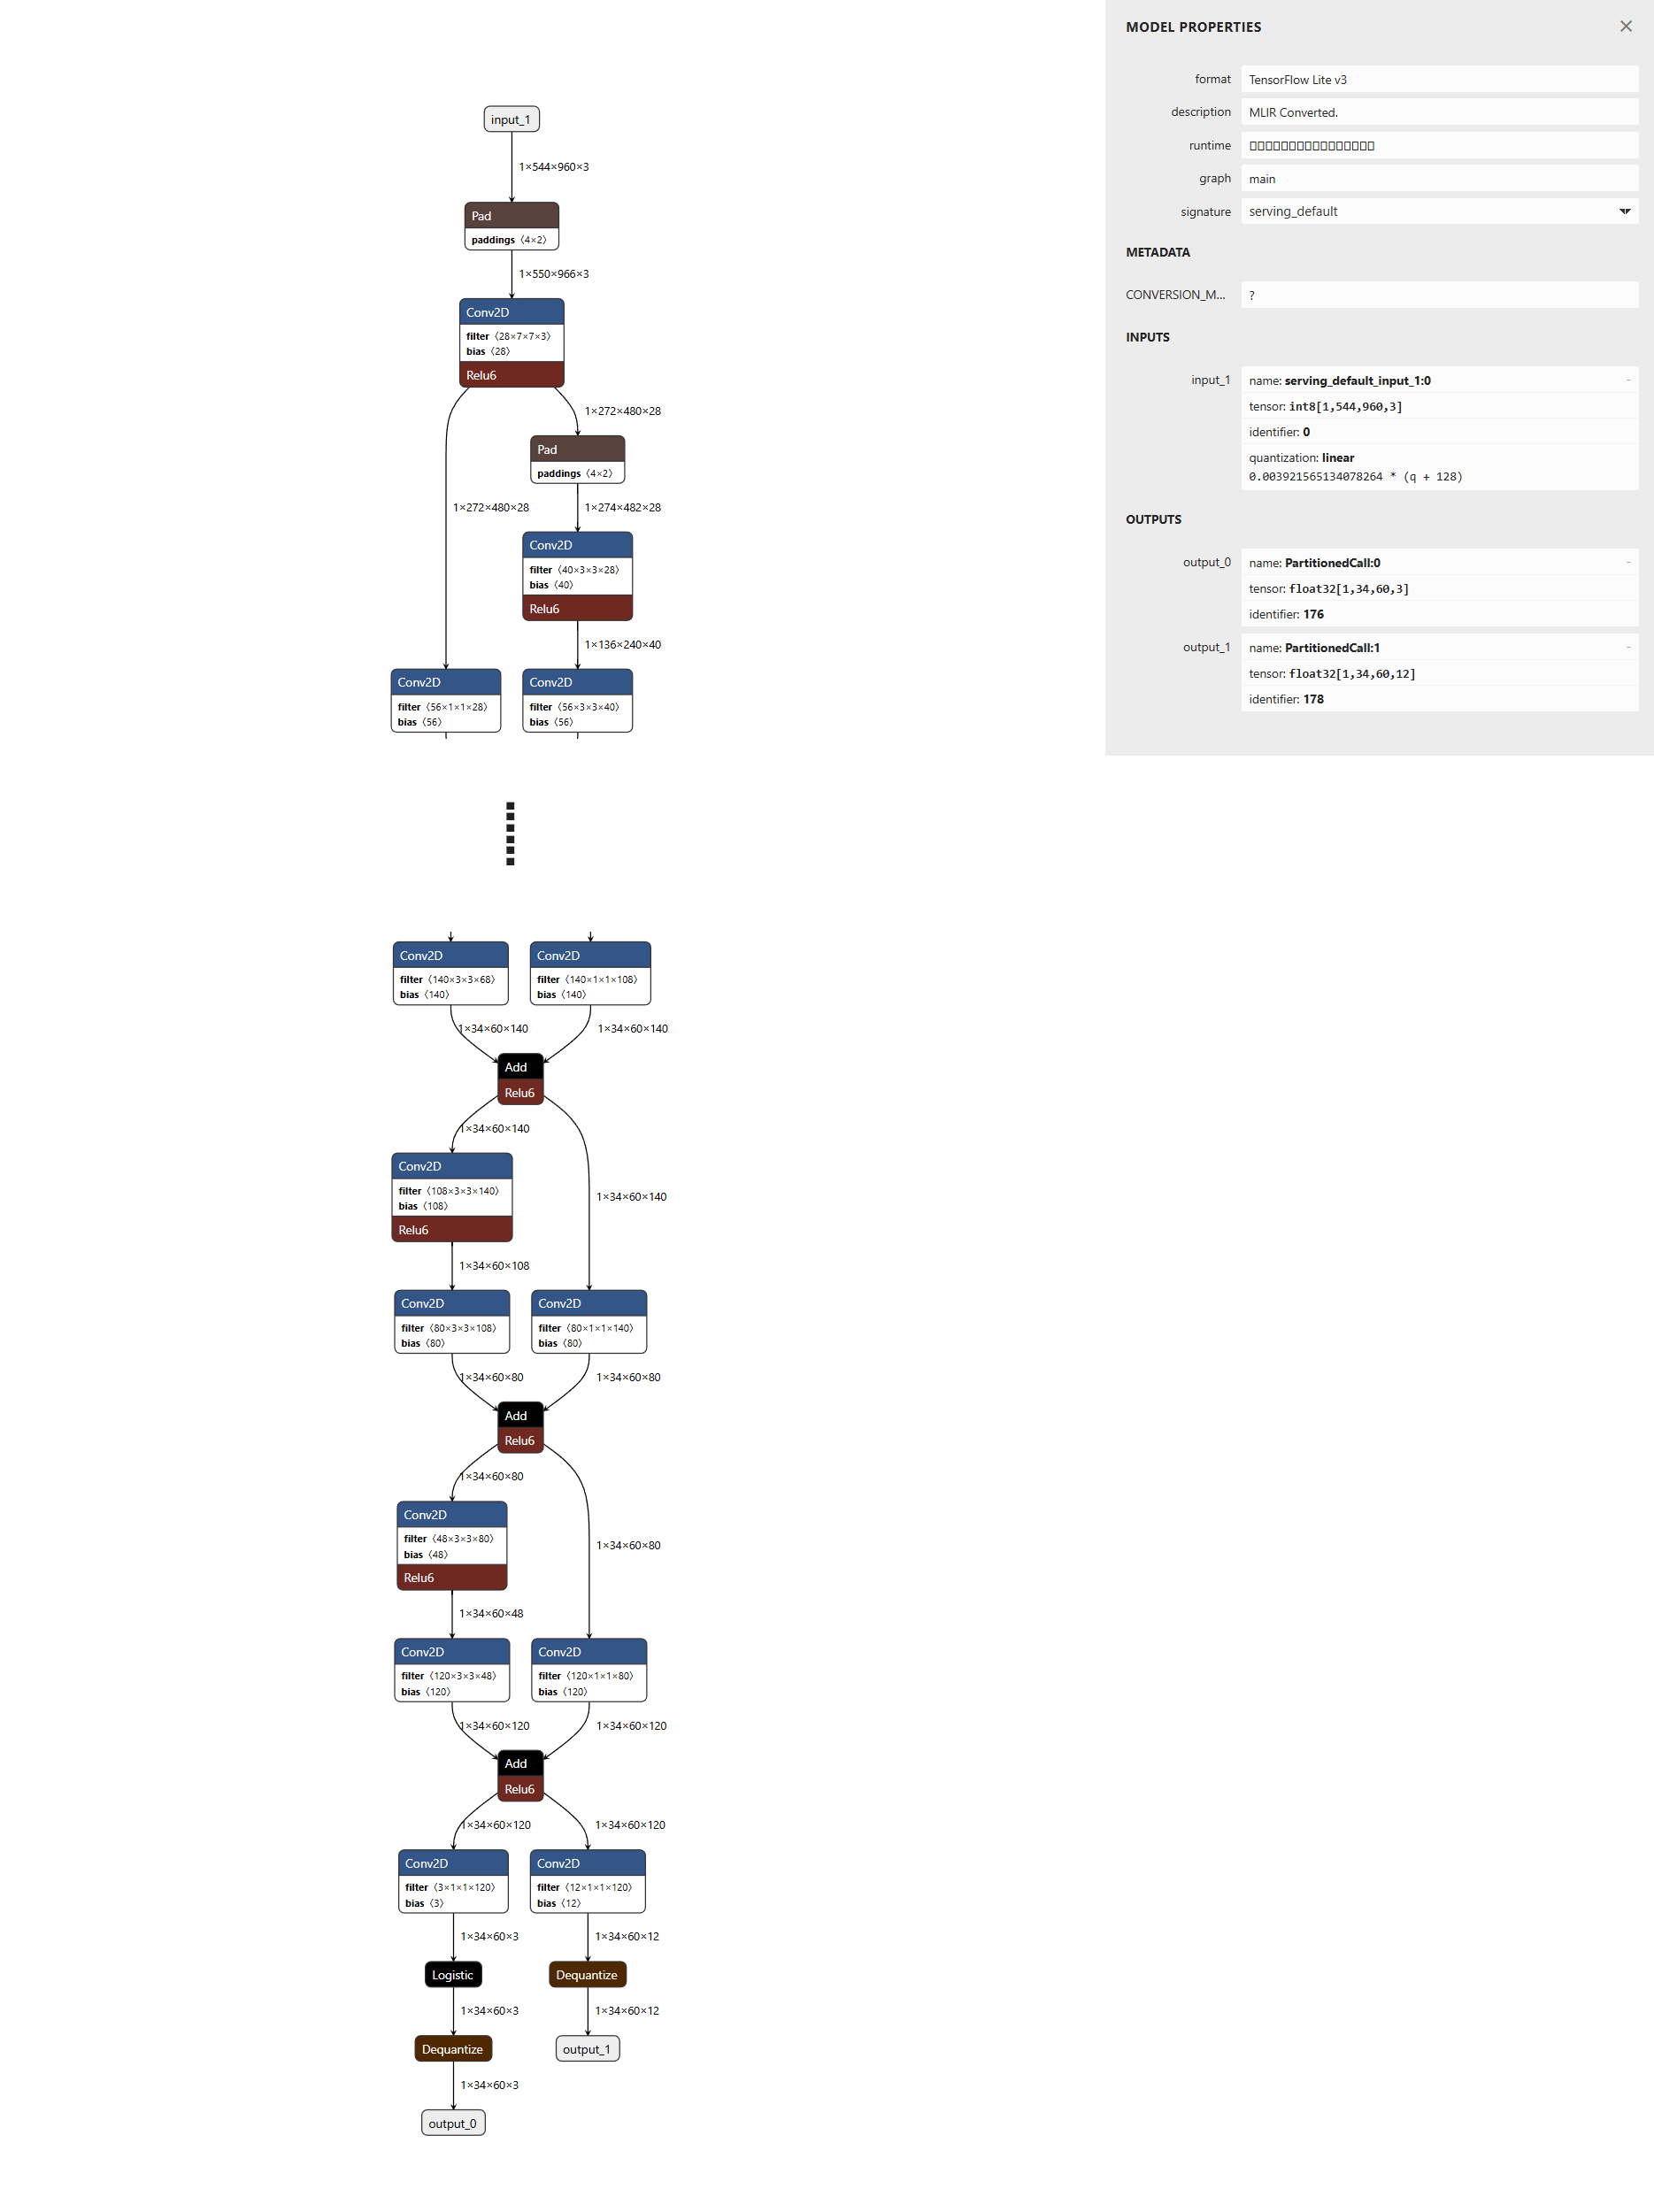
class (output_0)
出力の1系統目は "各グリッドが保持するBoundingBoxの情報"に対する「3クラスそれぞれの確率(One-Hot Encoding)」を保持 しています。そのため、横幅=60Grid/縦幅=34Gridのグリッド構成と合わせて、出力テンソルのShapeは (1, 34, 60, 3) となります。
boundingbox (output_1)
出力の2系統目は "各グリッドを中心としたBoundingBoxの(LEFT, TOP, RIGHT, BOTTOM)" をクラス3つそれぞれに対して保持 しています。このFeatureMapは「3クラス分」の「LEFT, TOP, RIGHT, BOTTOM」の情報を保持するため、12要素から構成され、横幅=60Grid/縦幅=34Gridのグリッド構成と合わせて、出力テンソルのShapeは (1, 34, 60, 12) となります。
入力テンソル (input : RGB-image)
PeopleNetの入力テンソルは「960px x 544pxの3Channel=RGB形式の画像です(OpenCVが保持するBGR形式でない)。ニューラルネットワークに対して 量子化などを適用している場合 は、入力テンソルの型は int8 (-128〜127) uint8 (0〜255) float16 (0.0〜1.0) float32 (0.0〜1.0) のいずれかになります。 本記事が以降に示すプログラムは入力テンソルの型が int8 となるように量子化したTensorFlow Lite形式のモデルを利用しています。
### Load Image
img = cv2.imread("input.jpg")
### image information
height, width, channel = img.shape

### Resize and convert to int8
img_resized = cv2.resize(img, (960, 544))
img_rgb = cv2.cvtColor(img_resized, cv2.COLOR_BGR2RGB)
# uint8
print(img_rgb.dtype)
# 255 / 0
print(img_rgb.max(), img_rgb.min())
img_signed_int8 = img_rgb - 128
### make Input Tensor
predict_img = np.expand_dims(img_signed_int8, axis=0).astype("int8")
# int8
print(predict_img.dtype)
# 127 / -128
print(predict_img.max(), predict_img.min())
# (1, 544, 960, 3)
print(predict_img.shape)
本記事内で扱う入力テンソルが int8 に量子化された "PeopleNet"のTensorFlow Lite形式のモデルを入手・生成する方法については以下の記事をご参照ください
入力画像に対して得ることのできた出力画像
本記事の末尾に掲載するソースコードにより以下の入力画像に対して推論を実施した結果、以下の出力画像を得ることができました。
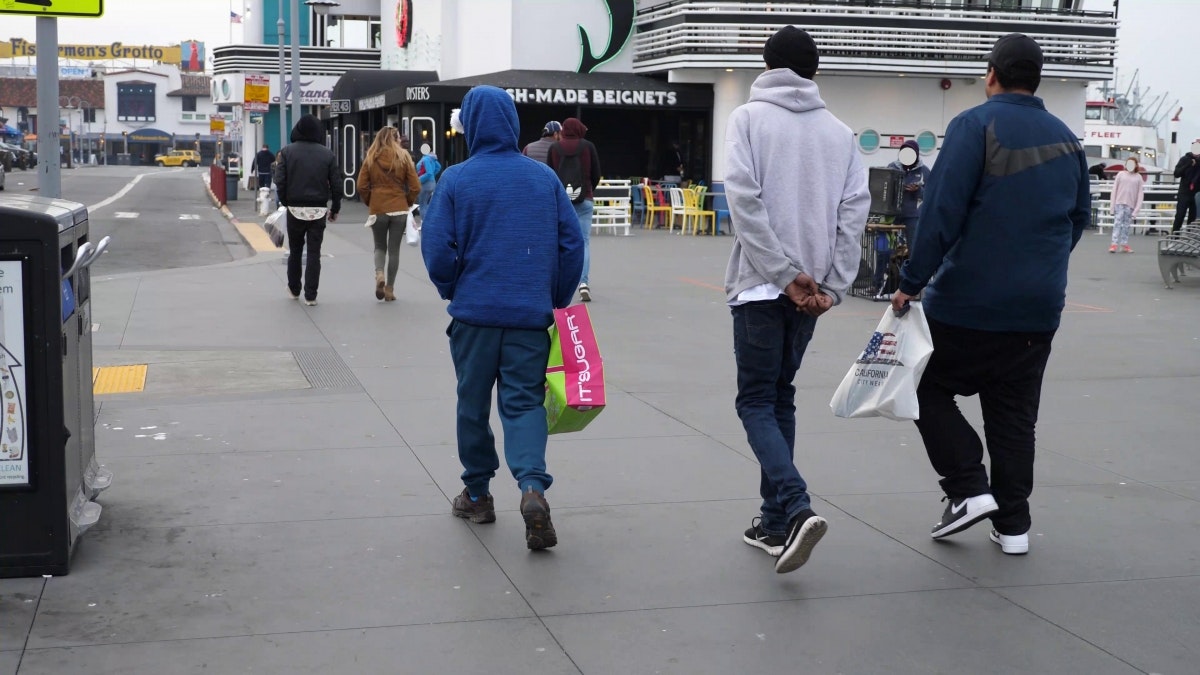
入力画像 (input.jpg)
出力画像 (output.jpg)
以上がPeopleNetの出力テンソルからBoundingBoxを生成する手順となります。
実際のソースコードは本記事の末尾に掲載します。
是非ご活用ください!ありがとうございました!
PeopleNetの出力テンソルをBoundingBox情報へと変換して画像中に描画するサンプルプログラム
PeopleNetのTensorFlow Liteモデルを生成する方法については別途記事を準備します。
Pythonの実装例
import tensorflow as tf
import matplotlib.pyplot as plt
import numpy as np
import cv2

######
### Generate Input Tensor
######
### Load Image
img = cv2.imread("input.jpg")
### image information
height, width, channel = img.shape

### Resize and convert to int8
img_resized = cv2.resize(img, (960, 544))
img_rgb = cv2.cvtColor(img_resized, cv2.COLOR_BGR2RGB)
# uint8
print(img_rgb.dtype)
# 255 / 0
print(img_rgb.max(), img_rgb.min())
img_signed_int8 = img_rgb - 128
### make Input Tensor
predict_img = np.expand_dims(img_signed_int8, axis=0).astype("int8")
# int8
print(predict_img.dtype)
# 127 / -128
print(predict_img.max(), predict_img.min())
# (1, 544, 960, 3)
print(predict_img.shape)

######
### Load TFLite model
######
interpreter = tf.lite.Interpreter(model_path="resnet34_peoplenet_int8.tflite")
interpreter.allocate_tensors()
input_details = interpreter.get_input_details()
output_details = interpreter.get_output_details()

print(input_details)
# [{'name': 'serving_default_input_1:0', 'index': 0, 'shape': array([  1, 544, 960,   3], dtype=int32), 'shape_signature': array([  1, 544, 960,   3], dtype=int32), 'dtype': <class 'numpy.int8'>, 'quantization': (0.003921565134078264, -128), 'quantization_parameters': {'scales': array([0.00392157], dtype=float32), 'zero_points': array([-128], dtype=int32), 'quantized_dimension': 0}, 'sparsity_parameters': {}}]
print(output_details)
# [{'name': 'PartitionedCall:1', 'index': 178, 'shape': array([ 1, 34, 60, 12], dtype=int32), 'shape_signature': array([ 1, 34, 60, 12], dtype=int32), 'dtype': <class 'numpy.float32'>, 'quantization': (0.0, 0), 'quantization_parameters': {'scales': array([], dtype=float32), 'zero_points': array([], dtype=int32), 'quantized_dimension': 0}, 'sparsity_parameters': {}}, {'name': 'PartitionedCall:0', 'index': 176, 'shape': array([ 1, 34, 60,  3], dtype=int32), 'shape_signature': array([ 1, 34, 60,  3], dtype=int32), 'dtype': <class 'numpy.float32'>, 'quantization': (0.0, 0), 'quantization_parameters': {'scales': array([], dtype=float32), 'zero_points': array([], dtype=int32), 'quantized_dimension': 0}, 'sparsity_parameters': {}}]

# set input
interpreter.set_tensor(input_details[0]['index'], predict_img)

######
### infer (invoke)
######
interpreter.invoke()

# get output
output_data_bbox = interpreter.get_tensor(output_details[0]['index'])
output_data_class = interpreter.get_tensor(output_details[1]['index'])

### check Output[0] (for bbox?)
# (1, 34, 60, 12)
print(output_data_bbox.shape)
print(output_data_bbox)

### check Output[1] (for class?)
# (1, 34, 60, 3)
print(output_data_class.shape)
print(output_data_class)

print(output_data_class.max(), output_data_class.min()) # 0.5 0.0

######
### reference
######
# -->> https://github.com/patterson163/TensorRT-PeopleNet/blob/master/sources/main.py
# -->> https://github.com/Kwull/deepstream-4.0.1/blob/master/sources/libs/nvdsinfer_customparser/nvdsinfer_custombboxparser.cpp

class PeopleNetPostProcess(object):
    def __init__(self, width, height, score_threshold=0.5):
        self.image_width = width
        self.image_height = height

        self.model_h = 544
        self.model_w = 960

        self.strideX = 16.0
        self.strideY = 16.0

        self.bboxNormX = 35.0
        self.bboxNormY = 35.0

        self.grid_h = int(self.model_h / self.strideY)
        self.grid_w = int(self.model_w / self.strideX)
        self.grid_size = self.grid_h * self.grid_w
        # debug
        print(self.grid_h, self.grid_w, self.grid_size)

        ### make Grid Information
        self.grid_centers_w = []
        self.grid_centers_h = []

        for i in range(self.grid_h):
            value = (i * self.strideY + 0.5) / self.bboxNormY
            self.grid_centers_h.append(value)

        for i in range(self.grid_w):
            value = (i * self.strideX + 0.5) / self.bboxNormX
            self.grid_centers_w.append(value)

        # debug
        print(self.grid_centers_h)
        print(self.grid_centers_w)

        ### thresholds
        self.min_confidence = score_threshold
        self.num_of_totalclasses = 3

    def applyBoxNorm(self, o1, o2, o3, o4, w, h):
        o1 = (self.grid_centers_w[w] - o1) * self.bboxNormX
        o2 = (self.grid_centers_h[h] - o2) * self.bboxNormY
        o3 = (o3 + self.grid_centers_w[w]) * self.bboxNormX
        o4 = (o4 + self.grid_centers_h[h]) * self.bboxNormY
        return o1, o2, o3, o4

    def change_model_size_to_real(self, model_size, type):
        real_size = 0
        if type == 'x':
            real_size = (model_size / float(self.model_w)) * self.image_width
        elif type == 'y':
            real_size = (model_size / float(self.model_h)) * self.image_height
        real_size = int(real_size)
        return real_size

    def start(self, feature_bbox, feature_scores, classes=[0]):
        boundingboxes = []
        self.analysis_classeds = classes

        ### for each-class
        for c in self.analysis_classeds: #range(self.num_of_totalclasses):
            ### search in Grid HxW
            for h in range(self.grid_h):
                for w in range(self.grid_w):
                    ### check probability
                    class_probability = feature_scores[h][w][c]
                    if class_probability >= self.min_confidence:
                        # get Bounding Box Info (for-all classes)
                        bbox_raw = feature_bbox[h][w]
                        # for Single-Class
                        bbox_idx_start = c * 4
                        bbox_idx_end = (c+1) * 4
                        bbox_part = bbox_raw[bbox_idx_start:bbox_idx_end]
                        # print Bounding Box Info
                        print(h, w, c, bbox_part)
                        ### get Offset BBOX from Center of Grid
                        o1, o2, o3, o4 = bbox_part
                        # grid-center - o1 = LEFT
                        # grid-center + o3 = RIGHT
                        # grid-center - o2 = TOP
                        # grid-center + o4 = BOTTOM
                        ### get POS BBOX for resized image
                        o1, o2, o3, o4 = self.applyBoxNorm(o1, o2, o3, o4, w, h)
                        xmin_model = int(o1)
                        ymin_model = int(o2)
                        xmax_model = int(o3)
                        ymax_model = int(o4)
                        # print Normalized Bounding Box
                        print(h, w, c, xmin_model, ymin_model, xmax_model, ymax_model)
                        ### get POS BBOX for non-resized (original) image
                        xmin_image = self.change_model_size_to_real(xmin_model, 'x')
                        ymin_image = self.change_model_size_to_real(ymin_model, 'y')
                        xmax_image = self.change_model_size_to_real(xmax_model, 'x')
                        ymax_image = self.change_model_size_to_real(ymax_model, 'y')
                        # print Normalized Bounding Box
                        print(h, w, c, xmin_image, ymin_image, xmax_image, ymax_image)
                        # Put BoundingBox
                        boundingbox = (xmin_image, ymin_image, xmax_image, ymax_image)
                        boundingboxes.append(boundingbox)

        return boundingboxes

### call decoder
post_process = PeopleNetPostProcess(width, height)
boundingboxes = post_process.start(output_data_bbox[0], output_data_class[0], classes=[0, 1, 2])

for bbox in boundingboxes:
    left, top, right, bottom = bbox
    cv2.rectangle(img, (left, top), (right, bottom), (0, 0, 255), 2)

cv2.imwrite('output.jpg', img)
記事は以上となります!お疲れ様でした!