※本記事は、MediaTek社の公開するドキュメントを参考に、下記の記事で扱うTensorFlow Lite形式のモデルを生成する手順についてまとめたものです。モデルの利用方法については下記の記事をご参照ください。
人物検出モデル "PeopleNet" をNGC Model Catalogから取得して、量子化されたTensorFlow Lite形式のニューラルネットワークモデルを生成する手順
多くの組み込みAI、いわゆるエッジAIの領域では、推論をする際、フットプリントが大きめとなっているTensorFlowやPyTorchをそのまま動かすのではなく、 エッジに最適化された実行プラットフォームである「onnxruntime」により量子化されたONNX形式のモデルを実行したり、「tflite_runtime」によりONNX以上にハードウェアに最適化されたTensorFlow Lite形式のモデルを実行することが一般的です。 そこで、本記事では、NGC Model Catalogより入手したPeopleNetのモデルをTensorFlow Lite形式へと変換する方法について解説いたします。

なお、本記事は下記のWebサイトの手順を参考にしました。
生成したTensorFlow Lite形式のモデルは以下の手順により利用することができます。
TensorFlow Lite形式のモデルを生成する
それではNGC Model Catalogからモデルを取得してから、これを量子化されたコンパクトなTensorFlow Lite形式のニューラルネットワークモデルへ変換するまでの流れを見ていきましょう。実行にはPythonの環境が必要となります。
NGC Model CatalogからONNX形式のモデルを取得する
まず、以下を実行し、NGCからONNX形式のPeopleNetのモデルを入手します。
### 作業ディレクトリを作成する
$ mkdir -p sandbox/python/peoplenet_onnx_to_tflite

### PeopleNetのONNX形式のモデルを入手する (プルーニング済み)
$ wget --content-disposition 'https://api.ngc.nvidia.com/v2/models/org/nvidia/team/tao/peoplenet/pruned_quantized_decrypted_v2.3.3/files?redirect=true&path=resnet34_peoplenet_int8.onnx' -O resnet34_peoplenet_int8.onnx

### 取得したファイルを確認する
$ ls
# resnet34_peoplenet_int8.onnx
Pythonの仮想環境を作成する
次に、ONNX形式やTensorFlow Lite形式などを扱うためのPythonの仮想環境を、Pythonの提供する「venv」の機能により作成します。 Anacondaを利用している場合は conda deactivate を実行して仮想環境から抜けてください。
### Anacondは利用しない
(base) $ conda deactivate

### Python3-venvを利用して環境を構築する
$ sudo apt install python3.10-venv

### Pythonの仮想環境 "venv" を作業ディレクトリ上に作成する
$ python3 -m venv venv

### "venv"を有効化する
$ . ./venv/bin/activate

### 必要なパッケージをインストールする
$ pip install onnxruntime
$ pip install onnx
$ pip install onnx2tf
$ pip install tensorflow
$ pip install tf-keras
$ pip install onnx_graphsurgeon
$ pip install sng4onnx
$ pip install tensorboard
$ pip install pandas
$ pip install matplotlib
$ pip install scikit-learn
$ pip install numpy
$ pip install ipykernel
$ pip install opencv-python
TensorFlow Lite形式のPeopleNetを生成する
それでは、構築したPythonの仮想環境内で、モデルを変換していきましょう。
入力テンソルを固定化する(バッチサイズを固定する)
まず、以下のコマンドを実行し、入出力のshapeを固定化します。本処理を行うことにより、推論時のバッチサイズが"1"に固定されます。 input.shape = (1,3,544,960)
### モデルの入力shapeを固定化する
$ python -m onnxruntime.tools.make_dynamic_shape_fixed --input_name input_1:0 --input_shape 1,3,544,960 resnet34_peoplenet_int8.onnx resnet34_peoplenet_int8_fixed.onnx

### 固定化されたモデルができていることを確認する
$ ls resnet34_peoplenet_int8_fixed.onnx
# resnet34_peoplenet_int8_fixed.onnx
suffixを除去する
次に、以下の手順でONNX形式のモデルに含まれたSuffixという情報を除去します。
### suffixを除去するPythonスクリプトを作成する
$ vim remove_suffix.py

### suffixを削除する
$ python remove_suffix.py resnet34_peoplenet_int8_fixed.onnx resnet34_peoplenet_int8_mod.onnx
# graph_input_names = ['input_1:0']
# graph_output_names = ['output_cov/Sigmoid:0', 'output_bbox/BiasAdd:0']

$ ls
# remove_suffix.py
# resnet34_peoplenet_int8.onnx
# resnet34_peoplenet_int8_fixed.onnx
# resnet34_peoplenet_int8_mod.onnx
# venv
### -->> remove_suffix.py

import onnx
import sys

def remove_suffix_from_names(model_path, output_model_path, suffix=':0'):
    # Load the ONNX model
    onnx_model = onnx.load(model_path)

    # Get input and output names to remove the suffix from
    graph_input_names = [input.name for input in onnx_model.graph.input]
    graph_output_names = [output.name for output in onnx_model.graph.output]

    print('graph_input_names =', graph_input_names)
    print('graph_output_names =', graph_output_names)

    # Remove suffix from input names
    for input in onnx_model.graph.input:
        input.name = input.name.removesuffix(suffix)

    # Remove suffix from output names
    for output in onnx_model.graph.output:
        output.name = output.name.removesuffix(suffix)

    # Remove suffix from node input and output names
    for node in onnx_model.graph.node:
        for i in range(len(node.input)):
            if node.input[i] in graph_input_names:
                node.input[i] = node.input[i].removesuffix(suffix)

        for i in range(len(node.output)):
            if node.output[i] in graph_output_names:
                node.output[i] = node.output[i].removesuffix(suffix)

    # Save the modified ONNX model
    onnx.save(onnx_model, output_model_path)

if __name__ == "__main__":
    if len(sys.argv) != 3:
        print("Usage: python3 script.py <input_model.onnx> <output_model.onnx>")
        sys.exit(1)

    input_model_path = sys.argv[1]
    output_model_path = sys.argv[2]

    remove_suffix_from_names(input_model_path, output_model_path)
ONNX形式からTensorFlow形式(not-TensorFlow Lite)へと変換する
onnx2tf コマンドを利用して、ONNX形式のモデルをTensorFlow形式に変換します。
### ONNXモデルをTensorFlowモデルに変換する
$ onnx2tf -i resnet34_peoplenet_int8_mod.onnx -oiqt

### 生成されたTensorFlowモデルを確認する
$ ls saved_model/
# assets
# fingerprint.pb
# resnet34_peoplenet_int8_mod_dynamic_range_quant.tflite
# resnet34_peoplenet_int8_mod_float16.tflite
# resnet34_peoplenet_int8_mod_float32.tflite
# resnet34_peoplenet_int8_mod_full_integer_quant.tflite
# resnet34_peoplenet_int8_mod_full_integer_quant_with_int16_act.tflite
# resnet34_peoplenet_int8_mod_integer_quant.tflite
# resnet34_peoplenet_int8_mod_integer_quant_with_int16_act.tflite
# saved_model.pb
# variables
量子化されたTensorFlow Lite形へと変換する
上記手順で生成したTensorFlow形式のモデルを入力として、これに量子化による最適化を加え、TensorFlow Lite形式のモデルとして保存します。
### 量子化されたTensorFlow Liteモデルへと変換する
# 変換スクリプトを作成する
$ vim conv_quantized_tflite.py

### 量子化されたTFLiteモデルを生成する
$ python conv_quantized_tflite.py

### 生成結果を確認する
$ ls *.tflite
# resnet34_peoplenet_int8.tflite
### -->> conv_quantized_tflite.py

import tensorflow as tf
import numpy as np

tf_model_path = './saved_model/'
tflite_model_path = 'resnet34_peoplenet_int8.tflite'

# Generate representative dataset
def representative_dataset():
    data = tf.random.uniform((1,544,960,3))
    yield [data]

converter = tf.lite.TFLiteConverter.from_saved_model(tf_model_path)
converter.optimizations = [tf.lite.Optimize.DEFAULT]
converter.representative_dataset = representative_dataset
### Bug?? "'generator' object is not callable"
# -->> https://stackoverflow.com/questions/12074726/typeerror-generator-object-is-not-callable
# converter.representative_dataset = representative_dataset()
converter.target_spec.supported_ops = [tf.lite.OpsSet.TFLITE_BUILTINS_INT8]
converter.inference_input_type = tf.int8  # Can be tf.uint8, or tf.float32 or tf.float16
converter.inference_output_type = tf.float32  # Can be tf.uint8, tf.int8 or tf.float16. We keep it float32 for ease of post-processing output data

tflite_model = converter.convert()

with open(tflite_model_path, "wb") as f:
    f.write(tflite_model)
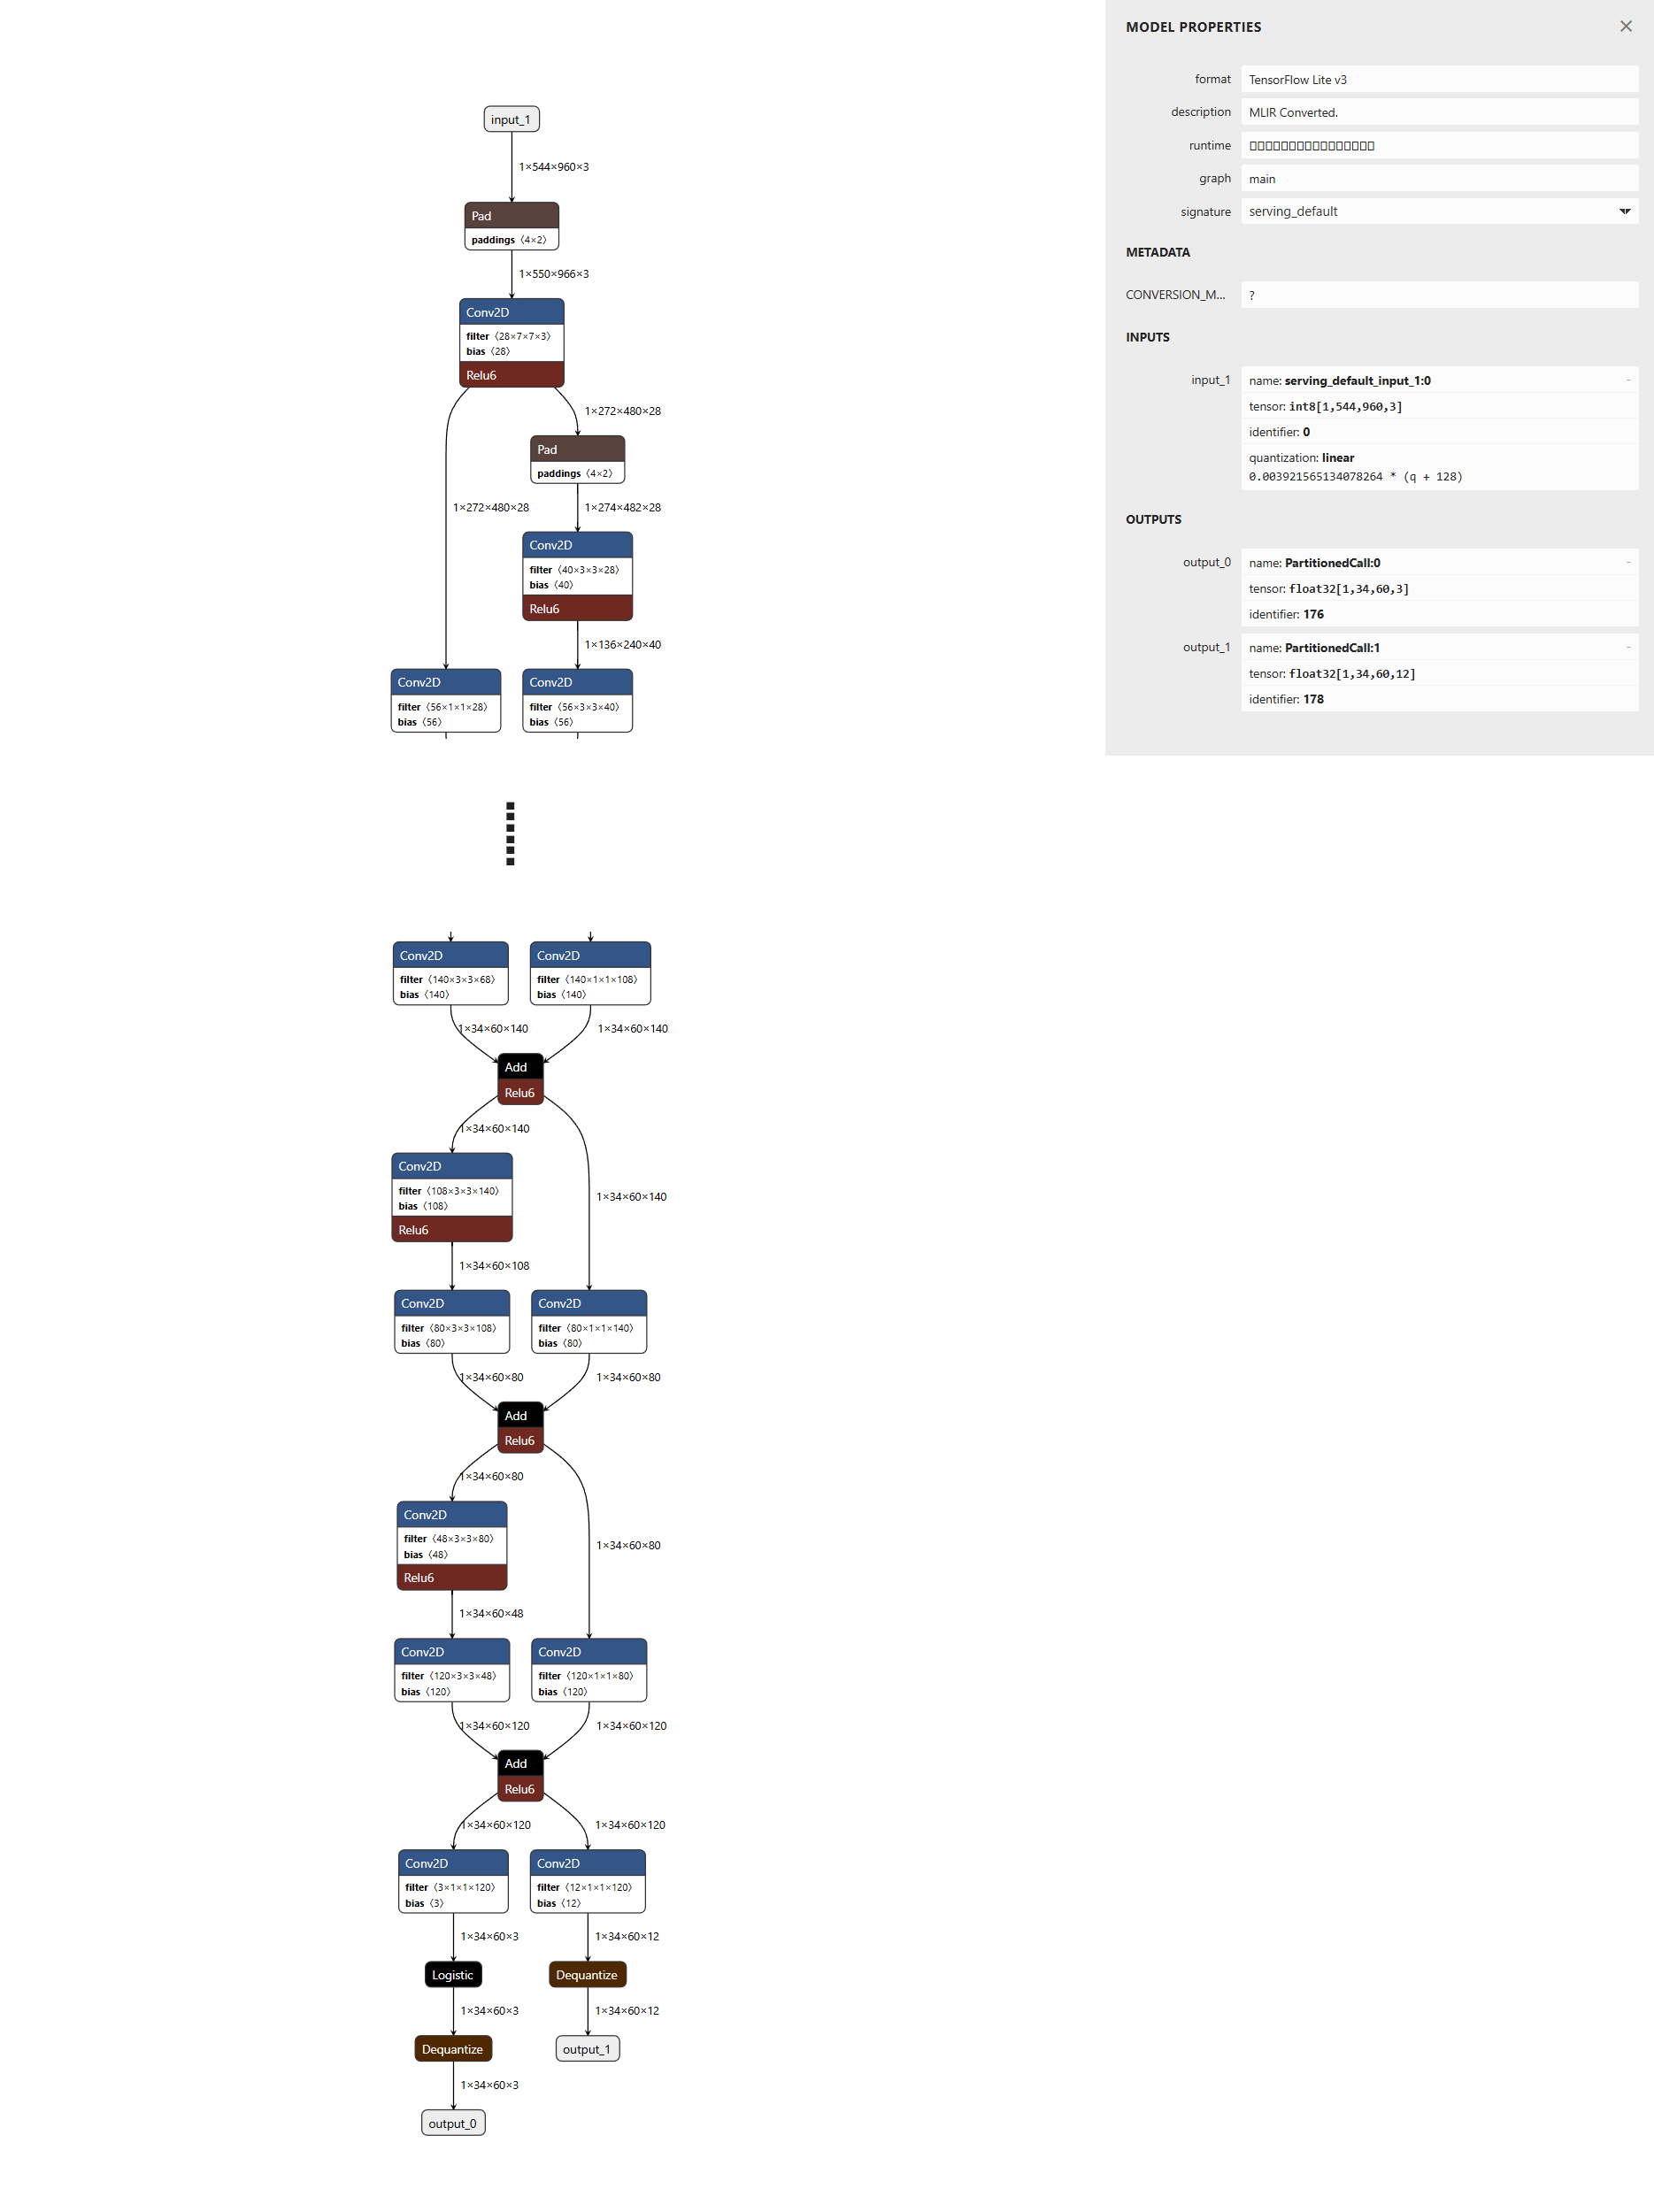
TensorFlow Lite形式のモデルを目視で確認する
生成されたTensorFlow Lite形式のモデルをNetronで可視化します。結果、以下のようにinputが1系統 (1, 544, 960, 3) 、outputが2系統 (1, 34, 60, 3) , (1, 34, 60, 12) あるモデルを確認することができます。
以上の確認が済みましたらTensorFlow Lite形式となった"PeopleNet"を利用することができます。 上記の手順により、入力テンソルは int8(not-uint8) に量子化されており、色の並びはRGB形式を期待しているため、OpenCV等で取得したBGR形式の画像は、以下の手順により "適切な" 入力テンソルの形状に変換してください。
### Load Image
img = cv2.imread("input.jpg")
img = cv2.resize(img, (960, 544))
img_rgb = cv2.cvtColor(img, cv2.COLOR_BGR2RGB)
### image information
height, width, channel = img_rgb.shape

### Resize and convert to int8
# uint8
print(img_rgb.dtype)
# 255 / 0
print(img_rgb.max(), img_rgb.min())
img_signed_int8 = img_rgb - 128
### make Input Tensor
predict_img = np.expand_dims(img_signed_int8, axis=0).astype("int8")
# int8
print(predict_img.dtype)
# 127 / -128
print(predict_img.max(), predict_img.min())
# (1, 544, 960, 3)
print(predict_img.shape)

### -->> predict_img を入力テンソルとして利用する

# ...

interpreter = tf.lite.Interpreter(model_path="resnet34_peoplenet_int8.tflite")
interpreter.allocate_tensors()

# ...

# set input
interpreter.set_tensor(input_details[0]['index'], predict_img)

######
### infer (invoke)
######
interpreter.invoke()

# get output
output_data_bbox = interpreter.get_tensor(output_details[0]['index'])
output_data_class = interpreter.get_tensor(output_details[1]['index'])

# ...
入力テンソルと出力テンソルの処理を含む、TensorFlow Lite形式のモデルを利用する方法とソースコード全文については下記の記事をご参照ください。

以上が、NGC Model Catalogから入手したONNX形式のPeopleNetモデルをTensorFlow Lite形式へと変換する手順となります。他のモデルの場合も大きな手順の変更はありませんので、本記事が何かの参考になれば幸いです。
お付き合いありがとうございました!
お疲れ様でした!