はじめに
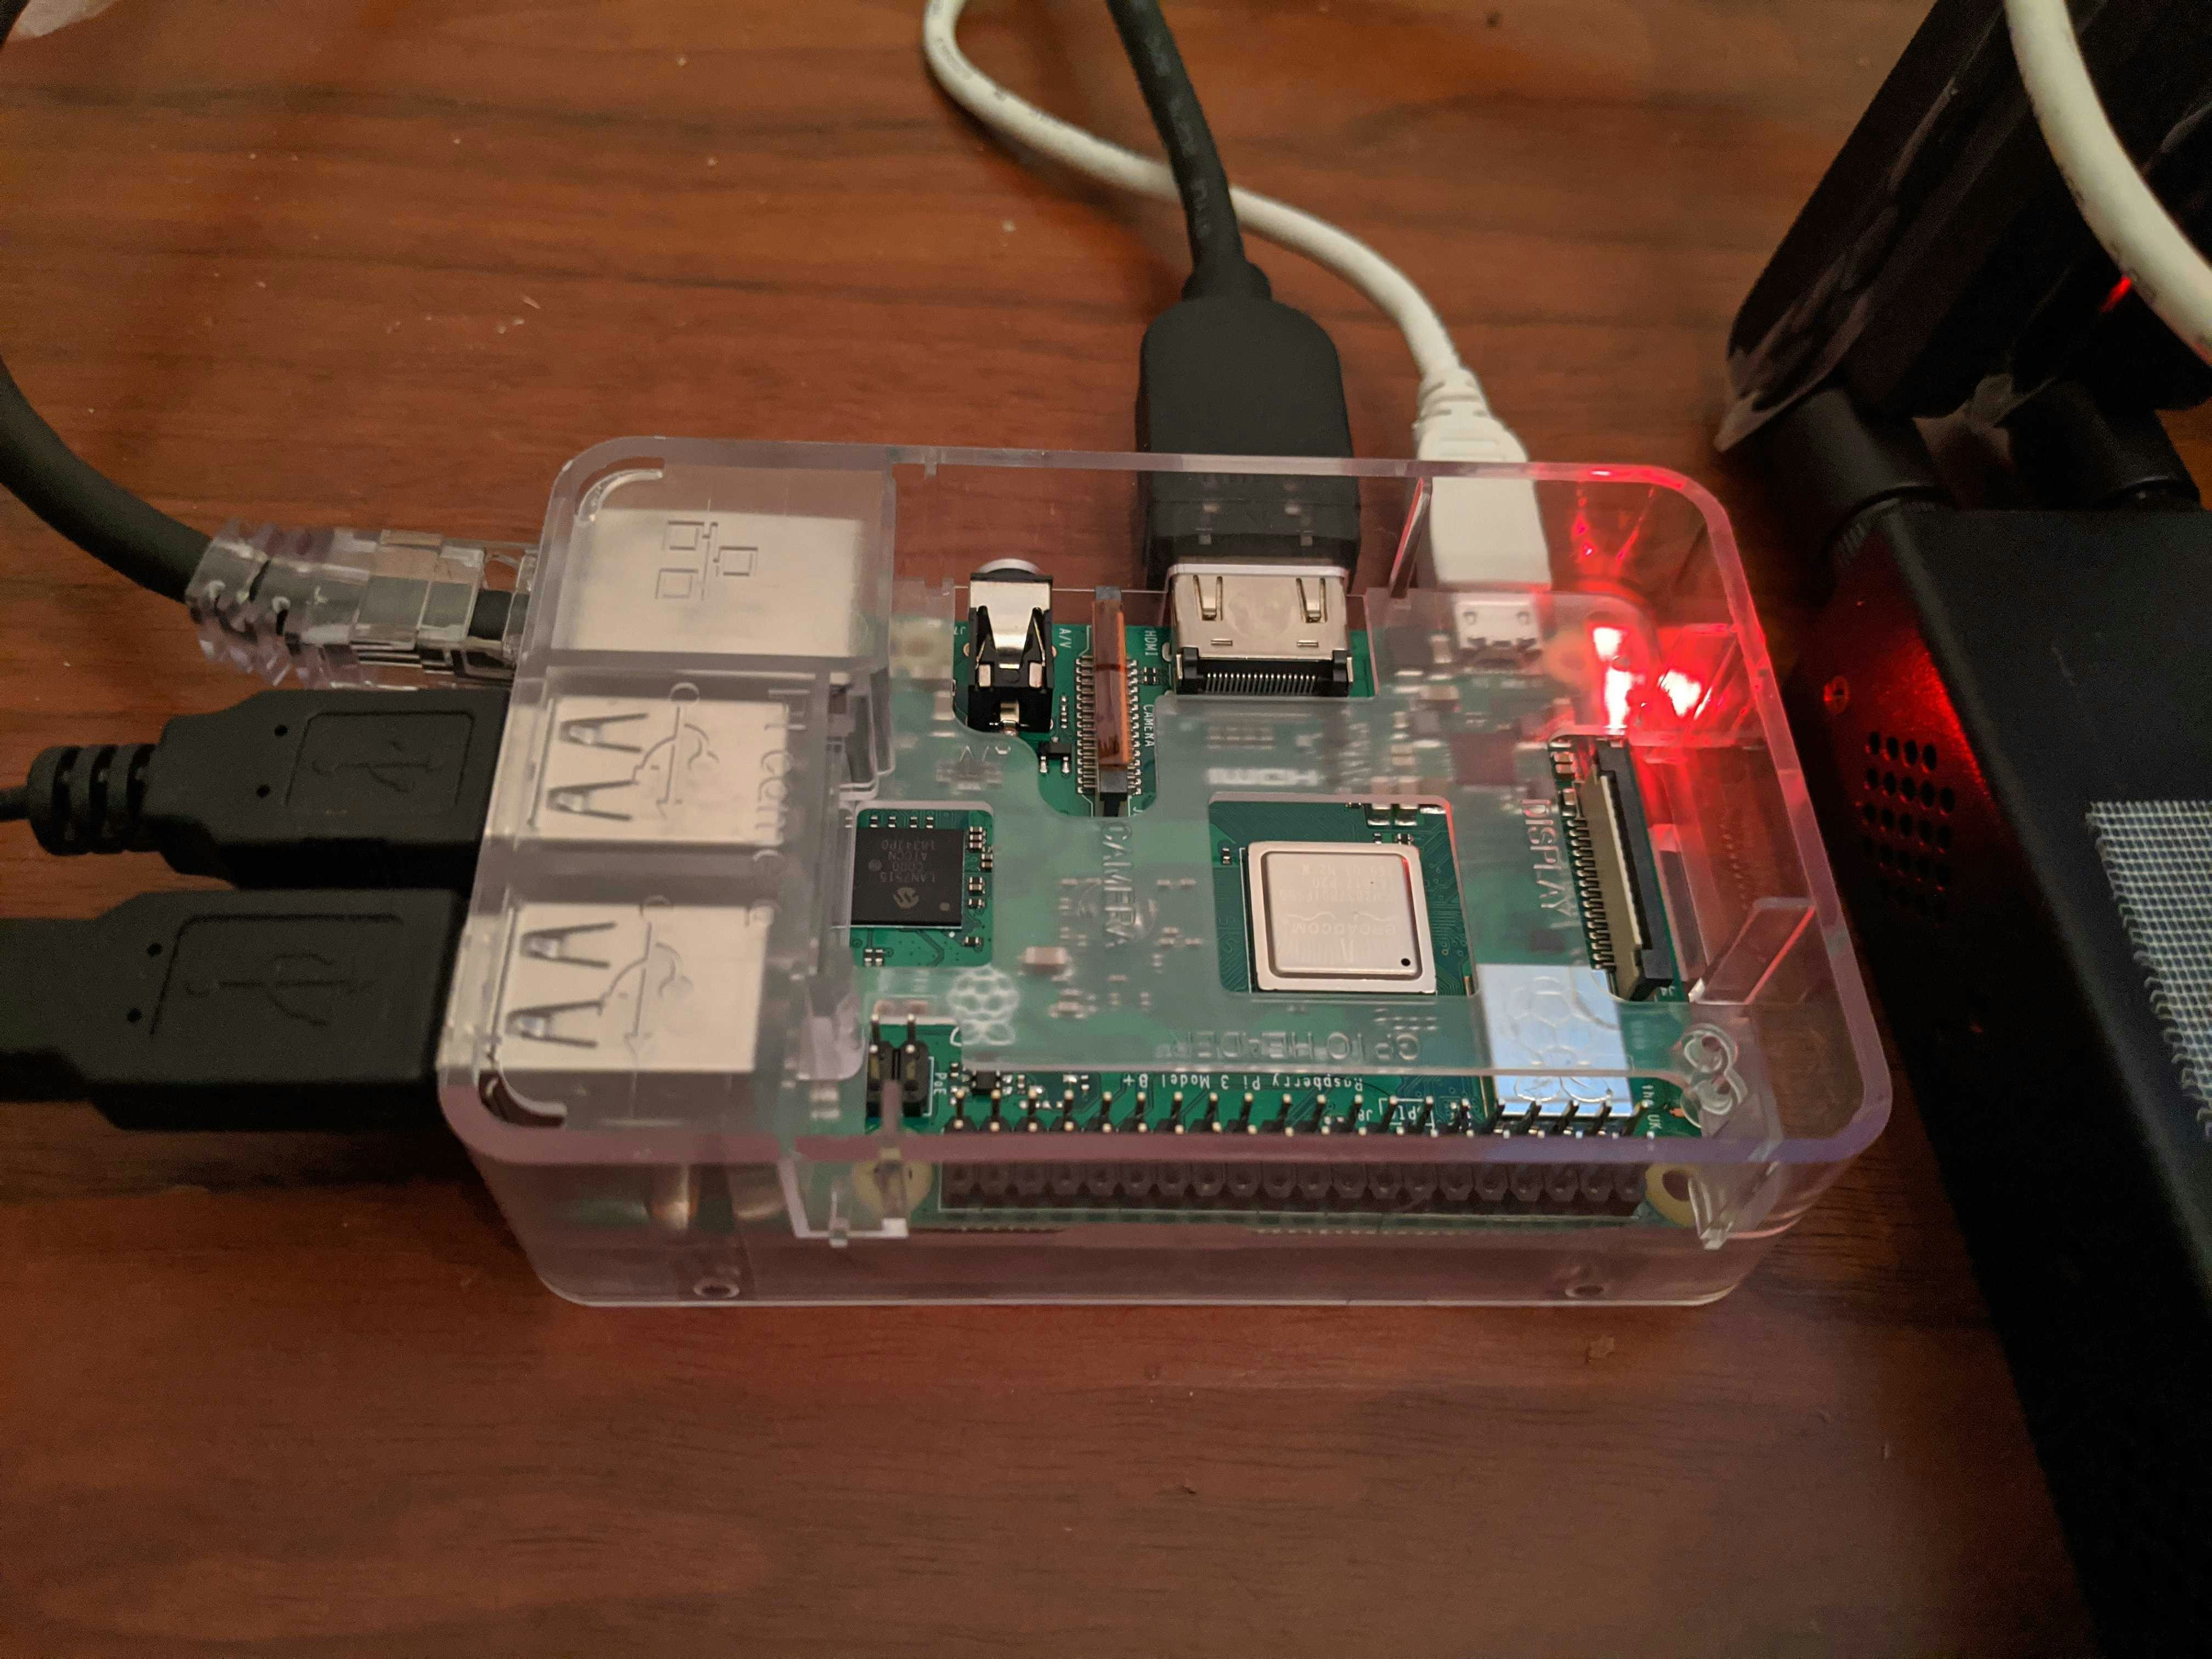
タイトルの通りではありますが、RaspberryPiを活用してCaptivePortal付きのWifiAPを作成したので、その手順等をまとめます。今回は、RaspberryPi 3 ModelB+にRaspbianを載せた状態からスタートしました。
- 今回の手順
-
- RaspberryPiのWifiAP化
-
- Captive Portalの構築
-
- 通信履歴をBigQueryに格納
-
※ At your own risk。本番ユースケース等は想定していません。また、悪用厳禁で。
手順
①RaspberryPiのWifiAP化

本体の初期設定
- SSHサーバーをON (任意)
pi@raspberrypi:~ $ sudo apt intall raspi-config
- VIM等、作業に必要な物を入れておく
pi@raspberrypi:~ $ sudo apt intall vim
Network Interfaceの設定
本来、dhcpcdというデーモンが入っており、そちらにインターフェースの設定をするのが主流(?)感あります。それを使って設定しても良いですが、dhcpcdとWifiAP構築に必要なデーモンの相性問題(起動順序問題)にぶつかった為、今回はdhcpcdを使わずにIPアドレスの設定をしました。 (dhcpdは、/etc/network/interfacesの設定値を検出してエラー状態になりますが。。)
- eth0 (インターネット側)
- IP: 192.168.10.200
- Netmask: 255.255.255.0
- Gateway: 192.168.10.1
- DNS: 8.8.8.8
- wlan0 (無線AP用)
- IP: 172.16.0.1
- Netmask: 255.255.0.0
# interfaces(5) file used by ifup(8) and ifdown(8)

# Please note that this file is written to be used with dhcpcd
# For static IP, consult /etc/dhcpcd.conf and 'man dhcpcd.conf'

# Include files from /etc/network/interfaces.d:
source-directory /etc/network/interfaces.d

iface eth0 inet static
address 192.168.10.200
netmask 255.255.255.0
gateway 192.168.10.1
dns-nameservers 8.8.8.8

allow-hotplug wlan0
iface wlan0 inet static
address 172.16.0.1
netmask 255.255.0.0
hostapdの導入&設定
hostapdは一言でいうと、RaspberryPi上のWifiアダプターを親機化する為のソフトです。
pi@raspberrypi:~ $ sudo apt install -y hostapd
下記のように設定ファイルを書くことで、SSIDや認証方式、Wifiパスワード等が設定可能です。
interface=wlan0
driver=nl80211
ssid=_TAGURO_SANZYOU
hw_mode=g
channel=8
wmm_enabled=1
macaddr_acl=0
ieee80211n=1
ht_capab=[HT40-][HT40+][SHORT-GI-20][SHORT-GI-40]
ieee80211ac=0
vht_capab=
ieee80211d=1
country_code=JP
ieee80211h=1
local_pwr_constraint=3
spectrum_mgmt_required=1
auth_algs=1
wpa=2
wpa_key_mgmt=WPA-PSK
rsn_pairwise=CCMP
wpa_passphrase=YOUR_PASSWORD
- SSID: _TAGURO_SANZYOU
- 認証方式: WPA2
- チャンネル: 8
- WMM(WME): 有効 (QoSの規格らしい)
- IEEE802.11関連設定
- IEEE802.11n: 有効化
- 2.4GHz帯・5GHz帯の2つの周波数帯が利用可能な規格
- 今回は、2.4GHz帯を利用 (hw_mode=g)
- Ref: https://www.infraexpert.com/study/wireless15.html
- IEEE802.11ac: 無効化
- 5Ghz帯が利用可能な規格
- Ref: https://www.infraexpert.com/study/wireless49.html
- IEEE 802.11d: 有効化
- 国コードと規制値(利用可能なチャネル・電波の強さ)を通達
- IEEE 802.11h: 有効化
- 5Ghz帯無線LANの共存制御の為の規格。動的周波数選択(DFS)や送信出力制御(TPC)周りの話。
- Raspberry Pi 3 Model B+の場合、5GHz帯も利用可能なのでhw_mode=aの時はケアすべき。
- IEEE802.11n: 有効化
参考: https://qiita.com/JhonnyBravo/items/5df2d9b2fcb142b6a67c
設定が完了したら下記手順で有効化します。
pi@raspberrypi:~ $ sudo systemctl unmask hostapd.service
Removed /etc/systemd/system/hostapd.service.
pi@raspberrypi:~ $ sudo systemctl start hostapd.service
pi@raspberrypi:~ $ sudo systemctl enable hostapd.service
isc-dhcp-serverの導入&設定
下記のようにパッケージを導入します。導入直後は設定が存在しない為、デーモンの起動に失敗します。一旦、stopしておきます。
pi@raspberrypi:~ $ sudo apt-get install -y isc-dhcp-server
pi@raspberrypi:~ $ sudo systemctl stop isc-dhcp-server.service
下記の設定項目を/etc/dhcp/dhcpd.confへ追記。
- DHCPアドレス割当範囲
- 172.16.1.50 〜 172.16.1.100
- DNSサーバー
- 172.16.0.1 (RaspberryPi)
subnet 172.16.0.0 netmask 255.255.0.0 {
   range 172.16.1.50 172.16.1.100;
   option domain-name-servers 172.16.0.1;
   option domain-name "test-ap.com";
   option routers 172.16.0.1;
   interface wlan0;
   option broadcast-address 172.16.255.255;
   default-lease-time 600;
   max-lease-time 7200;
}
wlan0でDHCPサーバーがLISTENするようにします
INTERFACESv4="wlan0"
INTERFACESv6=""
これで設定作業は完了です。下記コマンドで有効化します。
pi@raspberrypi:~ $ sudo systemctl start isc-dhcp-server.service
pi@raspberrypi:~ $ sudo systemctl enable isc-dhcp-server.service
dnsmasqの導入
dnsmasqは簡易DNSサーバーです。
pi@raspberrypi:~ $ sudo apt-get install -y dnsmasq
設定はいくつかすべきかもしれませんが、標準の設定でもそこそこ行けるので、一旦有効化作業のみ実施します。
pi@raspberrypi:~ $ sudo systemctl start dnsmasq.service
pi@raspberrypi:~ $ sudo systemctl enable dnsmasq.service
/etc/rc.localの編集
# !/bin/sh -e
#
# rc.local
#
# This script is executed at the end of each multiuser runlevel.
# Make sure that the script will "exit 0" on success or any other
# value on error.
#
# In order to enable or disable this script just change the execution
# bits.
#
# By default this script does nothing.

# Print the IP address
_IP=$(hostname -I) || true
if [ "$_IP" ]; then
  printf "My IP address is %s\n" "$_IP"
fi

# インターフェースの起動
ifup eth0

# wlan0の省電力モードをOFFにする (不要かもしれない)
sudo iw dev wlan0 set power_save off

# IPv4 Forwardingの有効化
echo 1 > /proc/sys/net/ipv4/ip_forward

# IPマスカレード設定
iptables -F
iptables -X
iptables -P INPUT   ACCEPT
iptables -P OUTPUT  ACCEPT
iptables -P FORWARD ACCEPT
iptables -t nat -A POSTROUTING -o eth0 -j MASQUERADE
iptables -A FORWARD -i eth0 -o wlan0 -m state --state RELATED,ESTABLISHED -j ACCEPT
iptables -A FORWARD -i wlan0 -o eth0 -j ACCEPT

exit 0
※IPv4 Forwarding有効化は、/etc/sysctl.confから設定してもOKです。
接続テスト
RasberryPiを一度再起動すると、設定したSSID名でWifIAPが立ち始めます。

WifiAPに接続後、無事インターネットに出れれば成功です。
トラブルに遭遇した場合、下記に問題があるかもしれません。
-
Wifiに接続できない
- hostpadの状況確認&設定見直し
-
クライアント側にIPアドレスが割り振られていない場合
- DHCPサーバー用デーモンの状況確認&設定見直し
-
IP割当はされているが、インターネットに出れない場合
- IPv4 Forwardingが無効になっている
- IPマスカレードが無効になっている
② Captive Portalの導入

今回、Captive Portal構築にあたって、nodogsplashと呼ばれるOSSを利用します。nodogsplashでは、IPTABLEを書き換えつつ自身がWebInterfaceを持つことで、Wifi接続ユーザーに強制的にWeb画面を使った認証をかける事ができます。
必要パッケージの導入
リポジトリをビルドするにあたって、必要ソフトを導入しておきます。
pi@raspberrypi:~ $ sudo apt install git libmicrohttpd-dev
nodogsplashのビルド
Ref: https://nodogsplashdocs.readthedocs.io/en/stable/compile.html
pi@raspberrypi:~ $ git clone https://github.com/nodogsplash/nodogsplash.git
pi@raspberrypi:~ $ cd nodogsplash/
pi@raspberrypi:~/nodogsplash $ make -j4
pi@raspberrypi:~/nodogsplash $ sudo make install
nodogsplashの設定
GatewayInterface wlan0
GatewayAddress 172.16.0.1
MaxClients 250
AuthIdleTimeout 480
nodogsplashの起動設定
nodogsplashコマンドを実行すると、すぐにバックグラウンドでデーモンが立ち上がります。OS起動時に自動で立ち上げを行わせる為に、下記一行を/etc/rc.localのexit 0の前に挿入します。
nodogsplash
テスト
RaspberryPiを一度再起動し、Wifiに再接続すると下記のような画面が表示されるはずです。(MacとAndroid、iPhoneでも同様の挙動になります)
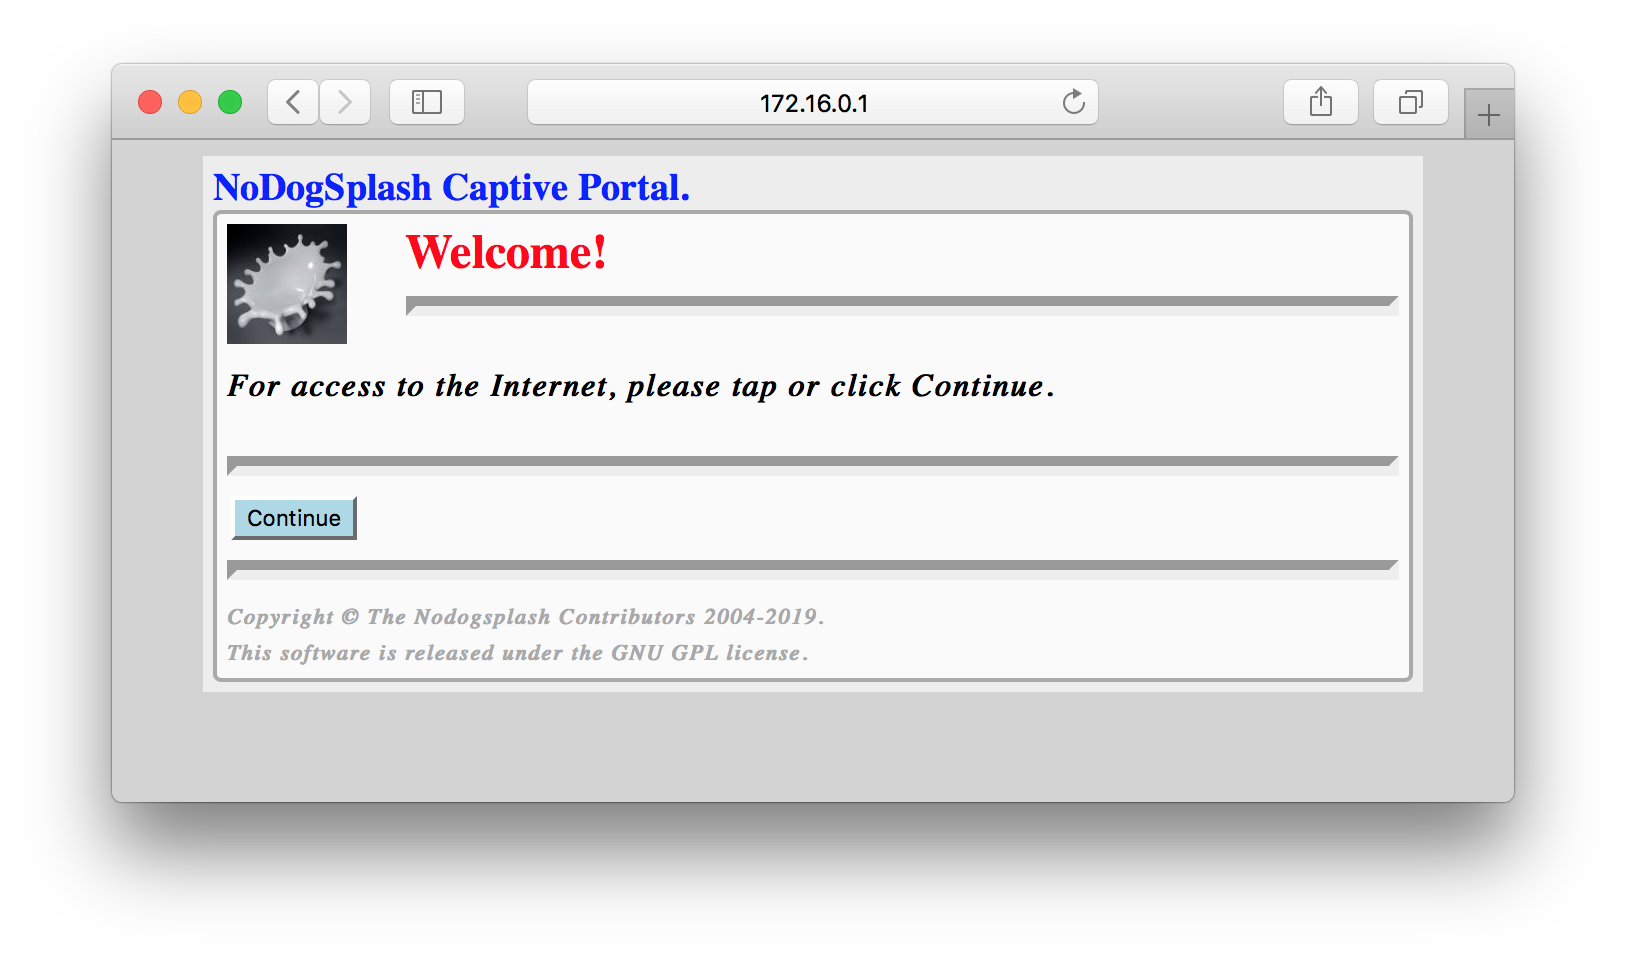
※表示されない場合、ブラウザで適当なWebページ(HTTP)を開くと、リダイレクトされる事が確認できます。
ndsctlによる端末操作 (任意)
ndsctlを使うと、接続中のクライアント一覧や手動によるクライアントの認証・Revoke等ができます。
pi@raspberrypi:~/nodogsplash $ sudo /usr/bin/ndsctl status
==================
NoDogSplash Status
====
Version: 4.3.4beta
Uptime: 7m 25s
Gateway Name: NoDogSplash
Managed interface: wlan0
Managed IP range: 0.0.0.0/0
Server listening: http://172.16.0.1:2050
Binauth: Disabled
Preauth: Disabled
FAS: Disabled
Client Check Interval: 30s
Preauth Idle Timeout: 10m
Auth Idle Timeout: 480m
Traffic control: no
Total download: 48893 kByte; avg: 878.98 kbit/s
Total upload: 9779 kByte; avg: 175.80 kbit/s
====
Client authentications since start: 1
Current clients: 1

Client 0
  IP: 172.16.1.51 MAC: XX:XX:XX:XX:XX:XX
  Last Activity: Sat Dec 14 20:23:10 2019 (0s ago)
  Session Start: Sat Dec 14 20:16:28 2019 (6m 42s ago)
  Session End:   -
  Token: 2c1b1074
  State: Authenticated
  Download: 48777 kByte; avg: 970.69 kbit/s
  Upload:   9400 kByte; avg: 187.08 kbit/s

====
Blocked MAC addresses: none
Allowed MAC addresses: N/A
Trusted MAC addresses: none
========
Ref: https://nodogsplashdocs.readthedocs.io/en/stable/ndsctl.html
nodogsplash画面のカスタム (任意)
splashページのテンプレートは下記ディレクトリに存在しています。ここにあるテンプレートを書き換えることで自由にレイアウトをいじることができます。
pi@raspberrypi:~/nodogsplash $ ls -l /etc/nodogsplash/htdocs/
total 16
drwxr-xr-x 2 root root 4096 Dec 14 20:06 images
-rw-r--r-- 1 root root 1216 Dec 14 20:06 splash.css
-rw-r--r-- 1 root root 2694 Dec 14 20:06 splash.html
-rw-r--r-- 1 root root 1351 Dec 14 20:06 status.html
③ 通信ログをBigQueryに格納

WifiAPの運用にあたって、通信ログを管理していきたい気持ちがあります。「誰がいつどこと通信していたか?」という記録をする為に、tcpdump+BigQuery+Fluentdを使って、一旦蓄積するような土壌を今回作りました。その手順について説明します。
GCP上でサービスアカウントの作成 (GCP上の作業)
BigQueryにデータを投げるにあたって、GCP上にサービスアカウントを作る必要性があります。「IAMと管理」のページから、ウィザードに従ってBigQueryのデータに対して書き込みができる権限を持つサービスアカウントを生成します。その後、サービスアカウントからシステム連携用のキーをJSON形式で発行し、RaspberryPi上のファイルシステムに配置します。(今回は、/home/pi/key.jsonというパスに置きました)

BigQuery上にデータセットの作成 (GCP上の作業)
BigQueryの画面に移動し、データセットをプロジェクトの下に作成します。今回は、「wifi_ap」としました。

本来はここでテーブルやスキーマの定義をすべきですが、Fluentd側のプラグインが自動で作ってくれるので一旦ここまでで大丈夫です。
Fluentdの導入
ここからはRaspberryPi上での作業になります。td-agentをgem経由でインストールする為に、ruby-devを導入します。
pi@raspberrypi:~ $ sudo apt-get install ruby-dev
pi@raspberrypi:~ $ sudo gem install fluentd --no-ri --no-rdoc
必要プラグイン類のインストール
今回、tcpdumpで得た通信履歴をBigQueryに格納します。tcpdumpとbigqueryにデータを送るfluent-pluginが必要となるので、下記のように導入します。
pi@raspberrypi:~ $ sudo apt-get install tcpdump
pi@raspberrypi:~ $ sudo fluent-gem install fluent-plugin-bigquery --no-ri --no-rdoc
Fluentdの設定ファイル作成 (fluent.conf)
RaspberryPiのファイルシステム上に、下記のようなファイルを作成します。
<source>
  @type exec
  tag raw_tcpdump.wlan0
  command tcpdump -tttt -i wlan0 -e
  <parse>
    @type none
  </parse>
</source>

<match raw_tcpdump.wlan0>
  @type exec_filter
  command /usr/bin/python3 /home/pi/stream_filter.py
  in_format json
  out_format msgpack
  tag        parsed_tcpdump.wlan0
  flush_interval 1s
</match>

<match parsed_tcpdump.wlan0>
  @type bigquery_insert
  auth_method json_key
  json_key /home/pi/key.json
  project XXXXXXXXXXXXXX
  dataset wifi_ap
  auto_create_table true
  table wlan0_%Y%m%d
  <buffer time>
    flush_interval 0.01
    total_limit_size 10g
    flush_thread_count 16
    timekey 1d
  </buffer>
  schema [
    { "name": "timestamp", "type": "TIMESTAMP" },
    { "name": "ap", "type": "STRING"},
    { "name": "log", "type": "STRING"}
  ]
</match>
※tcpdumpを使うと、かなりの量の通信ログが短期間に記録されます。flush_intervalを0.01secとし、16スレッドで送信するように設定しています。(それでも間に合わないケースが存在します)
tcpdump整形用スクリプトの用意
下記は、Fluentdのexec_filterプラグインから呼び出され、ひたすらtcpdumpからのデータをパース&整形する為のスクリプトです。stdin経由でjson形式のテキストが流れてくるので、ひたすら処理してmsgpack形式で出力して再度Fluentd側にパスする仕様になっています。
※tcpdumpの標準出力がなかなかじゃじゃ馬すぎて、今はお茶濁しパーサーを実装しています。そのうち、ちゃんとしたパーサーを実装します。
# coding: utf-8
import json
import logging
import logging.config
import sys
import traceback
import msgpack

logger = logging.getLogger('fluent-exec')
logger.propagate = False

def main():
    stdin = sys.stdin
    output(convert(validate(parse(readline(stdin)))))

def readline(stdin):
    for line in stdin:
        yield line

def parse(lines):
    for line in lines:
        yield json.loads(line)

def validate(rows):
    for row in rows:
        try:
            pass
        except Exception as e:
            logger.warn(e)
            logger.warn(row)
            continue
        yield row

def convert(rows):
    for row in rows:
        tmp = row['message'].split(' ')

        ret = {}
        # イベント発生時間
        ret['timestamp'] = '{} {}'.format(tmp[0], tmp[1])
        # AccessPointの名前
        ret['ap'] = 'ap_2'
        # 通信履歴 (本来はもっとちゃんとパースすべき)
        ret['log'] = ' '.join(tmp[2:])
        yield ret

def output(rows):
    for row in rows:
        sys.stdout.buffer.write(msgpack.packb(row))

if __name__ == '__main__':
    logger.info('Start main')
    try:
        main()
    except Exception as e:
        logger.error(traceback.format_exc())
        raise e
    logger.info('End main')
上記を動かすためには、msgpackを扱うライブラリが必要です。pipコマンド経由でインストール可能です。
※sudoをつけないと、システムが立ち上げた時にコケるようです。
pi@raspberrypi:~ $ sudo pip3 install msgpack-python
Fluentdのサービス化
下記のように、Fluentd立ち上げようのsystemdの設定ファイルを書きます。
[Unit]
Description = Wifi-Log BigQuery Transporter

[Service]
ExecStart=/usr/local/bin/fluentd -c /home/pi/fluent.conf
Type=simple

[Install]
WantedBy=multi-user.target
systemdをリロードし、今回定義したサービスを有効化します。
pi@raspberrypi:~ $ sudo systemctl daemon-reload
pi@raspberrypi:~ $ sudo systemctl start bigquery_logger.service
pi@raspberrypi:~ $ sudo systemctl enable bigquery_logger.service
問題なくサービス定義ができていれば、下記のようにサービスが立ち上がります。
pi@raspberrypi:~ $ sudo systemctl status bigquery_logger.service

● bigquery_logger.service - Wifi-Log BigQuery Transporter
   Loaded: loaded (/etc/systemd/system/bigquery_logger.service; disabled; vendor preset: enabled)
   Active: active (running) since Sat 2019-12-14 21:23:35 GMT; 18s ago
 Main PID: 3692 (fluentd)
    Tasks: 33 (limit: 2200)
   Memory: 66.9M
   CGroup: /system.slice/bigquery_logger.service
           ├─3692 /usr/bin/ruby2.5 /usr/local/bin/fluentd -c /home/pi/fluent/fluent.conf
           ├─3720 /usr/bin/ruby2.5 -Eascii-8bit:ascii-8bit /usr/local/bin/fluentd -c /home/pi/fluent/fluent.conf --under-supervisor
           ├─3748 /usr/bin/python3 /home/pi/fluent_stream_filter.py
           └─3752 tcpdump -tttt -i wlan0 -e

Dec 14 21:23:40 raspberrypi fluentd[3692]:     </buffer>
Dec 14 21:23:40 raspberrypi fluentd[3692]:   </match>
Dec 14 21:23:40 raspberrypi fluentd[3692]: </ROOT>
Dec 14 21:23:40 raspberrypi fluentd[3692]: 2019-12-14 21:23:40 +0000 [info]: starting fluentd-1.8.0 pid=3692 ruby="2.5.5"
Dec 14 21:23:40 raspberrypi fluentd[3692]: 2019-12-14 21:23:40 +0000 [info]: spawn command to main:  cmdline=["/usr/bin/ruby2.5", "-Eascii-8bit:ascii-8bit", "/usr/local/bin/fluentd", "-c", "/home/pi/fluent/fl
Dec 14 21:23:42 raspberrypi fluentd[3692]: 2019-12-14 21:23:42 +0000 [info]: adding match pattern="raw_tcpdump.wlan0" type="exec_filter"
Dec 14 21:23:42 raspberrypi fluentd[3692]: 2019-12-14 21:23:42 +0000 [info]: adding match pattern="parsed_tcpdump.wlan0" type="bigquery_insert"
Dec 14 21:23:44 raspberrypi fluentd[3692]: 2019-12-14 21:23:44 +0000 [info]: adding source type="exec"
Dec 14 21:23:44 raspberrypi fluentd[3692]: 2019-12-14 21:23:44 +0000 [info]: #0 starting fluentd worker pid=3720 ppid=3692 worker=0
Dec 14 21:23:44 raspberrypi fluentd[3692]: 2019-12-14 21:23:44 +0000 [info]: #0 fluentd worker is now running worker=0
動作確認
うまくいくと、通信のログ(tcpdump出力)がBigQuery側に流れるようになります。多少遅延はあるものの、一旦実用的には問題なさそうです。
