はじめに
現在、Reactを習得するために、23種類のReactアプリ開発に取り組んでいます。
今回はその第五弾として、Next.jsでTodoアプリを作成しました。
要件
一般的なTodoアプリの仕様を満たすことを目標にしました。
具体的には、以下の要件を満たすことを目指しています:
- タスク登録画面からタスクを登録できること
- タスク編集画面からタスクを編集できること
- タスク削除ボタンからタスクを削除できること
- タスクデータはsupabaseに登録し、データを操作すること
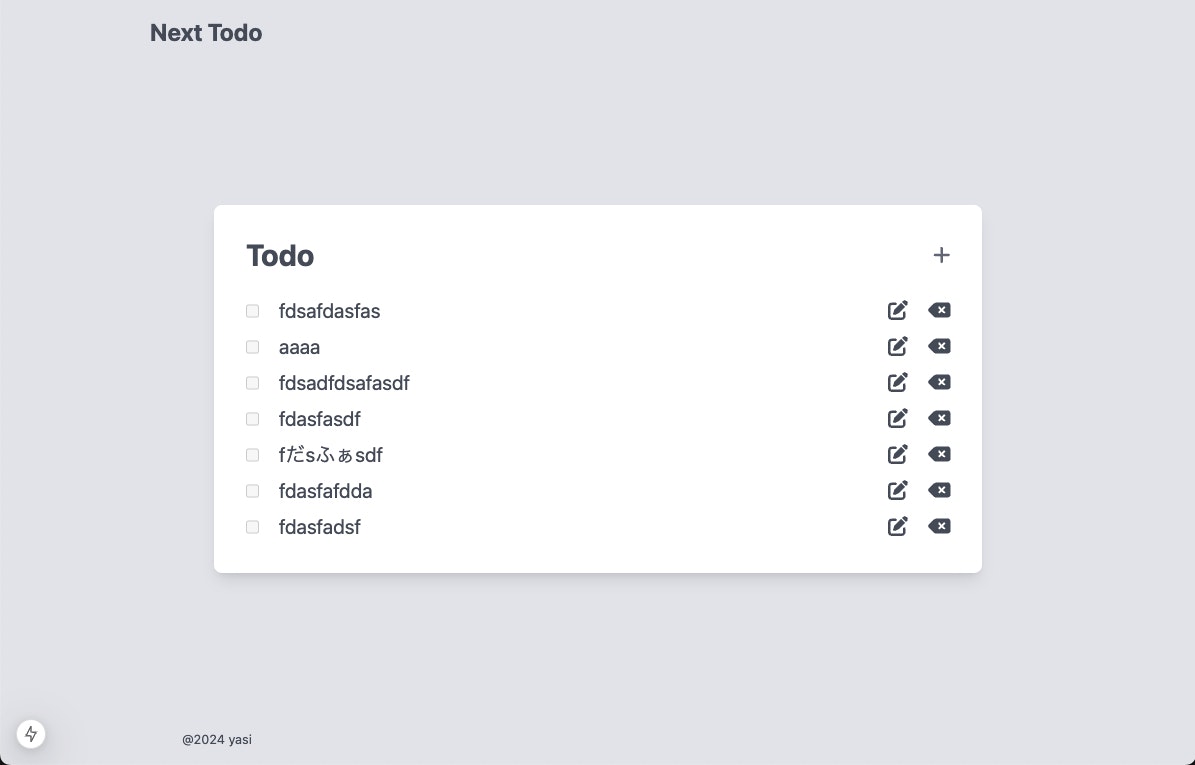
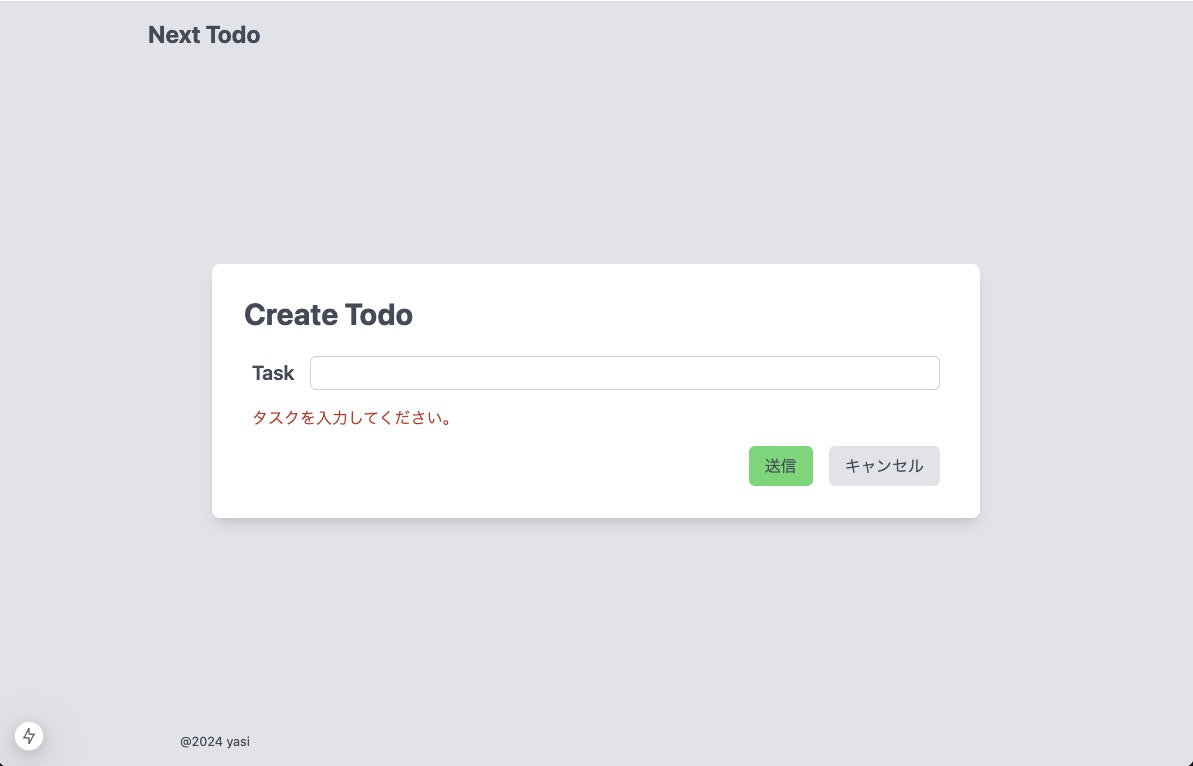
作成したアプリのイメージ
アプリ紹介動画
利用技術
- Next.js
- TypeScript
- Tailwind CSS
- zod
- prisma
- supabase
- FontAwesome
意識したポイント
SupabaseとPrismaでデータを永続的に保持
データの永続化にはSupabase、データ操作にはPrismaを利用しています。
以下は、タスク削除処理の一部です。
export async function deleteTodoAction(id: string): Promise<TodoState> {
  try {
    await prisma.todo.delete({
      where: {
        id: id,
      },
    });
    revalidatePath("/");
    return {
      error: "",
      success: true,
    };
  } catch (error) {
    if (error instanceof Error) {
      return {
        error: error.message,
        success: false,
      };
    } else {
      return {
        error: "システム異常が発生しました。",
        success: false,
      };
    }
  }
フォームのstate管理には、React19で新たに導入されたuseActionStateを使用しています。
フォームのアクションをサーバサイドで実行できるため従来より安全性が高いのと、
フォームの実行状態を手軽に取得できるので非常に便利ですね。
"use client";
import { useActionState } from "react";
import { deleteTodoAction } from "../lib/action";
import DeleteButton from "@/components/DeleteButton";
import { initialState, TodoState } from "../lib/todoTypes";

type TodoDeleteButtonProps = {
  id: string;
};

const TodoDeleteButton = ({ id }: TodoDeleteButtonProps) => {
  const deleteTodoActionBind = deleteTodoAction.bind(null, id);
  const [state, formAction, pending] = useActionState<TodoState>(
    deleteTodoActionBind,
    initialState
  );
  return (
    <>
      <form action={formAction}>
        <DeleteButton pending={pending} />
      </form>
      {state.error && <p className="text-red-600 mt-2">{state.error}</p>}
    </>
  );
};

export default TodoDeleteButton;
SupabaseとPrismaの環境構築に関する詳細は、以下の記事にまとめています。
【備忘録】Next.js でsupabaseとprismaを利用する
コンポーネント分割、ディレクトリ構成を意識して実装
CRUD操作が加わったことで、コンポーネントが少し複雑になりました。
今回は実装とルーティングを別々で管理し、
機能に関する実装はfeaturesディレクトリにまとめました。
├── app
│   ├── favicon.ico
│   ├── globals.css
│   ├── layout.tsx
│   ├── page.tsx
│   └── todos
│       ├── [id]
│       │   └── page.tsx
│       └── new
│           └── page.tsx
├── components
│   ├── CancelButton.tsx
│   ├── DeleteButton.tsx
│   ├── Footer.tsx
│   ├── Header.tsx
│   └── SubmitButton.tsx
├── features
│   └── todos
│       ├── components
│       │   ├── TodoCard.tsx
│       │   ├── TodoDeleteButton.tsx
│       │   ├── TodoEditButton.tsx
│       │   ├── TodoEditForm.tsx
│       │   ├── TodoList.tsx
│       │   ├── TodoNewForm.tsx
│       │   └── TodoPageLayout.tsx
│       ├── lib
│       │   ├── action.ts
│       │   └── todoTypes.ts
│       └── types.ts
└── utils
    ├── config.js
    └── prisma.ts
この構成は、Feature-driven Architectureの概念を参考にしています。
Feature-driven Architectureとは、機能を中心に設計・開発を行うアプローチです。
このアプローチにより、役割が明確になり、自分の中でより整理ができたと感じています。
ただし、最近はNext.jsに dynamic I/O や PPR が導入されることもあり、
app ディレクトリ内に実装をまとめる(コロケートする)べきだとする考え方もあります。
コンポーネント設計については、言語化ができていない部分が多いため、
今後もさまざまな設計手法を学び、アプリに適用していきたいと考えています。
アイコンはFontAwesomeを使用
削除、編集、追加ボタンのアイコンにはFontAwesomeを利用しています。
FontAwesomeは無料版でも商用利用が可能で、使っている方は多いと思います。
# FontAwesomeのインストール
# svg core
npm i --save @fortawesome/fontawesome-svg-core

# flee planのアイコン群
npm i --save @fortawesome/free-solid-svg-icons
npm i --save @fortawesome/free-regular-svg-icons
npm i --save @fortawesome/free-brands-svg-icons

# FontAwesome React コンポーネント
npm i --save @fortawesome/react-fontawesome@latest
layout.tsxにインポートの設定をおこないます。
import { config } from "@fortawesome/fontawesome-svg-core";
import "@fortawesome/fontawesome-svg-core/styles.css";
config.autoAddCss = false;
インストール後はFontAwesomeの公式ページにアクセスして
利用したいアイコンのコードをコピーするだけです。
削除ボタンの導入例です。
以下のURLにアクセスしてコードをコピーしてください。
import { faDeleteLeft } from "@fortawesome/free-solid-svg-icons";
import { FontAwesomeIcon } from "@fortawesome/react-fontawesome";

const DeleteButton = ({ pending, className = "" }: DeleteButtonProps) => {
  return (
    <button disabled={pending} className={className}>
      <FontAwesomeIcon icon={faDeleteLeft} />
    </button>
  );
};

export default DeleteButton;
Github
GitHubにコードをアップロードしていますので、よかったら確認してみてください。
https://github.com/yasi1989/next-todo
参考